
In this article, we’ll walk you through the top ecommerce checkout best practices for 2026.
It’s no secret that the ecommerce checkout page is arguably the most important part of your ecommerce store. After all, many of your visitors will be dropping out right here if they can’t find what they want or fail to make a purchase.
Thankfully, you can use some proven ecommerce checkout best practices to transform your checkout into one of the most persuasive parts of your store and increase conversions at the same time.
In this post, we’ll walk you through all the best checkout practices you should be looking to include in your ecommerce store in 2026. We’ll also give you one very simple way to implement them all, with the ecommerce checkout plugin, Flux Checkout for WooCommerce.
Flux Checkout for WooCommerce
Flux Checkout transforms the default WooCommerce checkout into one that’s lightning-fast, distraction-free, and reduces checkout abandonment.
So let’s get straight to it. Here are the 9 ecommerce checkout best practices to include in your ecommerce store in 2024. This list will outline each one and walk you through the steps to add it to your online store.
9 ecommerce checkout best practices to implement in 2026
Implementing the best checkout practices allows you to optimize your ecommerce checkout for a higher conversion rate.
📈 If done right, checkout optimization can increase conversions by an impressive 35%.
In this section, we’ll cover 9 of the best ecommerce checkout practices you should implement in your ecommerce store.
We’ll get straight to the point by talking about each practice and then provide a solution to get it done. So, here are the nine best ecommerce checkout best practices you should implement on your online store in 2026.
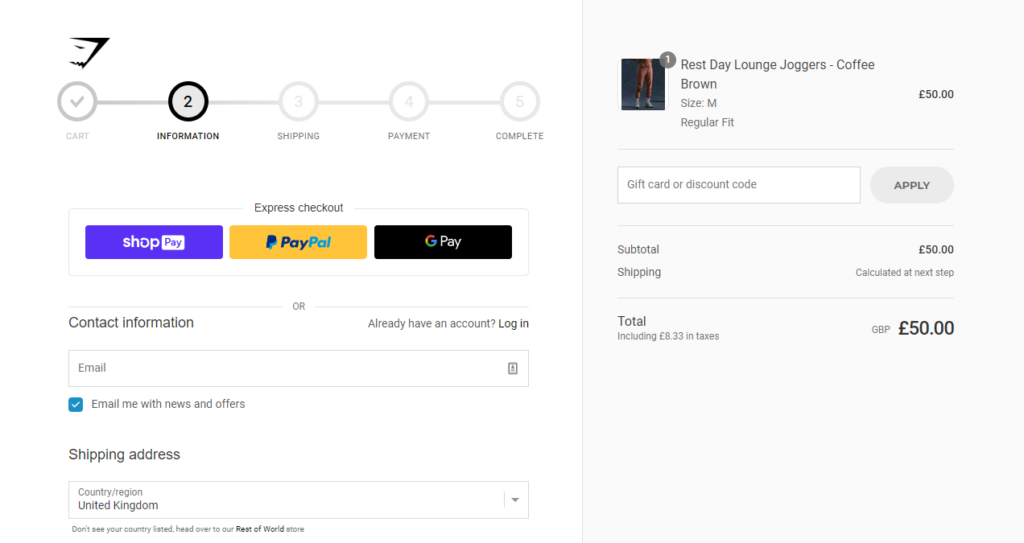
Number 1: Use a multi-step checkout
A multi-step checkout breaks down the checkout process into a series of steps. Each step of the checkout process is typically presented on a separate page, with a progress indicator at the top to show the customer where they are in the process.
For example, a typical multi-step checkout can have the following steps:
- Entering billing information.
- Selecting a payment method.
- Reviewing the order.
- Completing the purchase.
The other variation of the checkout flow is a one-page checkout where all the above steps are lumped together on a single page. This complicated checkout process overwhelms the customer making the checkout a lot more complicated than needed.
📈 This can cause more customers to abandon the checkout process. According to the Baymard Institute, 17% of customers abandon their carts if the checkout process is complicated.
A multi-step checkout makes it more manageable and user-friendly by breaking the checkout flow into steps. It helps customers focus on a single item before moving to the next. With customers having a seamless experience during checkout, more will be motivated to complete a purchase. This increases your store’s conversions while reducing checkout abandonment.
Want to see what other important metrics you should be tracking in your ecommerce store? Read our ecommerce metrics guide.
This is a proven technique, and ecommerce giants such as GymShark use it to boost their conversions.
How to add a multi-step checkout to your ecommerce store
To add a multi-step checkout to your WooCommerce store, you’ll need the help of the Flux Checkout for WooCommerce plugin.
Flux Checkout allows you to add an incredibly fast multi-step checkout to your WooCommerce store. You can ensure your customers have a seamless and consistent checkout flow in just a few clicks. Flux’s multi-step checkout keeps customers focused on completing this process by minimizing distractions.
To add a multi-step checkout process to your WooCommerce store, you’ll need to purchase Flux Checkout for WooCommerce from the Iconic store: iconicwp.com/flux-checkout-for-woocommerce
Flux Checkout for WooCommerce
Flux Checkout transforms the default WooCommerce checkout into one that’s lightning-fast, distraction-free, and reduces checkout abandonment.
Then follow these steps to install it on your WordPress website:
- Go to Plugins > Add New on your WordPress dashboard.
- Click the Upload Plugin button and upload the .zip you previously downloaded.
- Click the Activate button and enter your license key to verify your purchase.
With Flux Checkout installed in your WordPress website, it automatically introduces a multi-step checkout to your WooCommerce store. You can adjust a few settings to customize it and fit your new multi-step checkout with the rest of your store’s design.
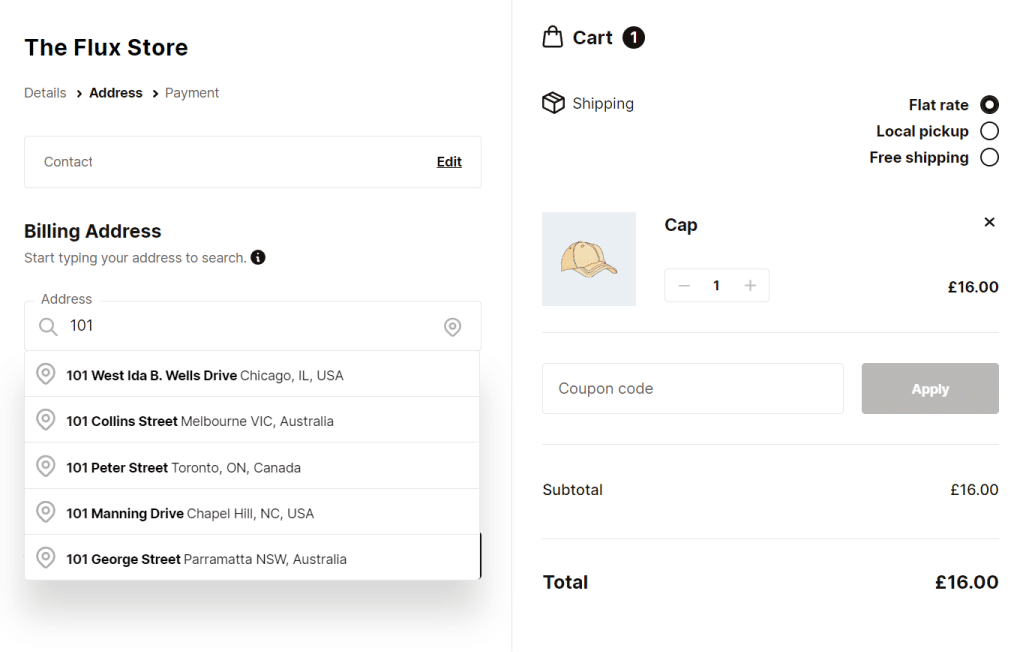
Number 2: Use address autocomplete/smart form filling
Address autocomplete/smart form filling entails automatically filling the address fields in billing or shipping forms when customers enter this information.
Address autocomplete accelerates the checkout
Autofill makes the checkout process faster and more convenient for customers. It does this by relieving them from manually filling in each detail of their shipping or billing address, which is time-consuming and can also yield errors.
This can also help reduce checkout abandonment, as the faster the customers get through checkout, the better.
📈 This is especially important since 26% of shoppers abandon shopping carts if the checkout process is too long.
Apart from enriching the checkout experience for customers, it also helps improve the accuracy of the information provided by the customers. Filling in the correct address minimizes the likelihood of deliveries to the wrong address. This reduces customer frustration.
The importance of addressing autocomplete is emphasized by ecommerce giants such as BestBuy, Target, and Walmart, who use it to improve their customer’s checkout experience.
How to add address autocomplete to your checkout page
You can also use Flux Checkout for WooCommerce to add address autofill to your checkout flow.
Flux can be integrated with the Google API, which allows instant address search. All a buyer has to do is start typing their address, and Flux will immediately generate a list of the locations related to the address. After selecting the closest match, this plugin will automatically fill the rest of the fields for them.
To enable address autocomplete on your WooCommerce store:
- Go to WooCommerce > Flux Checkout from your WordPress dashboard and click on the General tab.
- Click on the Use Address Autocomplete switch to turn it on, and fill out the necessary details.
Users can now use the address autocomplete feature to fill in shipping address details quickly.
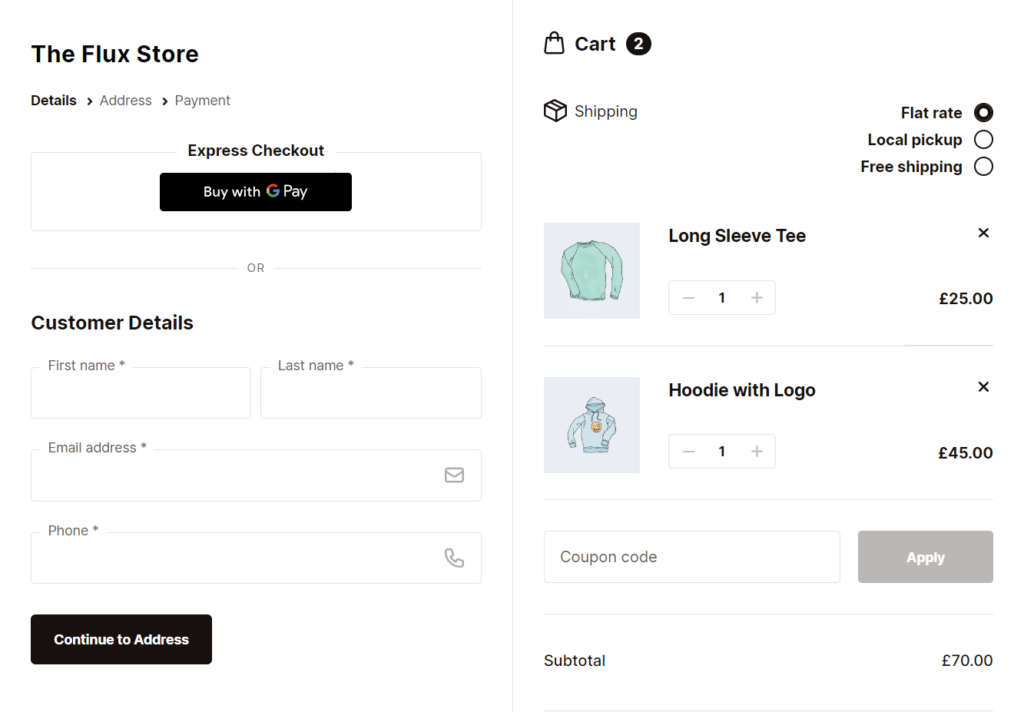
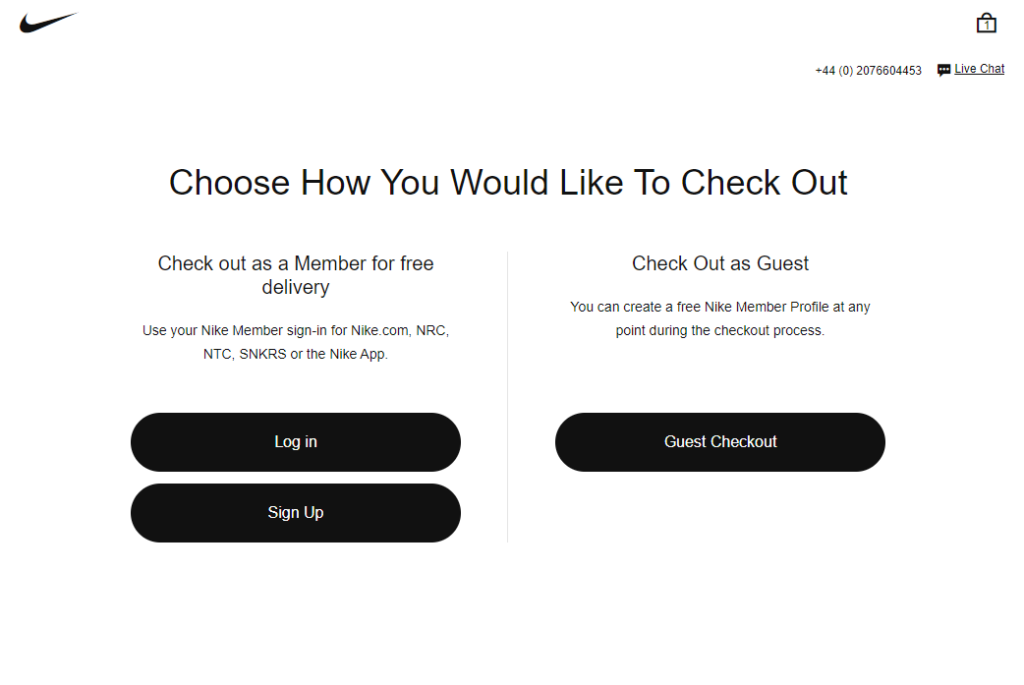
Number 3: Use a default guest checkout
Guest checkout refers to when an ecommerce store allows customers to complete a purchase without creating an account or signing in.
With guest checkout, customers can go through the checkout flow without account creation or providing their personal information that isn’t needed for checkout.

Guest checkout can shorten the checkout process for customers, enabling them to complete their purchases as quickly as possible. In addition, it is convenient for customers making a one-time purchase, so they don’t want to create an account.
Guest checkout is preferred by a majority of new customers
A significant number of customers prefer the guest checkout option.
📈 Shopify reports that 34% of all carts abandoned at checkout are because an ecommerce site requires customers to create an account.
So if you want to avoid checkout abandonment due to account creation, you should use guest checkout by default.
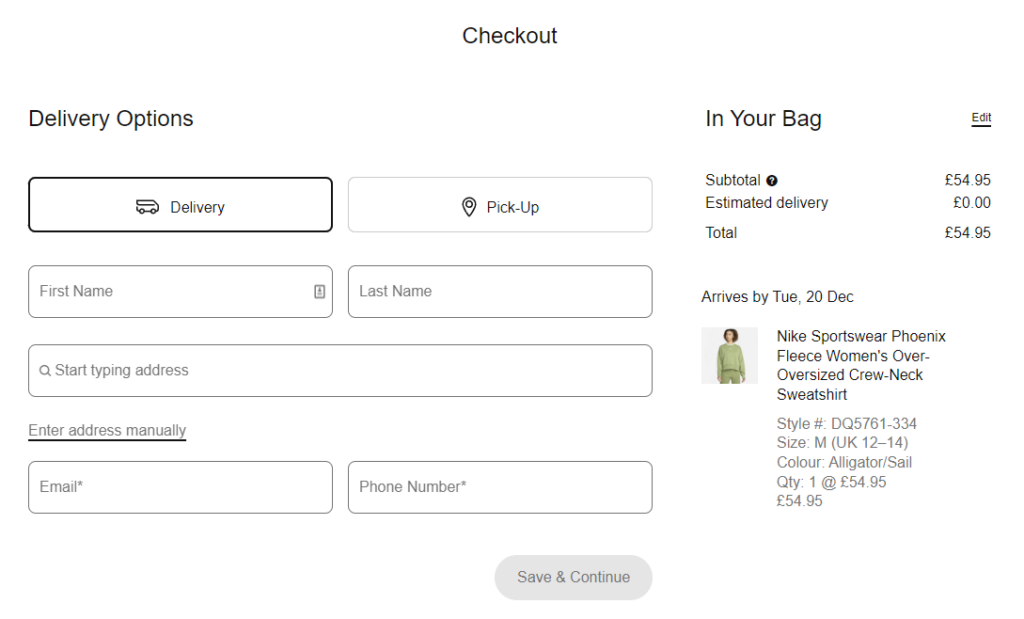
One of the leading online stores that use guest checkout is Nike. It has options for guest checkout and account creation after a customer proceeds from the cart to the checkout.
How to add a guest checkout to your online store
You can enable the guest checkout option from WooCommerce settings and introduce a multi-step guest checkout using Flux Checkout for WooCommerce.
Flux Checkout for WooCommerce
Flux Checkout transforms the default WooCommerce checkout into one that’s lightning-fast, distraction-free, and reduces checkout abandonment.
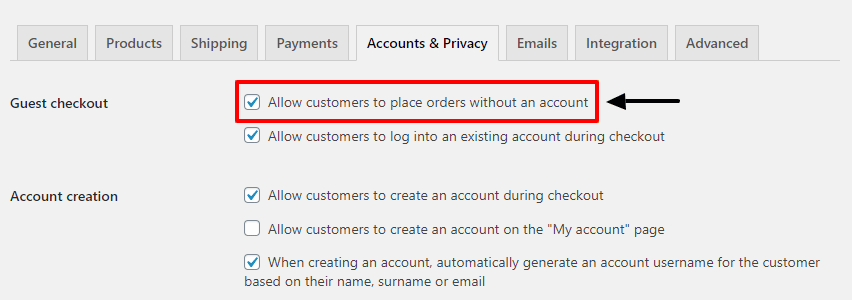
To enable guest checkout on your WooCommerce store:
- From your WordPress dashboard, hover on WooCommerce and click on Settings.
- Click on the Account & Privacy tab.
- Under the Guest Checkout section, click on the checkbox that says ‘Allow customers to place an order without an account’.
- Scroll down and click the Save Changes button.
With guest checkout enabled, Flux can add a multi-step guest checkout. To do this, install Flux as we did before, then customize its design to suit your store.
To find out how to do this, you can look at our detailed guide on how to customize your WooCommerce guest checkout.
Number 4: Remove distractions
Removing distractions during checkout reduces the options available and the steps involved. This involves removing unnecessary fields in the forms that need to be filled or skipping the unnecessary form fields that customers must complete.
You can achieve this by removing page sections, such as the footer, nav bar, sidebar, and so on, from the checkout.
Distractions can increase checkout abandonment
Checkout distractions can negatively impact customer experience in the following ways:
- They make it difficult for customers to focus on the checkout tasks.
- They can cause customers to make mistakes, such as overlooking important details.
- They can disrupt the checkout flow, needing customers to start this process again.
These frustrate customers, which could increase the cart abandonment rate.
Removing distractions helps to keep customers focused solely on completing the purchase and nothing else. A distraction-free checkout minimizes customer confusion and frustration. This helps to provide a smooth and seamless checkout experience that can increase conversions while reducing cart abandonment at checkout.
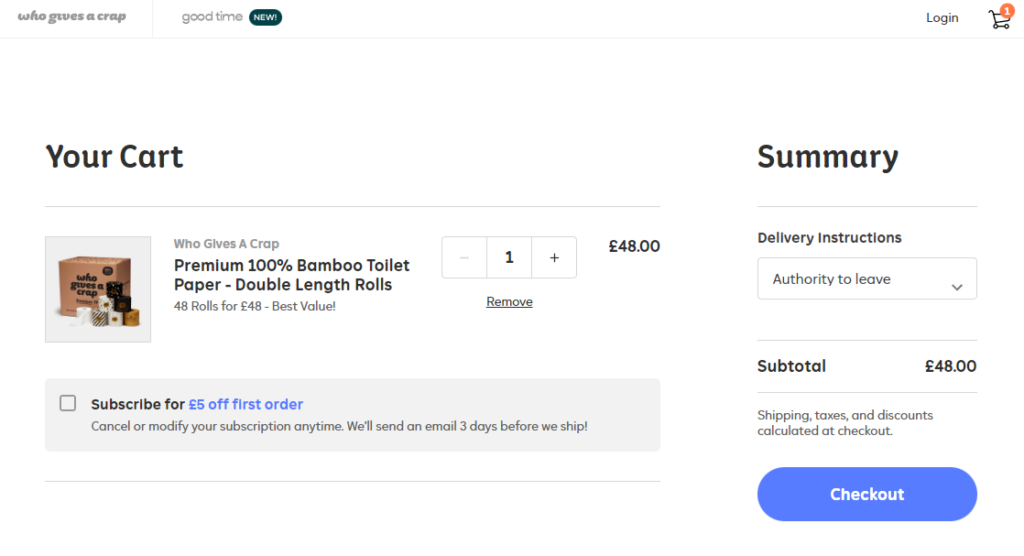
Who Gives A Crap’s checkout flow aims to provide a distraction-free checkout experience by only displaying the task and the order summary. The nav bar, footer, and other unnecessary sections are hidden.
How to remove distractions from your checkout page
By default, Flux’s checkout page only displays the necessary fields at each step of the multi-step checkout. For example, for the customer details step, you only get the customer’s email, name, and phone number; the other fields are hidden. This helps to keep the checkout flow distraction-free.
To do this, you’ll only need to install Flux Checkout as we did previously. You can also go a step further and hide the company field in the billing address step in the following steps:
- Go to WooCommerce > Flux Checkout and click the general tab.
- Click the toggle switch that says ‘Show Company Field’ to switch it off.
- Click the Save Changes button to update your changes.
Now the company field won’t be displayed in the billing address step.
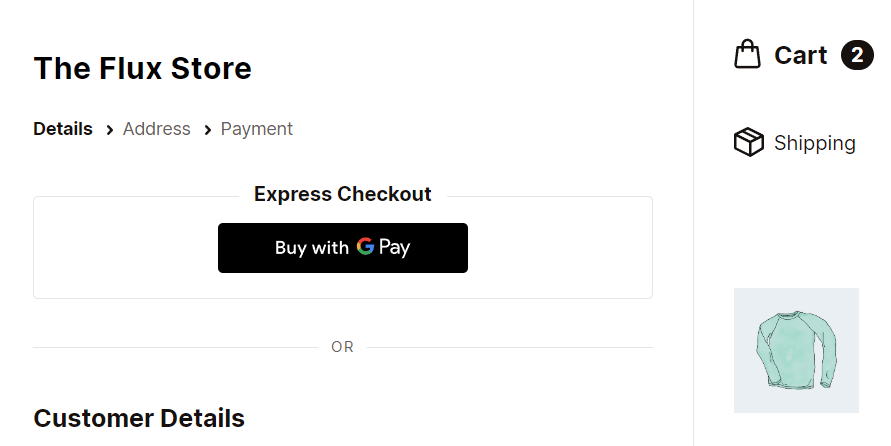
Number 5: Keep it clean and modern
The checkout should be streamlined and easy to use. Keeping the checkout design clean and modern enables it to achieve just that. Specifically, all the important sections should be easily visible, and product images should be included in the order summary. It shouldn’t have a cluttered design.
Minimizing checkout clutter improves customer experience
As the store owner, you should eliminate checkout clutter to improve your buyers’ checkout experience. You risk losing some of your customers to shopping cart abandonment with a cluttered design. This is because a cluttered design can cause the checkout to look more complicated than it is.
📈 According to Shopify, 18% of abandoned carts result from a complicated checkout.
But with a clean and modern checkout design, you can streamline your checkout flow, making it easier for customers to complete.
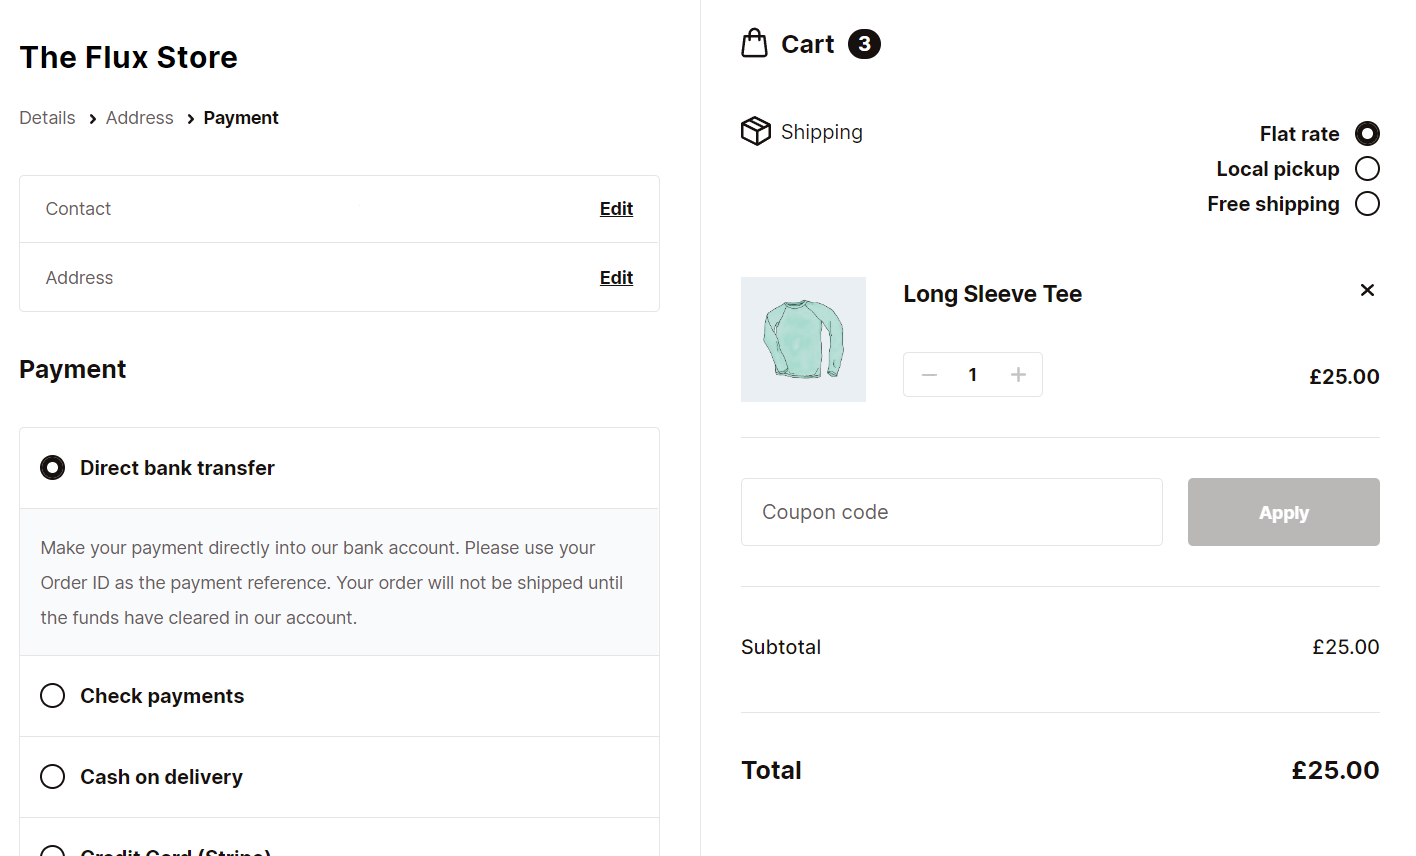
Nike utilizes a checkout with a modern design that includes icons for shipping options or local pickup and product images in the order summary neatly arranged in separate columns. This page is clear and concise, making the checkout flow seamless.
How to upgrade your checkout page design
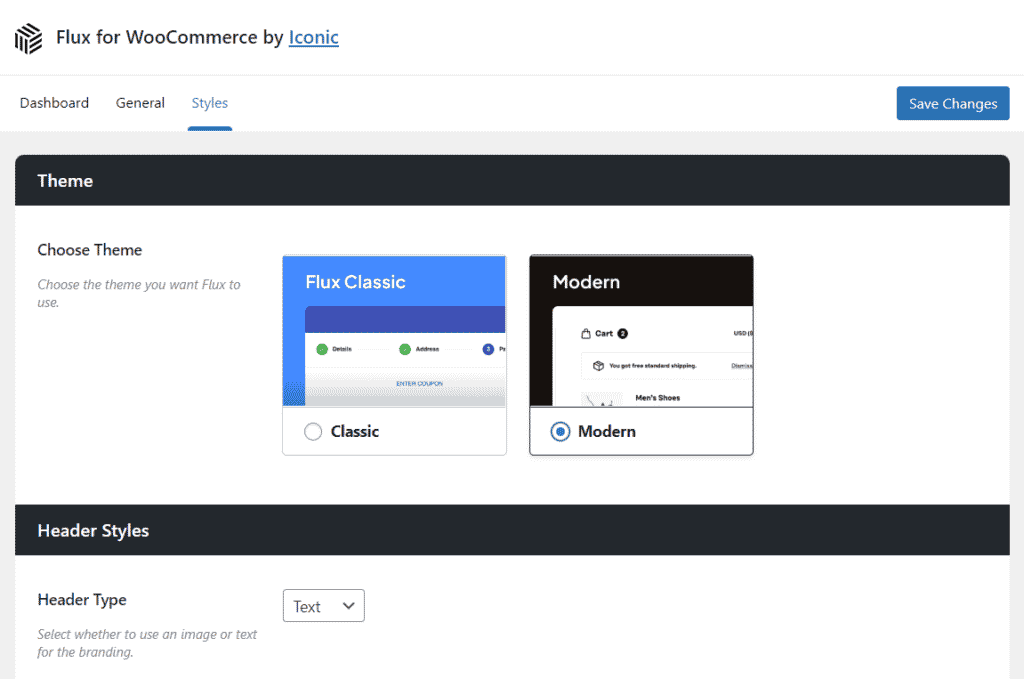
You can introduce a clean and modern design to your WooCommerce checkout using Flux. Flux Checkout has a modern theme specifically dedicated to delivering this type of checkout design to your customers. With Flux Checkout installed on your WordPress website, you can add this theme to your checkout flow.
Flux Checkout for WooCommerce
Flux Checkout transforms the default WooCommerce checkout into one that’s lightning-fast, distraction-free, and reduces checkout abandonment.
To a modern design to your checkout using Flux:
- Go to WooCommerce > Flux Checkout from your WordPress dashboard and click on the Styles tab.
- Click on the Modern option under the Choose Theme section.
- After selecting the modern option, there are specific settings you can make to customize the appearance of this page to suit your store. You can find them on our How to Customize the Flux Checkout style doc.
- When you’re done with your edits, click the Save Changes button.
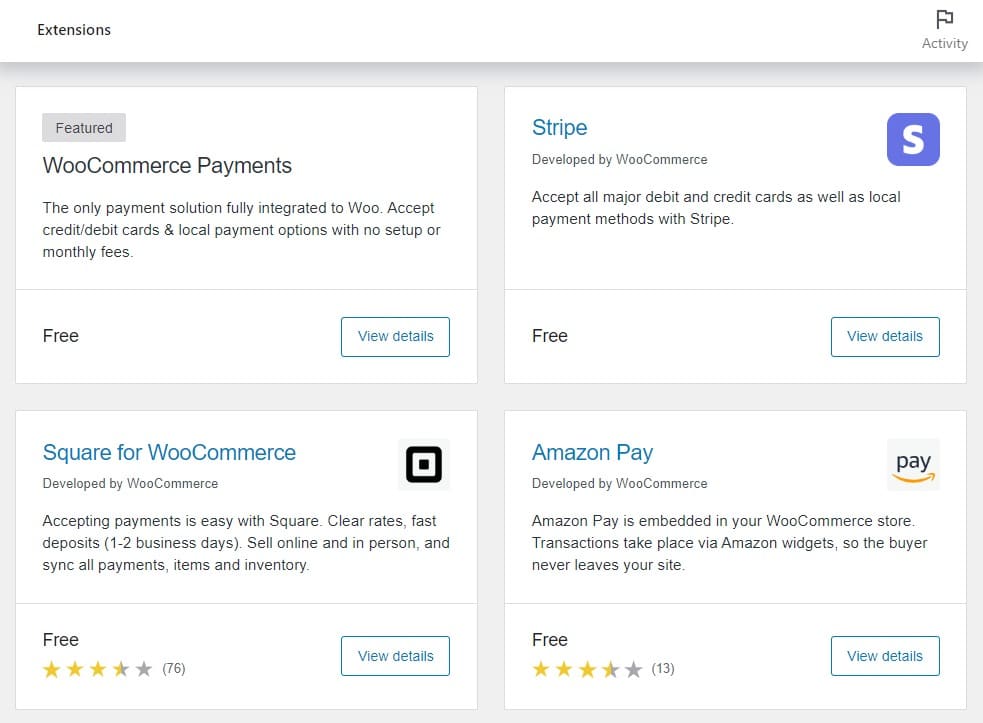
Number 6: Support payment methods your customers use
Different customers use different payment methods. You can ensure your store supports the payment methods most customers use by including the commonly used and easy-to-use payment gateways.
For example, most customers now use PayPal, Google Pay, Apple Pay, Amazon Pay, etc., because they’re quick and easy to use.
Limited payment options can increase checkout abandonment
Having only credit cards as a payment method can inconvenience customers. One of the reasons for checkout abandonment is that customers have to fill in their credit card details when buying products online. If they don’t have these details, they may leave it until later. They might forget or just shop elsewhere.
📈 9% of customers abandon the checkout process if they don’t see enough payment options.
Including multiple payment options not only adds to your customers’ experience but can also make your store accessible to a larger customer base. With their preferred payment option available, customers will be inclined to complete the purchase.
eBay is a prime example of a store that supports multiple convenient payment methods. This includes PayPal, Apple Pay, Google Pay, and so on.

How to include popular payment options
If you use WooCommerce with WordPress, adding extra payment methods is as easy as adding a new plugin. Examples of such plugins are the WordPress PayPal plugin that integrates PayPal and WP Simple Pay which adds Stripe. But for other ecommerce websites, you might need the help of a developer to get it done.
Number 7: Upsell and cross-sell
Cross-selling and upselling are sales techniques to get customers to spend more on your ecommerce site. In cross-selling, you offer a customer a related product or service in addition to the one they are interested in.
You can make this appealing by showing the customer how the related product complements the one they’re interested in. For example, if they’re interested in a phone, you can pitch a screen protector they can include in their order.
On the other hand, in upselling, you offer a customer a more expensive product, typically an upgrade, to the one they’re originally interested in. You can upsell by showing the customer the upgraded product’s features and how they will suit their needs better. For example, you can try to sell a more expensive phone with more features than the one they’re interested in.
Cross-sells and upsells boost revenue
Cross-selling and upselling help increase your store’s average order value by getting customers to spend more.
📈 In a HubSpot blog survey, more than 500 retailers reported that cross-selling and upselling are responsible for up to 30% of their revenue.
These are valid techniques used by established brands such as Amazon, Target, and Walmart.
How to add upselling and cross-selling to your checkout
To add cross-sells and upsells to your WooCoomerce checkout, you’ll need the help of the Iconic Sales Booster for WooCommerce.
Iconic Sales Booster for WooCommerce
Add cross-selling to your entire WooCommerce store in minutes with Iconic’s WooCommerce cross-sell plugin, Iconic Sales Booster for WooCommerce.
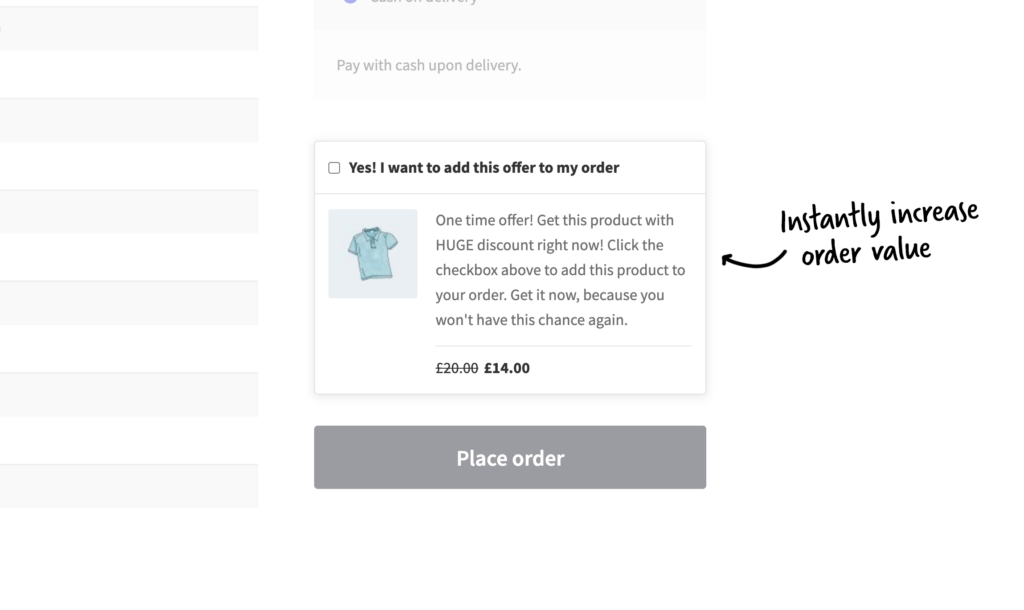
With Sales Booster, you can cross-sell and upsell at checkout and after checkout using reputable techniques such as order bumps and one-click cross-sells.
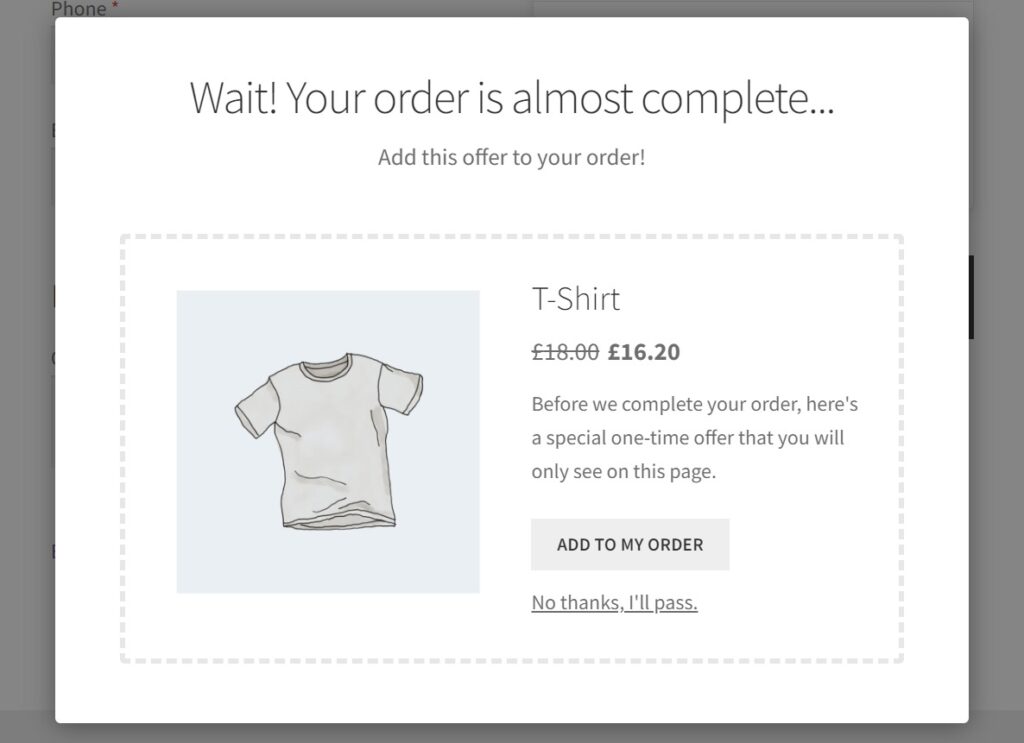
- You can add an order bump at checkout containing a one-time irresistible offer based on what the customer has in their cart. Then allow customers to add the order bump directly to their order without leaving the checkout.
- You can also add a one-click cross-sell after checkout containing a heavily discounted one-time offer after checkout. Then allow customers to add this to their order without re-entering their card details.
To add upselling and cross-selling to your checkout, you’ll need to purchase Iconic Sales Booster for WooCoomerce from Iconic: iconicwp.com/sales-booster-for-woocommerce and install it on your WordPress website. Here is a step-by-step guide on how to do it.
With Sales Booster installed, you can now:
After adding these, you can cross-sell and upsell at checkout and post-purchase and increase your average order value.
Number 8: Avoid checkout surprises
Checkout surprises entail a business hiding additional fees until customers are ready to pay for their purchase. This includes excess shipping costs, taxes, handling fees, etc.
Checkout surprises are a sales technique utilized by ecommerce stores to bait customers into thinking that it will cost them less to complete a purchase. Then when they get to the checkout, the price is surprisingly elevated.
Checkout surprises increase checkout abandonment
Checkout surprises are a recipe for checkout abandonment. If you don’t disclose additional fees to customers early, customers will feel like they’re being misled or overcharged. As a result, they will likely abandon the checkout process and go elsewhere to find the product or service.
📈 In a survey conducted by Baymard Institute (2500+ respondents), 16% of buyers reported abandoning their carts because of unclear pricing.
You can avoid this by showing customers the total cost upfront so they don’t encounter surprises at checkout. This can help you build trust with them, leading to more conversions and loyalty.
Nearly all leading ecommerce stores avoid checkout surprises and Louis Vuitton. The shipping fees are displayed together with the order throughout the checkout.
Number 9: Include the after-purchase confirmation page
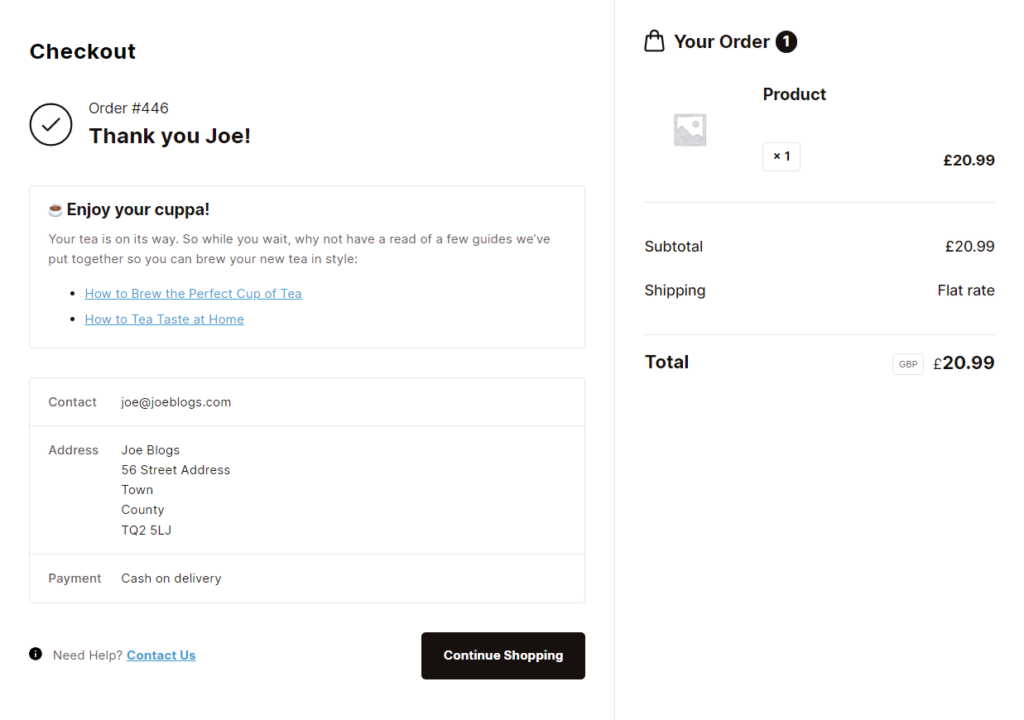
After a customer completes their purchase, there should be a page where they can confirm their order. This is commonly called the thank you or the order received page.
This page includes details that act as validation for online shoppers such as:
- Order details and payment information.
- Customer details.
- Delivery/shipping address/shipping method.
The purpose of this page is to allow customers to confirm they have successfully placed an order on your ecommerce store. They also use it to confirm if the right items are in their order and if their details and the delivery address are correct. You can also use this page to thank customers for their purchases and make them feel appreciated.
The order confirmation page presents a section where you can improve your customer’s experience after they’ve completed a purchase with your store. You can do this by making the confirmation details easily visible so a customer can confirm all this information at a glance.
They can also use this page to track their order and make inquiries in case of any issues. Improving this page can convert more new buyers into loyal customers.
Amazon’s thank you/order confirmation page is a great example of how to set up your order confirmation page. It has a thank you message, order confirmation, a useful link to review previous orders, and upsells/cross-sell to their promotions.
How to improve your order confirmation page
You can customize the order confirmation page and add much value to it with minimum effort. To do this on your WooCommerce store, you’ll need the help of the Flux Checkout for WooCommerce plugin.
Flux Checkout for WooCommerce
Flux Checkout transforms the default WooCommerce checkout into one that’s lightning-fast, distraction-free, and reduces checkout abandonment.
Flux Checkout lets you create a custom order confirmation page for your website. Using its customizable content section, you can add text, images, or any other custom content and edit it to your liking. You can add content such as a custom thank you message, a message from the founder, an instructional video or PDF manual, coupons, social media links, and more.
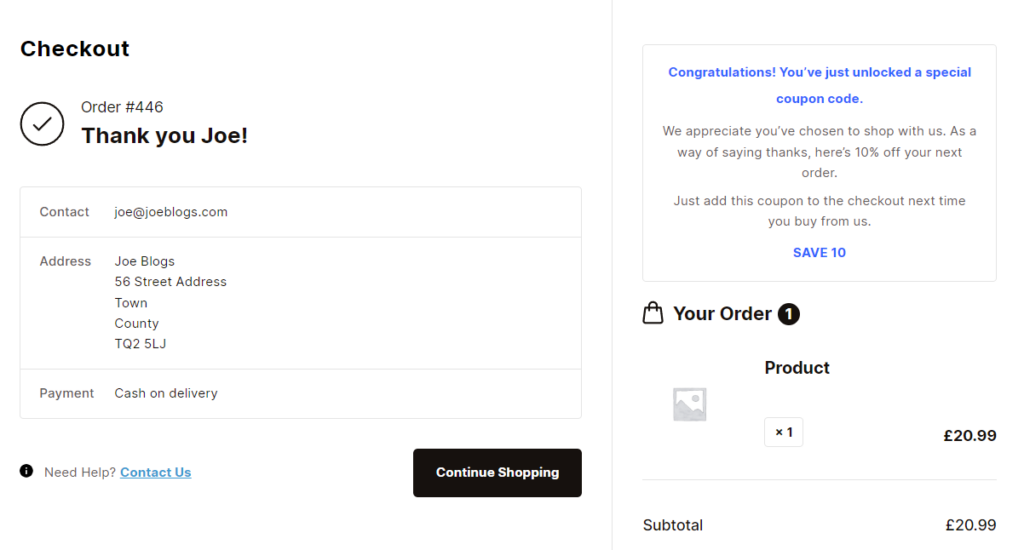
It highlights this page’s important sections, such as order number and details, final price (with shipping information included), customer details, and so on. Flux Checkout’s thank you page displays all this in a neat and clean design to avoid cluttering this page.
Flux also allows you to add a customer map to the order confirmation page so customers can visually confirm their shipping address.
With Flux installed, you can create a custom order confirmation page this way:
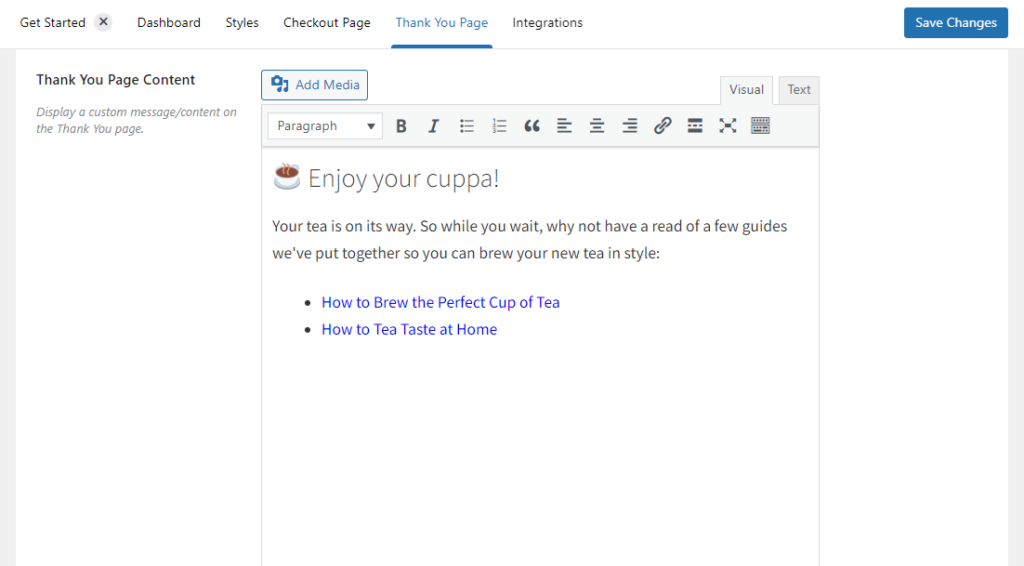
- Go to WooCommerce > Flux Checkout from your WordPress dashboard and click on the Thank You Page tab.
- Click the Enable Thank You Page toggle to enable your new thank you page. Below this, you will see a few settings which you can make.
- Show map – click this toggle switch to display the customer map.
- Thank you page content – here’s where you add custom content, including text, images, or video.
- Content placement – choose where the custom content will be displayed on the page.
- ‘Contact Us’ URL – add a link to your contact page where customers will be redirected if they need help.
- Once you’re done with your settings, click the Save Changes button.
That’s it. You’ve created a custom order confirmation page with content suited to your store.
Implement these ecommerce checkout best practices today
Your ecommerce checkout is the most important part of your store to you because customers complete a purchase here, and you get rewarded in terms of online shopping revenue.
For this reason, you have a job to implement these ecommerce checkout best practices to ensure customers can go through your checkout smoothly and have a better user experience.
All the above practices seem like a lot of work, but with the plugins mentioned in this guide, you can easily do them in just a few clicks.
You can get them easily via our All Access Club and build a smooth, fully-optimized checkout to boost your ecommerce business’ conversions.
Get the All Access Pass
Get all 14 Iconic plugins plus every plugin we make in the future. Increase conversions, optimize your store, and get access to special discounts and offers.
Or buy them individually here:
- Flux Checkout for WooCommerce – Upgrade your store’s ecommerce checkout flow at each stage.
- Iconic Sales Booster for WooCommerce – Add cross-sells and upsells at each stage of your ecommerce checkout process.

Gina Lucia is our in-house Content Manager at Orderable. She writes articles, user guides, technical documentation, and creates videos on everything WooCommerce and Orderable.
Gina has been working in the WordPress/WooCommerce space since 2012 when she developed WordPress websites for clients large and small.
For the past 8 years, she’s been writing about everything WordPress and WooCommerce, becoming an expert in what makes a WooCommerce store succeed.
When not writing, Gina loves to tend to her vegetable garden, read, or travel to mainland Europe.