
If you’re looking for some checkout page optimization tips to improve your store’s conversion rates and reduce checkout abandonment, this guide is for you.
You can do so much to make your WooCommerce website attractive and user-friendly to customers but if your checkout doesn’t deliver, all that other work is in vain. You might end up with a great-looking website that doesn’t get you near enough conversions.
? We don’t want that. So, in this post, we’ll walk you through 7 checkout page optimization tips to encourage sales and reduce checkout abandonment on your online store.
First things first, let’s start by looking at why checkout page optimization is important.
The importance of checkout page optimization
After leaving the cart page and clicking on the checkout button, you want your customers to follow through with their purchase. A well-optimized checkout can play an important role in ensuring this happens.
More will complete their purchases when customers find your checkout easy and convenient. This increases your conversion rates while decreasing the cart abandonment rates. To put it simply, a well-optimized checkout means more sales.
On the other hand, failure to optimize the checkout has the opposite effect. Customers will likely abandon their carts if the checkout process is complex.
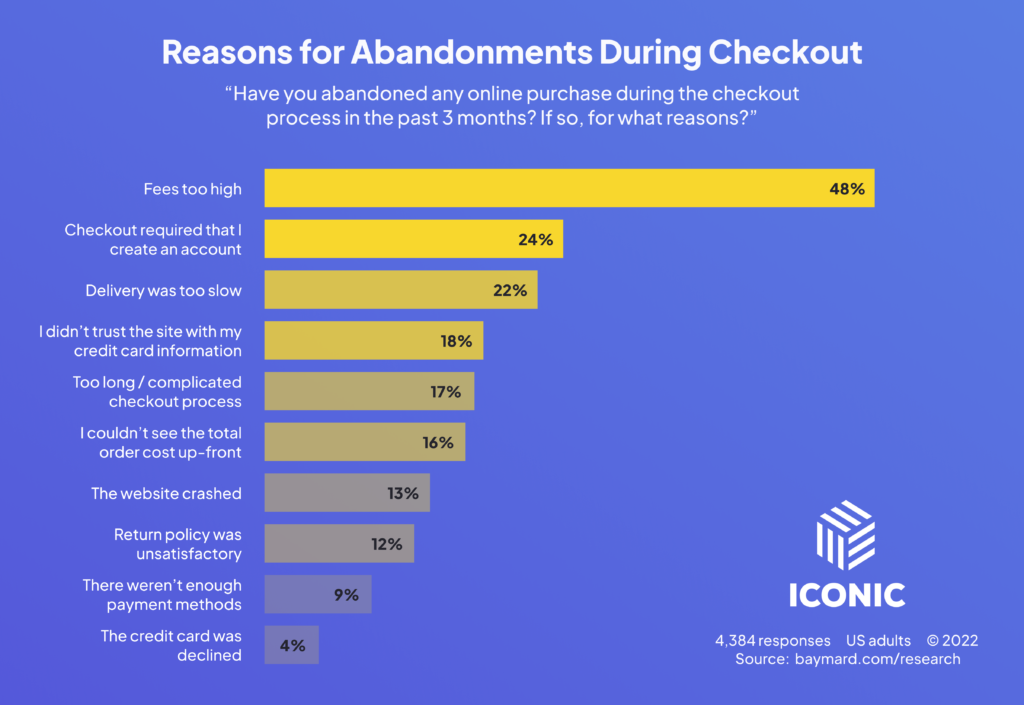
? In fact, a study from the Baymard Institute shows that out of 70% of all online shopping carts abandoned, 17% of shoppers do this if the checkout process is too complicated.
This shows that your checkout flow can make or break your ecommerce business, and optimizing it should be a top priority.
While there is a lot to love about WooCommerce, its default checkout page leaves room for improvement. With the average cart abandonment rate being at 70%, you simply can’t take any chances here.
7 checkout page optimization tips
In the next section, we’ll look at 6 tips and strategies you can use to optimize your checkout page and encourage sales. We’ll walk you through how to implement each one of them using specific tools and settings.
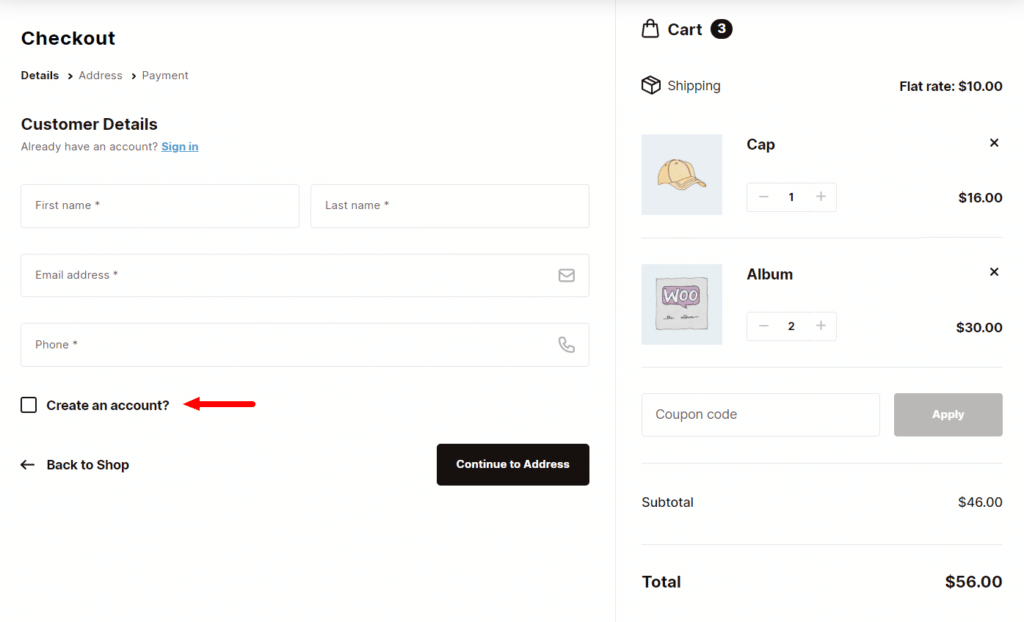
Tip 1: Include an intelligent guest checkout option
A guest checkout option allows customers to complete their purchase without creating an account on your ecommerce website.
But why is giving customers the option to checkout as guests is important?
Guest checkout is a convenient option for customers shopping at your ecommerce store for the first time and those wary of sharing their personal information.
With this option enabled, these customers can check out much quicker and easier. More new customers will complete their purchases, increasing conversions.
Account creation should be an option rather than something you force your customers to do.
? According to a study by Finance Online, 24% of online shoppers will abandon their carts if they’re forced to create an account before completing a purchase.
Thankfully, a guest checkout option will help to ensure this doesn’t happen.
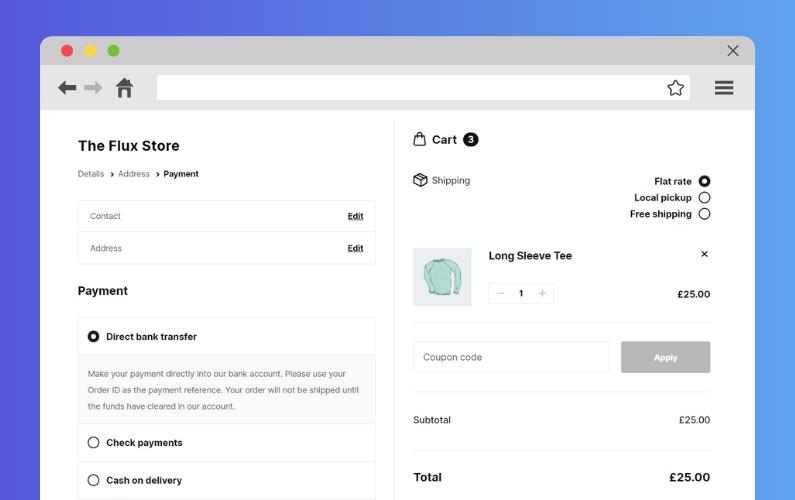
Enabling a guest checkout option is only the first step. You can take it further and improve it by making it more user-friendly using the Flux Checkout for WooCommerce plugin.
Flux Checkout for WooCommerce
Flux Checkout transforms the default WooCommerce checkout into one that’s lightning-fast, distraction-free, and reduces checkout abandonment.
How to add a better guest checkout option to your WooCommerce store
As an ecommerce store owner, you know how important a seamless checkout experience is in boosting conversions. With Flux Checkout for WooCommerce, you can add a seamless multi-step checkout for customers who opt for the guest checkout option. Your guest checkout option will be convenient and user-friendly to new customers.
Flux replaces your default WooCommerce checkout with a simple, fast, and visually appealing one. It has account creation checkbox prompts that simplify account creation and guest checkout – all without slowing down the checkout process.
With Flux, you’ll be able to give your customers a seamless experience when they use the guest checkout option. This means more conversions and more revenue for your business.
Enable guest checkout in WooCommerce
With Flux Checkout installed on your WordPress site, you’ll only need to change one setting to have a better guest checkout option for your customers.
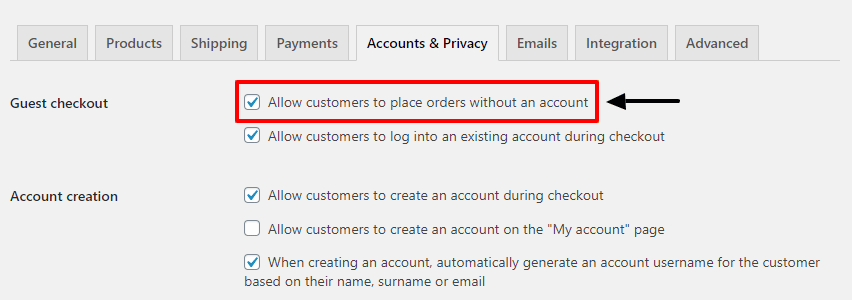
- From your WordPress dashboard, go to WooCommerce > Settings and click on the Accounts & Privacy tab.
- Next to the Guest Checkout option, check the box that says ‘Allow customers to place orders without an account’. That’s it.
Improve it with Flux Checkout
Apart from that, Flux Checkout has additional guest checkout/user account settings that make this process better. To access these settings:
- While you’re still on your WordPress dashboard, go to WooCommerce > Flux Checkout and click on the Checkout Page link at the top.
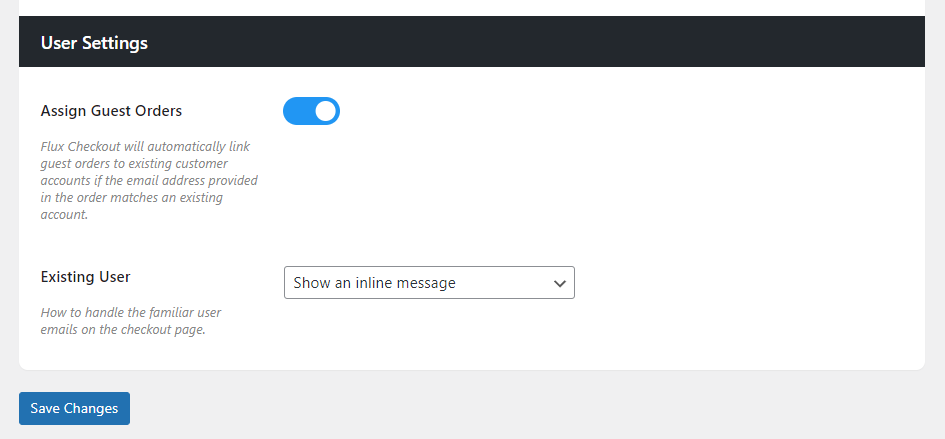
- Scroll down to the User Settings section. Here, you’ll find the following settings:
- Assign Guest Orders – Sometimes a customer with an existing account is in a hurry and uses the guest checkout option to complete this process as quickly as possible. Clicking on this toggle switch will assign guest orders to existing accounts if the email address matches an existing account. The order will be assigned to the customer’s account even if they don’t log in.
- Existing user – If the ‘allow guest orders’ option is enabled, you can use this setting to display a message when a customer inputs an email that matches an existing account. This can be a prompt asking them to log in or any other message without a login prompt. You can also choose to show no message at all.

Flux checkout upgrades your guest checkout option with these options, giving you more options and control over how you want customers to experience it.
Flux Checkout for WooCommerce
Flux Checkout transforms the default WooCommerce checkout into one that’s lightning-fast, distraction-free, and reduces checkout abandonment.
Tip 2: Include multiple different payment methods
When optimizing your checkout, include multiple payment methods to cater to a broader range of customers.
This is because:
- Different customers prefer to use different payment methods.
- Some payment methods are predominantly used in specific regions of the world. For instance, credit cards in the West and digital wallets like Alipay in Asia.
When adding multiple payment methods, prioritize the common, easy-to-use payment platforms like PayPal, Amazon Pay, Apple Pay, and so on.
Including multiple payment methods will make it convenient for customers to make payments. They will be inclined to make purchases and this increases your sales.
Offering a range of payment methods on your ecommerce site makes it accessible to customers worldwide. This could be important in growing your customer base.
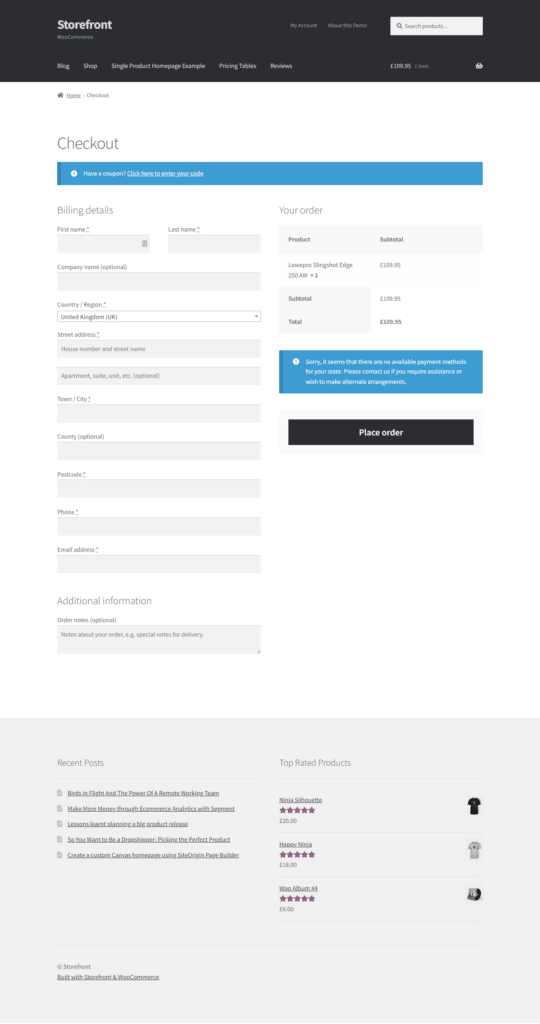
Having limited payment options increases cart abandonment
A single payment option will inconvenience customers who don’t use your option. This could lead them to abandon their carts.
? A cart abandonment study by Digital Commerce 360 revealed that 7% of customers abandon the checkout process when their preferred payment is unavailable.
The bottom line is that offering multiple payment methods will cater to more customers’ preferences, increasing sales.
How to include more payment methods for your WooCommerce
Adding a payment method to WooCommerce is as simple as installing a new plugin and customizing a few settings.
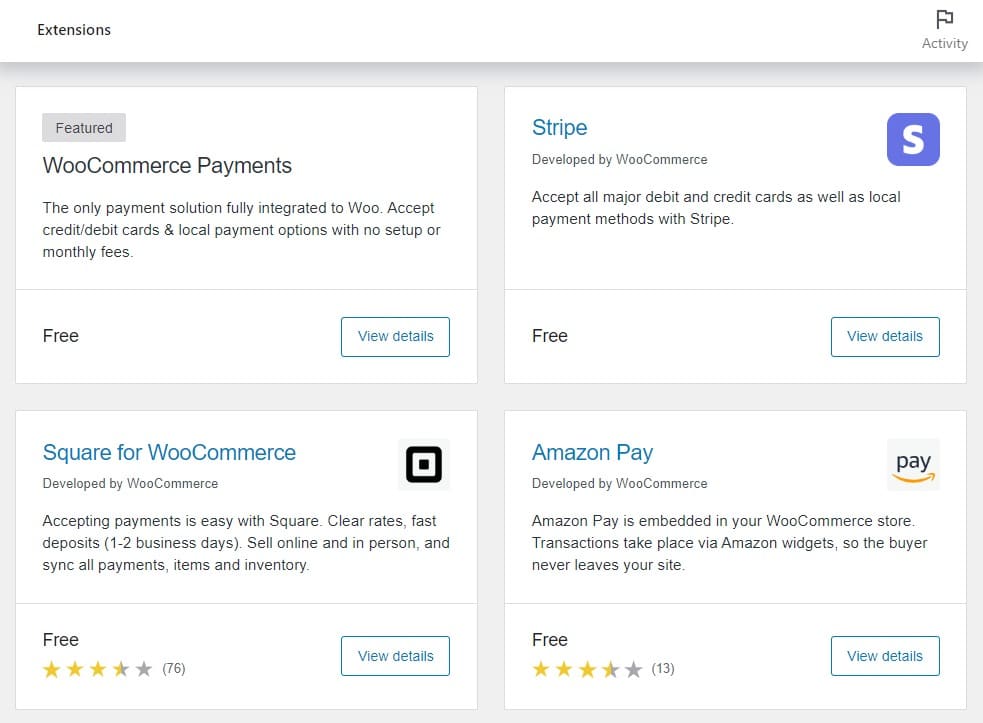
To start, you’ll have to install the plugin for the payment gateway you want to include, for example, PayPal.
- From your WordPress dashboard, go to Plugins > Add New search for PayPal.
- Install the WooCommerce PayPal Payments plugin and click on Activate.
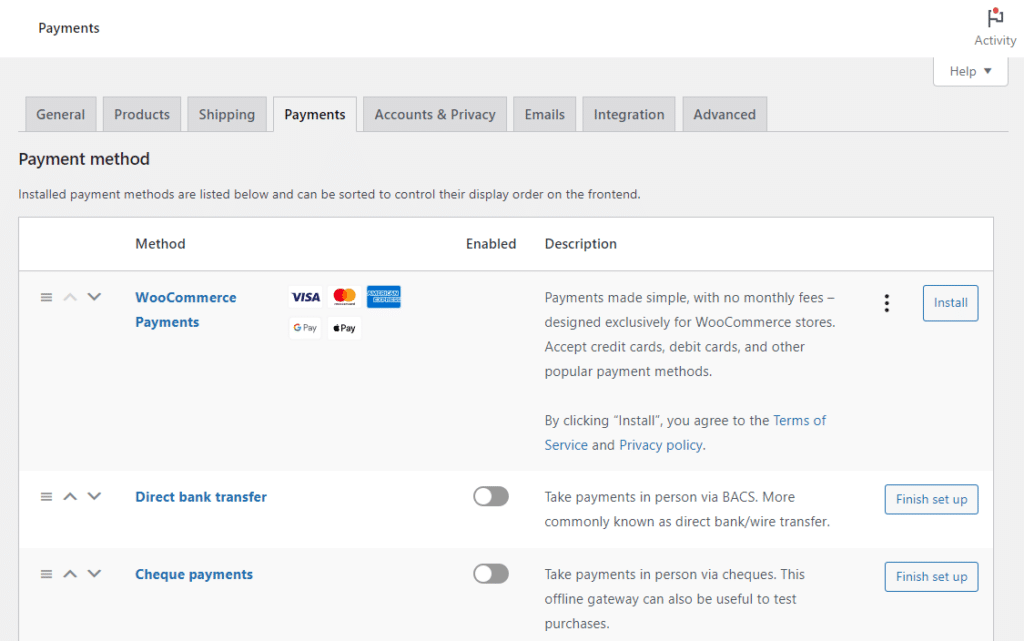
After the plugin is activated, change the following settings.
- Go to WooCommerce > Settings and click on the payments tab. You should see PayPal as one of the payment options.
- Click on it to start setting it up. The first thing you’ll want to do here is connect it to your PayPal account. You can do this by clicking on the Connect to PayPal button.
- Connect your PayPal business account to WooCommerce, filling in details such as email address, merchant ID, etc., under Manual Mode.
- When you scroll down, you’ll see the PayPal checkout settings. Here, you can change your title, description, etc.
- Once done, click on Save Changes.
Now that all of this is set up, you can start accepting customer payments via PayPal.
Tip 3: Add a progress bar or multi-step checkout
A great way to optimize your checkout is to make it more engaging. You can do this using visual cues like:
- A muti-step checkout flow – This is a visually appealing and engaging checkout process where everything a customer needs to do on the checkout page is broken down into simple and manageable steps. For instance, entering payment information, selecting a shipping address, and confirming the order will be presented in separate steps.
- A progress bar – To engage customers throughout the multi-step checkout flow, you can add a progress bar to show them the step they’re in and how far they have to go to complete their purchase.
These visual cues keep customers engaged and focused on following through with their purchases. Customers are more likely to complete their purchase when actively involved in this process.
? Studies show that an engaged customer is 90% more likely to buy and could spend 300% more than other customers. This way, keeping your customers engaged can increase your sales.
These visual elements create a better experience for customers, which improves their overall satisfaction with your service. This will encourage them to keep coming back.
By default, WooCommerce has a one-page checkout and you can’t add engaging visual cues like a progress bar to it. Thankfully, with Flux Checkout, you can add all of these elements to your WooCommerce checkout.
How to create a multi-step checkout
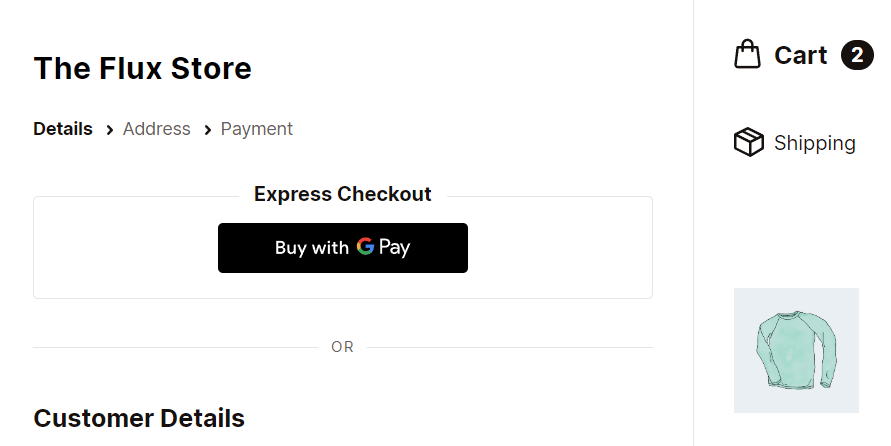
With Flux Checkout, you won’t have to take chances with the default clunky one-page WooCommerce checkout. This plugin transforms it into a well-structured multi-step checkout designed to provide a smooth, organized, and engaging customer experience.
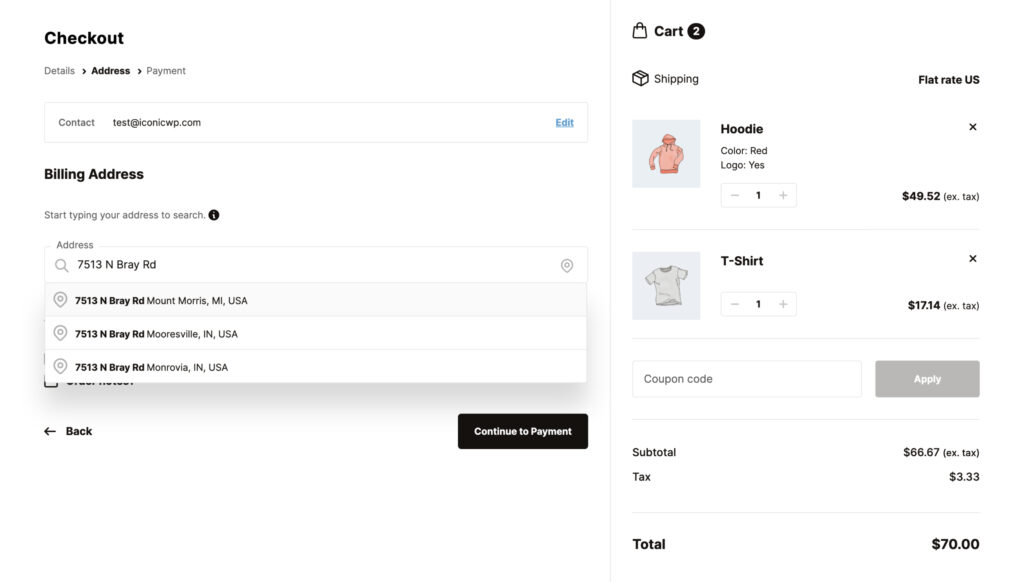
As customers go through the checkout process, Flux displays a progress bar on top to show customers the step they’re in clearly. They will know how far they still have to go, ensuring they won’t be lost in the multi-step process.
Flux’s mobile-optimized checkout design allows customers to seamlessly checkout using their mobile devices.
Creating a multi-step checkout with a progress indicator is as easy as it can be with Flux Checkout. All you have to do is install it and it will handle the rest for you.
To do this, take the following steps:
- Purchase Flux Checkout for WooCommerce from the Iconic store: iconicwp.com/flux-checkout-for-woocommerce.
- Then, log into your WordPress dashboard, go to Plugins > Add New, and click on Upload Plugin.
- Select the Flux Checkout extension file you downloaded and upload it.
- Click Install Now, then Activate, and you’ll be directed to the license activation screen.
- Enter your License Key and then click on Agree & Activate License. That’s it.
A multi-step checkout and a progress indicator are built-in features of Flux Checkout. Because of this, once you install Flux, it will automatically upgrade your WooCommerce checkout with these features.
Flux Checkout for WooCommerce
Flux Checkout transforms the default WooCommerce checkout into one that’s lightning-fast, distraction-free, and reduces checkout abandonment.
Tip 4: Include cross-selling and/or upselling
Your checkout isn’t about getting potential buyers over the line alone. You can leverage your customers’ strong intention to buy and pitch products that they might need as upsells or cross-sells.
The checkout is one of your store’s highest-converting areas since customers strongly intend to buy when they get to it. When you pitch complementary products (upsells) or higher-value products (upsells), customers are highly likely to add them to their purchases.
Cross-sells and upsells at checkout increase the average order value (AOV) by getting customers to spend more per order.
? In a recent Hubspot survey, retailers revealed that cross-selling and upselling are responsible for 30% of their total revenue. These product recommendations can contribute significantly to your store’s revenue.
In the default WooCommerce, you can only cross-sell to customers on the product page under the related products section. To add cross-sells to your checkout, you’ll need the Iconic Sales Booster for WooCommerce plugin.
How to add cross-selling to your checkout page
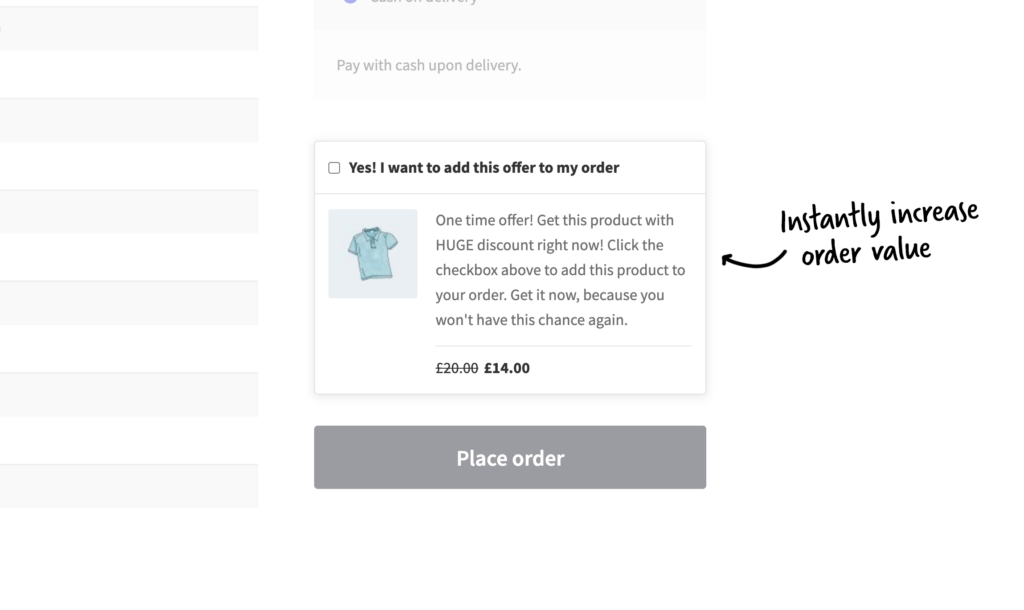
Iconic Sales Booster for WooCommerce allows you to maximize your sales through order bumps at checkout. This is a cross-sell that will pop up when a customer is completing the checkout process.
Sales Booster allows you to customize the order bump popup to make it more attractive and appealing to customers. You can include irresistible discounted offers and customize the sales text to achieve this.
The recommended product will be relevant as it will be based on what the customer has in their cart. Customers can add the order bump directly to their order, creating a seamless and uninterrupted experience.
To add order bumps at checkout:
- Install and activate Iconic Sales Booster for WooCommerce.
- Go to Sales Booster > Order Bumps and click on Add New.
- Add a title to name your order bump. Below this, you’ll see three tabs:
- Products – In this section, you’ll select the specific products for which the order bump will be displayed. You can also choose to display the order bump when any or all of the products are in the cart.
- Offer – This is where you’ll select the amount of discount you’ll offer as a percentage or fixed price.
- Customize – Here you’ll see a visual preview of the order bump, which you can customize. You can change the sales text and the design of the popup, including the border style, its position, etc.
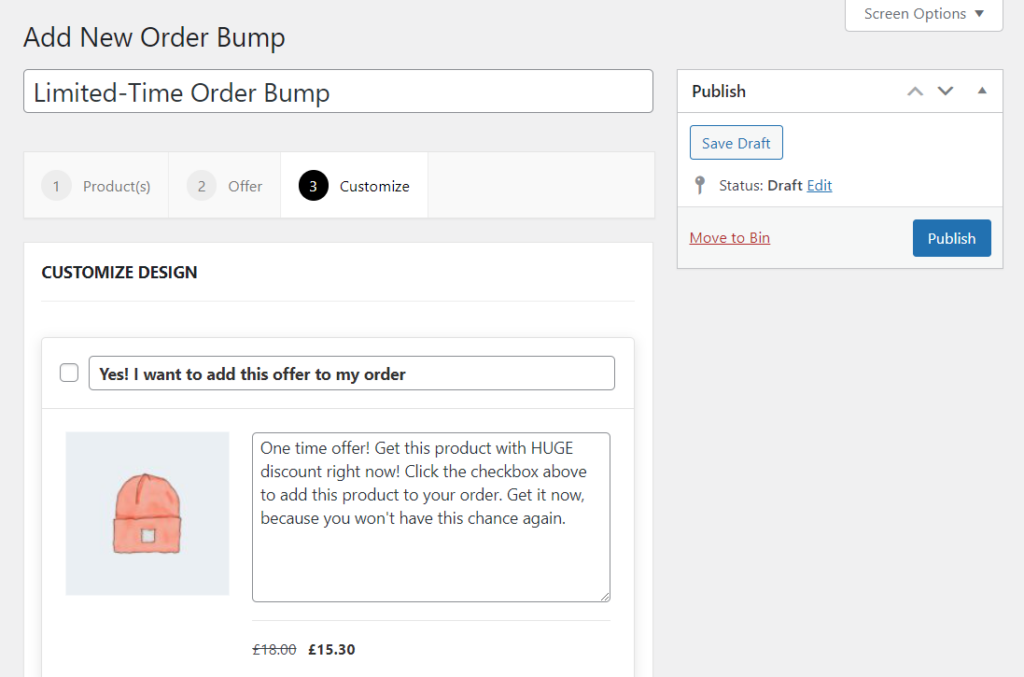
Once you’re happy with your settings, click on Publish/Update.
Iconic Sales Booster for WooCommerce
Add cross-selling to your entire WooCommerce store in minutes with Iconic’s WooCommerce cross-sell plugin, Iconic Sales Booster for WooCommerce.
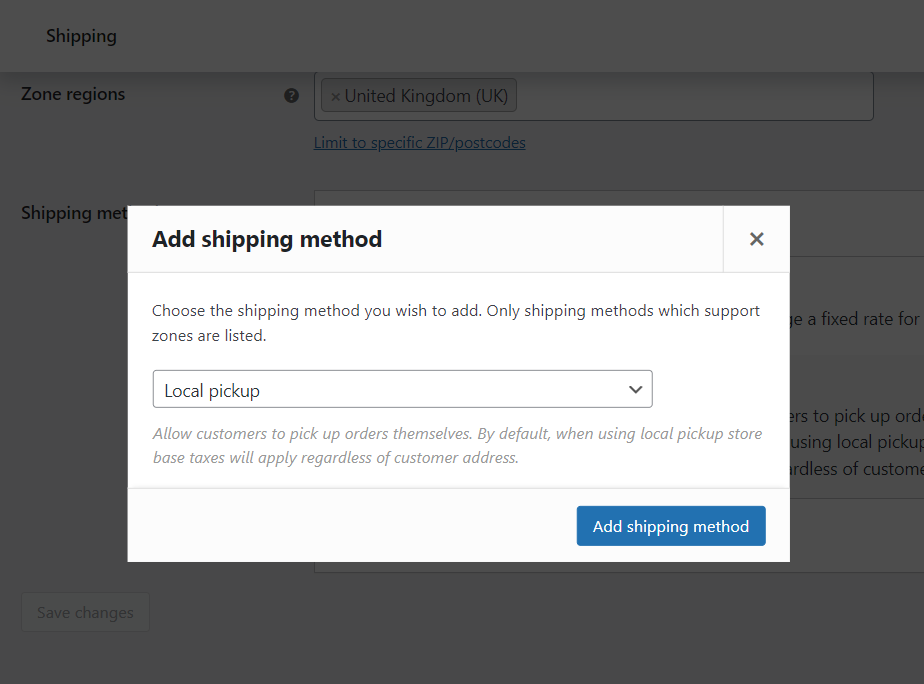
Tip 5: Ensure shipping information is clear
Shipping information needs to be clear because customers value transparency at this stage of their journey with your ecommerce business. This is why unexpected shipping costs are the leading reason for cart abandonment.
? According to a Cloudways study, unexpected shipping costs account for about 49% of abandoned carts. That’s nearly half of them.
When it comes to shipping information, especially extra costs, customers simply don’t like surprises. You can avoid these surprises by ensuring that shipping information is clear.
This entails showing customers shipping costs as soon as possible, for instance, immediately after they select their shipping address. This will help you avoid last-minute cart abandonment and build customer trust.
Clarity in shipping charges aside, you can also offer free shipping as a shipping option if you can do so. Free shipping is a powerful incentive that can boost your conversion rates. Customers are more likely to complete a purchase when they know they won’t incur extra shipping costs.
How to make sure your shipping information and charges are clear
To ensure shipping information and charges are clear you need to display it as early as possible. Preferably, it should be immediately after the customer has selected their shipping address. Clearly state the shipping costs and any additional fees upfront. This helps customers to avoid unexpected charges that could cause them to abandon their carts.
When using a multi-step checkout, this information should ideally be displayed at each step when possible (when shipping information is available). Flux Checkout’s built-in design ensures this.
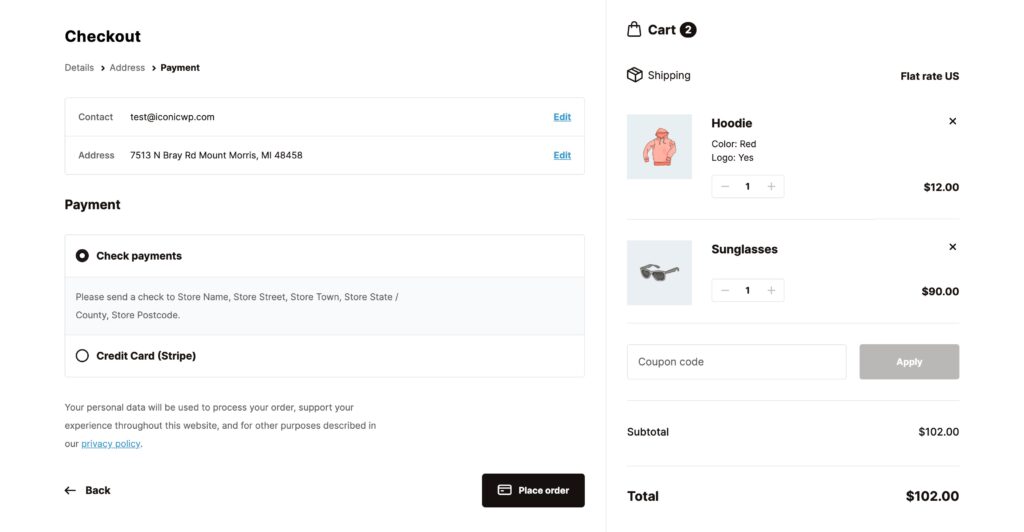
It lets you display the order summary containing shipping information throughout the multi-step checkout flow. It makes this information available to customers in a collapsable menu so that it doesn’t get in the way of checking out.
Customers can see shipping information at any step of the checkout process. All they’ll have to do is click on the collapsable menu to expand it and click on it again to collapse it when they want to proceed.
Tip 6: Make your checkout distraction-free
You’ll want to remove anything distracting to keep customers focused on completing the checkout. The idea here is to hide unnecessary elements like the header and footer so that customers can focus on what matters, for instance, entering billing information.
This benefits you in the following ways:
- A distraction-free increases the likelihood of a sale. Customers will complete their purchases when they remain focused during this process.
- It reduces the shopping cart abandonment rate. Distractions make the checkout more complicated than it has to be. Research from the Baymad Institute shows that 26% of online shoppers abandon their carts when they face a complicated checkout.
When you have distractions in your checkout process, you risk frustrating customers. They might end up confused and abandon the whole process at this late stage. Fortunately, a distraction-free checkout minimizes this risk. It provides them with a simple process that is fast to navigate and won’t test their patience.
To get the best out of your distraction-free checkout, you can ensure that it has a clean design with form fields that are easy to use. This creates a better user experience that will encourage customers to follow through with their purchases.
All of this is achievable with Flux Checkout for WooCommerce.
Flux Checkout for WooCommerce
Flux Checkout transforms the default WooCommerce checkout into one that’s lightning-fast, distraction-free, and reduces checkout abandonment.
How to create a distraction-free easy to use checkout
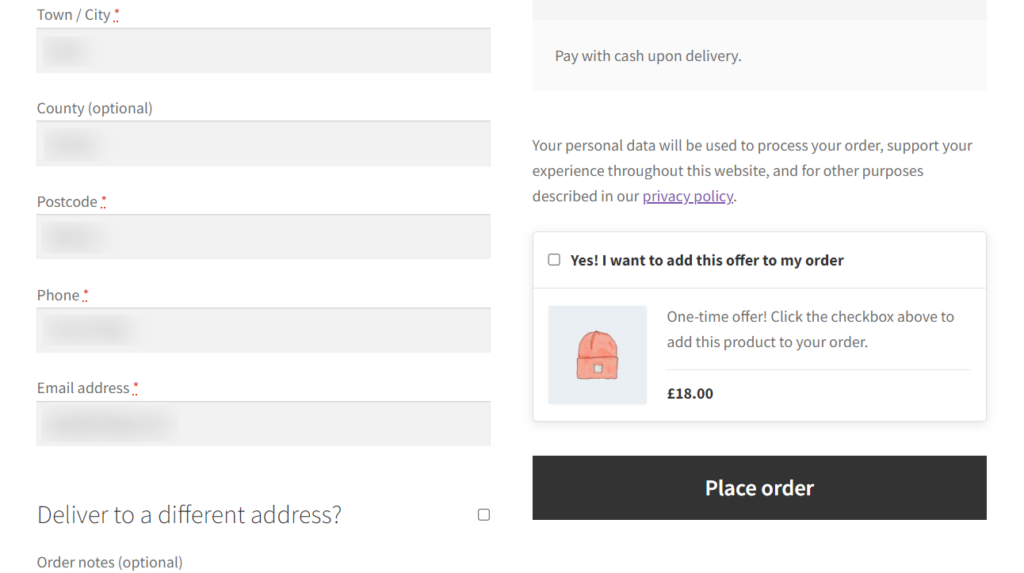
Flux Checkout helps to improve your conversion rate by keeping the checkout page free from distractions. By default, Flux removes anything on this page that could distract customers and deter them from completing the checkout.
This includes navigation elements like headers, footers, and sidebars. This way, customers can focus on the task at hand at each step of the multi-step checkout.
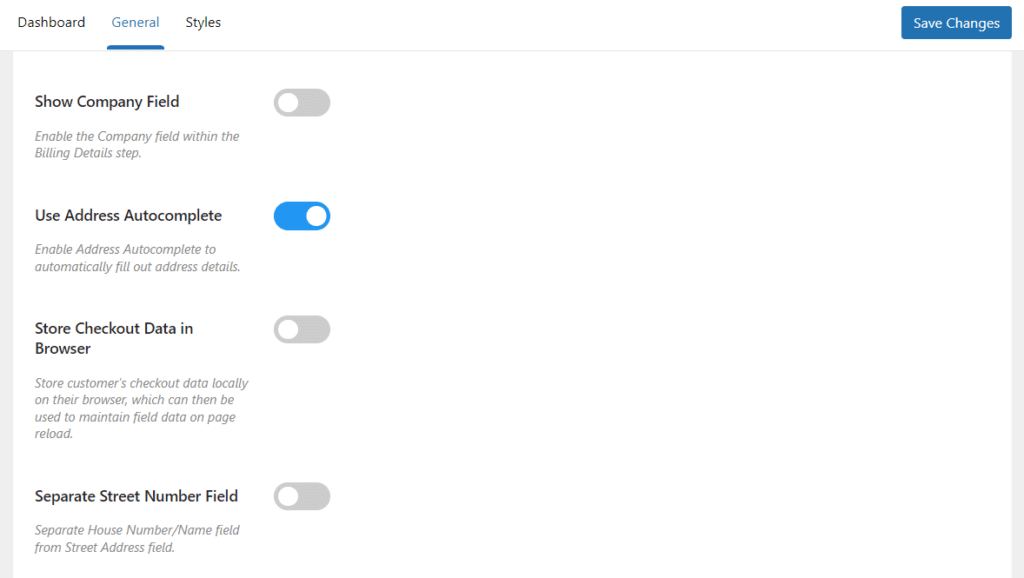
Apart from that, Flux enables you to take the initiative in simplifying your checkout further. You can remove additional fields such as the Company, Coupon (or discount code field), and Separate Street Number checkout fields.
To remove these fields:
- From your WordPress dashboard, go to WooCommerce > Flux Checkout and click on the Checkout Page tab.
- Click on the toggle switches that say ‘Show Company Field’ and ‘Separate Street Number Field’.
- Click the Save Changes button at the bottom.
After making these changes, your customers won’t see these fields when checking out. Instead, they’ll be met with a clean, uncluttered checkout with user-friendly form fields. These fields will be highlighted when customers fill them out, creating a better user experience.
You can also enrich your customer’s experience as they fill out the shipping address fields using Flux’s address autocomplete feature. All customers have to do is start typing their address and Flux will generate a series of the closest matches.
Flux will fill in the rest of the fields when they select a matching address. To activate the address autocomplete feature, go to the Checkout Page tab above and click on the Address Autocomplete toggle switch to turn it on.
Tip 7: Optimize your checkout page for each customer
Your checkout page doesn’t have to be one size fits all, not every customer has to see the same thing when they reach your checkout page.
In fact, each customer can see something different depending on who they are, or what they have in the cart.
Let’s say your customer is only buying digital products. You may want them to see specific messages about returns, or reviews that encourage them to see the checkout through to the end.
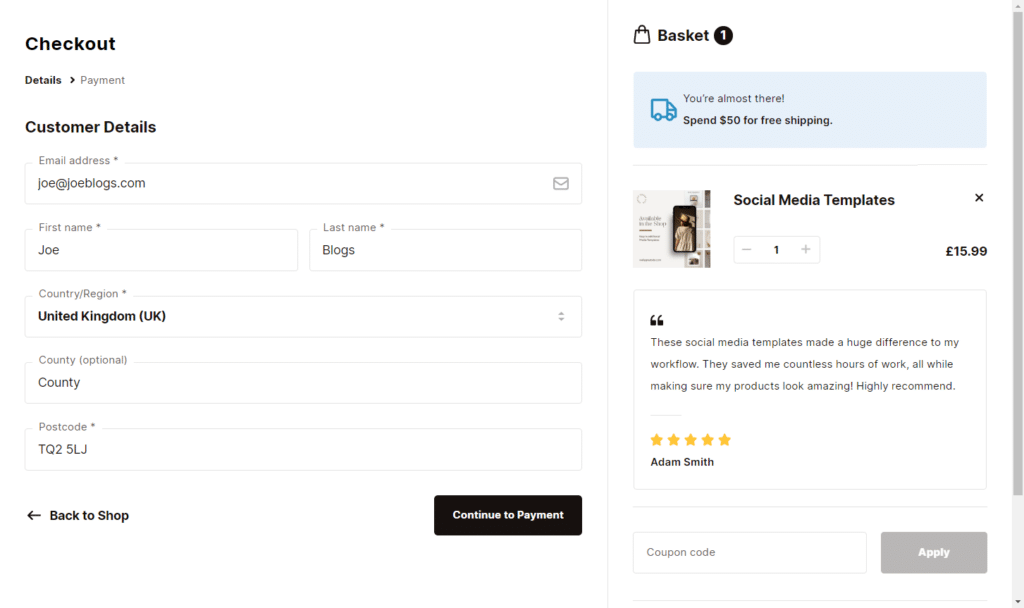
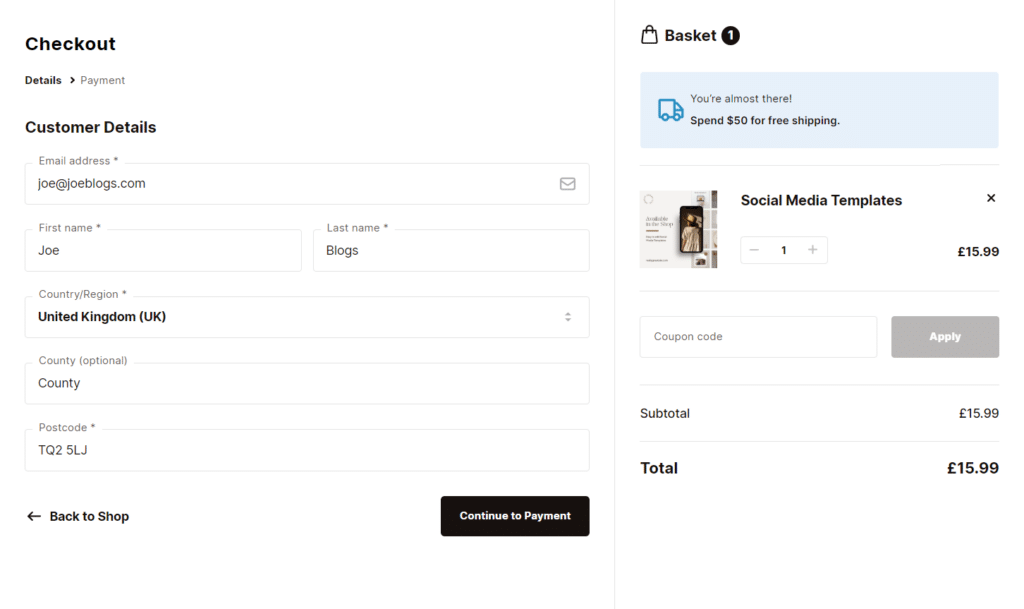
Or, your customer might have only $40 worth of items in their cart, but if they reach $50, they’ll get free shipping. You might want them to know, but only if they’re under the threshold.
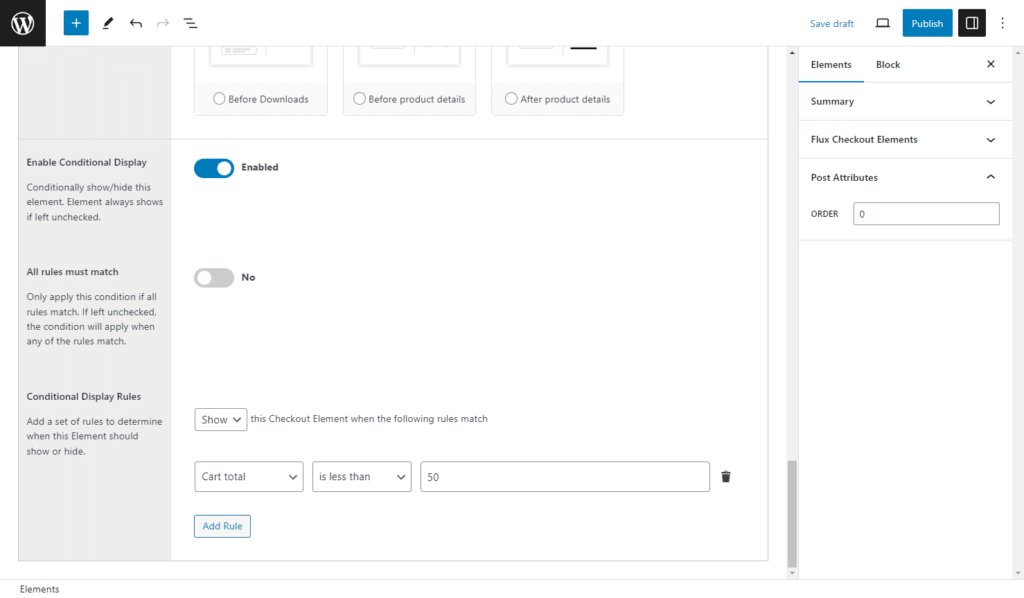
This is where conditional checkout blocks come in. Where you can display messages, or interactive elements only when certain conditions are met.
How to add conditional messages to the checkout page
To do this, you’ll need the help of a plugin if you’re using WordPress. This is because WordPress/WooCommerce on its own doesn’t allow you to edit the checkout.
In steps Flux Checkout for WooCommerce which allows you to create these conditional elements using the WordPress block editor in minutes.
You can create anything from CTA buttons, to customer reviews, security badges, return policy, trust badges, payment logos, and so much more.
You’ll then be able to place them wherever you like throughout the checkout process. Which has already had an upgrade thanks to Flux.
By doing this, you can customize if you want customers to see messages depending on the items in their cart, their cart total, or their user role.
Improve your checkout page optimization today
The importance of your ecommerce checkout can’t be overstated. It is where you make or lose a sale. As such, you must make every effort to optimize your checkout and get more sales.
With the tips in this guide, you’ll be well on your way to creating a seamless checkout experience that will get you more conversions. Needless to say, there’s a lot to do to improve your checkout, but the results are totally worth it.
Fortunately, you’ll have all the help you need to upgrade your checkout quickly and easily with the plugins mentioned in this guide:
- Flux Checkout for WooCommerce – Upgrade your store’s entire checkout flow to maximize conversions.
- Iconic Sales Booster for WooCommerce – Add cross-sells to your checkout to improve your average order value.
Flux Checkout for WooCommerce
Flux Checkout transforms the default WooCommerce checkout into one that’s lightning-fast, distraction-free, and reduces checkout abandonment.

Gina Lucia is our in-house Content Manager at Orderable. She writes articles, user guides, technical documentation, and creates videos on everything WooCommerce and Orderable.
Gina has been working in the WordPress/WooCommerce space since 2012 when she developed WordPress websites for clients large and small.
For the past 8 years, she’s been writing about everything WordPress and WooCommerce, becoming an expert in what makes a WooCommerce store succeed.
When not writing, Gina loves to tend to her vegetable garden, read, or travel to mainland Europe.