
If you’re looking to improve your checkout process steps and optimize your checkout for conversions, this guide is for you.
It takes a lot of time, resources, and effort to get potential customers onto your ecommerce website. The last thing you’ll want to do is lose them at checkout, right when they’re about to purchase. It feels like giving away sales and having your marketing efforts wasted.
So, we’re here to help. We’ll break down each of the checkout process steps and equip you with strategies to improve them all.
Here’s what we’ll walk you through:
- What the ecommerce checkout process steps are.
- How to improve them (outlining the benefits of doing each).
With the strategies discussed in this guide, you’ll be ready to turn more site visitors into paying customers.
But before we can look at how to fine-tune the checkout process at each step, let’s first understand what it is.
What is the ecommerce checkout process?
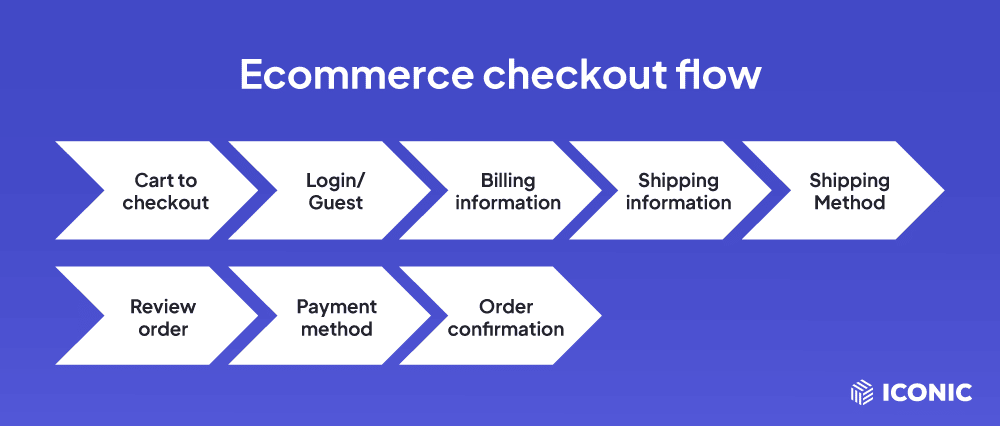
The ecommerce checkout flow (or checkout process) refers to a series of steps a customer takes to complete a purchase in your online store.
Usually, this process starts on the cart page when the customer clicks on the ‘Proceed to Checkout’ or ‘Buy Now’ call to action (CTA) button when they’re ready to purchase. In this process, the customer will fill in the details needed to complete the purchase and or have the order delivered to their doorstep.
The checkout flow ends on the order confirmation/thank you page when the customer has completed their purchase.
One-page versus multi-step checkout flow
When setting up your ecommerce website, there are two different types of checkout flow you can choose to have:
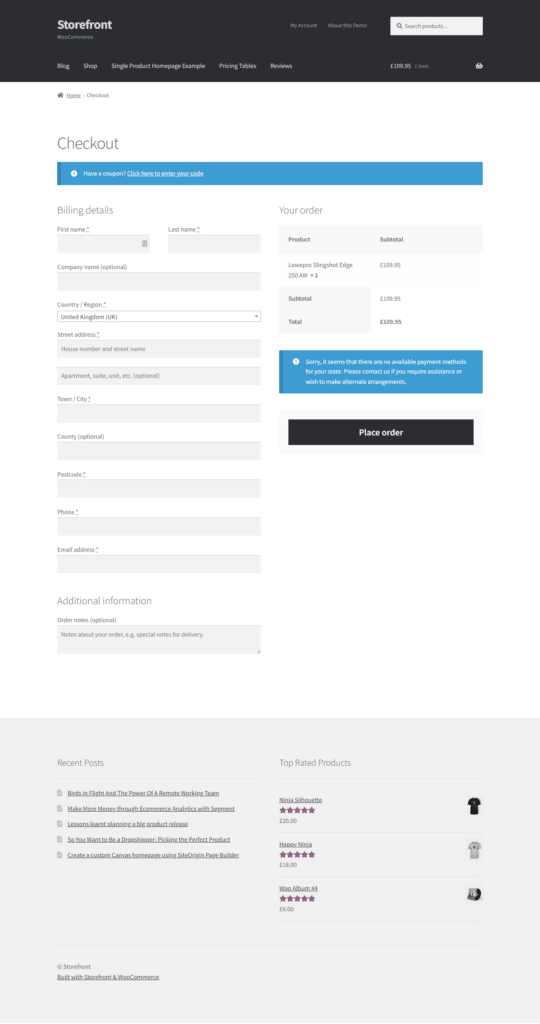
- One-page checkout – With a one-page checkout, the customer completes all of the checkout process steps on a single page. This is the default checkout for most ecommerce websites and the one that comes with the default WooCommerce setup.
? Data from the Baymard Institute reveals that the average US checkout contains 23.48 form elements.
This is a lot of content, and lumping these steps on one page can overwhelm the customer. The solution? Reducing unnecessary form elements, or better yet, using a multi-step checkout.
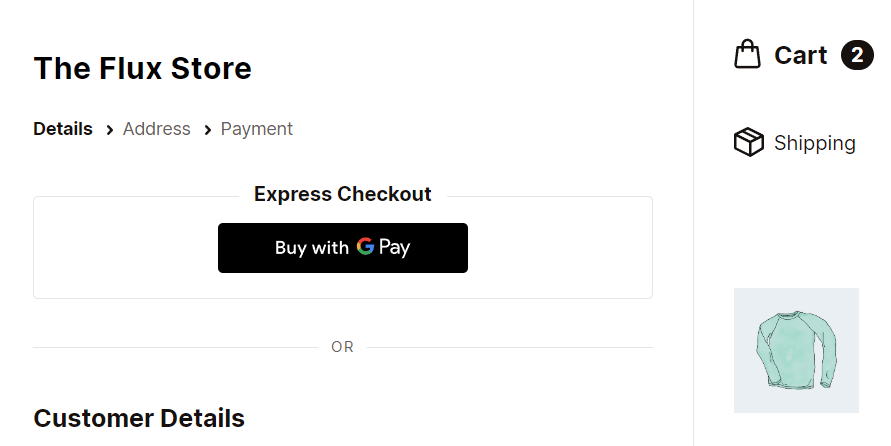
- Multi-step checkout – A multi-step checkout, on the other hand, breaks down the checkout flow, presenting the key stages in a series of simple steps. Customers will enter their personal details, address, and billing information in separate steps.
A multi-step checkout usually has a progress indicator to show customers the step they’re currently in and how many more are left in the checkout process.
This checkout style converts more customers because it simplifies the checkout flow and makes it more user-friendly. Which is why it is gaining popularity among ecommerce stores today.
The ecommerce checkout process steps and how to improve them
The checkout flow’s (checkout process steps) importance to you as the store owner can’t be overstated – this is where the money’s at. You make or lose a sale here. A poor experience at one stage makes the overall checkout experience poor.
? This can increase your cart abandonment rate. According to Shopify, 70% of all shopping carts are abandoned during the checkout process.
For this reason alone, you must do everything possible to improve your checkout process at each step.
So, now let’s look at the steps of the checkout process and how to improve each one to increase your conversions while minimizing cart abandonment.

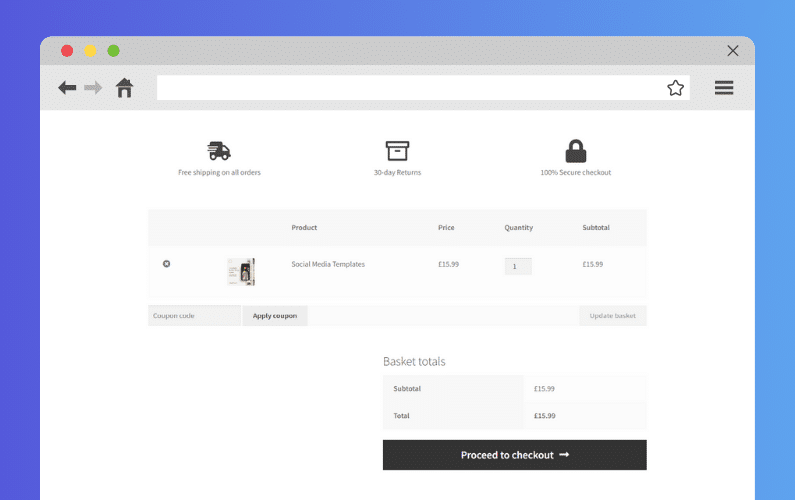
Step 1: Proceed to checkout
This is the step in which the checkout process is initiated. Here, customers will find the ‘Proceed to Checkout’ or ‘Buy Now’ button on the shopping cart page. When customers are done online shopping and satisfied with the items in their cart, they will click this button to start the checkout process.
The benefits of improving the ‘Proceed to Checkout’ step
Customers expect you to present a clear and well-designed ‘Proceed to Checkout’ button in this step. A well-designed ‘Proceed to Checkout’ button helps to prevent cart abandonments even before customers begin checking out.
By improving this step, you’ll ensure that you start on the right foot. It sets a positive tone that encourages customers to initiate the checkout process. Ultimately, it contributes to a positive checkout experience, which increases your conversion rates.
How to improve the ‘Proceed to Checkout’ step
Improving this step is all about presenting this call to action button clearly. Here, you want to make sure that there is no question as to what the customer should do next.
You can achieve this by:
- Stating clearly what the button does – the ‘Proceed to Checkout’ and ‘Buy Now’ labels should work fine.
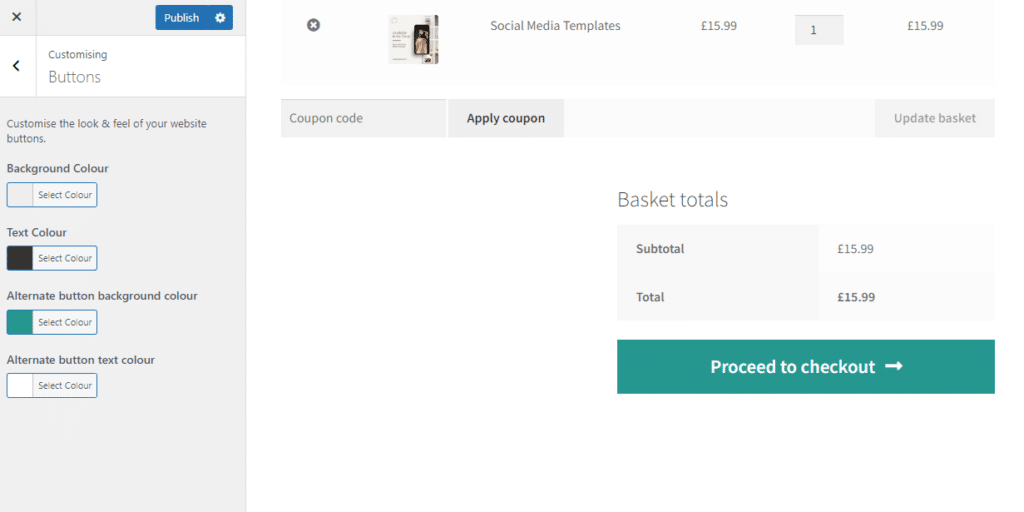
- Using contrasting colors for this button – so that it stands out on the cart page.
- Using popups – use popups to help customers reach the cart page and the ‘proceed to checkout’ step easily. When a customer clicks on ‘Add to Cart’, you can display a popup asking them if they would like to view their cart page.
These popups are useful in moving customers from the shop page to the checkout as quickly as possible. Apart from this, you can also use these popups to cross-sell or upsell to your customers and increase your average order value.
To utilize these popups this way, you’ll need the Iconic Sales Booster for WooCommerce plugin.
Cross-sell to customers just before the checkout using Iconic Sales Booster
Iconic Sales Booster for WooCommerce allows you to make the most out of your customer’s intent to buy by cross-selling to them at different stages of their journey with your store.
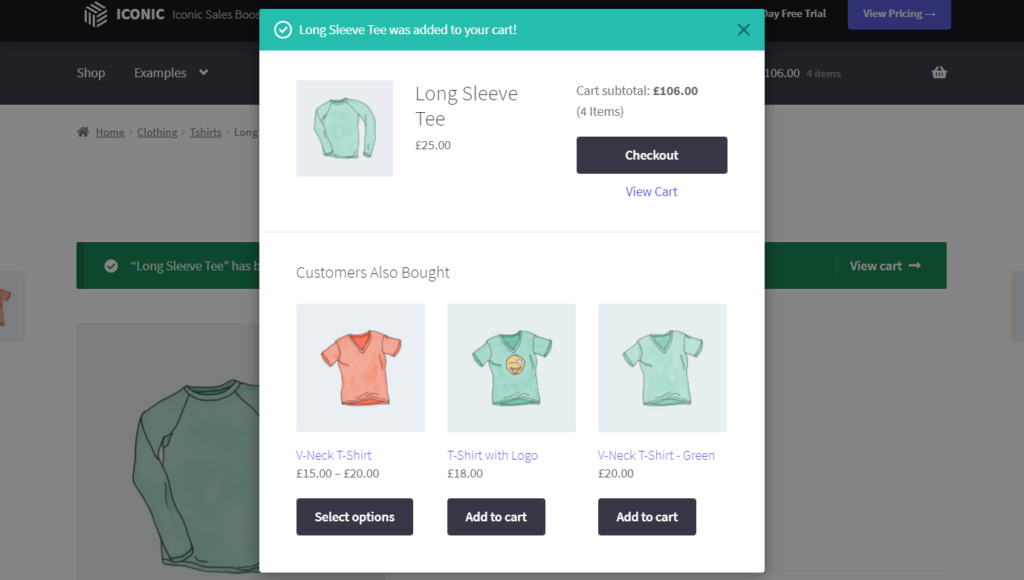
With this plugin, you can display a related products popup under a ‘Customers also bought’ title when customers click the ‘Add to cart’ button.
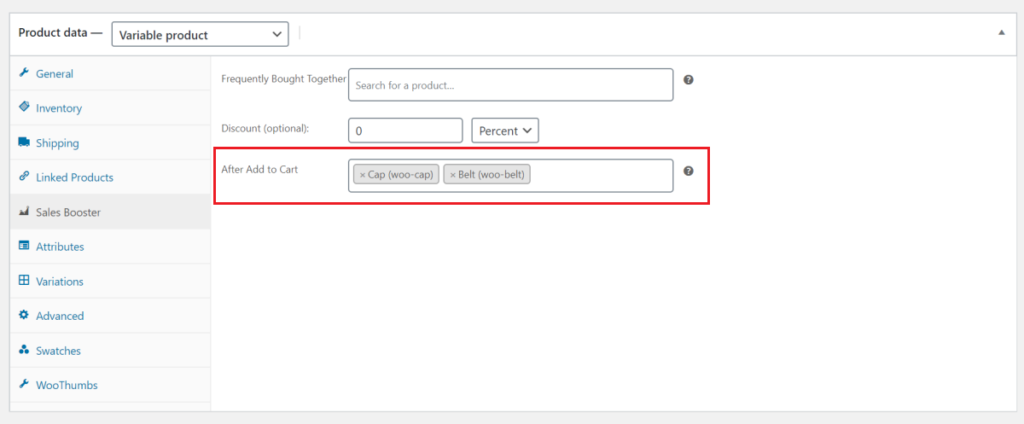
Sales Booster gives you the freedom to customize this popup for each product. This ensures that only relevant products will be recommended, as they will be based on the cart contents. For instance, if a customer has a shampoo in their cart, a conditioner or other shower accessories will appear in the popup.
Customers can directly add the recommended products to their order, which makes for a seamless and frustration-free experience.
Using these popups, you can move customers to the checkout as quickly as possible while still allowing them to keep shopping through recommended products.
Iconic Sales Booster for WooCommerce
Add cross-selling to your entire WooCommerce store in minutes with Iconic’s WooCommerce cross-sell plugin, Iconic Sales Booster for WooCommerce.
Step 2: Optional login/sign up or guest checkout
Once customers get to your checkout, you can ask those who have accounts to log into them and those who don’t to create one. Alternatively, you can allow customers who prefer not to do this to check out as guests.
Depending on whether they have an account or not, customers will see the following options in this step:
- ‘Already have an account? Sign-in here’.
- Create an account.
- Guest checkout.
Why you should improve guest checkout or account creation/login
Customer accounts are extremely important in enhancing user experience. They make it easy for customers to make repeat purchases as they won’t have to enter as many details as they do when they shop for the first time. Also, they can see their shopping history and manage their wishlists here.
Despite this importance, you should not force your customers to create an account before completing a purchase.
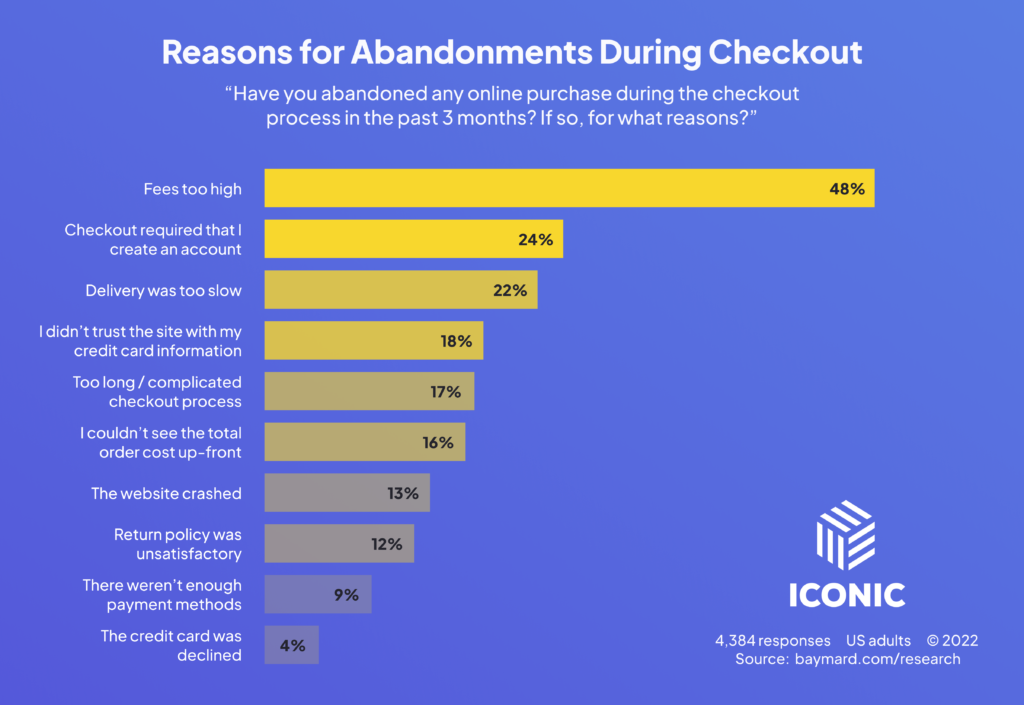
? According to research, 25% of online shoppers abandon their carts if an ecommerce site requires them to create an account.
This makes forced account creation one of the biggest contributors to cart abandonment during checkout.
So, having a guest checkout option can help minimize cart abandonment. Customers can checkout much quicker, easier, and with their preferred option. This smooth checkout experience could encourage more customers to shop with you again.

How to improve account creation/sign-in and guest checkout
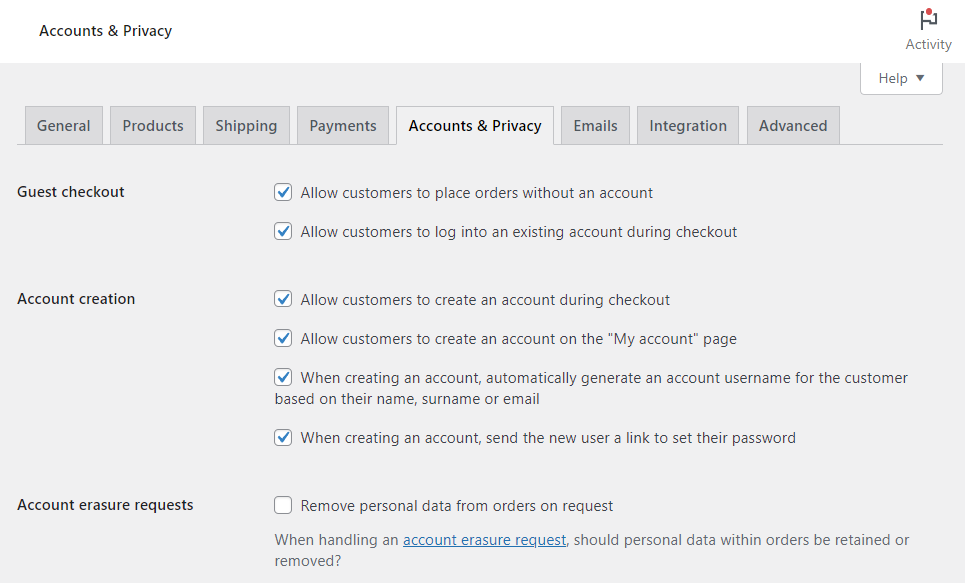
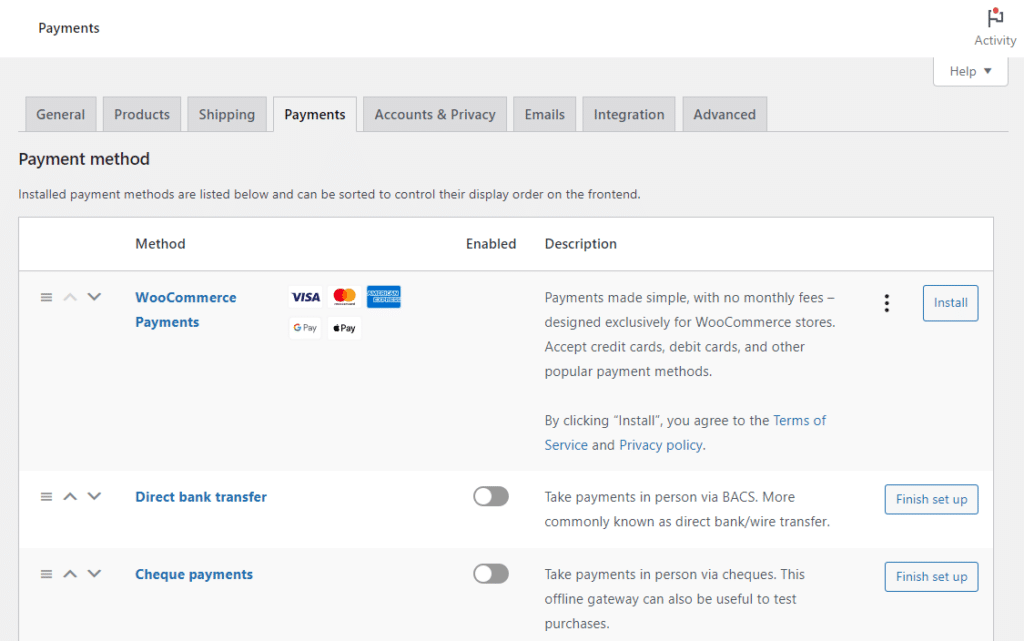
By default, WooCommerce provides several settings that allow you to customize account creation and enable guest checkout on the checkout page.
From the WooCommerce Settings page, you can do the following:
- Allow customers to log into an existing account during checkout. This is where they will be presented with the message ‘Already have an account?’ followed by a clickable sign-in link.
- Allow customers to create an account during checkout. You can simplify this process for them by automatically generating an account username for the customer based on their name or email.
To allow a guest checkout option, all you have to do is check the box that says ‘Allow customers to place orders without account’ on the WooCommerce settings page. With this option enabled, customers choose to create accounts or checkout as guests.
But why stop there? You can take it further and improve both guest checkout and account creation options using the Flux Checkout for WooCommerce plugin.
Improving guest checkout and account creation/sign-in options with Flux Checkout
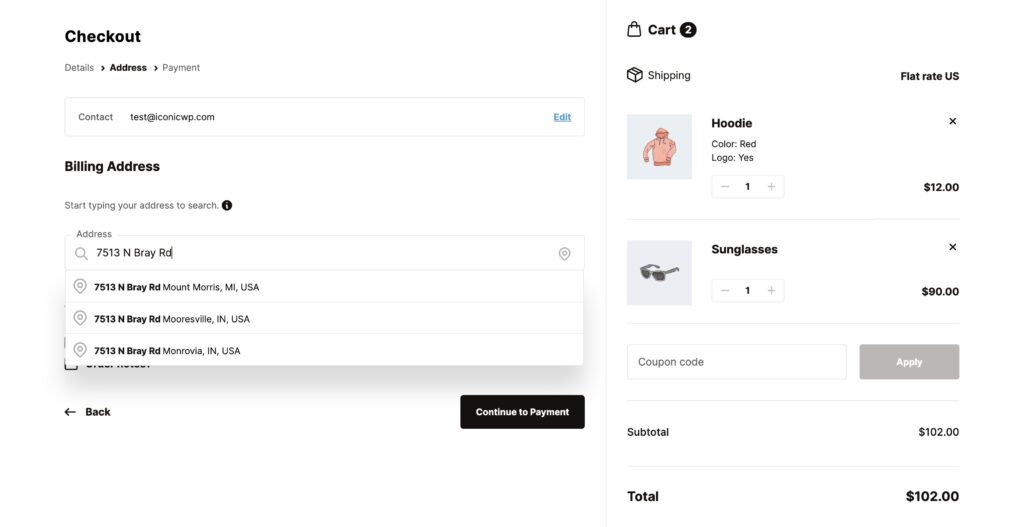
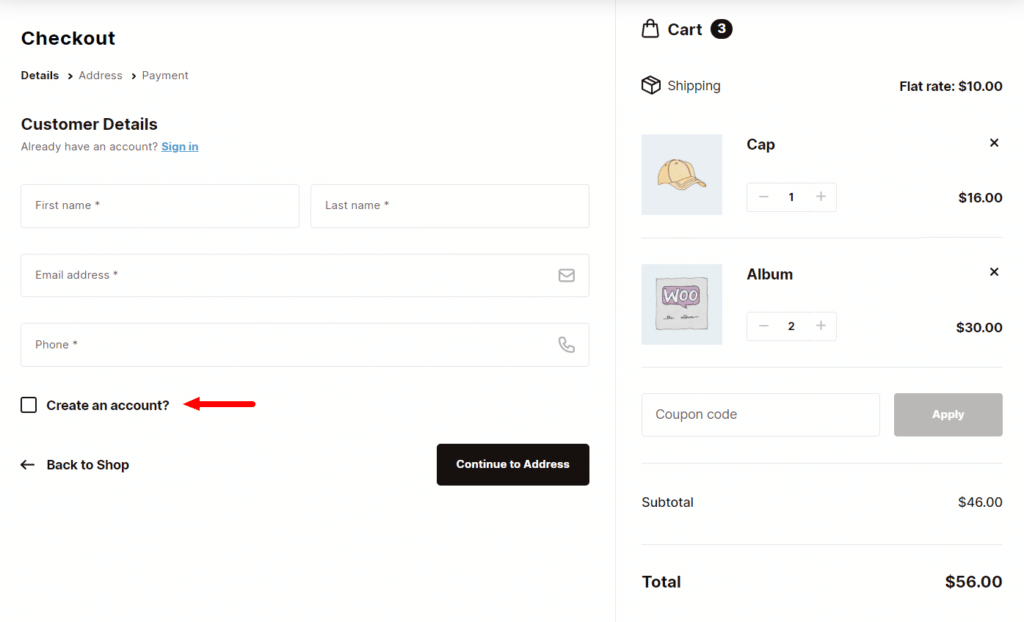
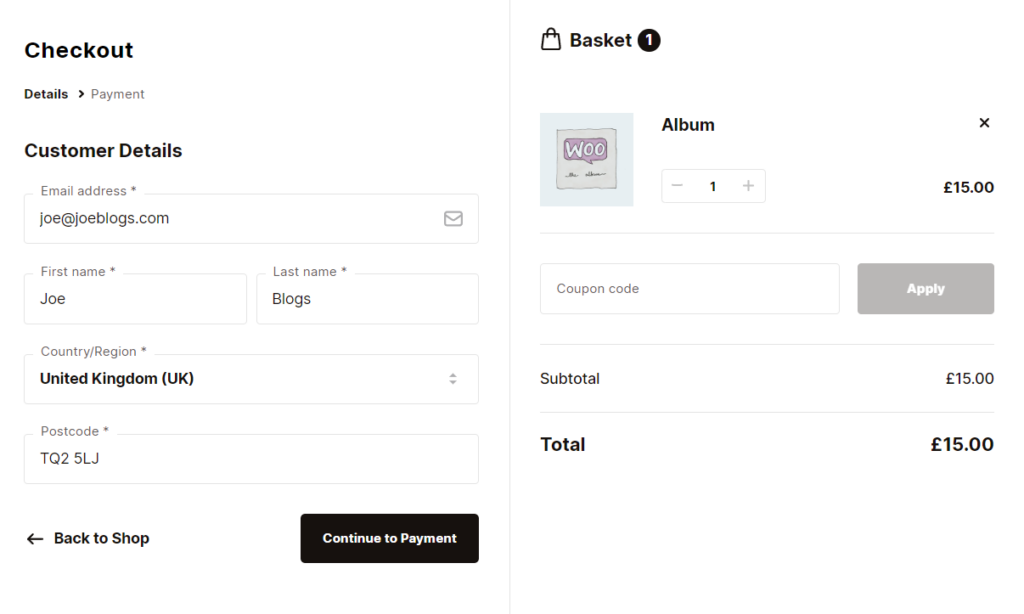
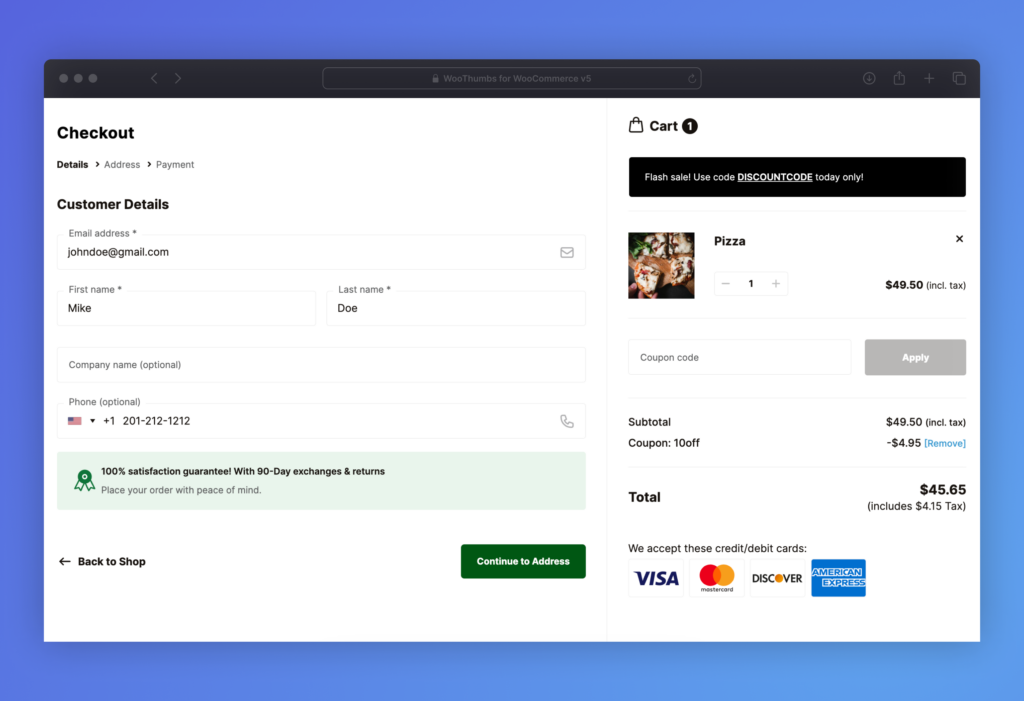
Flux Checkout is designed to upgrade each aspect of your WooCommerce checkout to minimize checkout abandonment. To begin with, it replaces your default WooCommerce one-page checkout with a multi-step checkout.
Flux Checkout fully supports account creation/sign-in and guest checkout settings. Once you set them up, they will adopt Flux’s user-friendly and uncluttered checkout design. The account creation setting will be presented as a checkbox and the account creation fields will be hidden until the customer clicks on this checkbox.
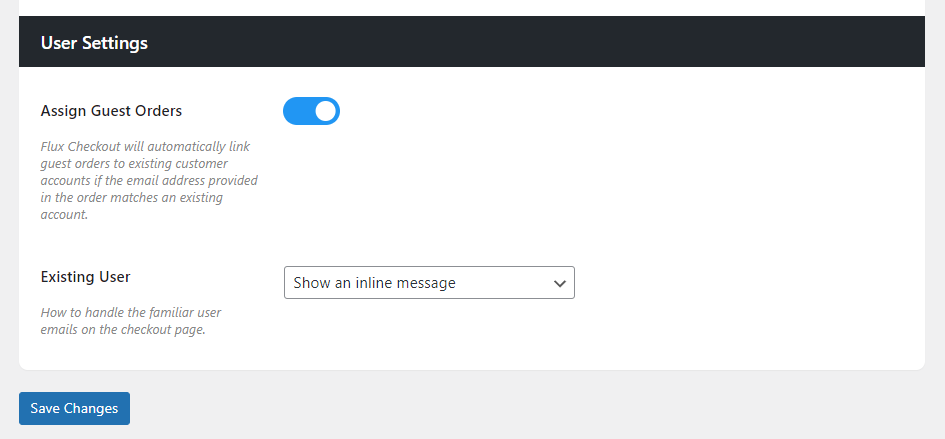
On top of that, it has additional settings that improve the guest checkout option, such as:
- Assign Guest Orders – Customers with an account can check out as guests. With this option enabled, guest orders can be assigned to existing customer accounts if the email address provided matches an existing account.
- Existing user – When you allow ‘Assign Guest Orders,’ you can use this setting to display a message asking customers to log into their account when they provide an email that matches an existing account.
With these settings, Flux Checkout for WooCommerce enables you to improve the user experience for your customers regardless of the checkout option they choose.
Flux Checkout for WooCommerce
Flux Checkout transforms the default WooCommerce checkout into one that’s lightning-fast, distraction-free, and reduces checkout abandonment.
Step 3: Enter the billing address
In this step, the customer will enter the address details associated with their payment method. This can be the street address, city, state, postal code, etc. This information will be used to verify that the customer is the legitimate account owner that will be used to make the payment.
Customers expect this step to be simple and secure as they will share their details with your ecommerce website.
The benefits of making the billing address step secure and simple
? In a recent cart abandonment study, 18% of customers revealed that they abandoned their carts because they didn’t trust the ecommerce site with their credit card information.
Securing your ecommerce site gives your customers peace of mind. They will trust your ecommerce business with their information and be more at ease with sharing it with you. This helps to minimize the number of carts abandoned because an online store is unsecured.
At the same time, making this process user-friendly allows customers to provide accurate billing information. This is essential for a successful purchase.
How to make entering the billing address secure and simple
You can secure your ecommerce website by ensuring it has an SSL certificate. An SSL certificate ensures that hackers can’t intercept the customer’s information as they share it with your website. Getting an SSL certificate is quite easy, and most reliable WordPress hosting providers provide it for free.
Customers shop online because it is easier than going to the store. So let’s make it easy for them. To do this, you can leverage Flux Checkout’s address autocomplete feature.
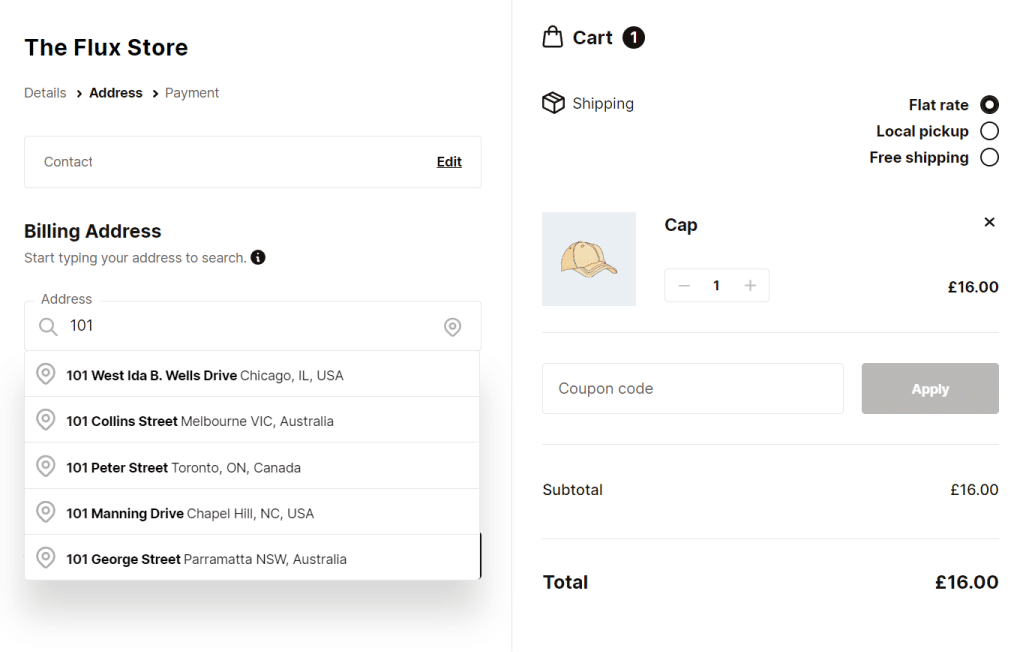
Save customers time with Flux’s Address Autocomplete
The ‘entering billing address’ step requires customers to fill out several fields. Flux Checkout allows you to improve their experience by auto-filling these fields for them. As soon as they start typing their address, Flux will generate several close matches for their address.
All they’ll have to do here is select their specific address from the ones Flux generates and the rest of the address fields will be filled for them.
This not only improves their checkout experience but also ensures that there are no billing errors that result from customers providing the incorrect address.
Flux Checkout for WooCommerce
Flux Checkout transforms the default WooCommerce checkout into one that’s lightning-fast, distraction-free, and reduces checkout abandonment.
Step 4: Selecting shipping method and providing shipping information
Customers will select their preferred shipping method from the shipping options you provide in this step. Then, they will provide the address where the order will be delivered (the shipping address).
As expected, providing the shipping address is optional for customers who select the in-store pickup shipping method. Also, this whole step is unnecessary if customers buy virtual products like e-books.
What is the benefit of simplifying this step?
The process of providing shipping information can be long and complicated since there are several fields that customers need to fill in.
? We don’t want that since studies show that 18% of customers abandon their carts because of a long and complicated checkout process.
You can massively improve customer experience at checkout by simply taking the work out of filling in these fields. By doing this, you’ll also save customers time. This is especially important for busy customers or those in a hurry. The result? A quick and easy checkout can lead to higher conversion rates.
How to simplify entering shipping information
Flux Checkout’s built-in features take the work out of entering shipping information, making this process more user-friendly. First, its address autocomplete feature comes in handy in saving customers time as they fill in their shipping addresses. They only have to start typing their address and Flux will fill out the rest of the fields for them.
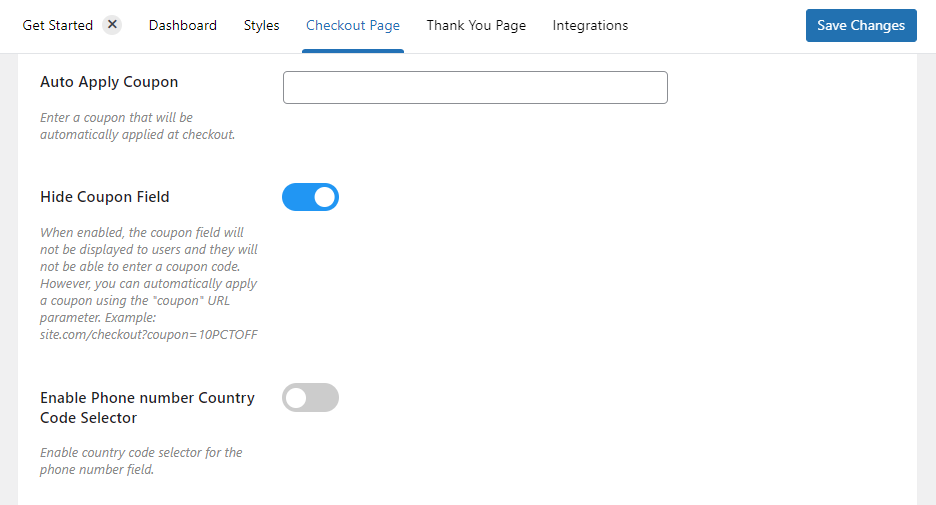
Apart from address autocomplete, Flux allows you to simplify your checkout flow by optionally reducing the number of unnecessary additional fields. You can remove fields such as Company Name, Coupon Code, and Separate Street Number when they’re not needed.
With this setting, you can keep your checkout page free from clutter and distractions to allow customers to focus on completing the checkout.
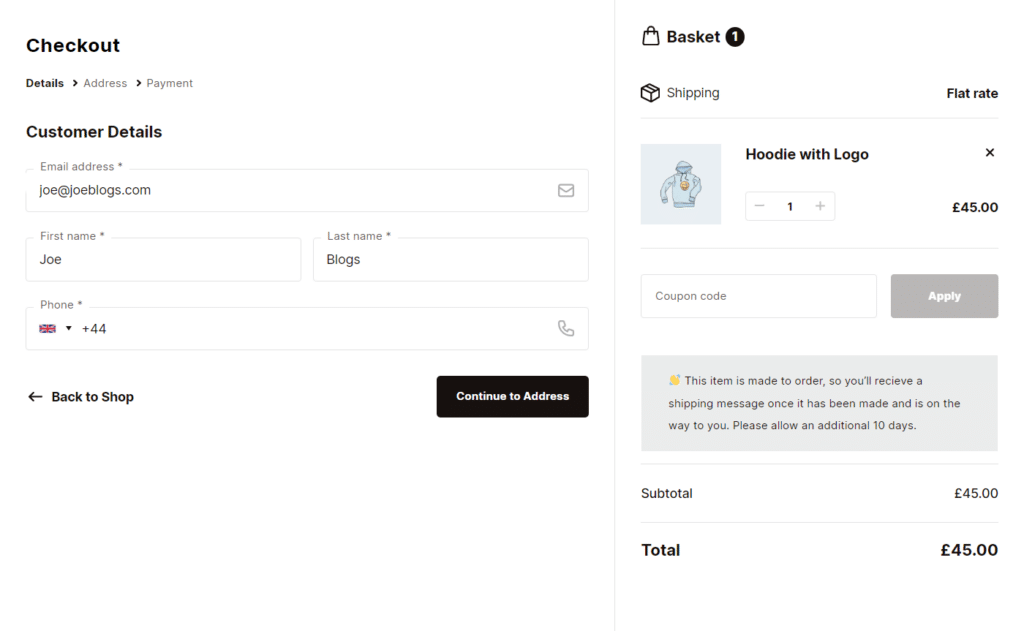
Flux Checkout also allows you to create conditional messages that appear depending on the items or amount in the customer’s cart. Let’s say you want to display specific shipping messages or notifications for different product categories, you can do so with Flux Checkout and display them anywhere in the checkout process.
Flux Checkout for WooCommerce
Flux Checkout transforms the default WooCommerce checkout into one that’s lightning-fast, distraction-free, and reduces checkout abandonment.
Step 5: Order preview
Before a customer pays for their order, they will verify the details of their purchase in the order preview step. This includes the specific items, their quantities, unit prices, and extra costs like shipping, taxes, etc.
Why should you make the order preview available to customers when they need it?
You should prioritize making the order preview available to customers when they need it because research shows that:
- 47% of customers abandon their carts if extra costs are too high.
- 17% of customers abandon their carts when they can’t see or calculate the total cost of the order upfront.
These numbers show that customers value transparency when it comes to costs. The earlier you display shipping charges in the order preview, the better.
Customers don’t like checkout surprises, and displaying the order preview as early as possible can help you avoid surprising them with additional costs. This will help you minimize cart abandonment.
Showing customers a summary of their orders early helps them to correct the mistakes they might have made while shopping. This reduces the likelihood of ordering errors and the need for returns or exchanges.
How to improve the order preview and make the most of it
Despite being one of the final steps of the checkout flow, you should not overlook the order preview. You can improve this step for your customers by making the order summary available throughout the checkout. This will remind customers of the items they’ve selected in their order.
Ensure you clearly state shipping costs, taxes, and other additional fees upfront. This information should be available to customers as early as possible. For instance, you can show shipping costs when customers provide their shipping address.
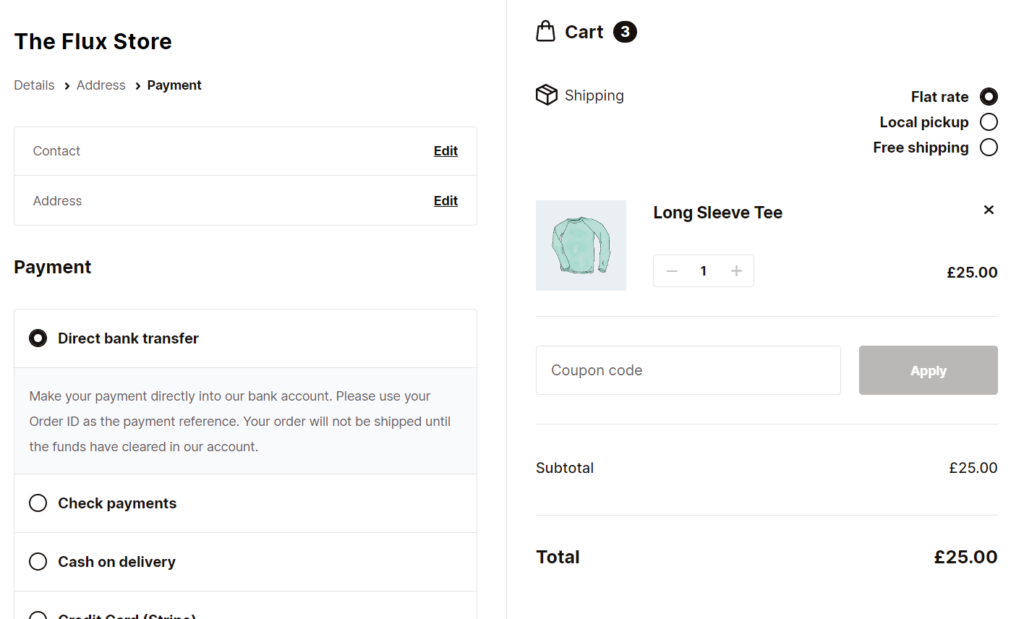
Show customers the order summary throughout the checkout with Flux Checkout
Flux Checkout’s built-in design allows you to display the order summary with the additional fees throughout the multi-step checkout process. Users checking out on desktop devices will see the order preview and the checkout steps displayed side-by-side.
On the other hand, the order summary will be available to mobile users in a collapsable menu. This way, it won’t get in the way as customers complete the checkout. Whether customers checkout using desktop or mobile devices, they will access the order summary when needed.
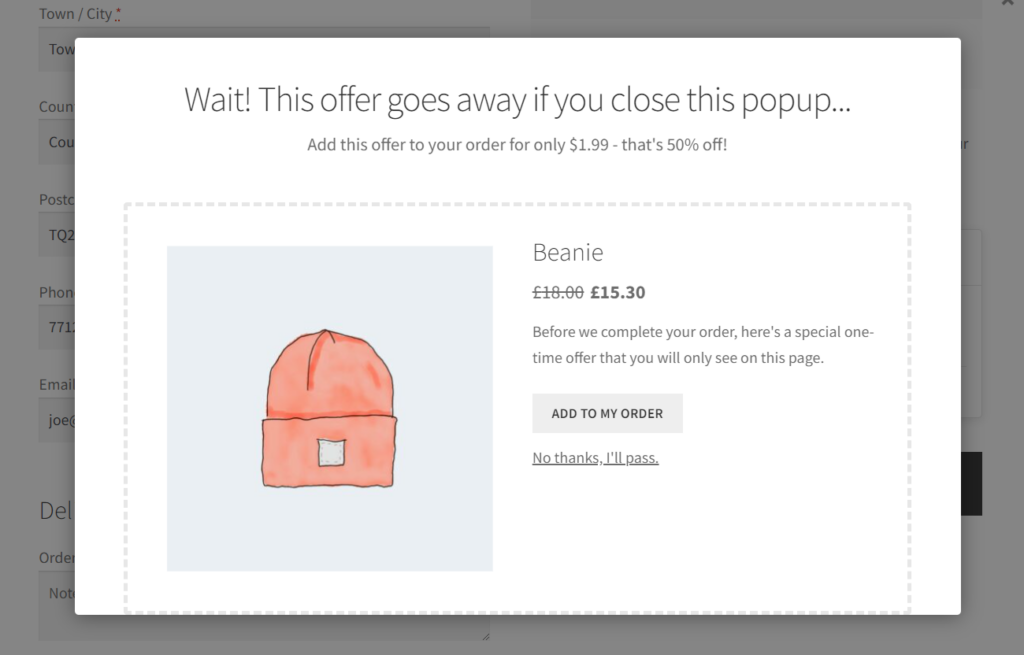
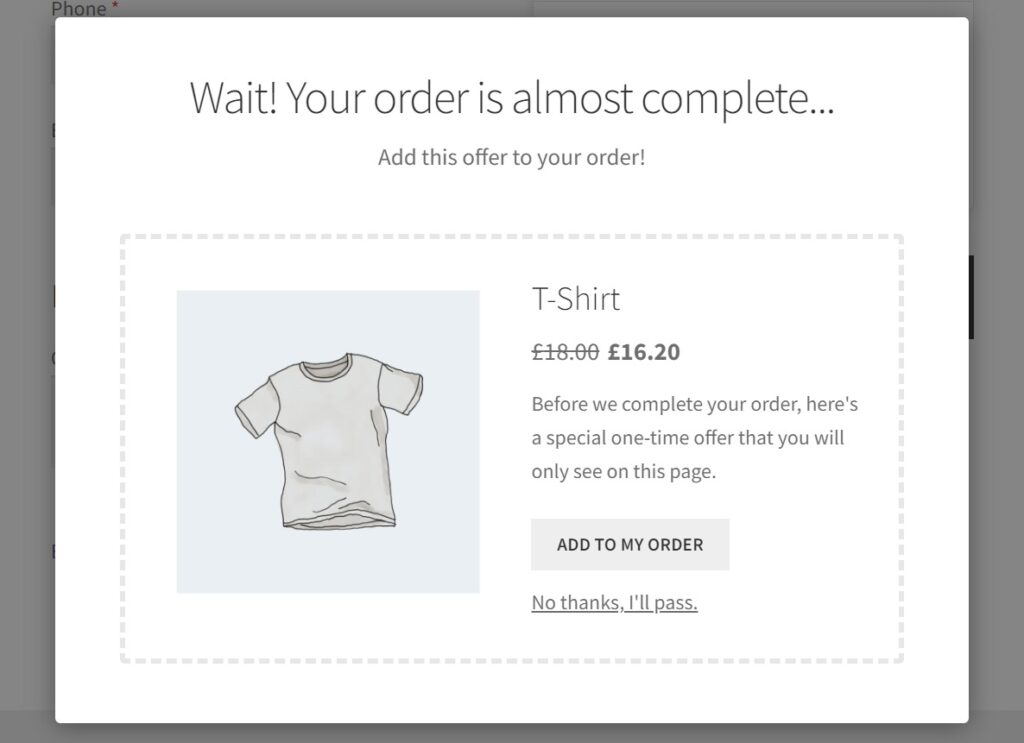
Pitch an order bump as customers review their orders using Iconic Sales Booster
With Iconic Sales Booster for WooCommerce, you can display an irresistible offer in a popup just as customers are about to complete the checkout. The offer will be based on the items in the customer’s cart, increasing the chances of making a sale.
To deliver a smooth and uninterrupted experience, Sales Booster will allow customers to add this offer directly to their orders. They won’t have to leave the checkout page. With order bumps at checkout, you can maximize your average order value.
Iconic Sales Booster for WooCommerce
Add cross-selling to your entire WooCommerce store in minutes with Iconic’s WooCommerce cross-sell plugin, Iconic Sales Booster for WooCommerce.
Step 6: Select the payment method and confirm payment
In this step, customers will first select their preferred payment method from the ones you’ve included. Then, they will enter the details of their accounts and confirm payment for the products in their carts. Customers would prefer to use their favorite payment method here.
The benefit of including customers’ preferred payment option
This is perhaps the most important step for you as the store owner because here is where money exchanges hands, and you get revenue.
It is important to provide various payment options, allowing customers to use their preferred options. This makes your checkout process more convenient and user-friendly as it caters to different customer preferences and payment habits.
When customers find their preferred payment option here, they will have no problems completing their purchase. As a result, providing various payment options can directly increase conversions.
However, if you have limited payment options, you risk increasing cart abandonments at this stage of the checkout.
? According to research, 9% of customers will abandon the checkout process when they don’t find their preferred payment option. Fortunately, you can avoid this by simply including a variety of payment options.
How to include multiple payment options in WooCommerce
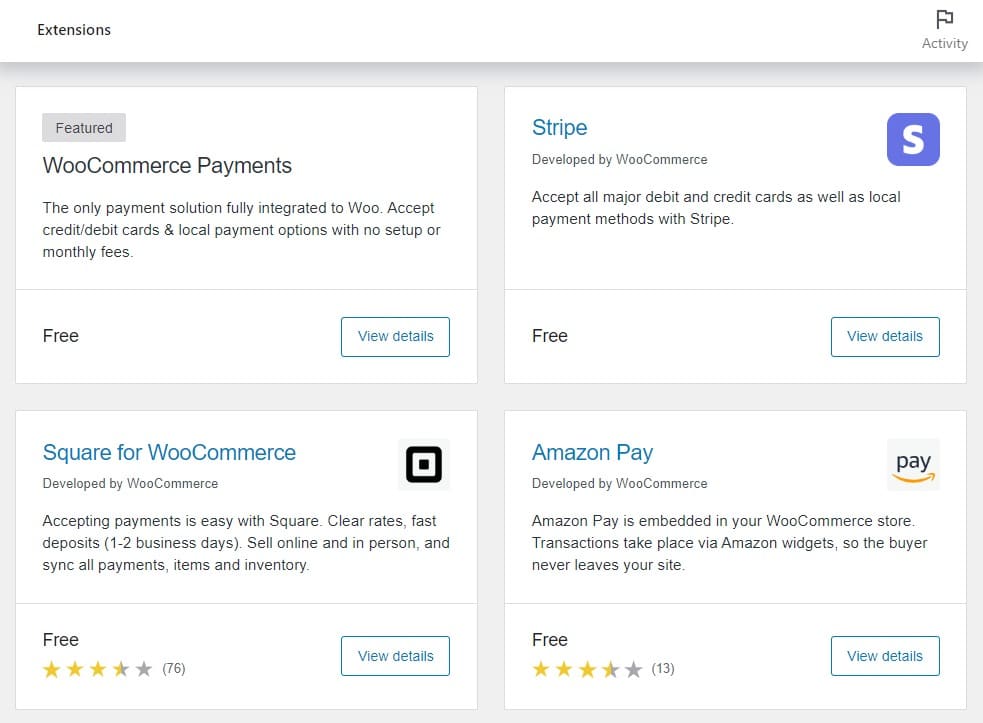
To make it easy for customers to complete their purchases, provide popular mobile payment options such as Amazon Pay, PayPal, Apple Pay, etc., together with credit cards. Adding these options to WooCommerce is pretty easy.
First, create a business account with these payment providers. Then, install their corresponding plugins on your WordPress site. Most of these payment gateways have dedicated WordPress plugins that are free of charge.
Finally, you’ll need to connect your account with the plugin to start accepting payment through these payment gateways.
Add trust signals to accompany your payment methods
With Flux Checkout for WooCommerce installed on your WordPress site, you’ll also be able to add trust signals that allow customers to see the type of payment methods you accept.
These icons or images can be created by you and displayed anywhere in your checkout process steps to encourage customers to checkout.
Take this one step further and include security trust seals and any other bodies you’re registered with to establish trust.
Cross-sell to customers post-purchase with Iconic Sales Booster
As a last-ditch effort to get a sale, Iconic Sales Booster allows you to display a cross-sell right after a customer has completed a purchase. You can create special offers (for example, 50% off) to entice customers to add these product recommendations to their purchases.
Just like order bumps at checkout, customers can add this cross-sell directly to their existing order without re-entering their payment information.
Sales Booster allows you to customize each element of the offer text to make it more appealing to your customers. This high-converting technique will boost your AOV even after customers have completed a purchase.
Iconic Sales Booster for WooCommerce
Add cross-selling to your entire WooCommerce store in minutes with Iconic’s WooCommerce cross-sell plugin, Iconic Sales Booster for WooCommerce.
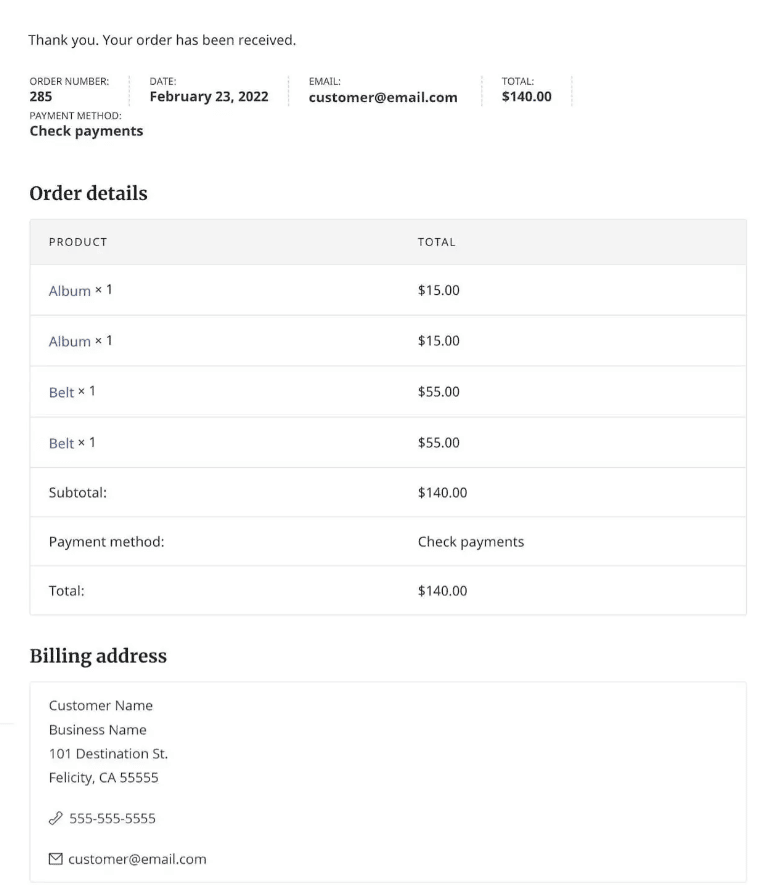
Step 7: Order confirmation/thank you page
The checkout process doesn’t simply end after the customer has completed their purchase. It extends to the order confirmation page after the customer has paid.
On this page, customers expect a confirmation message showing they’ve received their order, the order summary, and the estimated delivery date.
The benefit of improving the order confirmation page
Since the customer has completed the purchase at this stage of the checkout flow, improving the order confirmation page is meant to encourage them to make repeat purchases and become loyal to your brand.
When you improve this page and make it more user-friendly, it adds to your customer’s overall checkout experience. This great experience might just keep them coming back to shop with you over and over again.
This way, improving your order confirmation page will increase your customer’s lifetime value (CLV).
How to upgrade your WooCommerce order confirmation page
If you’re going for a user-friendly order confirmation page, the default WooCommerce setup doesn’t cut it. Thankfully, Flux Checkout for WooCommerce has you covered here as well.
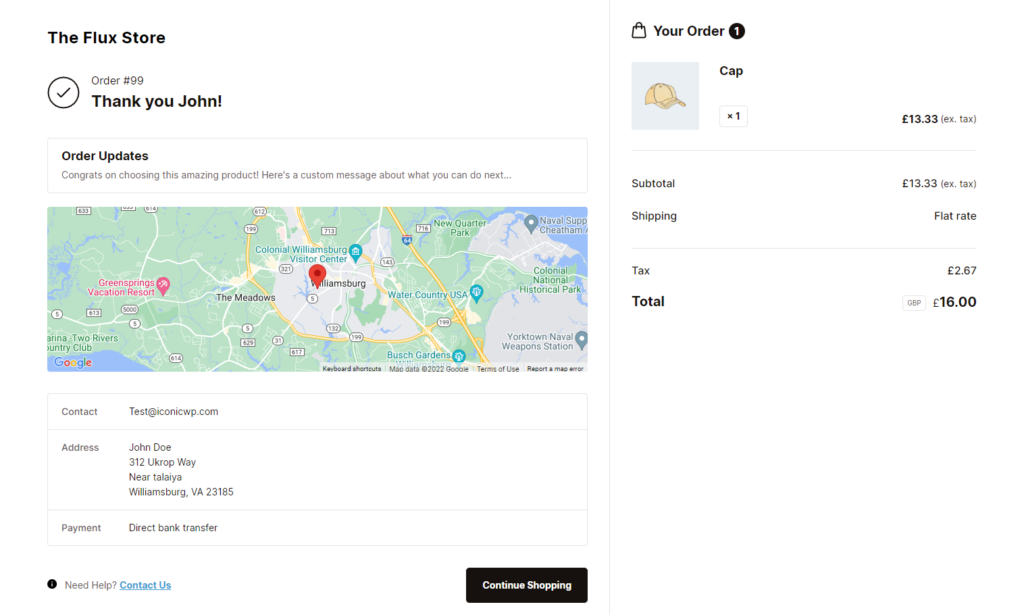
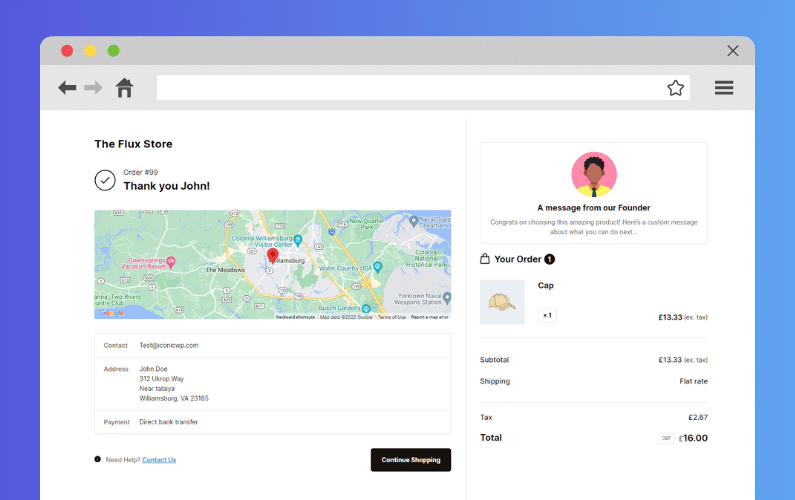
With Flux, you can create a user-friendly, visually appealing order confirmation page to replace the default WooCommerce ‘Thank You’ page.
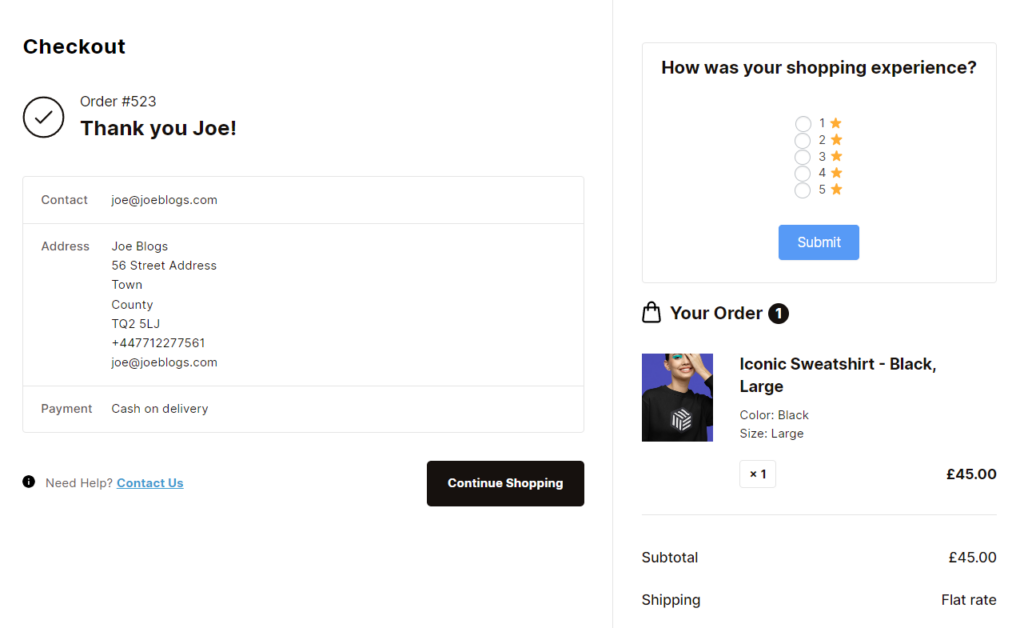
This plugin upgrades each element of the order confirmation page in the following ways:
- It improves the layout design by arranging the order summary and customer details neatly in boxes side-by-side.
- It highlights the important parts of this page, including the order summary, order updates, etc., allowing customers to confirm these details at a glance.
- It also displays product image thumbnails for each item to enable customers to confirm this information quickly.
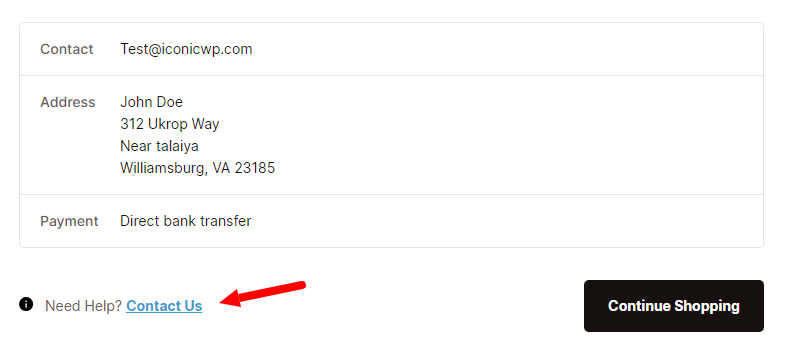
You can also add a ‘Contact Us’ button that leads customers to your contact pages. They can use this to reach out if they face any issues post-purchase.
To top it off, Flux’s order confirmation page has a custom content section.
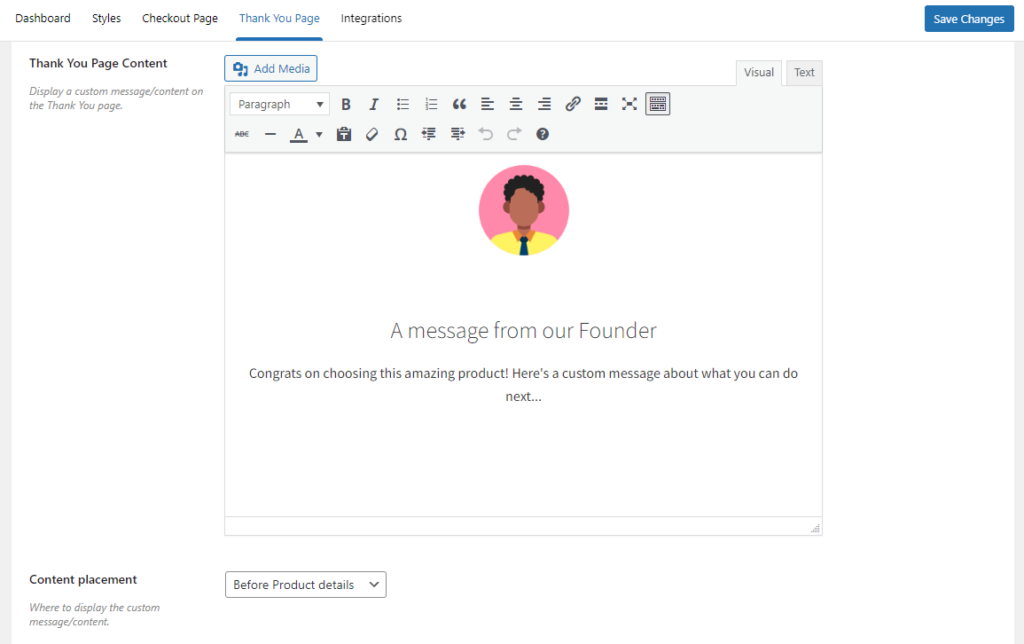
You can use this to add content that encourages your customers to continue engaging with your business, for example:
- Links to your social media accounts or community forums.
- A coupon code.
- A video that shows how you work behind the scenes.
With these features, Flux helps to improve the post-purchase experience for your customers. This could improve your customer retention rate and foster customer loyalty.
Flux Checkout for WooCommerce
Flux Checkout transforms the default WooCommerce checkout into one that’s lightning-fast, distraction-free, and reduces checkout abandonment.
Improve your checkout process steps today
Improving your checkout process steps is of utmost importance to you as the store owner. Doing so helps you encourage more customers to complete their purchases and you’ll make more sales.
You can improve your overall checkout process steps by leveraging the strategies discussed in this guide.
If you want to make every one of the improvements discussed in this guide with little effort, you can do it with the help of these plugins:
- Flux Checkout for WooCommerce – Upgrade your checkout process at each step.
- Iconic Sales Booster for WooCommerce – Cross-sell to customers just before the checkout, during this process, and after customers have completed it.
WooCommerce Conversions Bundle
Increase your WooCommerce store’s conversion rate and watch your revenue skyrocket. Includes Sales Booster, Flux Checkout, and WooThumbs.

Gina Lucia is our in-house Content Manager at Orderable. She writes articles, user guides, technical documentation, and creates videos on everything WooCommerce and Orderable.
Gina has been working in the WordPress/WooCommerce space since 2012 when she developed WordPress websites for clients large and small.
For the past 8 years, she’s been writing about everything WordPress and WooCommerce, becoming an expert in what makes a WooCommerce store succeed.
When not writing, Gina loves to tend to her vegetable garden, read, or travel to mainland Europe.