
Are you looking for ways to improve your ecommerce checkout process? This guide is here to help.
In this guide, we’ll share what a successful checkout process looks like and help you improve yours in just a few steps.
Here’s what we’ll explore:
- What a good ecommerce checkout process looks like.
- Why improving your checkout experience will benefit you.
- How to improve your checkout process in just 5 steps.
Flux Checkout for WooCommerce
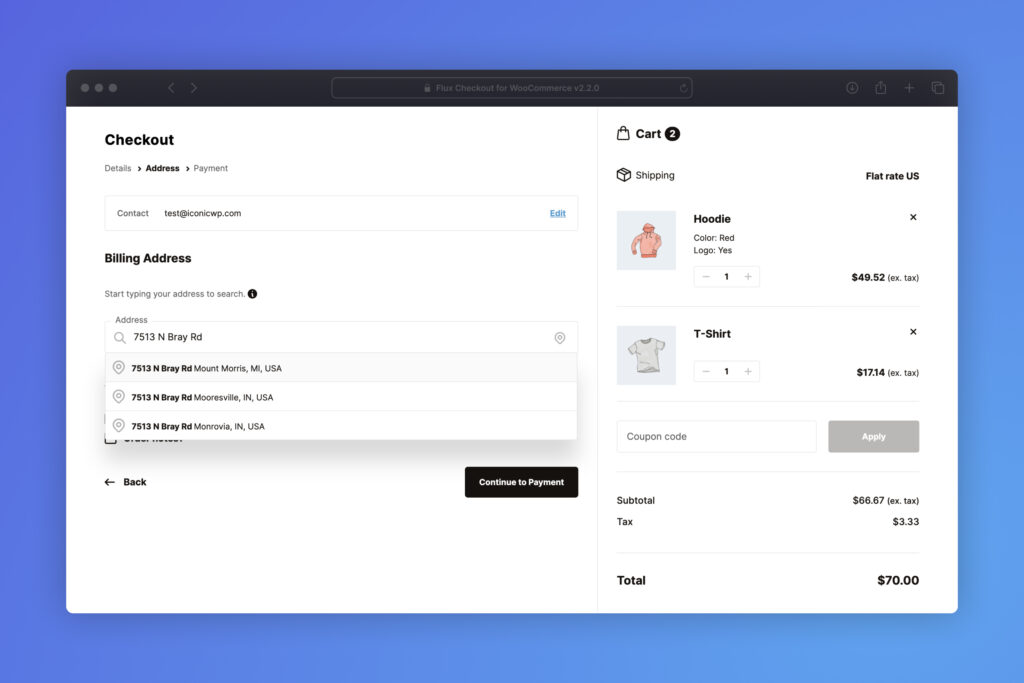
Flux Checkout transforms the default WooCommerce checkout into one that’s lightning-fast, distraction-free, and reduces checkout abandonment.
What does a good ecommerce checkout process look like?
An effective ecommerce checkout process should be simple, direct, and focused on customer experience. It should guide your customers through each checkout step. From the moment they begin the process to that final, satisfying click of confirming their purchase.
Each stage should have crystal-clear instructions, telling your customers exactly what to do to proceed to the next. When your customers find navigating your checkout process easy, they’re far more likely to click the ‘complete order’ button.
What is a checkout process?
The checkout process(or checkout flow) consists of a series of steps a customer takes to complete a purchase on your ecommerce site.
This process starts when a customer adds an item(s) to their shopping cart and is ready to pay. Each stage guides your customers until the final step of payment confirmation.
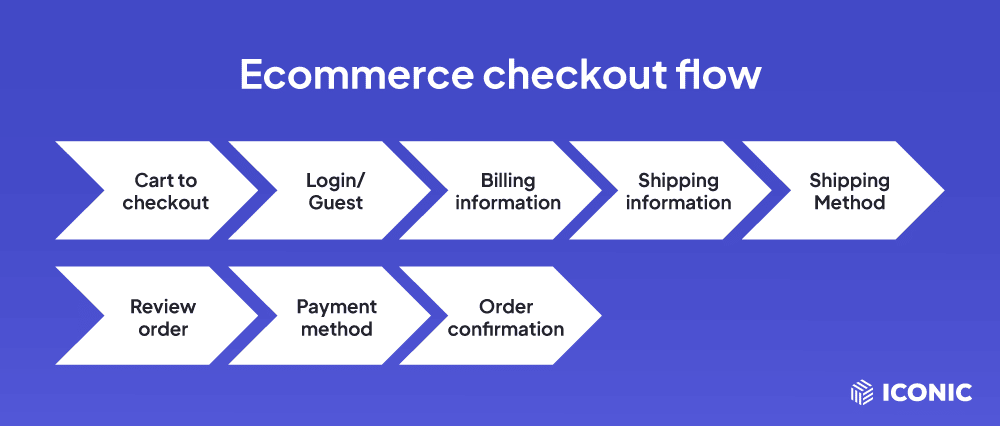
Steps to a good ecommerce checkout flow
- Proceed to checkout. When customers are satisfied with their cart contents, they’ll click the ‘Proceed to Checkout/Buy Now’ button to start the checkout process. The next step is landing on the ecommerce checkout page.
- Optional login/sign-in or guest checkout. You can ask customers with an account to log in at this stage. Those who don’t have accounts can choose to create new ones. Alternatively, customers who prefer not to do this can select the guest checkout option.
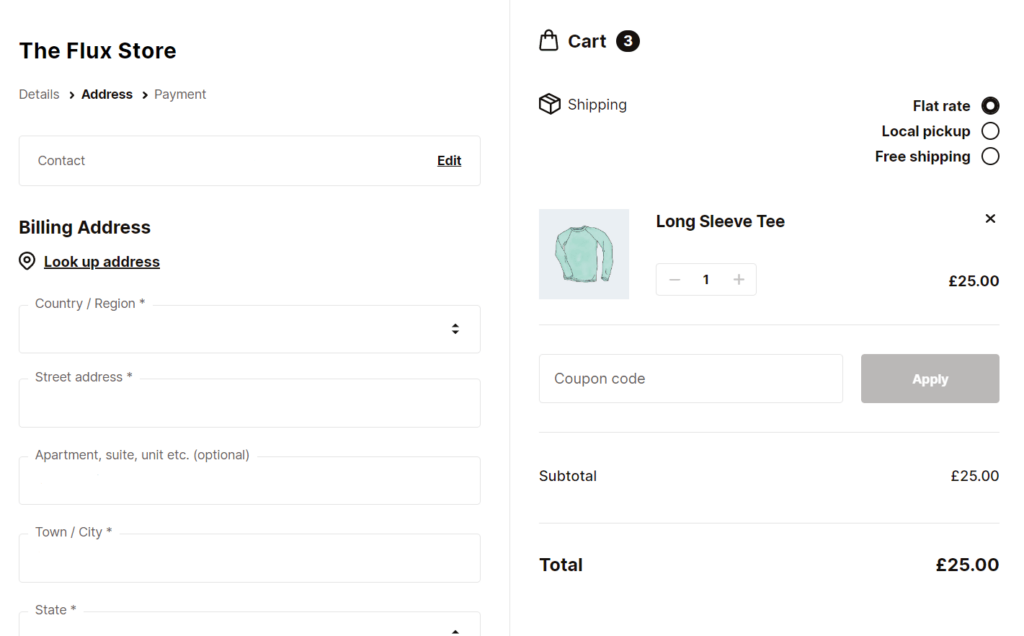
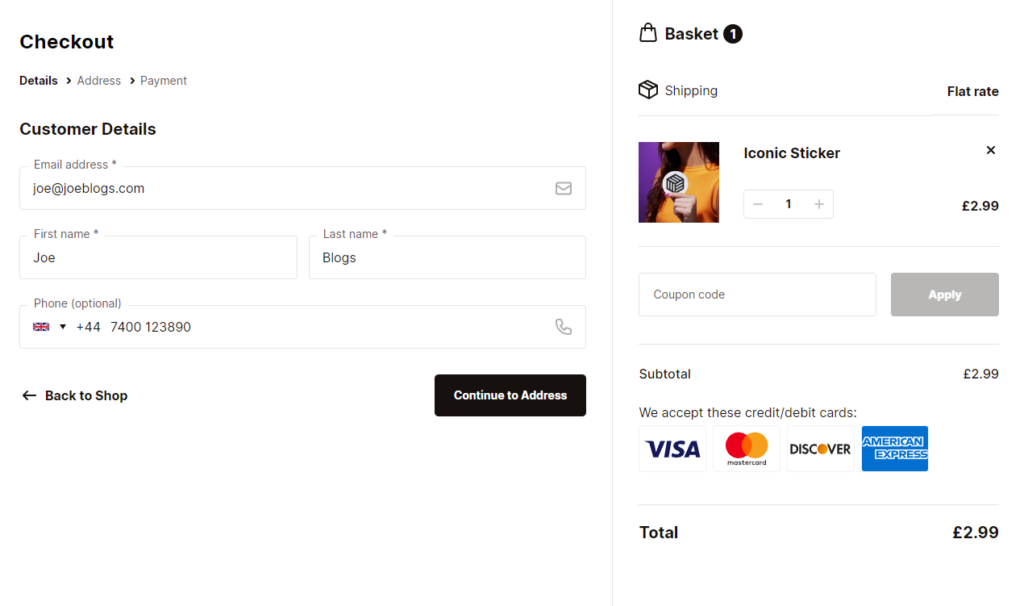
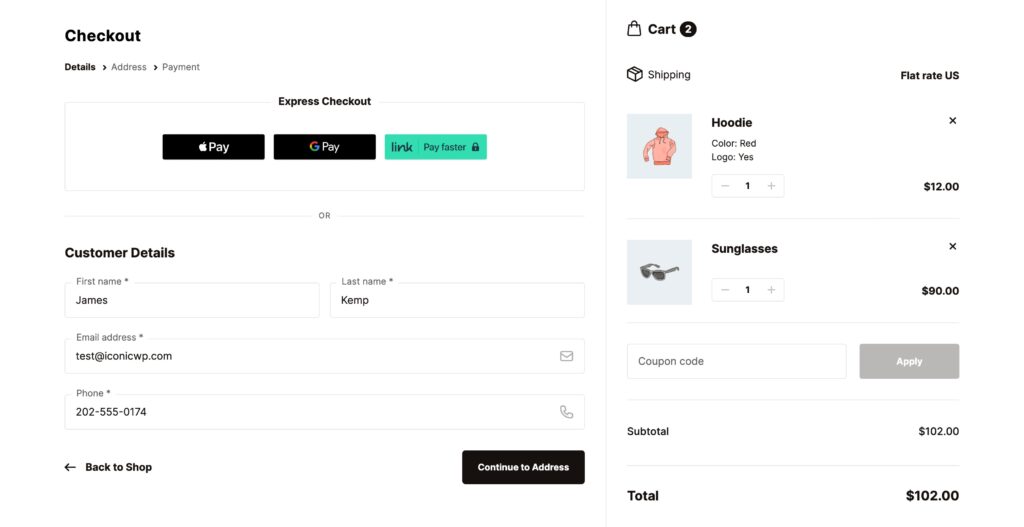
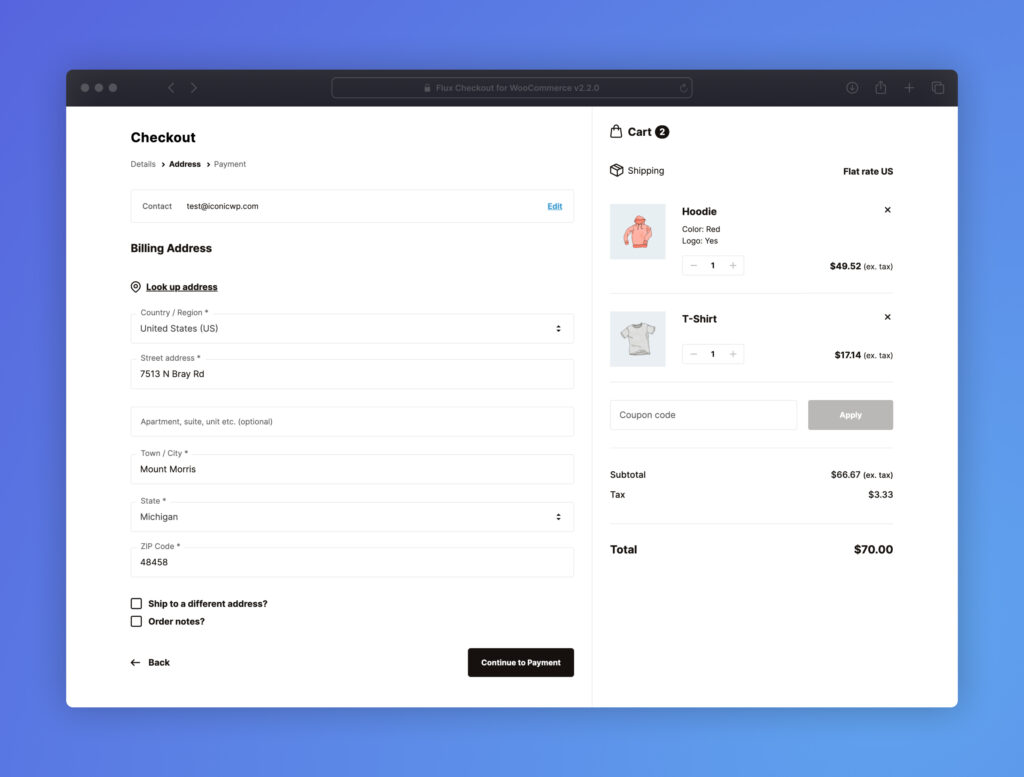
- Enter customer information. This is where you collect the customer’s billing address and shipping address. Most ecommerce stores separate this stage into two parts to allow your customers to enter their billing and shipping information separately. The customer will also add other information like their phone number and validation information.
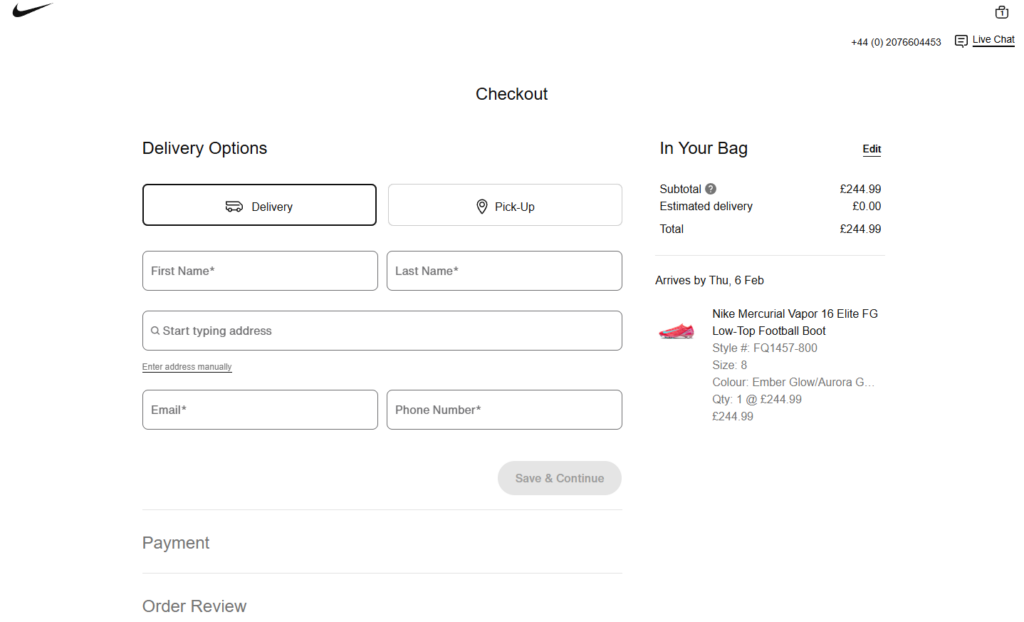
- Select a shipping method. Here, customers can select their preferred shipping method, such as delivery or in-store pickup.
- Order overview. Customers can review their order details, which include selected items, quantities, unit prices, shipping costs, taxes, and more. This section typically allows customers to enter coupon or promo codes and may also display upsells or cross-sells.
- Select a payment method and confirm an order. At this stage, customers select their preferred payment method, such as a credit or debit card, a wallet like PayPal, Apple Pay, or another provider. If they select a credit card as their payment option, they will also enter other payment information, such as card details.
- Order confirmation or thank you page. After the payment is completed, the checkout process leads to the order confirmation page. On this page, you can display a message confirming receipt of the order, along with a summary of the order and the estimated delivery date.
These stages may vary slightly depending on the specific ecommerce store, but they generally cover the essential steps of a checkout process.
Now we know the stages of a checkout flow let’s look at what a good checkout process looks like.
What does a good checkout process contain?
A good checkout process should contain the following key components and best practices that make it effective:
- Simplicity. Keep the checkout process quick and easy for customers. This means fewer fields, a multi-step process, and automatic form filling.
- Guest checkout. Offer a guest checkout option for customers who do not wish to create an account.
- Transparent pricing and directions. All costs, including shipping and taxes, should be disclosed upfront. Clear directions and progress indicators should also be provided throughout the checkout process.
- Order confirmation. Provide a detailed order confirmation page with a thank you message, order details, payment information, and shipping methods.
We’ll go through each of these in more detail below.
Simplicity
Customers should be able to get through your checkout process as quickly and as easily as possible.
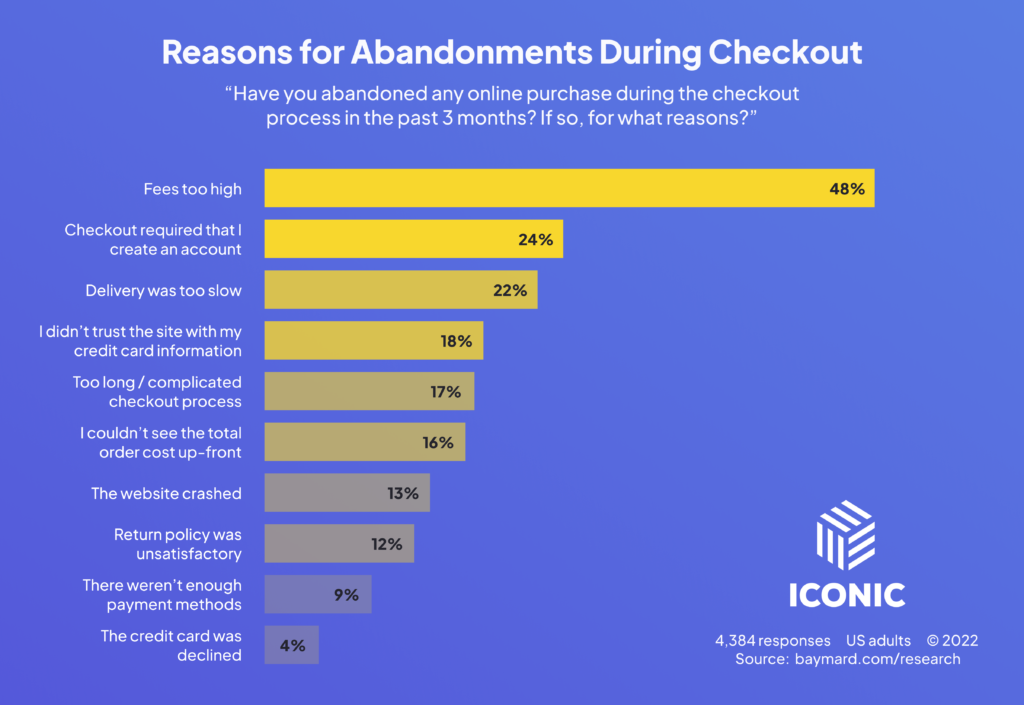
This way, they won’t change their minds about buying from you, as 17% of customers are ready to abandon their carts when they encounter a complicated checkout process.
There are a few things you can do to simplify your checkout flow, including:
- Introducing a multi-step checkout to guide the customer through this process.
- Minimize the number of steps required to complete a purchase.
- Reduce form fields and use only the necessary ones.
- Allow your customers to save their information for future purchases. This will improve the experience of repeat buyers.
A straightforward checkout will enrich your customers’ checkout experience and help them make their purchases hassle-free.
A Guest checkout option
Not every customer wants to create an account before completing a purchase in your online store. Customers who are making a one-time purchase or those who are conscious about sharing their information will prefer to get through their ecommerce journey without creating an account.
A study conducted by the Baymard Institute revealed that 24% of customers would abandon their carts if forced to create an account.
A guest checkout solves this problem for you by catering to customers who prefer not to create an account in your store.
Visible progress indicator
Incorporating a multi-step checkout page into your ecommerce site will usually include a progress indicator, bars, or steps.
A progress bar shows customers where they are in the checkout process and how many steps remain. This can help you reduce anxiety and keep customers engaged and motivated to proceed with their purchase.
Security badges
Today, customers are more concerned about data privacy and cybersecurity. 18% of customers will abandon the checkout process if they don’t trust an ecommerce site with their credit cards.
At this stage, prominently display security badges or trust signals, such as SSL seals and trust seals. This will make your customers feel more secure and reassured, and they will be more willing to share their details without concerns about data loss.
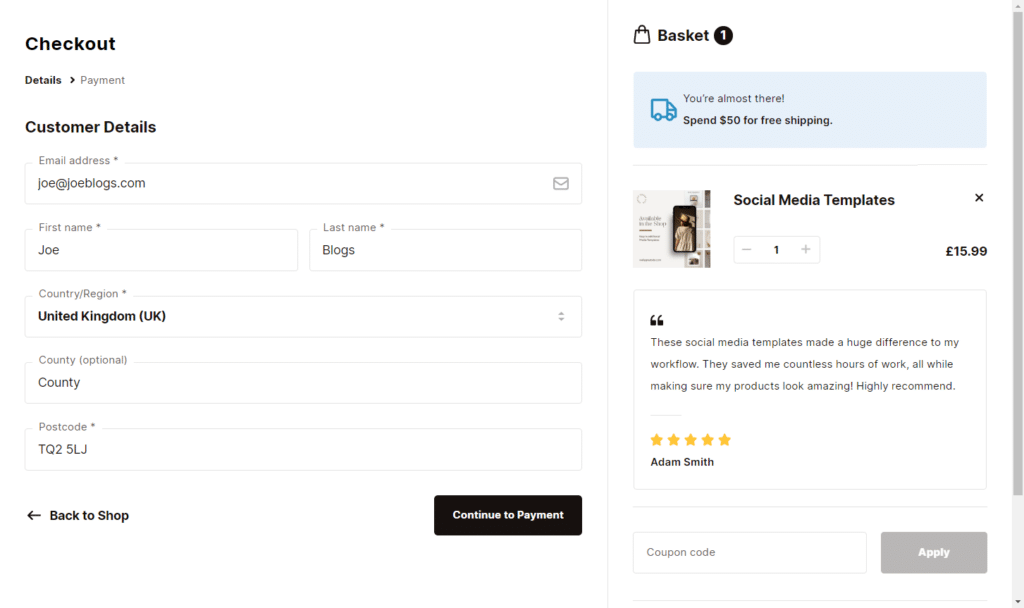
Additional trust signals like customer testimonials and reviews could also be used at this stage to solidify the customer’s intent to buy.
Security and privacy compliance
Beyond trust badges, it is essential to follow security and privacy standards. SSL encryption protects data during transactions, and PCI DSS ensures payment details are handled securely. GDPR and CCPA give customers control over their personal information. Multi-factor authentication (MFA) adds extra security by requiring more than a password.
Highlighting these protections on your checkout page builds trust. A simple statement or dedicated section can reassure customers that their data is safe. This not only increases conversions but also keeps your business compliant with regulations.
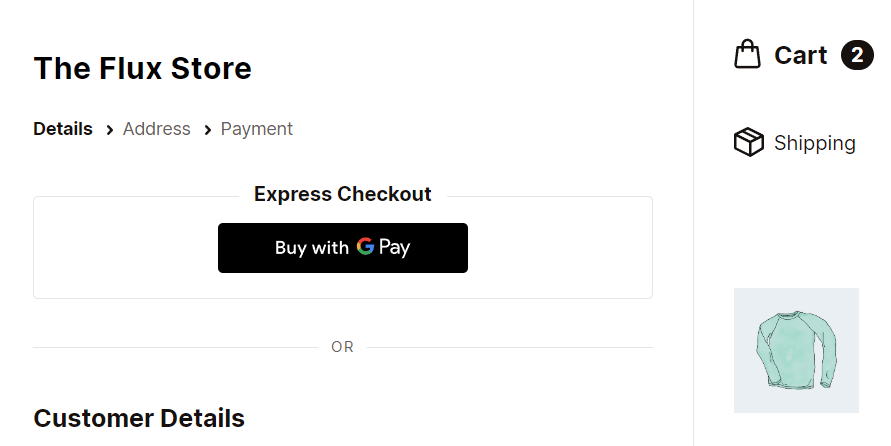
Multiple payment options
Different customers prefer different payment options. Some are comfortable using mobile payment options like Amazon Pay, Stripe, PayPal, and others, while others might prefer direct bank transfers or credit cards.
You should offer a variety of payment options to accommodate various customer preferences. This will ensure you don’t lose customers because your preferred payment option is unavailable.
Beyond traditional options, consider emerging payment methods. Buy Now, Pay Later (BNPL) services like Klarna and Afterpay are becoming more popular, especially for higher-value purchases. Cryptocurrencies and local payment solutions can also appeal to specific customer segments. The more flexible your payment options, the smoother the checkout experience.
Transparent pricing
Be upfront about all costs, including shipping and taxes, in your ecommerce business. Nobody likes surprises, especially when they involve extra charges. Unexpected costs are one of the major causes of cart abandonment.
According to Saleslion, unexpected costs contribute to 60% of carts being abandoned.
Being upfront about all costs builds trust and prevents frustration. Clearly display shipping fees, taxes, and any additional charges early in the process. This helps customers make informed decisions and reduces the risk of them leaving before completing their purchase. Transparency not only improves conversions but also sets clear expectations.
Easy form filling
Use auto-fill features where possible, and only ask for the necessary information to speed up the checkout process. This may also be useful when customers return to shop online with you. They won’t have to re-enter most of their billing and shipping details.
Include an order summary
An order summary allows you to show customers:
- The items they’ve selected and the quantity of each item.
- Taxes applied, VAT, shipping costs, unit prices, total prices, and more.
In this section, you want to provide a detailed breakdown to allow customers to confirm everything is in place before purchasing. This will help customers to have peace of mind.
Flexible shipping
Like with multiple shipping options, you should provide different shipping options for your customers.
In-store pickup or local deliveries should be made readily available to local customers. You can also offer express shipping for customers willing to pay more for faster delivery.
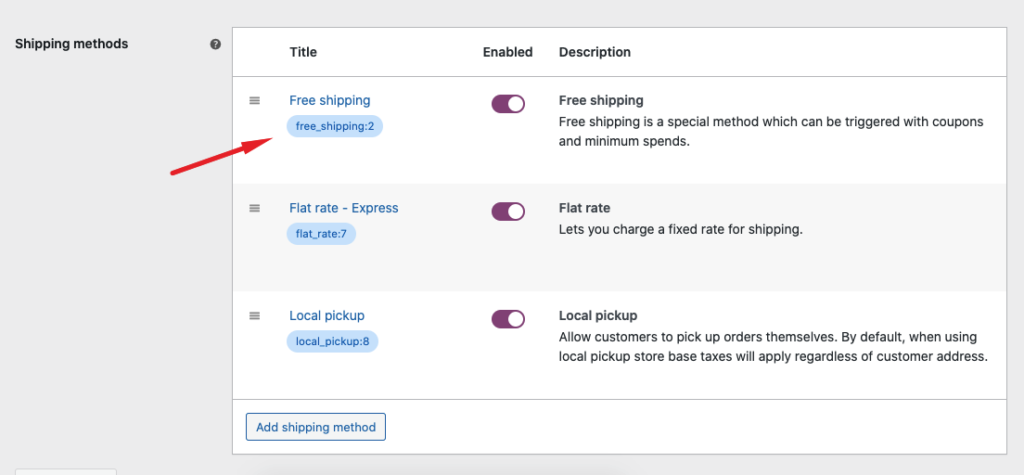
However, the shipping methods you choose will depend entirely on your delivery capacity and the services you use to do it.
Responsive design
More people are shopping on their mobile devices than ever before. In 2022, 58% of all online purchases were completed on mobile, which is expected to grow. If your ecommerce site isn’t mobile-friendly, you risk losing a significant share of potential customers.
Optimizing your checkout process for mobile users goes beyond making your site responsive. Page load speed is a crucial factor – slow-loading pages frustrate users and lead to abandoned carts. Compressing images, using efficient code, and enabling browser caching can help improve performance.
Another key challenge is effectively presenting information on smaller screens. Mobile checkouts should be clean and clutter-free, with large buttons and auto-filled fields to streamline the process.
Avoid forcing users to zoom or scroll excessively. Prioritize essential details like payment options and shipping costs upfront.
Clear CTAs
Always ensure that your call-to-action buttons, such as “Proceed to checkout”, “Buy Now”, “Continue to Payment” or “Place Order”, are clear and prominent.
When your CTA buttons are properly labeled, customers will know when to proceed to the next checkout step. In addition, they can tell what the next step is all about.
Checkout without distractions
It’s also important that you have a distraction-free checkout experience for your customers. This involves completely removing header, footer, or sidebar links and navigation that could divert potential customers from the task at hand – to complete their purchase.
You can save additional information or promotional content for the order confirmation or thank you page. Customers can look at this after they’ve completed the purchase.
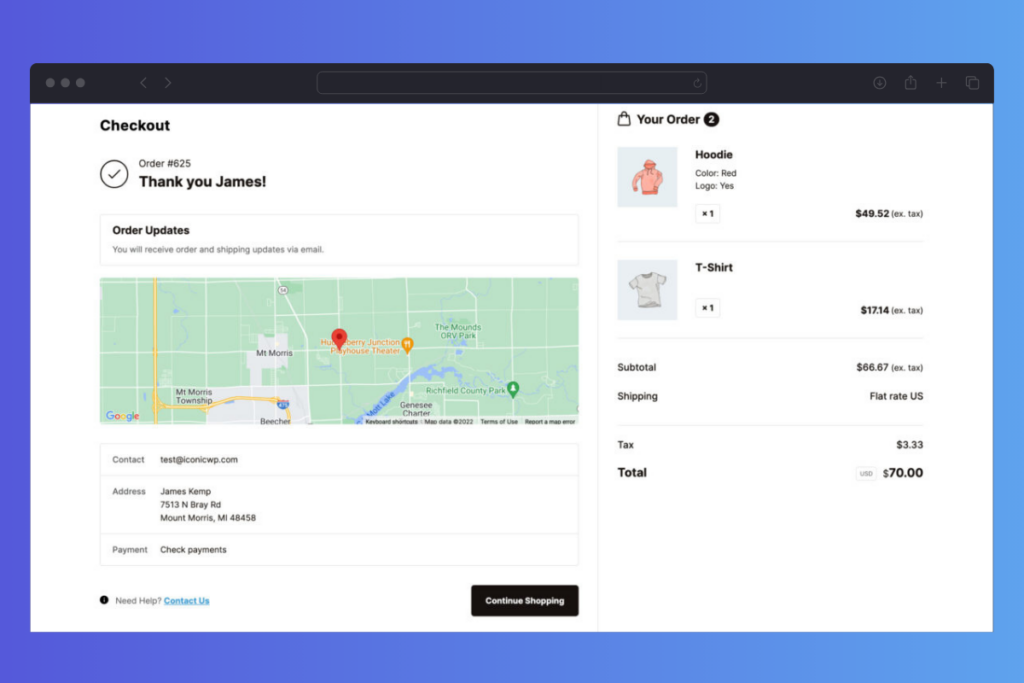
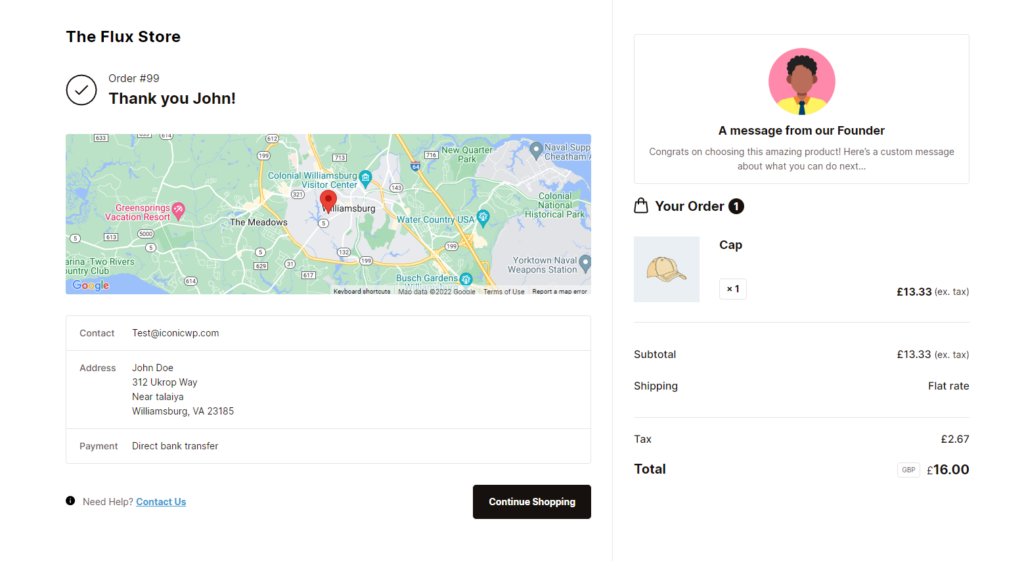
Order confirmation page
An order confirmation page is like a receipt. It assures your customers that you’ve received their order and allows them to verify the order details.
It can include:
- A thank you message mentioning the customer’s name.
- Order number, order details, customer contact information, payment information, and shipping methods.
- When should they expect their shipment, what follow-up action is required from their end, and more.
If you have any applicable coupon code discounts or promotions, you can show them to your customers on this page. Alternatively, you can provide this information via email.
A way to reduce cart abandonment
Cart abandonment is a common challenge for ecommerce stores. Many customers add items to their cart but leave before completing the purchase. To reduce this, it’s essential to understand why it happens. Unexpected costs, a complicated checkout process, or security concerns can all drive shoppers away.
Using exit surveys or analytics tools can help identify specific pain points in your checkout process. If customers frequently abandon their carts at a certain step, it may indicate an issue with pricing transparency, payment options, or form complexity. Addressing these problems can lead to higher conversions.
Social proof can also help reduce hesitation. Displaying customer testimonials, reviews, or trust badges near the checkout page reassures shoppers that they are making a safe and smart purchase. When customers feel confident, they are more likely to complete their order, reducing cart abandonment and boosting sales.
Recover abandoned carts
Recovering abandoned carts is just as crucial as preventing them. Automated email reminders can bring customers back by offering a discount, reminding them of limited stock, or simply making it easy to resume checkout. Personalized messages with product images and clear calls to action can be highly effective.
Testing and optimization
An optimized checkout process requires continuous testing and refinement to remain effective. Customer preferences and technology change over time, so regular analysis ensures the checkout flow remains smooth and user-friendly.
A/B testing to improve conversions
A/B testing allows you to compare different versions of your checkout elements to see what works best. Small changes, such as adjusting button colors, simplifying form layouts, or rewording calls to action, can significantly impact conversion rates.
Testing different payment options can also help you understand which methods your customers prefer, ensuring you don’t lose sales due to limited choices.
Error notifications and form validation
Customers can quickly become frustrated if they encounter unclear error messages or confusing form fields. Adding real-time error notifications helps guide users through the checkout process by flagging missing or incorrect information immediately.
Form validation should be tested regularly to make sure all required fields are marked, and the checkout process remains smooth on desktop and mobile devices.

Continuous optimization
Testing and refining your checkout process should be ongoing. Regular optimization helps reduce cart abandonment and improve user experience. By continuously analyzing and improving your checkout flow, you can boost conversions, enhance customer satisfaction, and maximize sales.
So, now that you know what goes into a good ecommerce checkout process, let’s see why it is essential to improve the checkout experience.
Why improving your checkout experience will benefit you
The checkout process is quite delicate. So, if you can correctly implement everything we‘ve discussed above to optimize your checkout process, you can reap several benefits. These include:
Improved customer loyalty
An optimized checkout process saves customers time and effort and allows them to complete the transaction without frustration. This convenience improves their overall shopping experience, encouraging them to buy from you again.
An easy shopping experience contributes to customer loyalty, and 55% of customers will become loyal to a brand that provides a good shopping experience.
Reduced checkout abandonment rates
Suppose the user experience at each stage of your checkout process is excellent. In that case, customers are more likely to complete their orders rather than abandon their carts, which will significantly reduce cart abandonment rates.
According to Shopify, a long and complicated checkout can cause some customers to abandon their carts by 18%.
Increased conversion rates
Improving your checkout flow can also improve your conversions. It makes it convenient for customers to complete a purchase, and as cart abandonment rates go down, conversion rates go up.
Improved sales and revenue
As more customers convert, you can increase sales and revenue, which can help your business grow.
To sum it up, an optimized checkout is extremely beneficial to your ecommerce store, and you should strive to improve it. Knowing this, let’s look at how to improve it in 5 steps.
How to improve your checkout process in just 5 steps
In this section, we’ll show you how to improve your checkout process to include every key component in a good checkout flow.
We’ll do this with the help of the Flux Checkout for WooCommerce plugin. You need a working WordPress website and WooCommerce as your ecommerce platform for this.
Flux Checkout for WooCommerce
Flux Checkout transforms the default WooCommerce checkout into one that’s lightning-fast, distraction-free, and reduces checkout abandonment.
Upgrade your WooCommerce checkout with Flux Checkout for WooCommerce
Flux Checkout is a powerful WordPress plugin that can help you to convert your WooCommerce checkout into one that is simple, fast, and distraction-free.
With this plugin, you can include everything that makes up a checkout process, including:
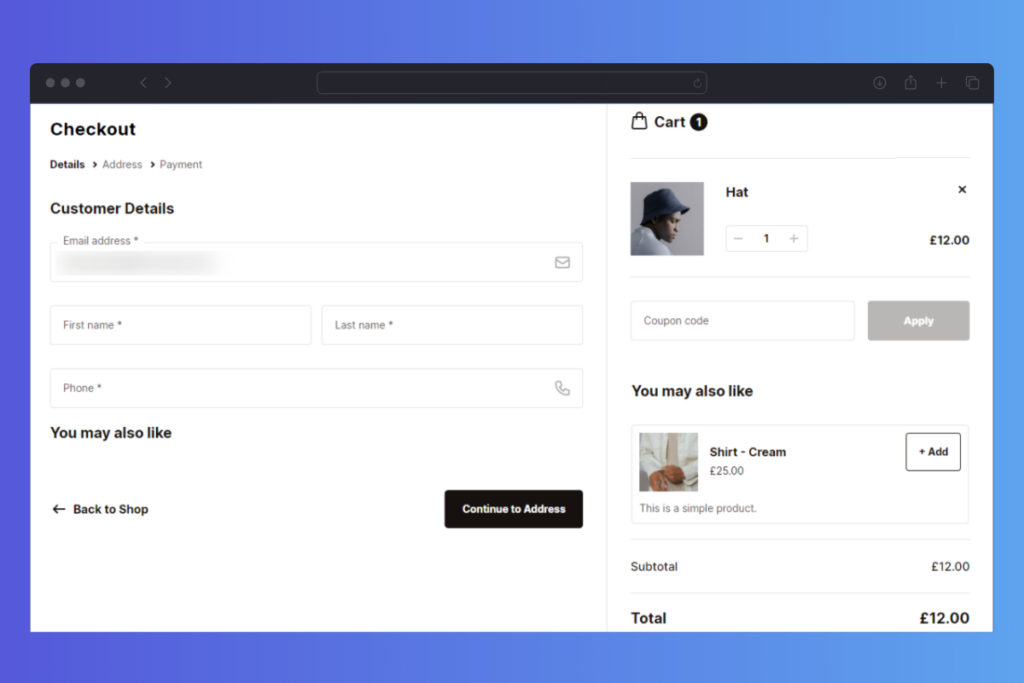
- A multi-step checkout. It replaces the default one-page WooCommerce checkout with a multi-step checkout that guides customers through the checkout flow. You can use Flux Checkout for WooCommerce to create a multi-step guest checkout.
- A visible progress indicator. This displays a progress indicator to show the customer the stage of the multi-step checkout they’re in.
- Minimizing distractions. This plugin also removes distractions like your site’s header, sidebar, and footer to keep your customers focused on completing the purchase.
- Address Autocompletion. To save customers time when filling in billing or shipping details.
- Trust seals and custom content. With Flux, you can add any content you like to any point in the checkout process. From customer reviews to trust seals and custom messages.
- Cross-selling at checkout. Add cross-selling to your checkout process by allowing customers to add recommended items right inside the checkout.
- A customizable order confirmation page. Flux allows you to create a custom order confirmation page and add content that could be valuable to customers or lead them to their next purchase.
Flux has various customization options, including a modern or classic design. After selecting your style, you can customize it to fit your store’s design.
Flux’s fully responsive checkout design allows customers to have a seamless checkout on desktop and mobile devices.
Now we’ve addressed what you can do with Flux, let’s use it to improve your checkout flow in 5 steps.
Step 1: Install the Flux Checkout plugin
To get started, purchase the WooCommerce checkout plugin, Flux Checkout for WooCommerce from the Iconic site: iconicwp.com/flux-checkout-for-woocommerce
Flux Checkout for WooCommerce
Flux Checkout transforms the default WooCommerce checkout into one that’s lightning-fast, distraction-free, and reduces checkout abandonment.
Then take the following steps:
- On your WordPress dashboard, navigate to Plugins > Add New.
- Then click Upload Plugin and choose the zip file you downloaded to your computer to upload it.
- Next, when the upload is successful, click Activate. You’ll need to enter your license key to do this.
Step 2: Select which WooCommerce checkout design to use
When you use Flux Checkout, it replaces the existing checkout in your store with a multi-step checkout process.
To do this, take the following steps:
- From your WordPress dashboard, go to WooCommerce > Flux Checkout and click the Styles tab at the top of the page.
- Select which theme you’d like for your store. Either Classic or Modern Flux checkout design. This will update the appearance of your existing checkout.
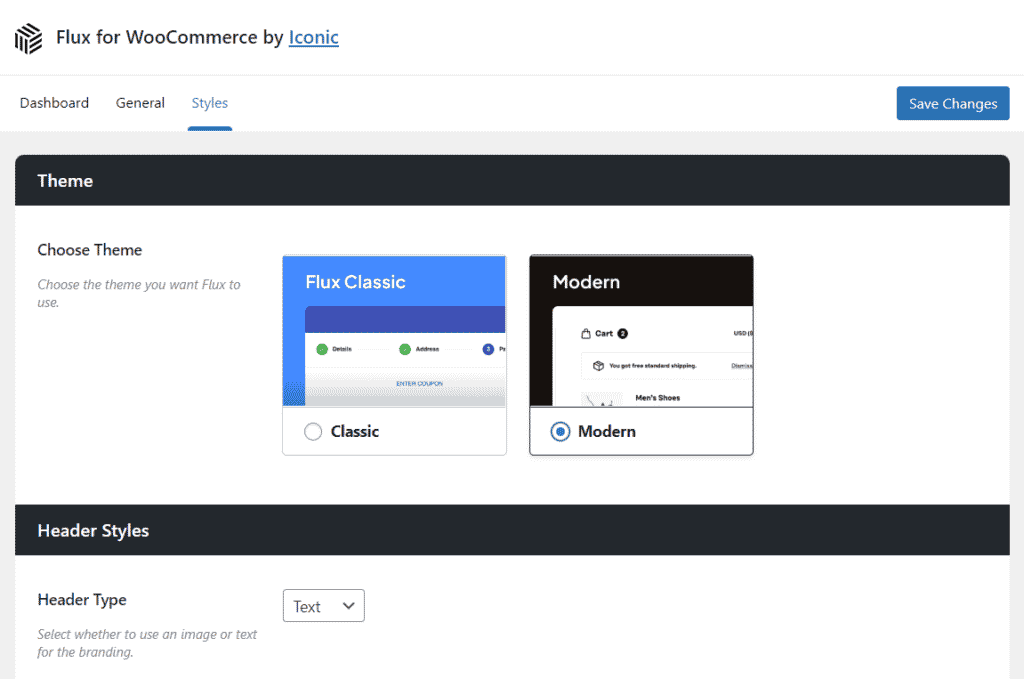
Note: If you use the default WooCommerce one-page checkout, Flux Checkout will automatically update it to a multi-step checkout.
Step 3: Customize your WooCommerce checkout design
Once you’ve chosen the theme for your store, customizing it to match your site’s design is a straightforward process.
- While still in the Styles tab, you’ll be able to change the following:
- Customize the header styles section. In this section, you’ll have two options available:
- Header type. This allows you to select if you want to use Text or Image as your header
- If you choose Text, you can rename the Header Text, pick your font family, color, and more.
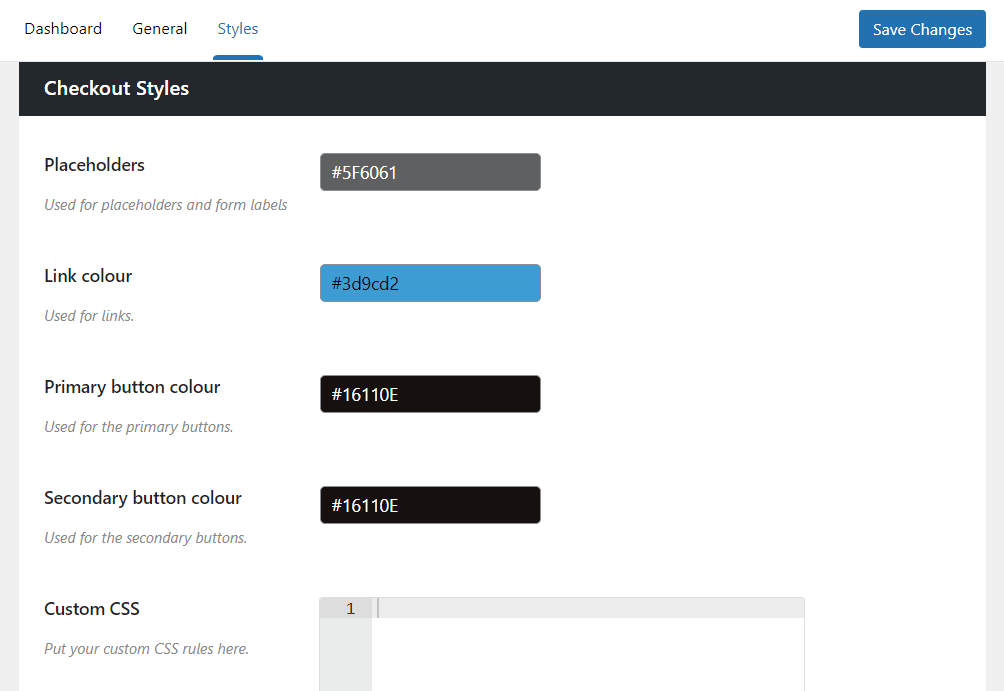
- Customize the checkout styles. This section allows you to be more personal with your select checkout design. Depending on your chosen theme, you can change placeholder, link, and button colors.
- Customize the header styles section. In this section, you’ll have two options available:
- When you’re happy with all your changes to your checkout’s appearance, click Save Changes to apply the updates.
Then, check your newly updated checkout to ensure the changes you’ve made have been implemented successfully.
Step 4: Enable account creation/login or guest checkout
Flux Checkout allows you to offer your customers both account creation/login and guest checkout. To do this, take the following steps:
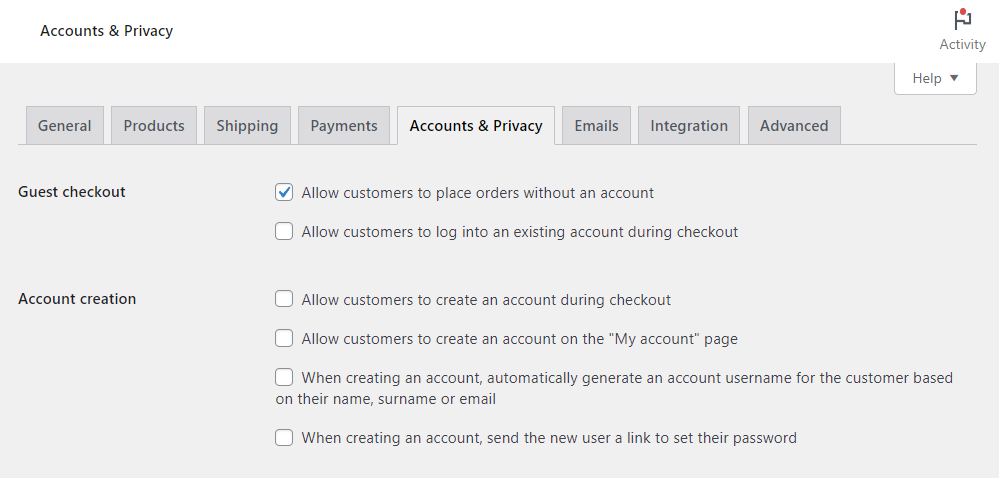
- From your WordPress dashboard to WooCommerce > Settings > and click on the Accounts & Privacy tab.
- You will be able to do the following:
- Enable account registration/log in using WooCommerce and Flux Checkout. You will have the following options.
- Allow existing customers to sign into their accounts using a display message and clickable link. For example, “Already have an account? Sign in”
- Allow customers to log in to their accounts with a popup, create an account during checkout, and other settings such as automatically generating an account username for the customer based on various criteria.
- Allow guest checkout in WooCommerce will allow your users to checkout without creating an account.
- Enable account registration/log in using WooCommerce and Flux Checkout. You will have the following options.
Flux Checkout also provides additional settings to help you customize your checkout even further. To find these settings:
- Go to WooCommerce > Flex Checkout from your WordPress dashboard.
- Then, click the Checkout Page tab at the top to open the checkout page settings.
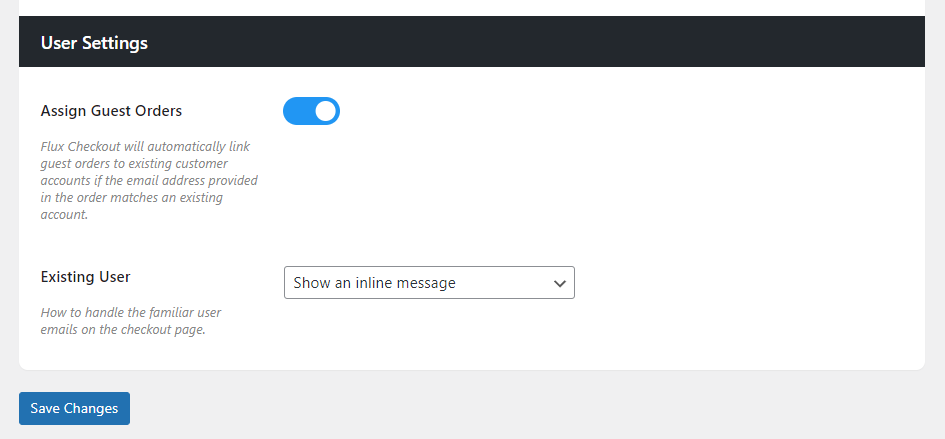
- Scroll down the page until you reach the User Settings section. You’ll have two options here:
- Assign Guest Orders. This feature automatically links guest orders to existing customer accounts when the customer’s email matches their account. So, even if a customer checks out without logging in, their order will still be assigned to their account(this only works if they already have one).
- Existing user. With Assign Guest Orders enabled, you can prompt customers to log in with a message. (That is, if they have an existing account with you.)
You can do this using an inline message or a popup with an inline message. But this is optional if you want to assign orders without prompting login.
- If you’re happy with all your changes, click Save Changes to continue.
Step 5: Customize the thank you/order confirmation page
If you want to thank your customers for confirming their orders, your checkout process hasn’t ended yet.
Simply take the following steps:
- Go to WooCommerce > Flux Checkout and click the Thank You Page tab/link. This will open the Thank You Page settings.
- Toggle on the Enable Flux Thank You Page switch. This will replace the default WooCommerce checkout thank you page.
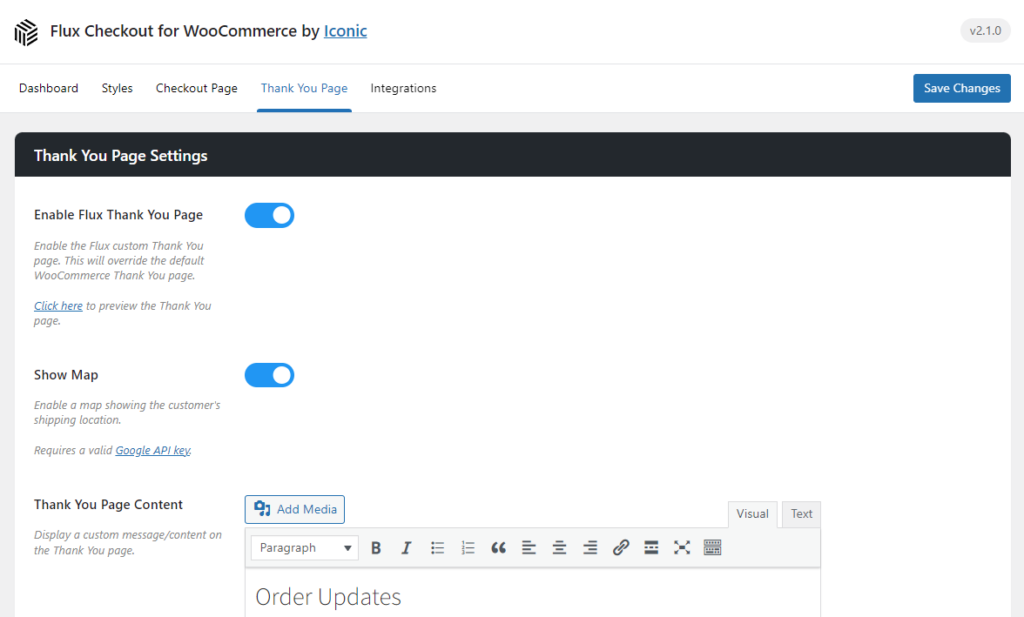
- You’ll be able to do the following:
- Show Map – Use this setting to toggle the map to show on your Thank You page.
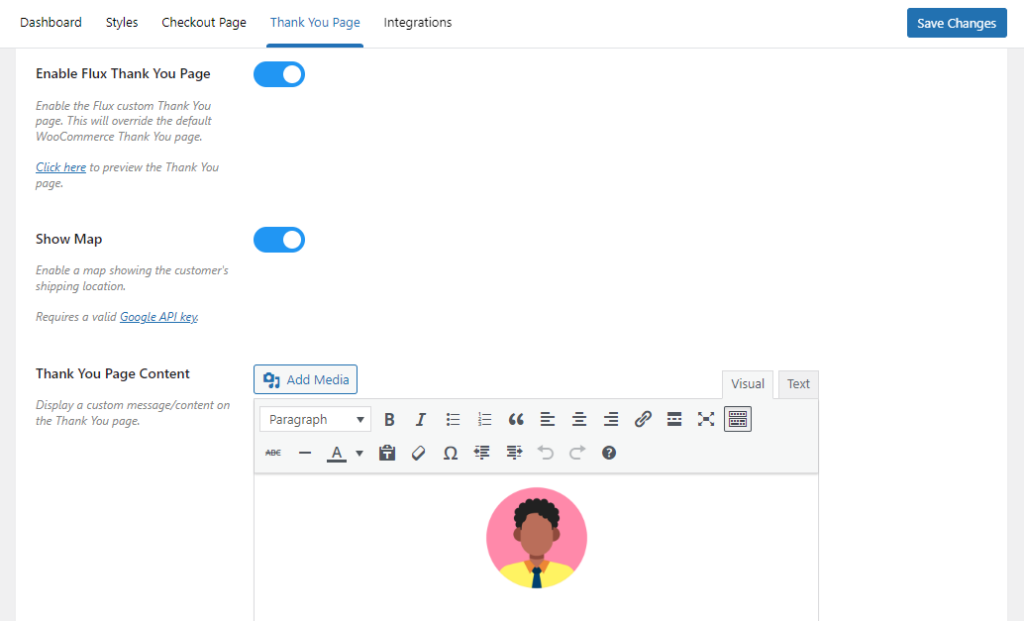
- Thank You Page Content – You can add any rich content you choose. Use this to provide information about the delivery instructions, promotional content, or anything else you’d like to share with your customers.
- Content placement – Use this setting to decide the placement of the content. Including: After order status, Before Customer details, After Customer details, Before Product details, and After Product details.
- Contact Page – Select a page that will be linked to the Contact Us button on the Thank You page.
- That’s it. Once you’re happy with your changes, click the Save Changes button at the bottom of the page.
There you have it! You’ve just upgraded your WooComerce checkout to a fast and user-friendly multi-step checkout with Flux.
Upgrade your ecommerce checkout process today
If you want to boost conversions, ramp up sales, and drive up your ecommerce website revenue, then sprucing up your checkout process should be at the top of your to-do list.
The best way to do this is to upgrade your WooCommerce checkout in five easy steps using the WordPress plugin Flux Checkout for WooCommerce.
This plugin allows you to create a swift, sleek, and mobile-friendly checkout that will encourage more customers to complete their purchases.
Flux Checkout for WooCommerce
Flux Checkout transforms the default WooCommerce checkout into one that’s lightning-fast, distraction-free, and reduces checkout abandonment.

Gina Lucia is our in-house Content Manager at Orderable. She writes articles, user guides, technical documentation, and creates videos on everything WooCommerce and Orderable.
Gina has been working in the WordPress/WooCommerce space since 2012 when she developed WordPress websites for clients large and small.
For the past 8 years, she’s been writing about everything WordPress and WooCommerce, becoming an expert in what makes a WooCommerce store succeed.
When not writing, Gina loves to tend to her vegetable garden, read, or travel to mainland Europe.