Are you looking to boost conversions and get more revenue on your ecommerce store? Creating the best checkout experience for your customers is the best way to go about it.
As an ecommerce store owner, the checkout is the most important part of your store because it’s where customers decide to purchase from you. By improving it, you’ll encourage more customers to complete purchases in your store and become loyal to your brand.
? In this article, we’ll walk you through some ways to create the best checkout experience for your ecommerce customers and how to do it with the help of Flux Checkout for WooCommerce.
7 ways to improve your ecommerce checkout page experience
Optimizing your checkout experience is important in enhancing overall customer satisfaction and boosting your store’s conversion rate.
? A streamlined checkout page can boost a store’s conversions by 35% while reducing the cart abandonment rate.
Optimizing the checkout experience can also give your customers a user-friendly and convenient shopping journey and encourage them to buy from your business.
That being said, here are 7 ways you can improve your ecommerce checkout experience.
1. Opt for a checkout page design that has useability in mind
While upgrading your checkout, you should make sure to keep the customer’s experience in mind. Apart from general things like having a clear layout, you can get right down to the details.
This comprises focusing on specific accessibility and user-friendly elements that will make a notable difference in your customers’ checkout experience. These elements include the following.
Showing borders when a customer clicks a field
To help customers easily confirm if they’ve clicked on a field, you can show borders or highlights when they do so. Only the borders for the field that has been clicked will be highlighted while leaving the rest of the fields unhighlighted.
This allows customers to see clicked form fields at a glance. They can then fill them with the required information as quickly as possible.
Loading animations on the continue button
A loading animation when a customer clicks on the continue button provides visual feedback to the user that the system is actively processing their request and has not crashed.
In a multi-step checkout, this animation gives customers peace of mind that your website is working on getting them to the next step of the checkout flow. This loading animation can also be useful when a customer clicks the checkout button.
Tooltips added to certain checkout fields/buttons
You can also add information to be displayed in small windows that pop up when users hover over certain checkout fields or buttons. Tooltips help to provide additional information on these sections.
You can use this to specify what customers should fill in certain fields.
How to make these usability changes to your checkout
You can make these usability changes by upgrading your WooCommerce checkout with Flux Checkout for WooCommerce.
This powerful plugin upgrades your entire checkout process while prioritizing user experience. By adding it to your WooCommerce store, you’ll be able to include all the user-friendly elements mentioned above.
In addition, Flux allows you to add icons to input fields to help specify what information should be filled in. This can be a message icon representing the email address field or a call icon representing a phone number.
You can add Flux to your WooCommerce store by purchasing it from the Iconic store here: iconicwp.com/flux-checkout-for-woocommerce
Flux Checkout for WooCommerce
Flux Checkout transforms the default WooCommerce checkout into one that’s lightning-fast, distraction-free, and reduces checkout abandonment.
Then follow these steps to install it on your WordPress website:
- From your WordPress website, go to Plugins > Add New.
- Click the Upload Plugin button at the top and upload the .zip file you downloaded after buying the plugin.
- Click on Activate Plugin and enter the license key you received via email to verify your purchase, and that’s it.
With Flux installed, all the useability changes mentioned above will be added to your WooCommerce checkout.
2. Keep your checkout simple and clean
Your ecommerce checkout flow can seem complicated if all the steps are lumped together on a single page. This one-page checkout overwhelms customers with too many steps to be completed at once.
It can also cause customers to be easily distracted and eventually unable to complete a purchase. Generally speaking, a one-page checkout complicates your checkout flow.
? This can increase shopping cart abandonment at the checkout by up to 17%, according to an online shopping study done by the Baymard Institute.
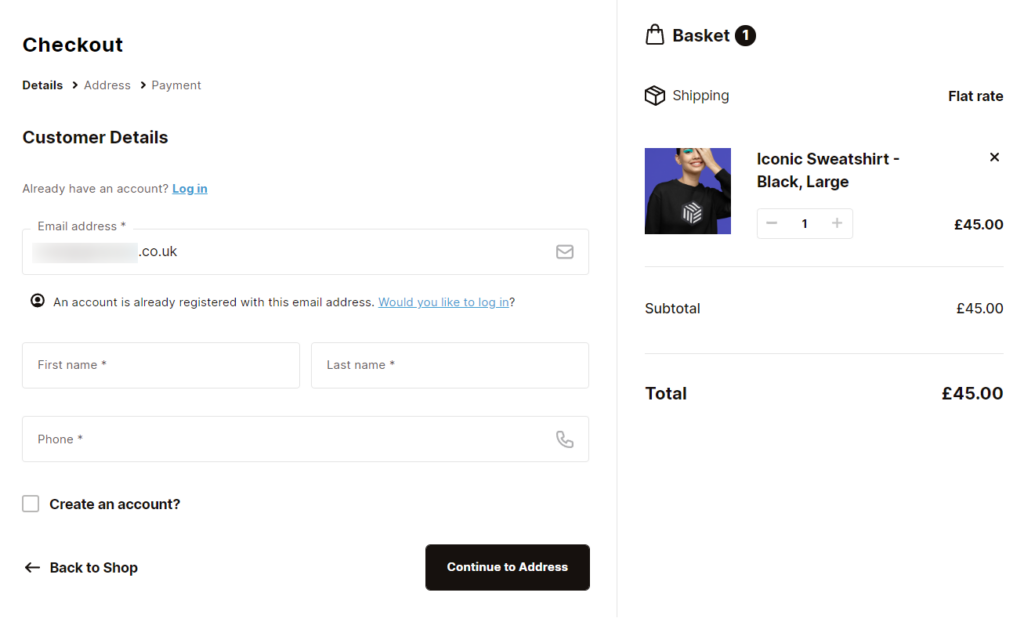
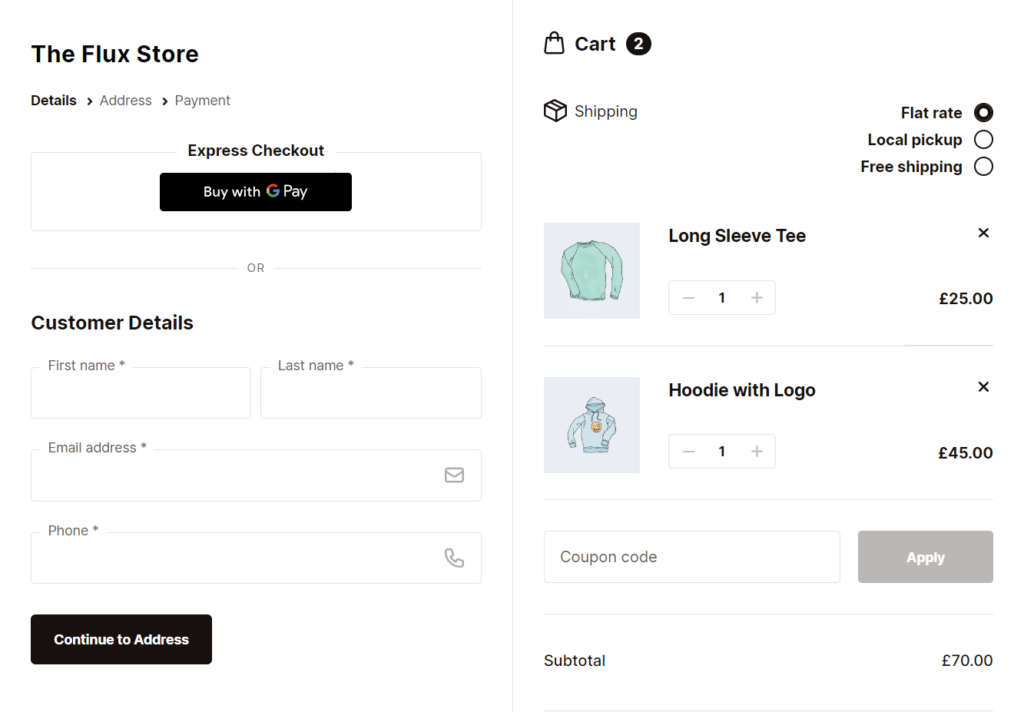
You can mitigate this by introducing a multi-step checkout. This simplifies the checkout flow by breaking it down into smaller, more manageable steps.
A multi-page checkout keeps customers focused on completing one step before moving to the next. Doing so makes it easier for customers to complete your checkout, which can increase conversions for your store.
How to add a multi-step and distraction-free checkout
You can add a multi-step checkout flow that is distraction-free to your WooCommerce store using Flux Checkout.
After installing Flux, it automatically adds a multi-step checkout, separating your checkout flow into a series of steps like entering billing information, selecting a payment method, reviewing the order, and so on. This multi-step checkout design also includes a progress indicator to show customers the stage of the checkout process.
It also minimizes distractions by only displaying the fields that are required for each step. To limit distractions, Flux also allows you to hide the company field in the billing address step.
Flux’s multi-step checkout has templates you can import and edit to fit the rest of your store’s design. These templates have been designed to work well on both desktop and mobile devices.
Flux Checkout for WooCommerce
Flux Checkout transforms the default WooCommerce checkout into one that’s lightning-fast, distraction-free, and reduces checkout abandonment.
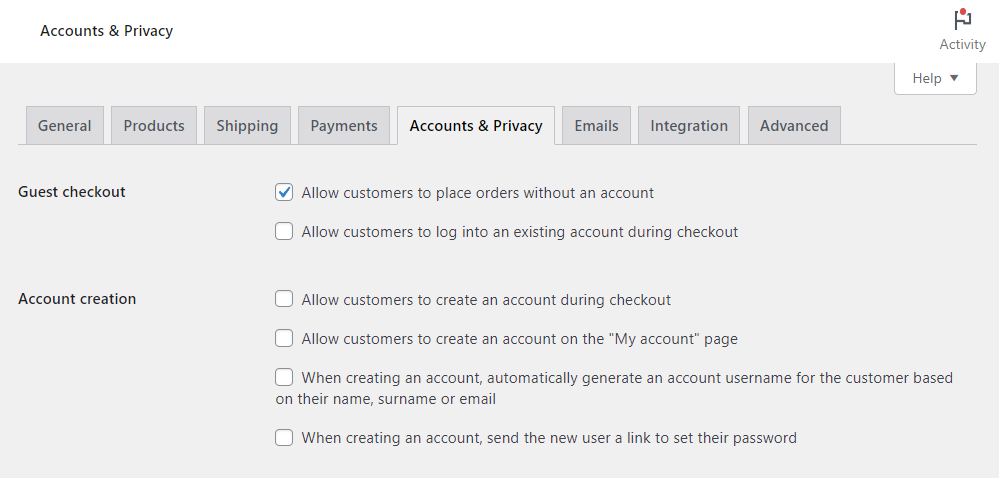
3. Make account creation or guest checkout easy
Account creation is one of the main contributors to cart abandonment at checkout. However, you can’t do away with account creation because it is vital in providing your customers with a personalized experience.
At the same time, forcing your customers to create accounts before completing a purchase will cause more to abandon your checkout.
? According to Shopify, 34% of all carts abandoned at checkout result from an ecommerce business requiring its customers to create an account before completing a purchase.
You can encourage more customers to complete your checkout by offering a guest checkout option or making the account creation process easy. Guest checkout allows customers to buy from your ecommerce site without creating an account.
This is convenient for customers making a one-time purchase and those uncomfortable sharing their personal details with your website. Offering guest checkout also shows that you value your customers’ choices, preferences, and privacy.
Apart from guest checkout, you can make the account creation process easy by allowing customers to create accounts within the checkout process.

In addition, you can also allow quick sign-in using social credentials similar to how ASOS does it. They allow customers to use their social media accounts to sign in at checkout. This is convenient since they don’t have to remember passwords.
How to make account creation or guest checkout easy
You can enable the guest checkout option directly from the WooCommerce settings by checking the box that says ‘Allow customers to place an order without an account’.
To make account creation easier on your ecommerce website, you’ll need Flux Checkout for WooCommerce.
Flux Checkout uses WooCommerce’s default settings to make account creation within the checkout process visually easier to understand.
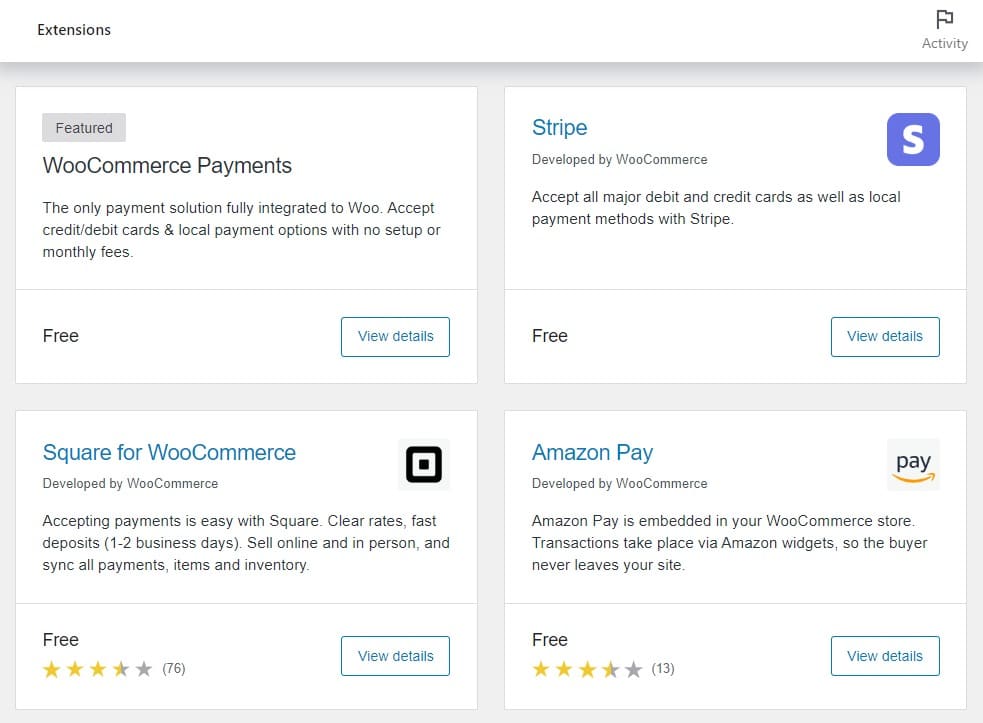
4. Offer the right payment options
It is important to offer more payment options and the right ones. Although different customers use different payment options, you can increase the chances of offering the right ones by integrating popular payment methods. These include Amazon Pay, PayPal, Google Pay, Apple Pay, etc.

Supporting customers’ preferred payment options in your ecommerce store can increase your conversion rate. This is because customers will likely complete a purchase if they can use their preferred payment method.
However, supporting credit cards as the only payment method can cause some customers not to complete your checkout flow.
? Since it is a major inconvenience for customers who don’t use this payment gateway, it can cause up to 9% of customers to abandon their carts.
In addition, it can frustrate customers since it requires them to enter a lot of payment information.
Apart from making your customers’ shopping experience smooth, integrating the popular payment options can also make your store accessible to a larger customer base.
How to add payment options to your WooCommerce store
Adding a payment option to your WooCommerce store is as simple as installing a new plugin. You can do it in the following steps.
- From your WordPress dashboard, go to Plugins > Add New.
- Search for the payment option you want to add, for instance, Amazon Pay, and click it to install. Once installation is complete, click Activate.
- While still on your WordPress dashboard, go to WooCommerce > Settings and click on the Payments tab.
- Scroll to the payment option you’ve just installed and click the toggle switch to enable it.
Now customers who prefer this option will be able to use it.
5. Give customers better shipping options
If you want to improve your checkout process, making your shipping options more appealing is the way to go.
Shipping holds a lot of value in your checkout experience because it connects customers with your products. Online shoppers care a lot about shipping costs and delivery options.
? Shopify reports that high extra costs for shipping are the number 1 reason causing cart abandonment, and it accounts for about 55% of all carts abandoned.
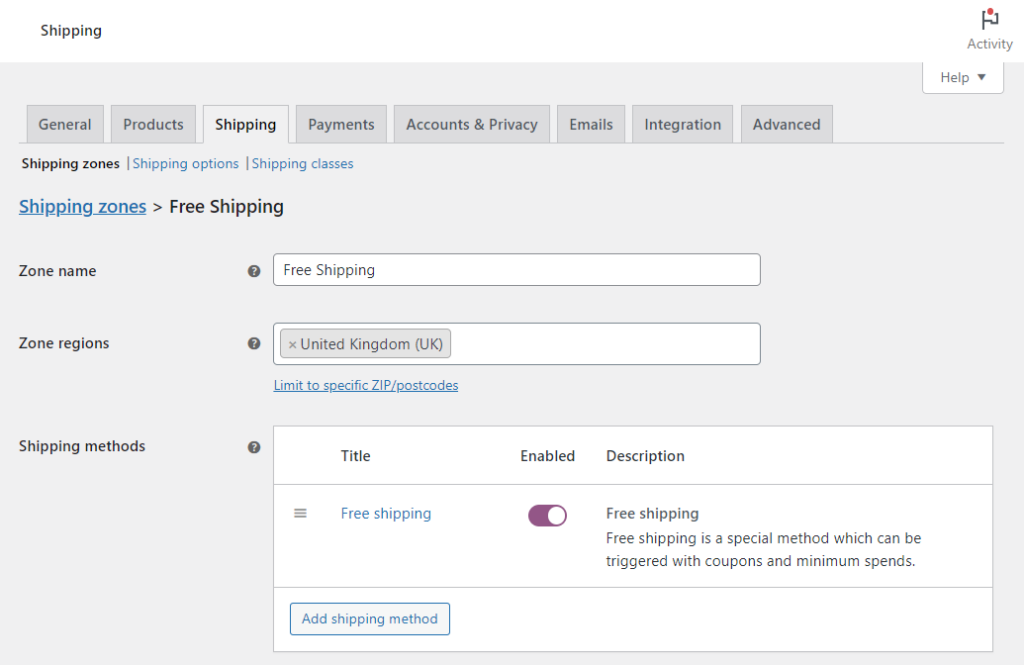
One way to overcome this is by offering free shipping. Free shipping plays a key role in convincing many customers to purchase from an ecommerce business.
? In a survey conducted by Deloitte, 77% of the respondents admitted that free shipping is one of the top reasons they shop online.
For this reason, offering free shipping can win you more customers. If you have to charge delivery fees, ensure customers see the shipping costs upfront to avoid checkout surprises.
Improve customer experience with delivery slots
While still on shipping, you can go the extra mile and allow your customers to choose a convenient time frame when they are available to receive their deliveries. You can add delivery or pick-up date and time slots to your checkout.
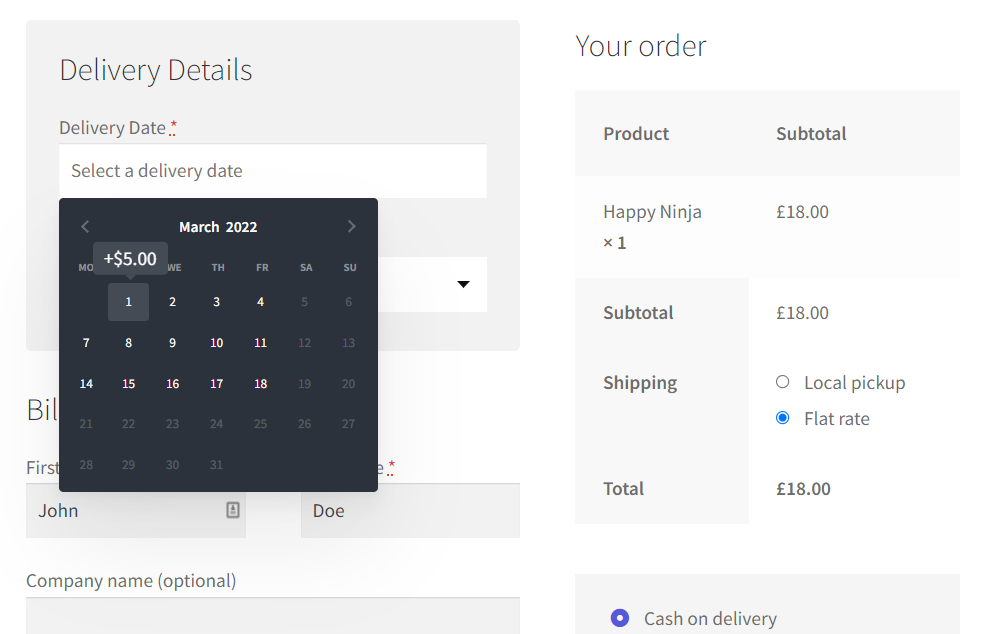
With delivery slots added to your checkout, you’ll be able to do the following:
- Take control of your delivery/local pickup schedule while improving customer satisfaction at checkout. Delivery slots allow customers to choose a convenient time to receive their deliveries. As the store owner, delivery slots enable you to set up a delivery schedule that matches your working days and available staff.
- Allow customers to reserve a delivery slot before shopping.
- Increase your revenue by charging additional fees on certain time slots.
- Manage your deliveries better by restricting the number of orders per day and per time slot.
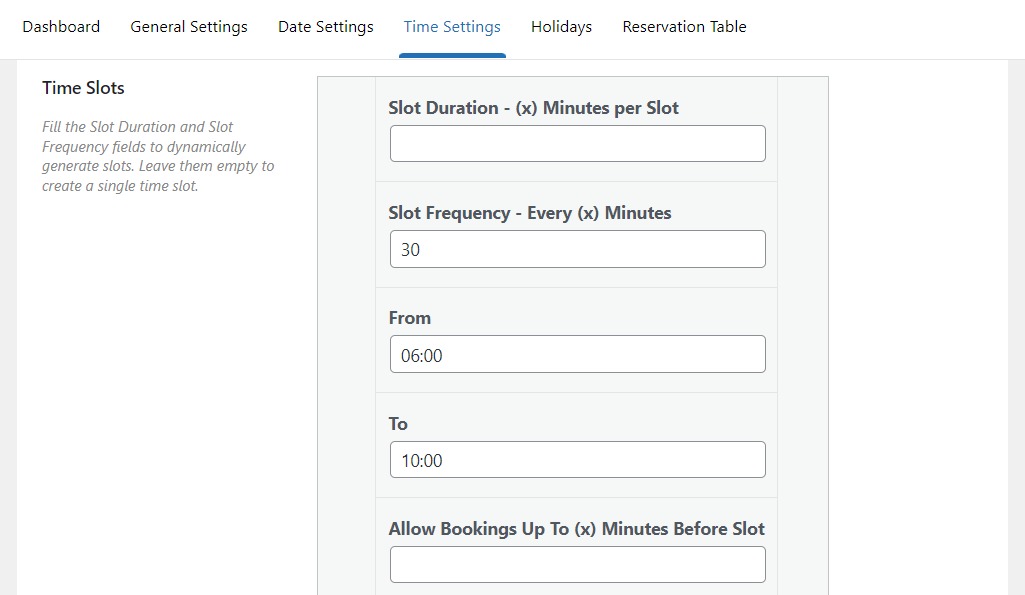
To do this on your WooCommerce store, you’ll need the help of the WooCommerce Delivery Slots plugin.
WooCommerce Delivery Slots
Let customers choose their preferred WooCommerce delivery date and time right from your WooCommerce checkout page. With WooCommerce Delivery Slots, you can set a flexible delivery schedule to suit you and your customers.
Apart from all the above, this plugin allows you to flexibly set up your delivery/pick-up slots. This includes assigning delivery slots to specific shipping methods, disabling delivery slots for certain products, and more.
6. Use address autofill
It’s also important to take the work out of your checkout, and one of the ways to do this is by using address autofill/autocomplete. Address autofill saves customers time and effort when entering shipping or payment details.
? This helps them to get through the checkout faster, which is important because 26% of shoppers will abandon their carts if the checkout process is too long.
Apart from making the checkout flow smoother for customers, address autofill also ensures that customers provide accurate information when filling out delivery information forms. This reduces the likelihood that deliveries will be made to the wrong address. You will avoid frustrating your customers with deliveries going to the right addresses.
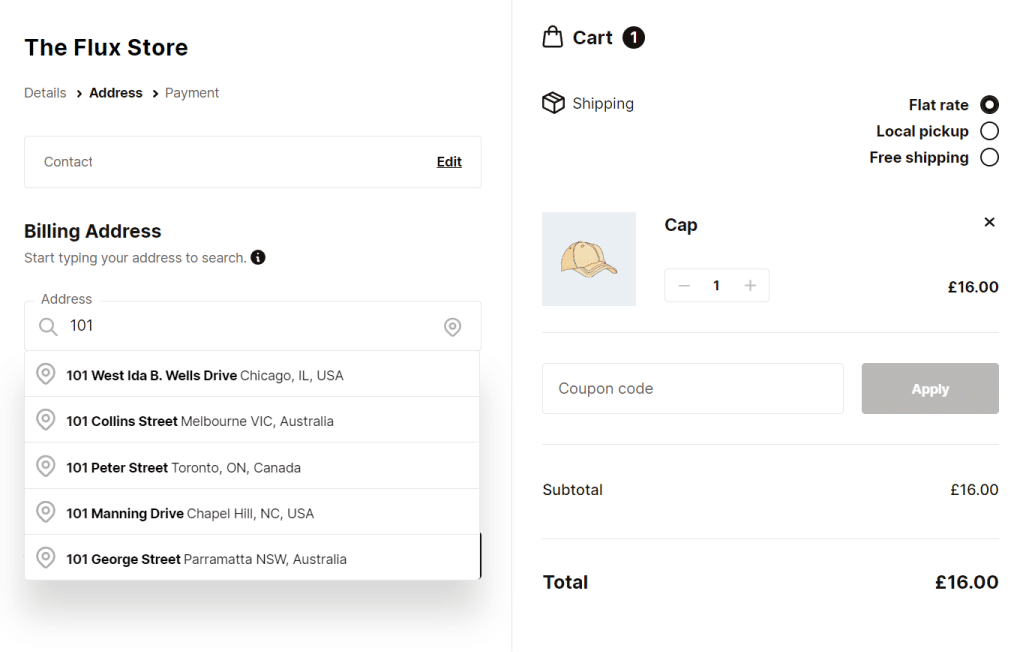
How to add address autofill to your checkout page
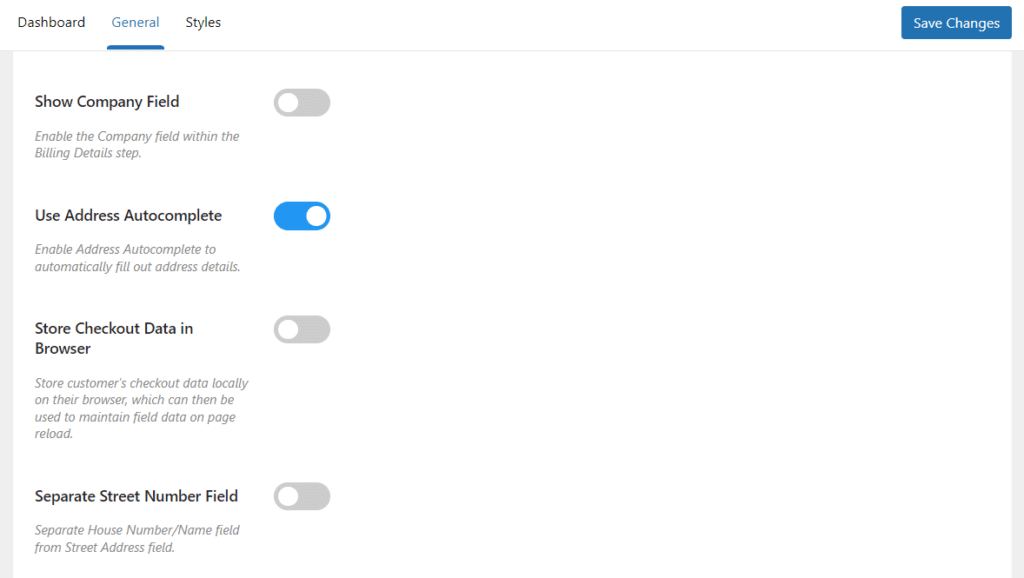
To add address autofill to your WooCommerce store, you’ll need Flux Checkout for WooCommerce.
Flux Checkout has an address autocomplete feature that suggests possible address matches as soon as the customer starts typing. Its integration supports this with the Google API, allowing instant search. Once a customer clicks on the suggested addresses, the rest of the fields will be automatically filled.
You’ll first have to install Flux to enable address autofill on your WooCommerce website. With Flux installed, follow these steps to enable address autofill.
- Go to WooCommerce > Flux Checkout from your WordPress dashboard and click on the General tab.
- Click on the Use Address Autocomplete switch to turn it on, and follow the additional instructions.
Customers will now be able to use this feature to fill address fields a lot faster.
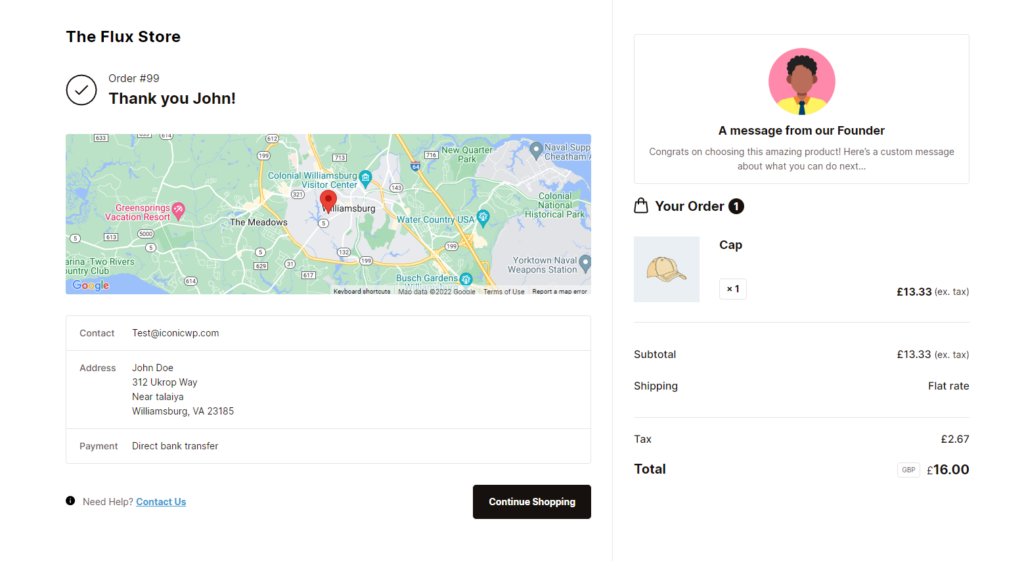
7. Don’t forget the order confirmation page
Although the order confirmation page comes post-purchase, customers will not be entirely satisfied with your service if they have a poor experience. Its primary role is to allow customers to confirm the details of their order, but it can be more than just that.
You can upgrade your store’s order confirmation page, encourage customers to buy from you again, and even become loyal customers.
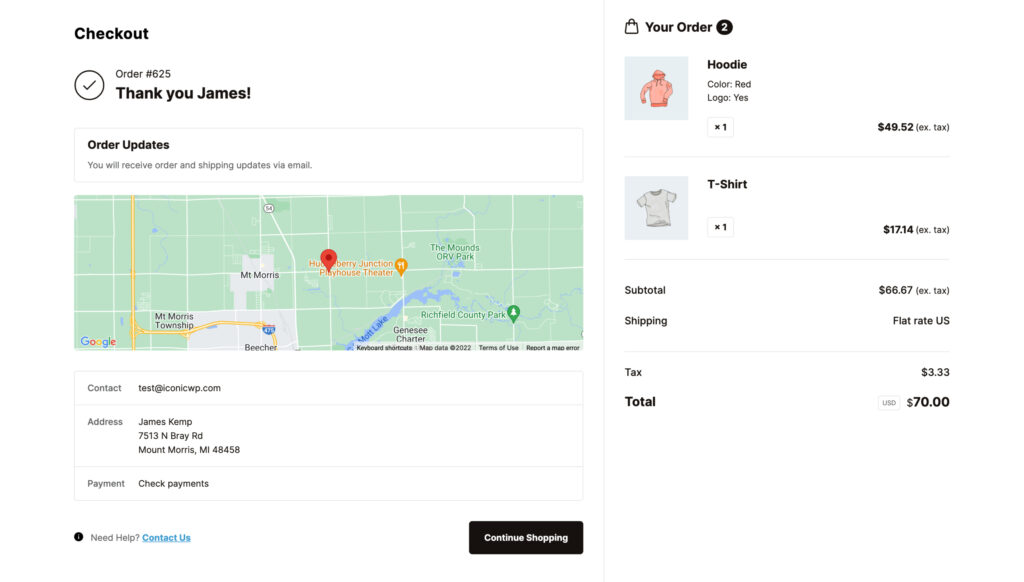
Here are some of the things you could add to this vital page:
- First, improve how the order summary and shipping address are displayed. This way, customers can confirm their details at a glance.
- Include a custom message, for instance, a personalized ‘Thank you for your order message’ to make your customers feel more appreciated.
- Provide additional information, like a PDF document containing an instructional manual for technical products. If you sell special dishes, you can add recipes in a PDF document on how customers can enjoy your product.
- Share a behind-the-scenes video showing the manufacturing process.
By going the extra mile to improve this page, you enrich your customers’ experience throughout their ecommerce journey on your shop. This will encourage them to return to buy from you when they need your product again.
How to upgrade the WooCommerce order confirmation page
The default WooCommerce order confirmation page has a very basic and unappealing design with very limited features. Fortunately, you can use Flux Checkout for WooCommerce to upgrade this page’s appearance so that it can work to help you to retain your customers.
Flux Checkout for WooCommerce
Flux Checkout transforms the default WooCommerce checkout into one that’s lightning-fast, distraction-free, and reduces checkout abandonment.
By installing Flux on your WooCommerce store, you can make the following improvements to the order confirmation page.
- Improve the layout and design of this page. This entails displaying the page content neatly arranged in separate boxes.
- Highlight the important parts of the page, for instance, the products on the order summary or shipping address, and even show a delivery map. To allow customers to confirm their details at a glance. Flux also displays images and order details to make order confirmation visually appealing.
- Add any content you want to the page. Flux’s thank you/order confirmation page has a custom content section where you can add anything. This can be text, images, video, a PDF document, etc.
- Add links to this page – These can be links to sales promotions, social media accounts, etc. You can also add a link to your support page if customers have inquiries.
Flux allows you to generate a custom order received page and edit its appearance to match the rest of your store’s design.
To make these changes, you’ll first need to install Flux, then follow these steps to create a custom order confirmation page:
- From your WordPress dashboard, WooCommerce > Flux Checkout and click on the Thank You Page tab.
- Click the toggle switch that says Enable Thank You Page. With this page enabled, you can make these edits.
- Show map – click on this to display the delivery map.
- Thank you page content – a field where you can add your custom content.
- Content placement – decide where the custom content will be displayed on the page.
- ‘Contact Us’ URL – add a link to your contact page where customers will be redirected if they have inquiries.
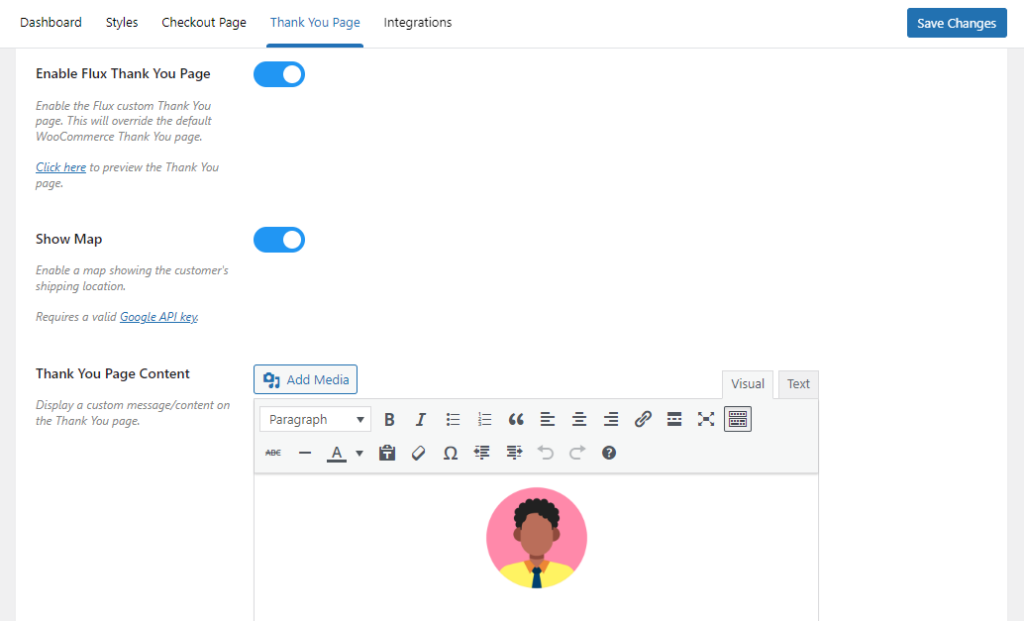
- When you’re satisfied with your settings, click the Save Changes button.
Optimize your checkout for the best checkout experience today
If you want to improve your online store’s conversion rate and get more revenue, you must take steps to optimize your checkout for the best experience.
With the suggestions mentioned in this guide, you’re well on creating a smooth and seamless checkout experience for your customers. Despite these steps seeming like a lot of work, with Flux Checkout, you’ll be able to do them efficiently in just a few clicks.
In our Local Delivery Bundle, you can get all the plugins mentioned in this guide, plus Sales Booster (for upsells and cross-sells).
WooCommerce Local Delivery Bundle
Add local delivery and local pickup to WooCommerce with ease. Includes Delivery Slots, Flux Checkout, and Sales Booster.
Or buy them individually here:
- Flux Checkout for WooCommerce – upgrade your entire checkout process at each stage.
- WooCommerce Delivery Slots – add delivery or pick-up date and time slots to your checkout.

Gina Lucia is our in-house Content Manager at Orderable. She writes articles, user guides, technical documentation, and creates videos on everything WooCommerce and Orderable.
Gina has been working in the WordPress/WooCommerce space since 2012 when she developed WordPress websites for clients large and small.
For the past 8 years, she’s been writing about everything WordPress and WooCommerce, becoming an expert in what makes a WooCommerce store succeed.
When not writing, Gina loves to tend to her vegetable garden, read, or travel to mainland Europe.