Cross selling has long been one of the most successful sales-boosting techniques of ecommerce stores.
Online giants such as Amazon widely use cross selling, and they report it accounts for 35% of their revenue. But what about creating a WooCommerce cross sell? What are the best ways to drive up conversions and revenue on this platform?
While there are many ways you can cross sell (and upsell) to your customers using a default WooCommerce store. You can really take things up a notch with the help of a few plugins (depending on your goals).
By the end of this article, you’ll know exactly how to implement tried and true cross selling techniques with the help of the a few of the best WooCommerce cross selling plugins.
But first, let’s start by explaining what cross selling is and how it can benefit your WooCommerce store.
What is cross selling?
Cross-selling is the act of encouraging a customer to buy complementary products in addition to those already in their basket.
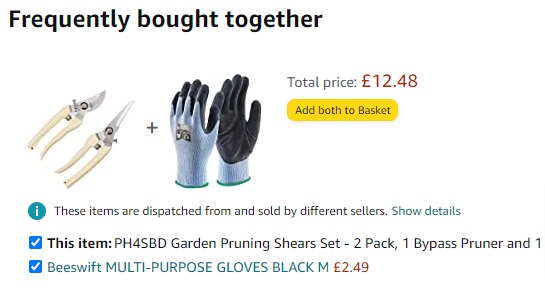
For instance, let’s say you sell gardening shears in your WooCommerces store. In that case, it would make sense to try and cross sell some gardening gloves, other types of shears, or gardening equipment as a group.
This has long been a staple tactic used to increase revenue in ecommerce stores and even brick-and-mortar stores.
If you’ve ever visited a fast-food restaurant and you’re asked, “would you like fries with that?” Then you’ve experienced cross selling first-hand.
What is upselling?
Upselling is not the same as cross-selling, and the terms are often confused. Upselling is the process of nudging customers into purchasing a more expensive version of the same product or a product that has an upgrade or add-on to make it more expensive.
To use the example above, you could upsell your customer into buying a more expensive version of the shears that are built to last a lot longer. The product is the same, but you’re encouraging customers to buy a premium or upgraded version.
So, to recap:
- Cross-selling persuades customers to buy additional related products on top of their original purchase.
- Upselling encourages customers to buy anything that would make the original purchase more expensive.
As you can see, both drive up sales in their own distinct ways.
Now we know the difference between the two, you might well be thinking, how does cross selling work in WooCommerce?
How to use cross selling in WooCommerce
There are plenty of ways to cross sell to your customers within WooCommerce.
Let’s first cover the standard options provided with the default WooCommerce setup. Then we’ll show you how to supercharge your sales using a couple of cross sell plugins.
Cross sell using WooCommerce related products
Within a standard WooCommerce store, there are specific options for cross selling and upselling. You can also create related products by using the same tags or categories if you wish.
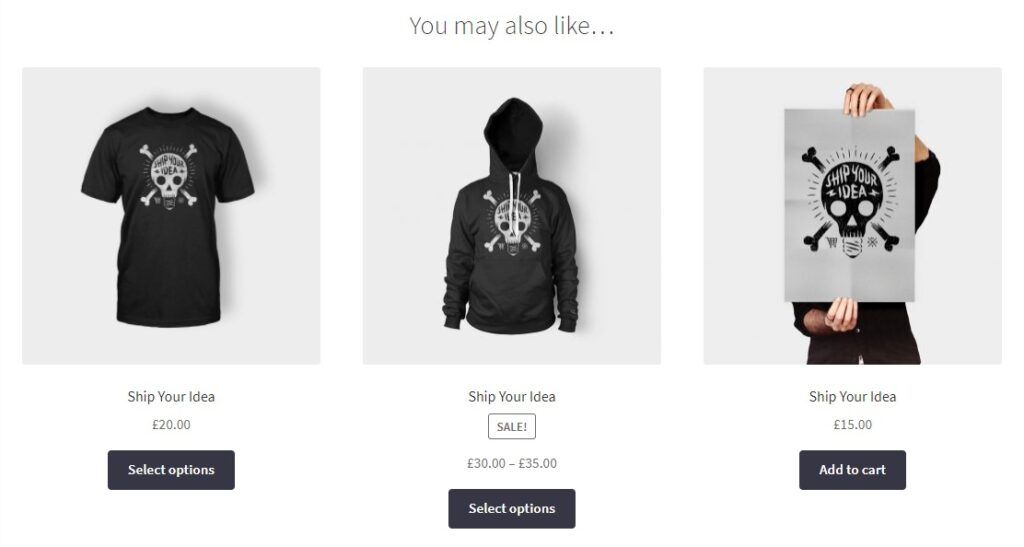
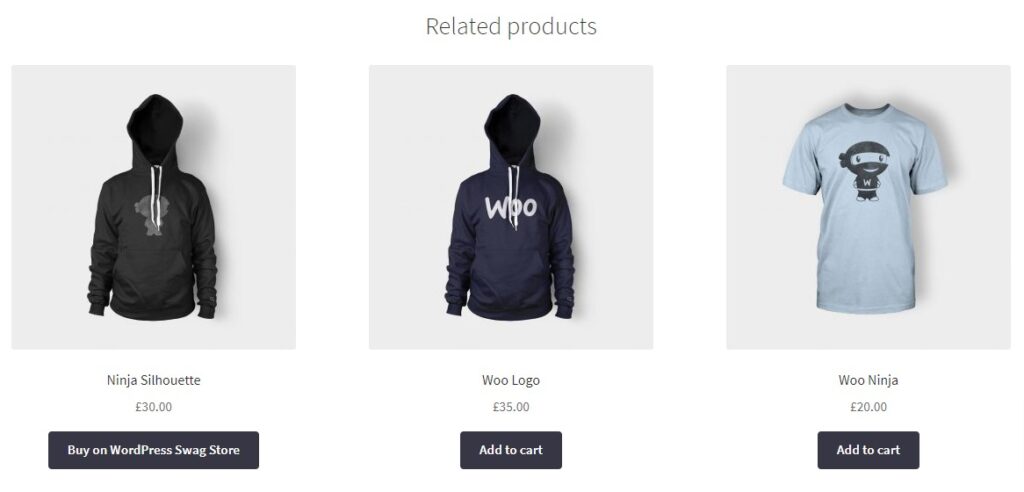
Upsell products will usually appear on the single product page under the product description. They often come under the heading ‘You may also like…’.
Cross sell products usually appear on the cart page in WooCommerce. They usually sit underneath the “add to cart” products table with a thumbnail image.
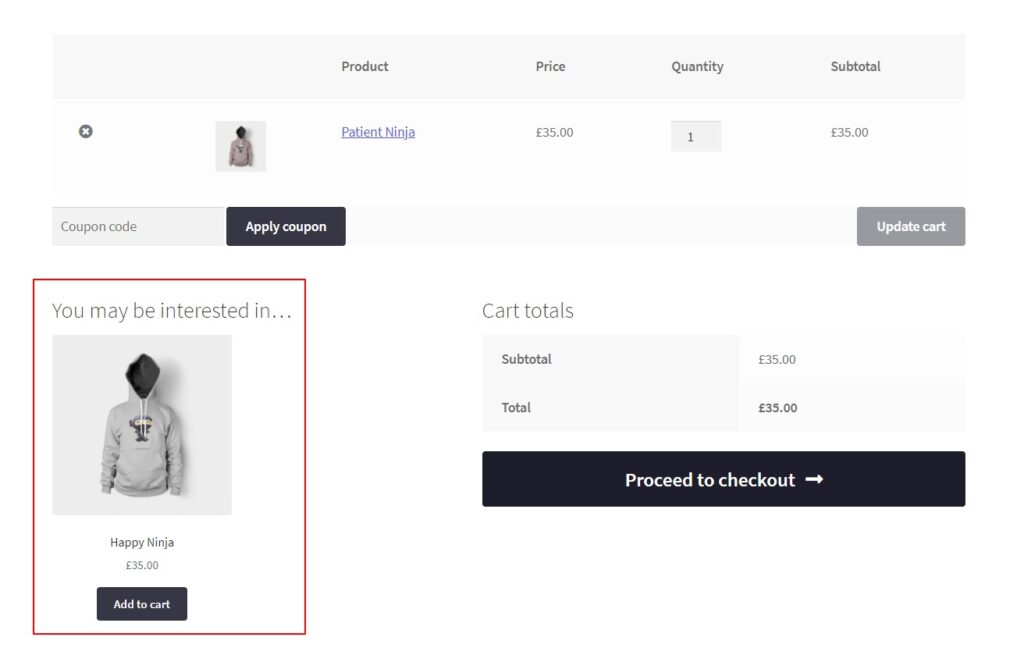
Note: We say “tend to” and “usually” because their positioning depends on the specific theme and coding of your WooCommerce store. The best way to check is to give it a go. Either that, or check the documentation with your WooCommerce store’s theme.
How to add cross sells and upsells in WooCommerce
To set up cross sells and upsells in WooCommerce, take the following steps:
- From your WordPress dashboard, go to Products.
- Select the product you want to add cross sells or upsells to.
- Navigate down to the Product Data module on the product page.
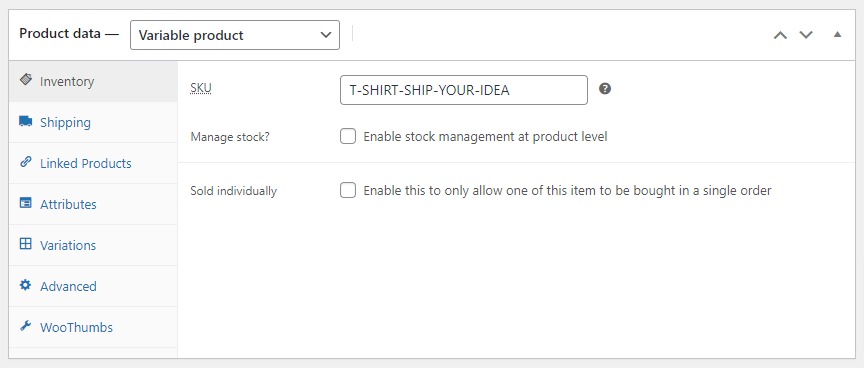
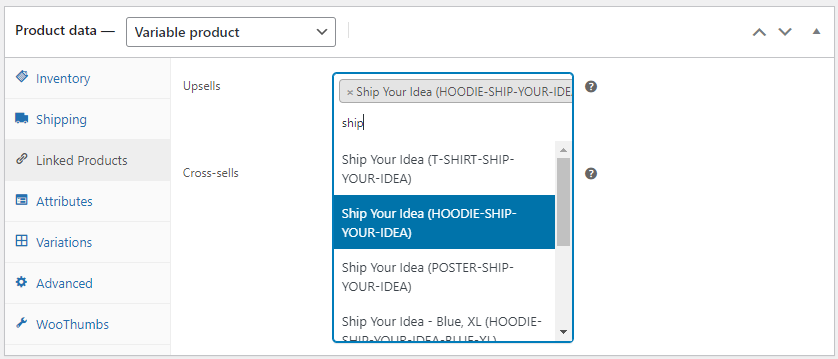
- Select the Linked Products tab on the left.
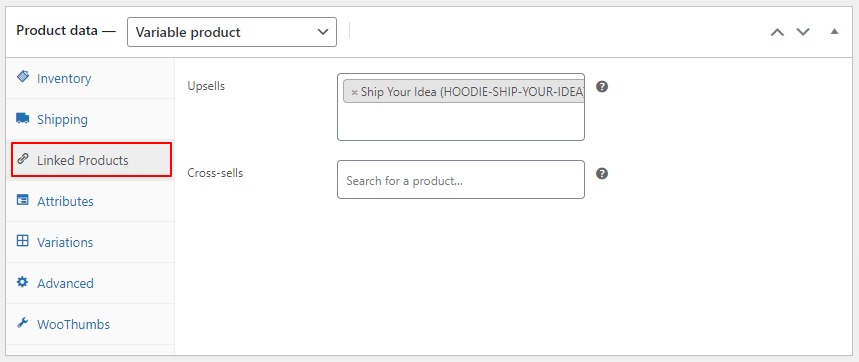
- Here you will see Upsells and Cross-sells boxes. Add your desired products to one or both fields and then Save or Publish the product.
How to set up WooCommerce related products using tags and categories
The final default option (that you can use without a plugin) is to create related products using product tags and categories, which you can select on the single product page from the product categories toolbar on the right-hand side.
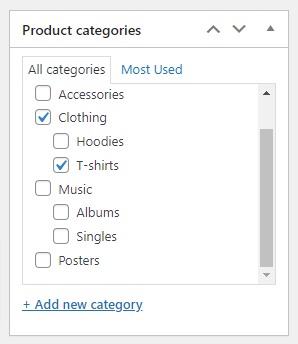
Related products usually appear on the product page underneath the product description (the same place as upsells). Once again, this depends on your specific store theme and custom coding.
Unfortunately, you cannot alter how these products appear because WooCommerce automatically generates them based on your selected tags or categories.
For example, you won’t be able to determine that a specific hoodie always appears with a specific T-shirt to complete a ‘look’.
Note: If not keen on this feature, check out our guide on how to remove related products.
Now we’ve explained how to set up the default cross selling, upselling, and related product options. Let’s walk you through ways you can add WooCommerce cross sell products with the help of some plugins.
The best WooCommerce cross sell plugins
There’s nothing wrong with adding the basic cross selling techniques in a standard WooCommerce setup.
However, by installing a dedicated plugin, you can benefit from advanced features that have much higher conversion rates and give you more control.
You’ll be able to:
- Provide your customers with social proof.
- Allow them to add multiple cross sell products to their basket at once.
- Offer a one-click, high-converting cross sell after checkout.
- Add cross sell products to the checkout page.
- And more.
All of the above are bound to instantly increase order values in your WooCommerce store.
Let’s take a closer look at the top three features in a little more detail, and show you how easy it is to implement them with Iconic Sales Booster for WooCommerce and Flux Checkout for WooCommerce.
Iconic Sales Booster for WooCommerce
Iconic Sales Booster for WooCommerce is a plugin that allows you to add cross selling to your entire WooCommerce store within a few minutes. It provides you with four different ways of adding cross selling to each part of the customer’s journey. From browsing on the product page, to completing their order.
Let’s take a closer look at each of these feature, the benefits of using them, and how to set them up.
Iconic Sales Booster for WooCommerce
Add cross-selling to your entire WooCommerce store in minutes with Iconic’s WooCommerce cross-sell plugin, Iconic Sales Booster for WooCommerce.
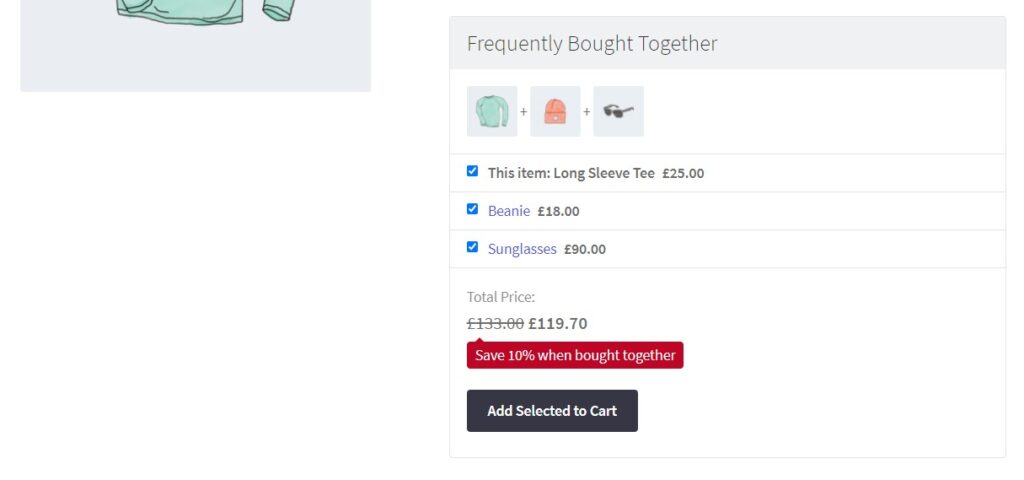
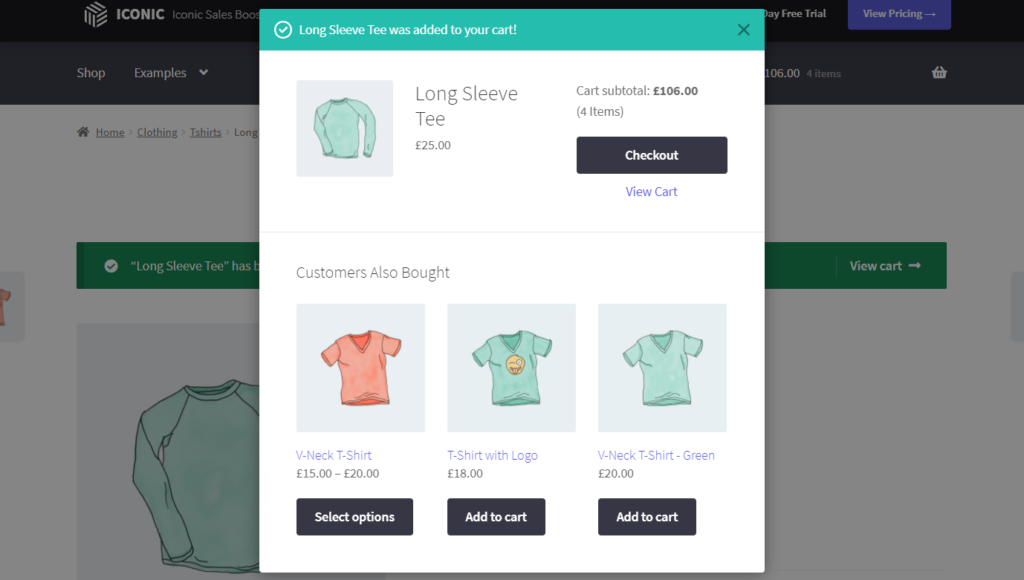
Include “frequently bought together…” in your WooCommerce store
The “Frequently bought together” feature is a staple for ecommerce giants such as Amazon. In fact, they use this exact phrase on their website to increase their average order value. So it’s not a bad idea to borrow it from the world’s most successful online store.
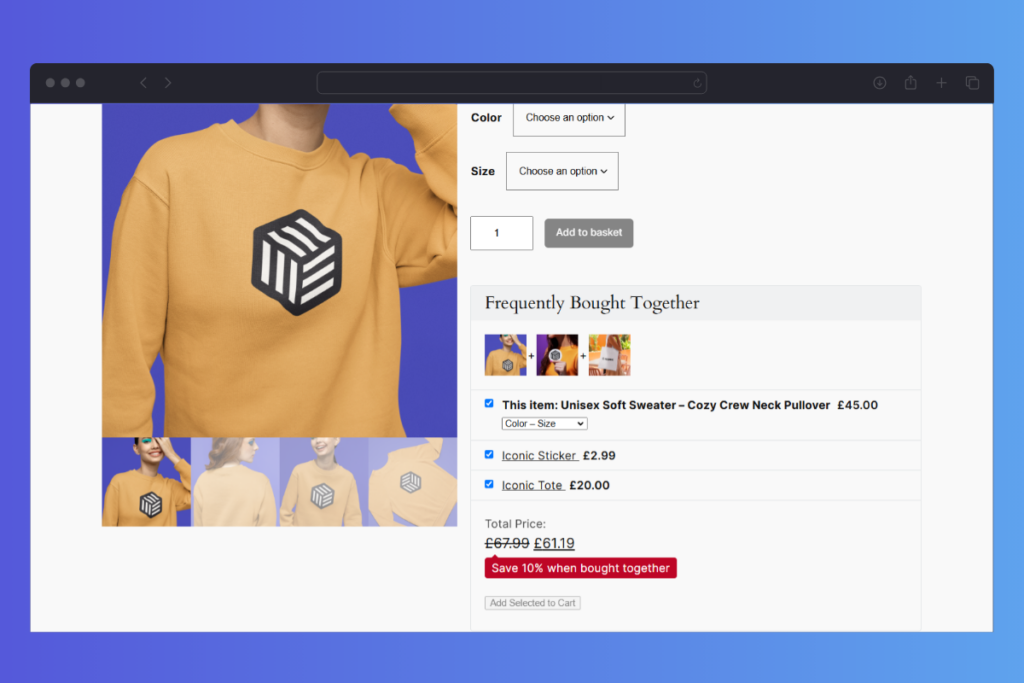
To set this up on your WooCommerce store, take the following steps:
- From your WordPress dashboard, go to Products.
- Select the product you want to add cross sells to.
- Navigate down to the Product Data module on the product page.
- Click on the Sales Booster tab.
- Once on the Sales Booster tab, start typing the name, SKU, or ID of a product you want to offer as a cross sell in the Frequently Bought Together field.
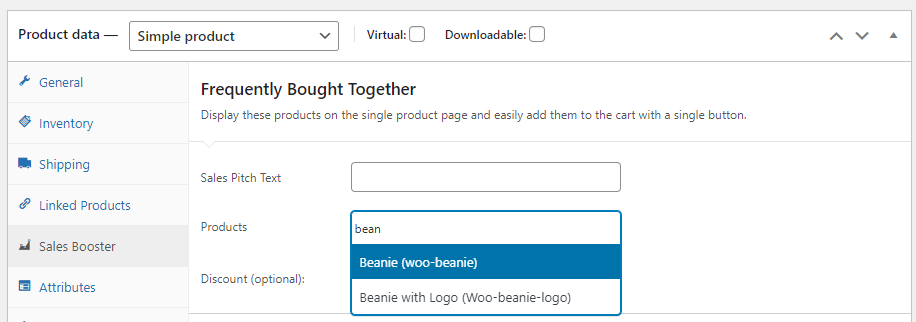
- Once your product appears, click it or press enter to add it.
- Choose whether you want to add an optional discount to your frequently bought together products.
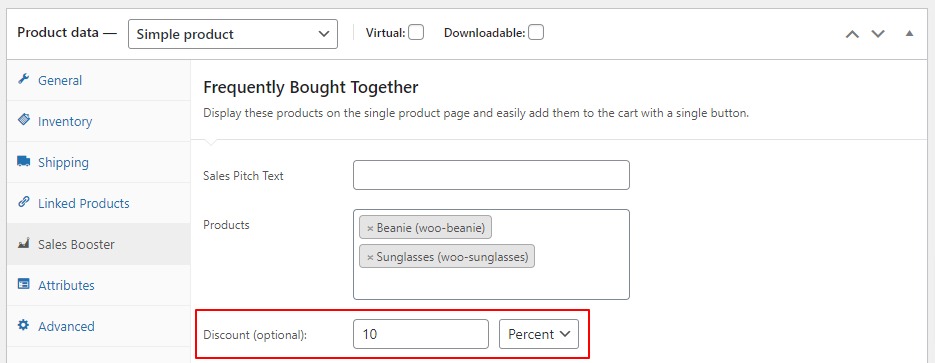
- Hit Save or Publish the product.
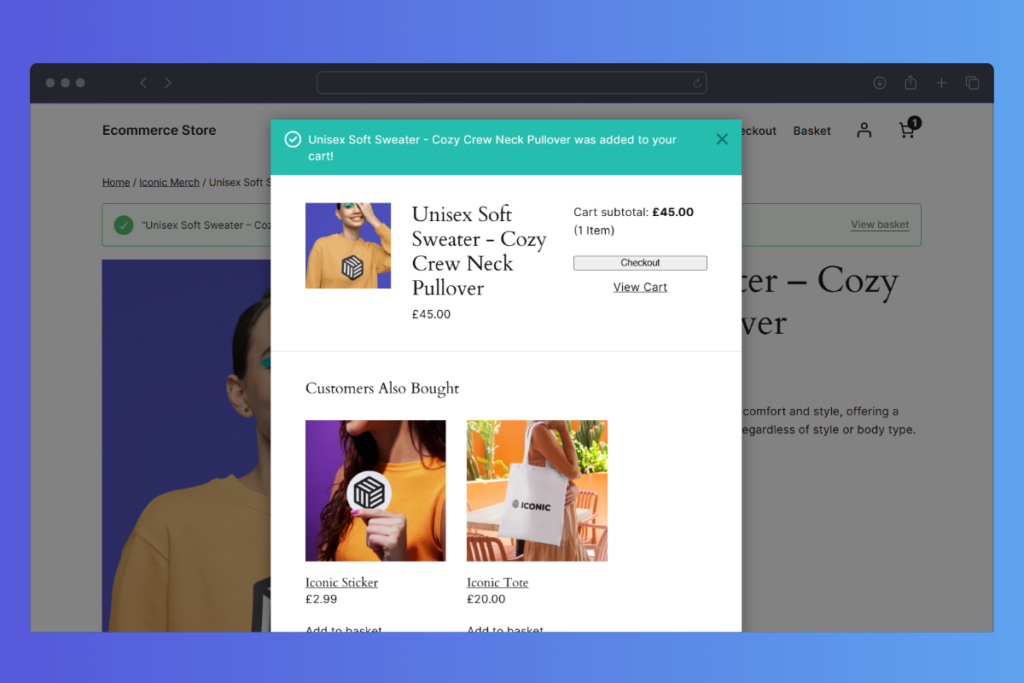
Add “customers also bought…” to your store
One of the most effective sales techniques is providing social proof to your customers. You gain credibility and trust by showing consumer trends by showing them products that other customers have bought together.
To set up this feature, simply follow these steps after you’ve downloaded the plugin:
- Go to Plugins > Add New > Upload Plugin.
- Choose the zip file you downloaded, upload, and then click Activate.
- Once activated, you’ll need to enter your license key.
- Go to Products.
- Select the product you want to add cross sells to.
- Navigate down to the Product Data module on the product page.
- Click on the Sales Booster tab.
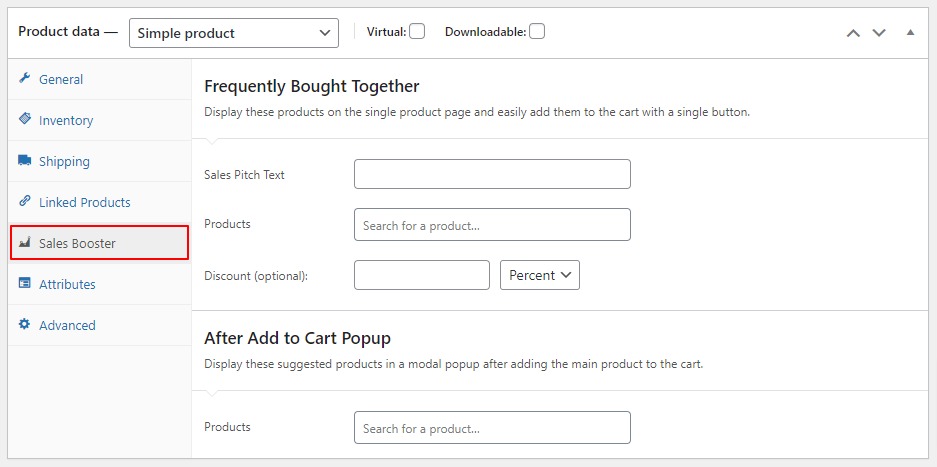
- In the After Add to Cart field, start typing the name, SKU, name, or ID of the product you want to offer as a cross sell.
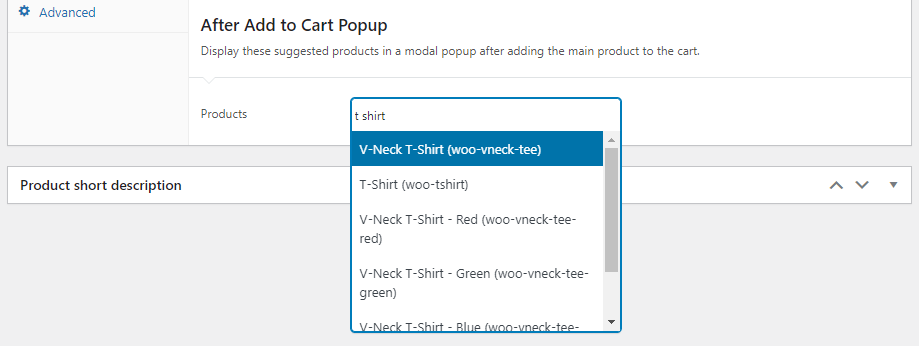
- Once your product appears, click it or press enter to add it.
- Hit Save or Publish the product.
That’s it! You have a handy set of products to tempt customers once they’ve added a product to their cart.
Add a cross sell or upsell after your WooCommerce checkout
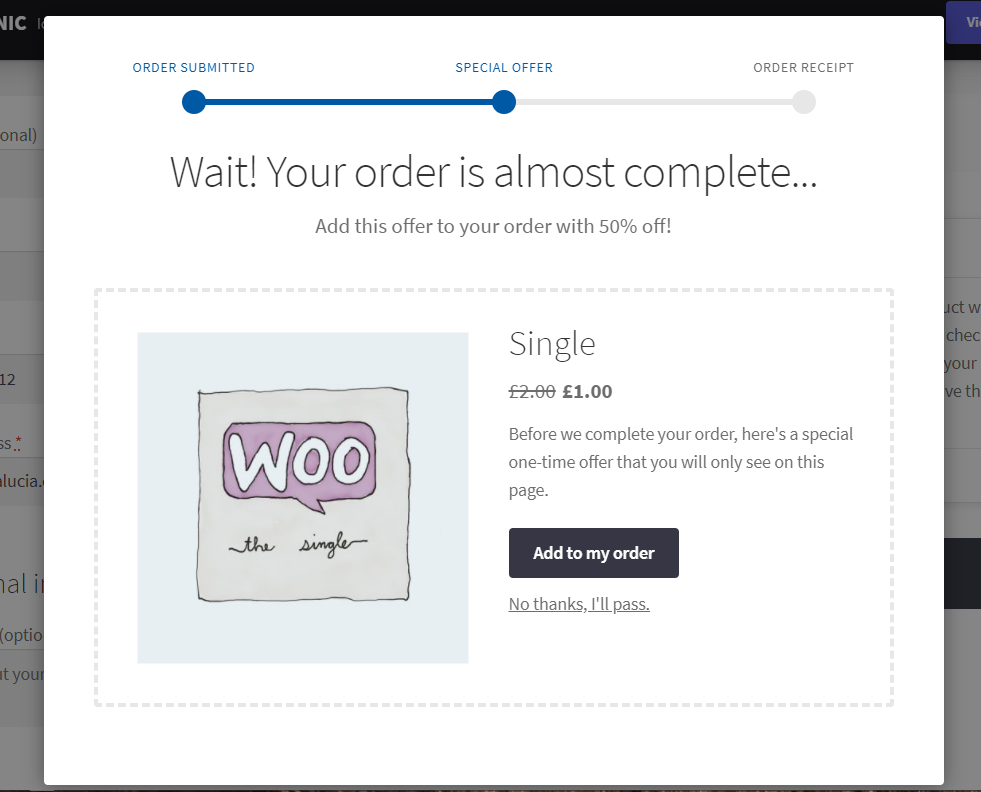
One of the best times to upsell or cross sell to your customers is when they have already demonstrated their intent to buy. So what better time than immediately after the checkout?
This feature allows you to add a WooCommerce upsell after checkout (or cross sell) in just one click without the need for them to enter their card details again.
So if you want to up your WooCommerce upsell game, this plugin is a no-brainer!

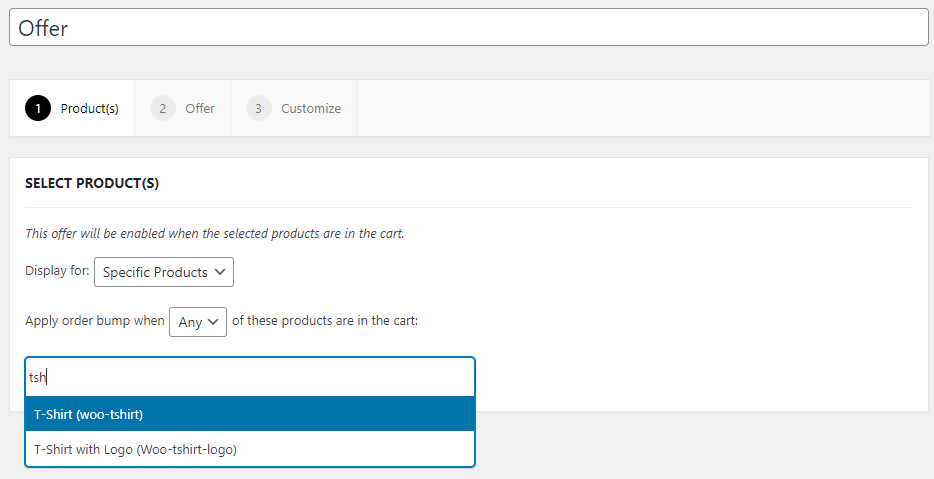
To create a one-click cross sell or upsell after checkout, follow these steps:
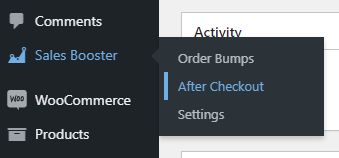
- Login to your WordPress admin area.
- Navigate to Sales Booster > After Checkout.
- Click Add New and enter a title.
- Below the title field, you will see three tabbed sections.
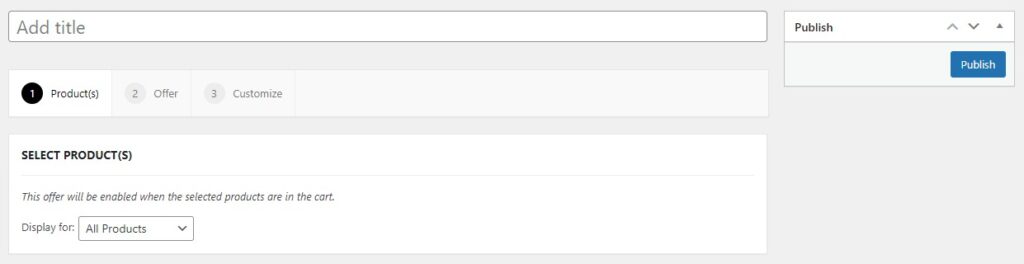
- The first section allows you to select which products to display for this one-click cross sell.
- You can select All Products or Specific Products. If you choose Specific Products, you will see a search field where you can choose which products to display the cross sell for.
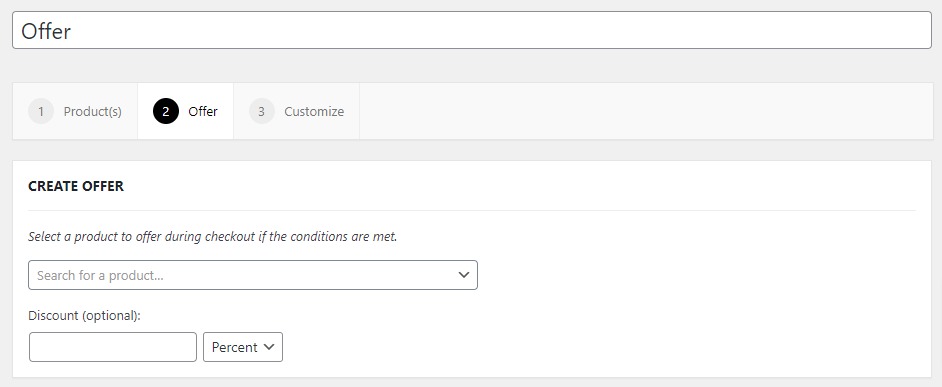
- Once done, click the Offer tab (the second section).
- Here, enter the name, SKU, or ID of the product you want to offer after checkout. Once selected, you can choose to offer a discount for this product when purchased after checkout.
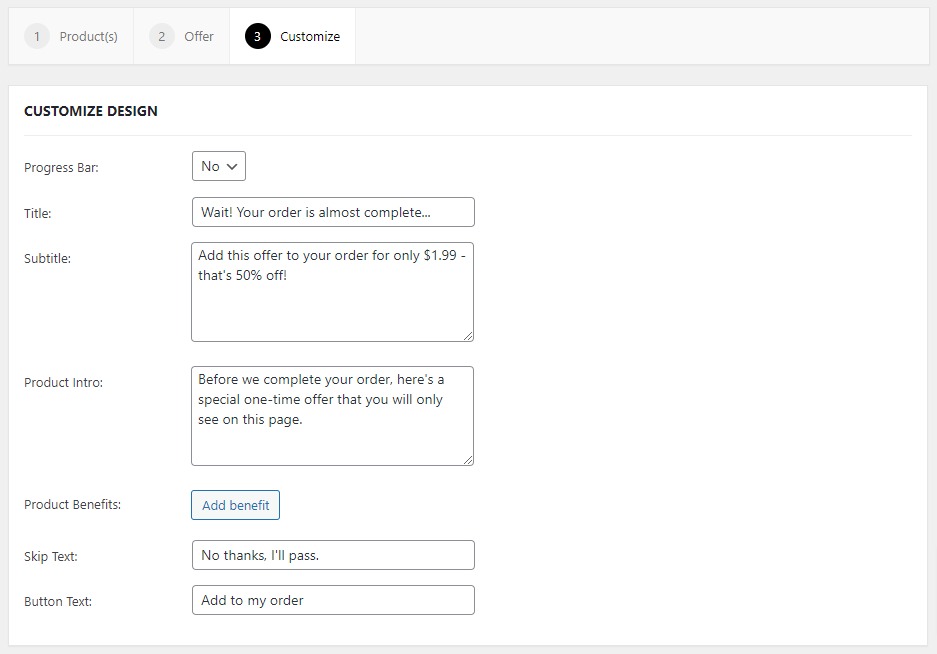
- Click the Customize tab (third section). Here you can modify the content displayed in the offer to make it as compelling as possible.
- Once you’ve finished each section, Publish or Update to initiate the one-click cross sell.
Iconic Sales Booster for WooCommerce
Add cross-selling to your entire WooCommerce store in minutes with Iconic’s WooCommerce cross-sell plugin, Iconic Sales Booster for WooCommerce.
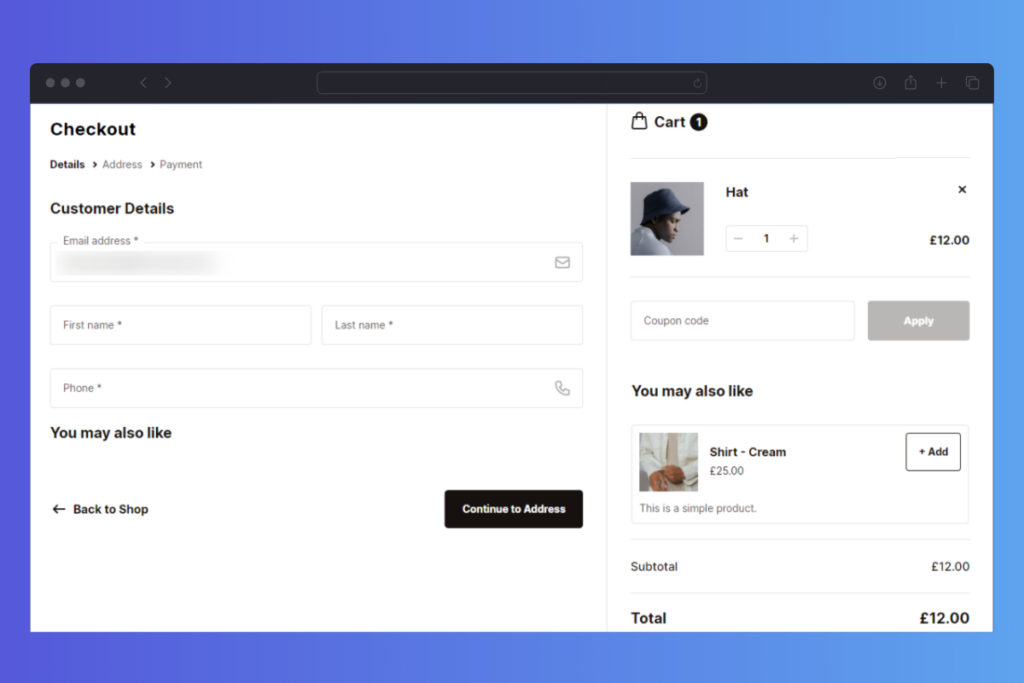
Flux Checkout for WooCommerce
Flux Checkout for WooCommerce is a WooCommerce plugin that transforms the default WooCommerce checkout into one that’s designed for conversions and reducing checkout abandonment.
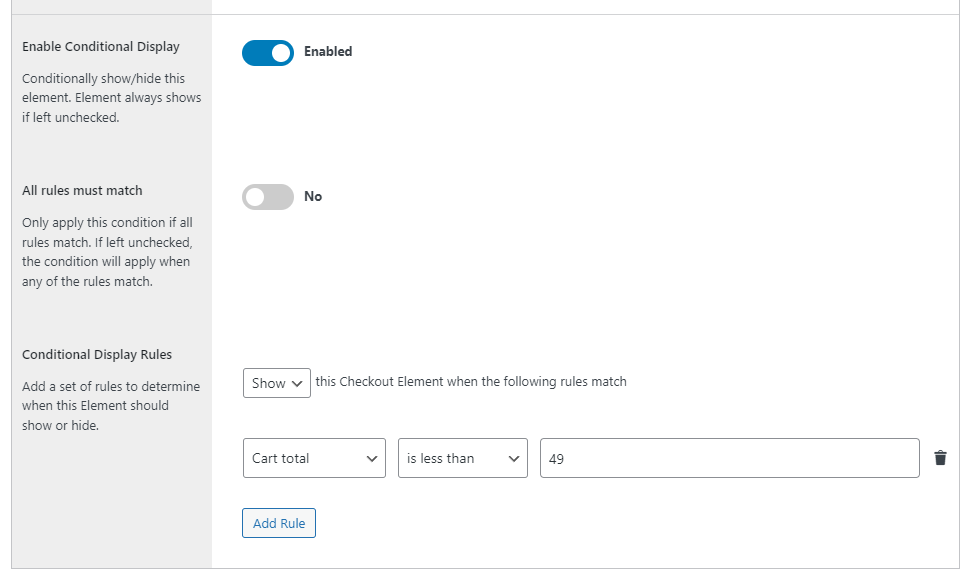
One of its main features however, is cross selling. With Flux Checkout for WooCommerce, you can create custom cross sell offers and add them to the checkout flow. You can position them anywhere in the checkout process and make them conditional based on your customer’s user role, contents in their WooCommerce cart, or the cart total.
Flux Checkout for WooCommerce
Flux Checkout transforms the default WooCommerce checkout into one that’s lightning-fast, distraction-free, and reduces checkout abandonment.
To set up cross selling in your checkout with Flux Checkout for WooCommerce, take the following steps:
- From your WordPress dashboard, go to WooCommerce > Flux Checkout > Elements and then click Add new Element.
- Click on the blue Plus (+) button to open the block selector menu.
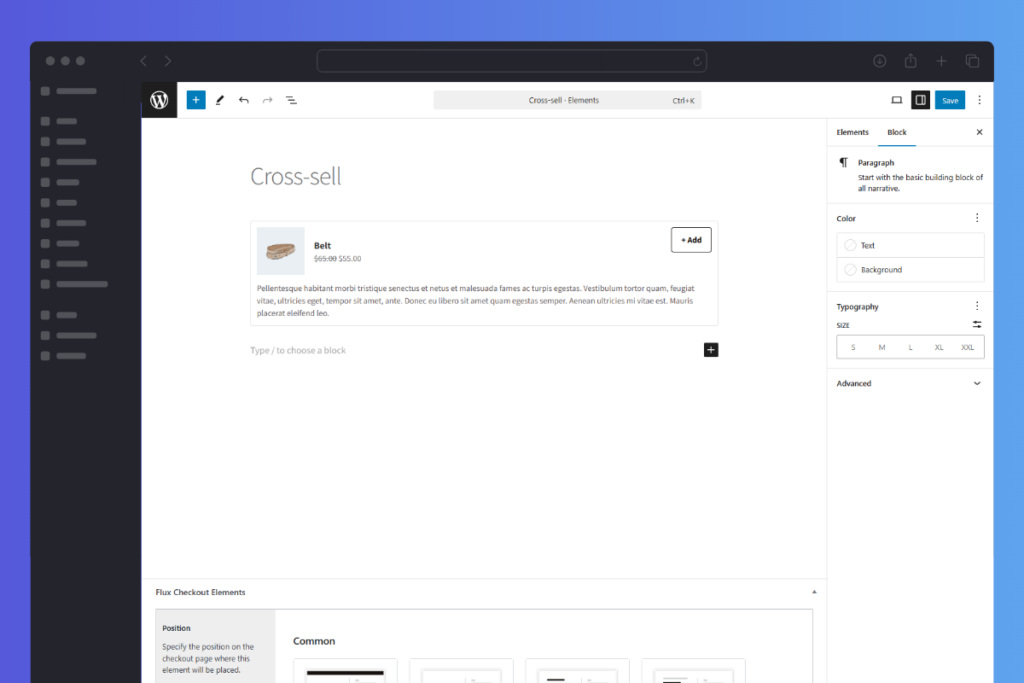
- Search for the Flux Checkout Cross-sell Products block and click on it to add it to the post.
- You can give it a Title and click on Choose Products from the right panel.
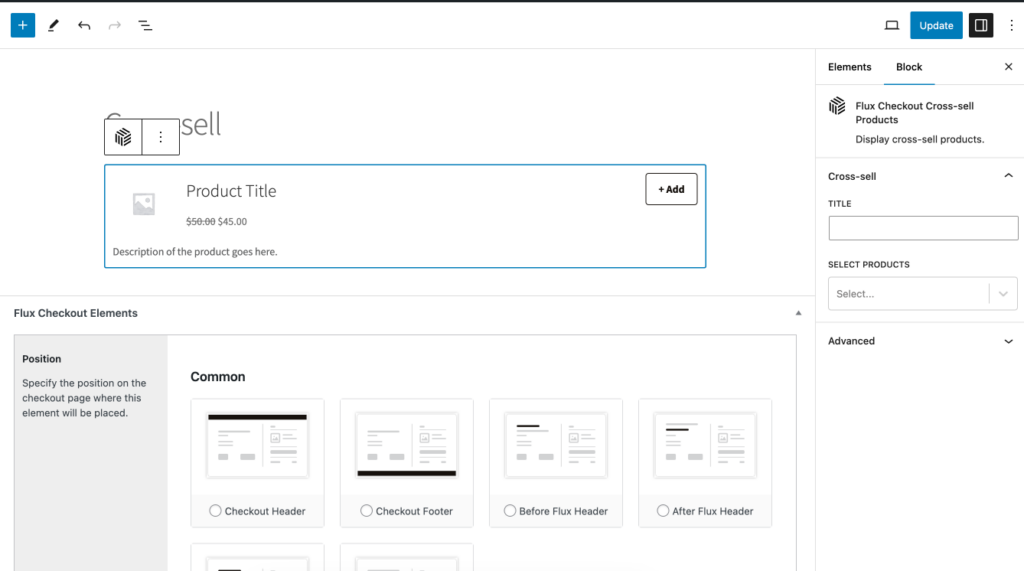
- You can then edit the conditional aspects of these cross-sell products, including their position, using the settings below. For more information on this, take a look at our Checkout Elements guide.
Want these steps in more detail? Check our Flux Checkout cross sell guide.
Flux Checkout for WooCommerce
Flux Checkout transforms the default WooCommerce checkout into one that’s lightning-fast, distraction-free, and reduces checkout abandonment.
Enjoy high-performance cross sells in WooCommerce with a sales boosting plugin
Cross selling is one of the oldest tricks in the book when it comes to driving up revenue. Even better, it doesn’t take much effort to implement a high-converting cross sell strategy in your WooCommerce store.
With Iconic Sales Booster for WooCommerce and Flux Checkout for WooCommerce, you can use social proof, one-click purchases, and customizable sales copy to ensure that you quickly boost sales on your most popular WooCommerce products.

Gina Lucia is our in-house Content Manager at Orderable. She writes articles, user guides, technical documentation, and creates videos on everything WooCommerce and Orderable.
Gina has been working in the WordPress/WooCommerce space since 2012 when she developed WordPress websites for clients large and small.
For the past 8 years, she’s been writing about everything WordPress and WooCommerce, becoming an expert in what makes a WooCommerce store succeed.
When not writing, Gina loves to tend to her vegetable garden, read, or travel to mainland Europe.