
In this guide, we’ll show you how to add a price to an attribute in WooCommerce. Plus, we’ll do it in just a few steps with the help of the WooCommerce plugin WooCommerce Attribute Swatches.
We’ll cover the following:
- Why you might want to add prices to your product attributes.
- How to add a price to an attribute in WooCommerce.
- How to add swatches to those attributes for a better customer experience.
WooCommerce Attribute Swatches
Replace the default WooCommerce variation dropdown menu with variation swatches for WooCommerce. Add color swatches, image swatches, and modern text buttons to your variable product pages.
So, before we get into adding prices to your product attributes in WooCommerce. We’ll first explore why you might need to add prices to your product attributes. We’ll also give you some examples of website owners who can use this method.
Watch the video tutorial or continue scrolling to read the full article.
Why add prices to your product attributes?
Adding prices to your product attributes can have a lot of benefits. It can increase your average order value, boost profit margins, and allow you to stock a variety of different quality items without a loss to your store.
But aside from these monetary benefits, adding prices to your attributes can also have practical benefits.
Different attributes cost more
The attributes you use in your store usually cover material changes, color, weight, specs, and more. So if you have, for example, a pair of shoes that come in a few different materials, these materials might cost different amounts to manufacture.
For this reason, you’d need to add different prices for these materials. The easiest way to do this for your product variations is to add a different price or additional price for each attribute.
In this case, a leather shoe could cost an additional $10 compared to a shoe made from a cheaper material.
Different attributes require different prices
Similarly, when a customer enters a website to buy tech products, such as cloud storage or software packages, they will be looking to find the package to suit them.
Different storage sizes or packages cost different amounts. If you’re using attributes to list these, the price should change depending on the package.
For example, if you’re selling cloud storage, the storage size attribute will likely contain different prices for 512GB or 1TB or 2TB storage.
Transparency boosts trust among customers
When prices for all the attributes are visible on the website, it becomes very transparent. Instead of applying hidden charges after a customer chooses a product option. It’s better to give them all possible options and respective prices at a glance.
As a result, customers rely on the brand more, and website owners can easily grow a loyal customer base.
All of these benefits speak for themselves, but if you’re looking to add prices to your product attributes in WooCommerce, you’ll need the help of a plugin.
Introducing the plugin WooCommerce Attribute Swatches
WooCommerce Attribute Swatches is a WordPress plugin that replaces the default WooCommerce attribute dropdown menus with text, color, or image swatches.
But that’s not all. WooCommerce Attribute Swatches will also let you do the following.
Add attribute fees to your pricing
With WooCommerce Attribute Swatches, you can add an additional cost to every one of your attributes should you need to.
This means you can charge more for different materials, colors, patterns, sizes, and more.

Modernize WooCommerce attributes
Update the default attribute dropdown menus on the single product page with text swatches, color swatches, image swatched, and more.
Give customers a better experience when exploring and customizing your products. Visual swatches will help them make decisions faster. Couple this with adding swatches to the category and shop page, and you’ll save them even more time.
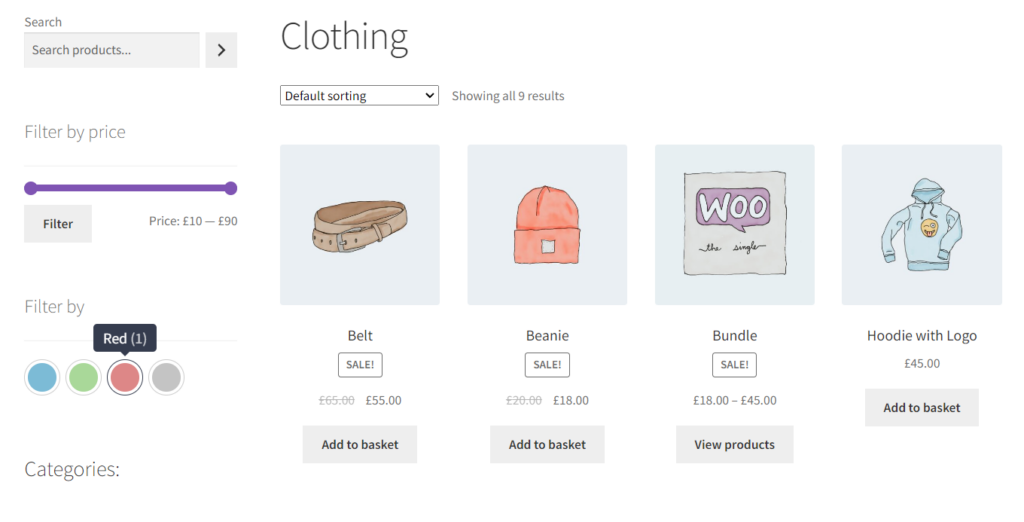
Add swatches to product filters
Finding the right product will be easier for your customers when you add those color and image swatches to product filters. Customers can instantly check the product’s appearance while searching, finding their desired products much faster.
Make shopping easier for customers
Once you add a price to all the attributes, customers can easily pick and choose the attributes they like. This will help them customize the product, and the total price will be calculated based on the attributes.
So now we know the benefits of using WooCommerce Attribute Swatches. Let’s get it set up on your store.
How to add a price to an attribute in WooCommerce
In this tutorial section, we’ll show you how to add a price to an attribute in WooCommerce using WooCommerce Attribute Swatches. First, we will walk you through how to install WooCommerce Attribute Swatches on your WordPress website.
Next, we will show how to create and display your product attributes on the WooCommerce product page. Finally, you will know how to add fees and swatches to your attributes.
Step 1: Install WooCommerce Attribute Swatches
To get WooCommerce Attribute Swatches, purchase and download it from the Iconic Store: iconicwp.com/woocommerce-attribute-swatches
WooCommerce Attribute Swatches
Replace the default WooCommerce variation dropdown menu with variation swatches for WooCommerce. Add color swatches, image swatches, and modern text buttons to your variable product pages.
Once you have the file on your device, you can proceed to the next step.
To install the plugin, follow these steps:
- Go to Plugins > Add New > Upload Plugin on your WordPress Dashboard.
- Then browse from your device and select the zip file you have downloaded previously.
- After the file is uploaded, click Activate.
- It will take a few moments to activate the plugin. After activation, you need to enter the license key.
Now that you have the plugin installed on your WordPress website, we can show you how to create attributes for your products.
Step 2: Create your product attributes
If you already have your attributes, you can skip to step 4. In this step, we’ll set up your product attributes in WooCommerce.
You can create a global product attribute by following the steps below:
- Go to Products > Attributes.
- Add the attribute Name that will be shown on the front end of your website.
- Then, add a Slug, which works as a reference for the attribute. It shouldn’t be more than 28 characters. Adding a slug is optional.
- Check the Enable Archives option if you want this attribute to have product archives in your store.
- Next, you should choose the Default sort order from the drop-down menu. Different options like Name, Name (numeric), Term ID, or Custom ordering are there to choose from.
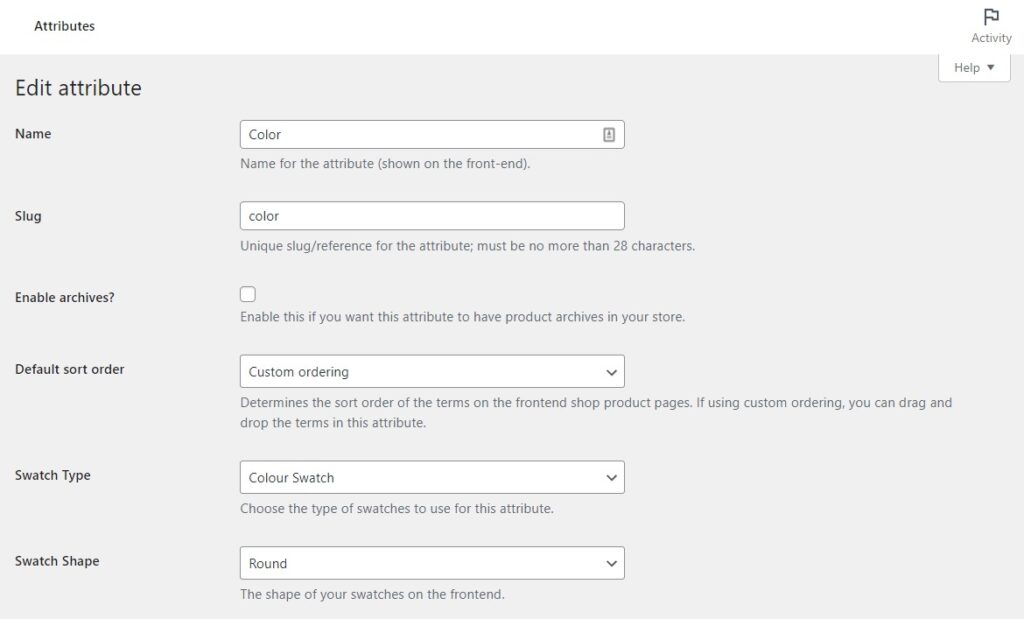
- After that, click Add Attribute button to confirm.
- You will see the attribute being added to the table on the right.
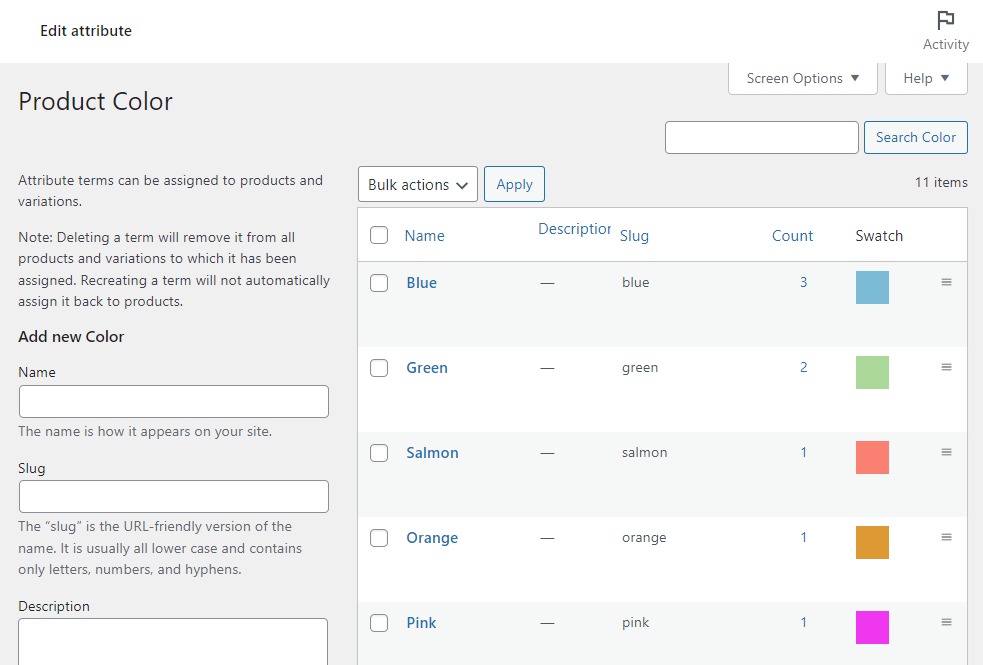
- Now, you need to add terms to your attributes. For example, if you have an attribute called Color, you can add terms like red, black, white, etc., to the Color attribute.
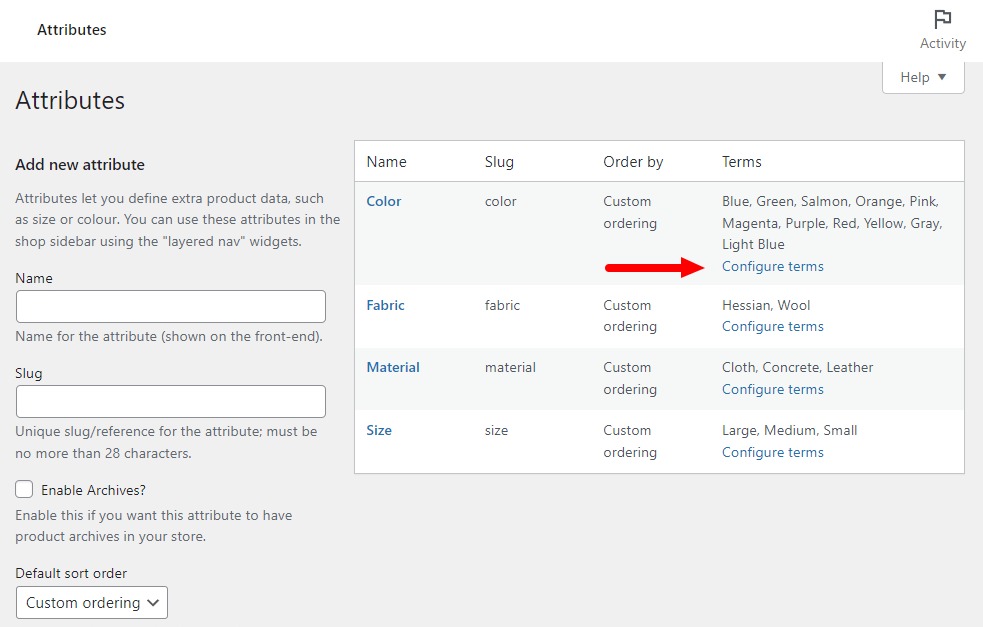
- To do this, click Configure terms in the Terms column. In the new field, you need to add the terms for the attribute. If you add color terms, the text will appear as Add new Color.
Now that you have created a new attribute, it is time to display the attribute on the product page.
Step 3: Display attributes on the WooCommerce product page
Once you have created the product attribute, you need to display it on the product page.
To display the product attribute on the product page, take the following steps:
- Go to Products > Add New product. You can also choose to edit existing products if there are any.
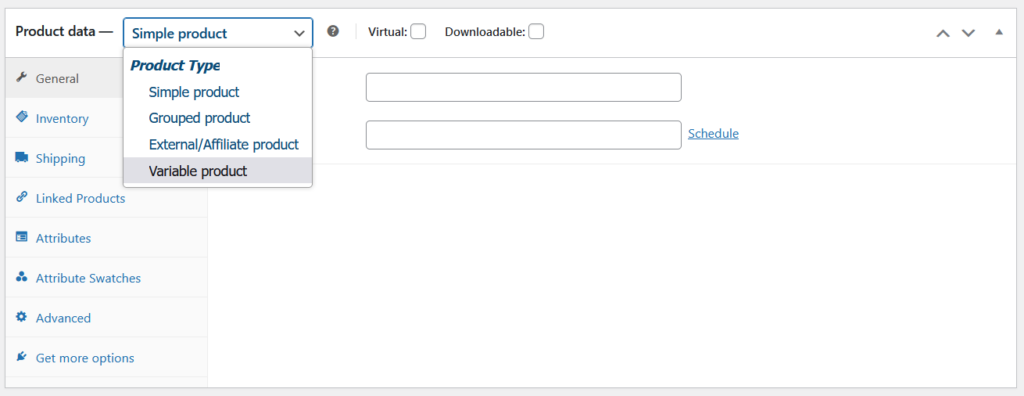
- Scroll down to the Product Data section of the page, and next to Product Data, click the dropdown menu and select Variable Product. This will change the product type to a variation option.
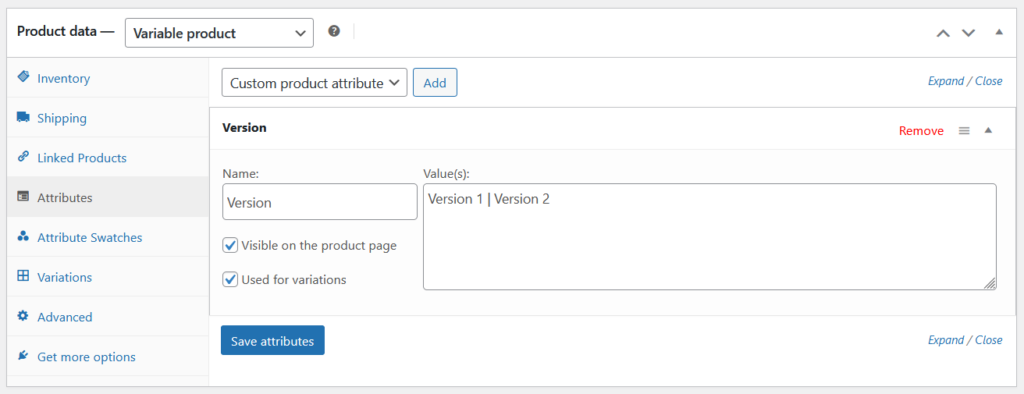
- Then, from the Product Data section, click the Attributes tab.
- On the right-hand side of the dialogue box, click the Custom product attribute drop-down menu to select the attribute you have recently added.
- After selecting the attribute, Color here, for example, click the Add button to add the attribute.
- Once the attribute is added, you need to add the terms of the attribute you have previously created. Click the Value(s) box to include the attribute values.
- Make sure to click the Used for variations checkbox so you can use these attributes for this variable product.
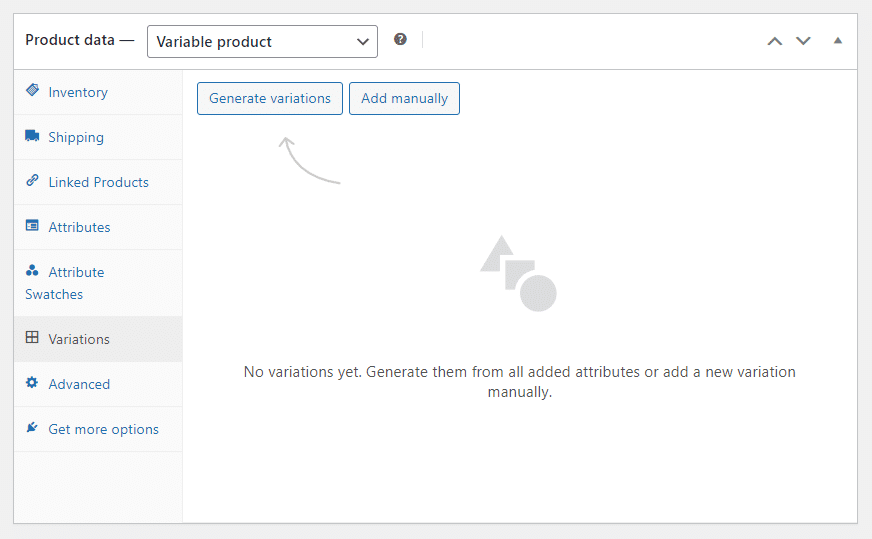
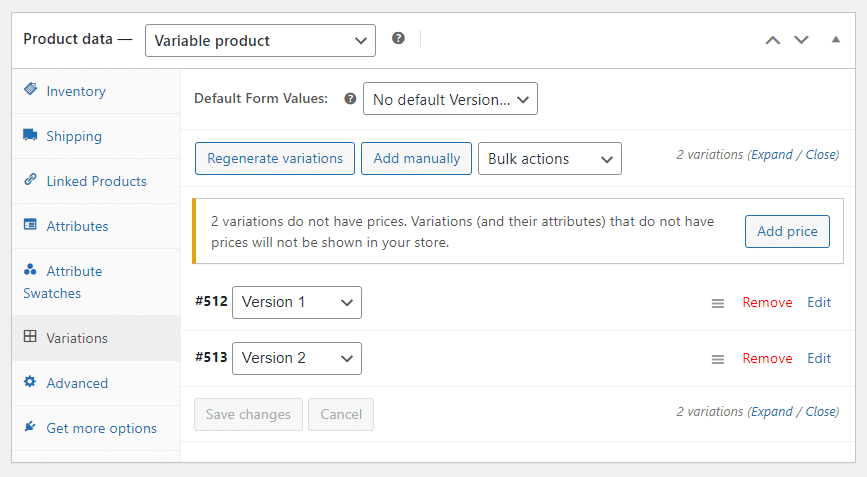
- Next, you’ll need to click the Variations tab on the left, and once here, click the Generate Variations button. You should then see your product variations appear.
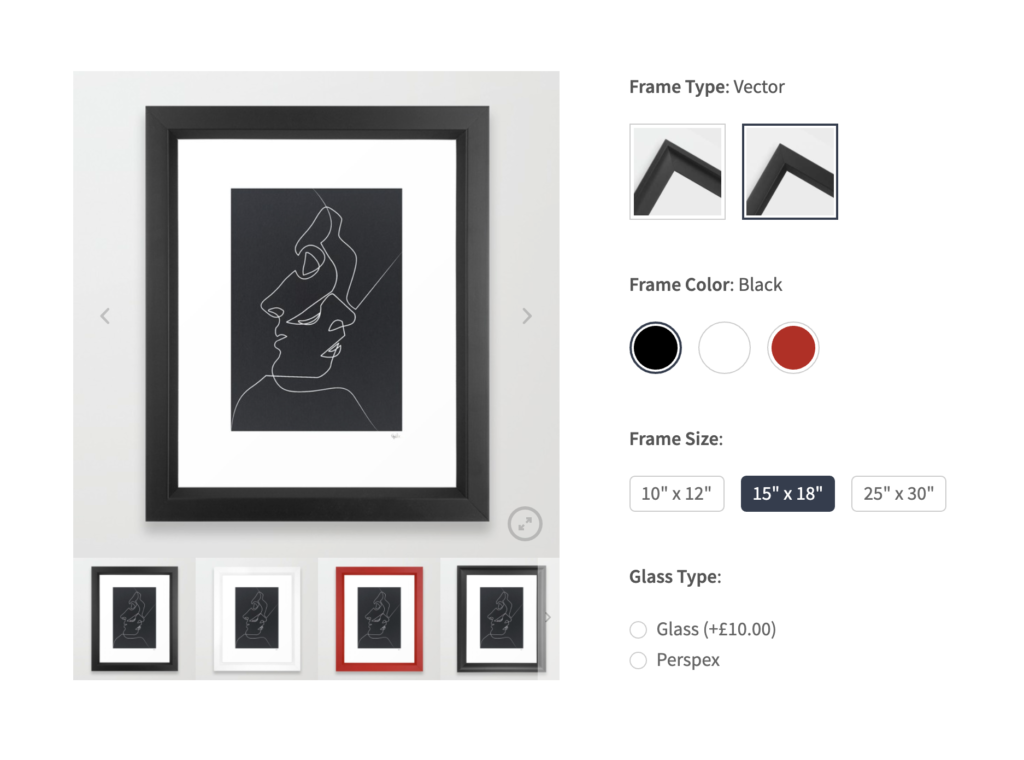
- Once done, make sure your variations have a price by either clicking each variation and adding it, or clicking the Add price button if it shows.
- After selecting the term, click the Save Attributes button to confirm your selection and Update or Publish your product.
You have successfully displayed product attributes on the product page. Now it’s time to add fees to your attributes using WooCommerce Attribute Swatches.
Step 4: Add fees to your attributes
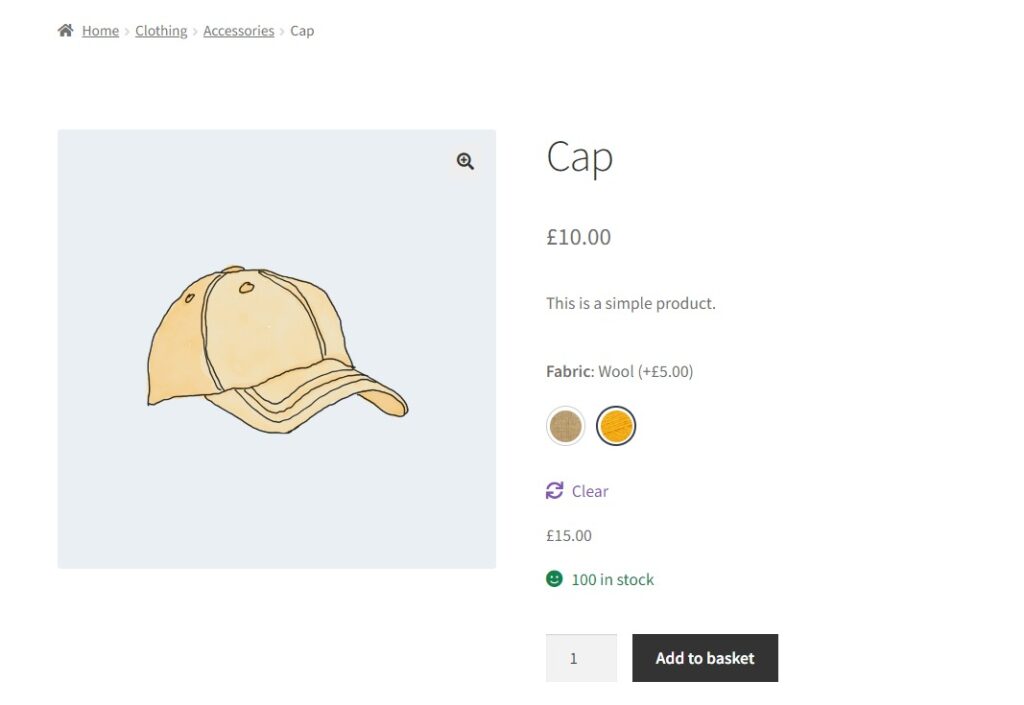
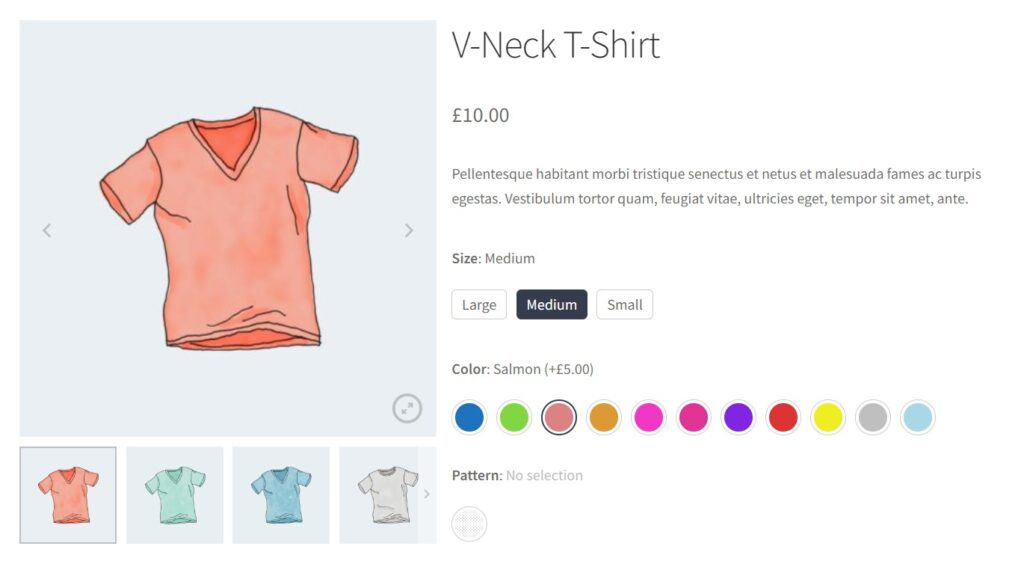
If different variations of your products cost different amounts, you can assign that price value to a product attribute in WooCommerce. All so that they show up on the product page when a customer visits your online store.
We’ll do it both globally(store-wide) and per product for your WooCommerce product variations.
To add fees to attribute swatches globally, do the following:
- Go to Attributes > Configure Terms on your WooCommerce dashboard.
- Hover your mouse over the attribute term you want to change. For example, if you want to add a special price to the term Red, hover on it and click Edit.
- Go to Swatch Options and type the variation price value in the Fee price field.
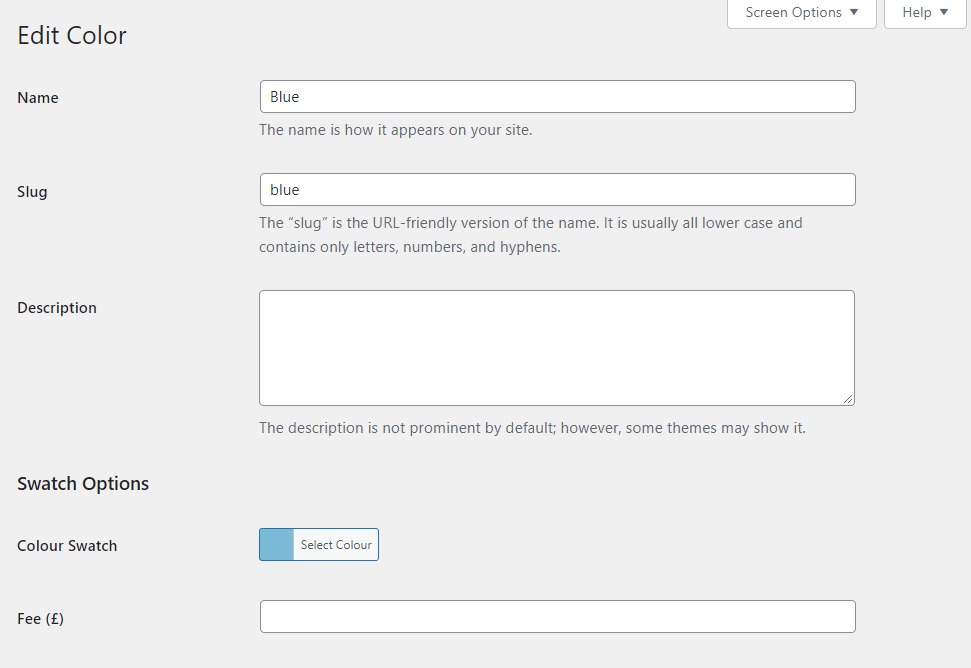
- Click Save changes once you are happy with everything.
To add fees to attribute swatches per product, take the following steps:
- From your WordPress dashboard, go to Products > All Products and click to edit the product you want to add fees to.
- Scroll down to the Product Data section and click the Attribute Swatches tab.
- Then click on the Fees section underneath your desired attribute to expand it.
- Insert the price in the Fees field.
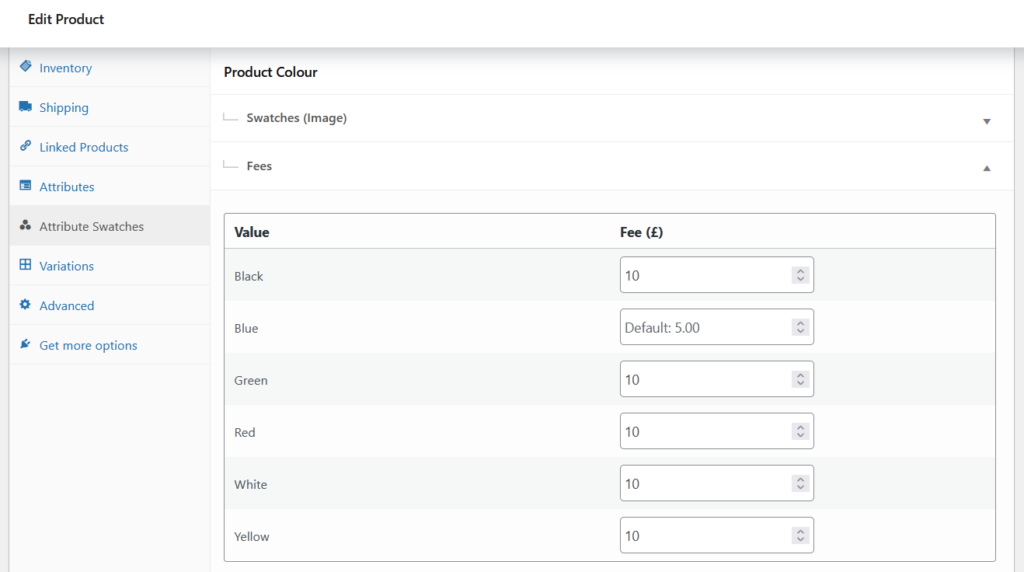
- Once you’re happy with your fees, go to the Publish section at the top and click Update to finalize everything.
Now your customers will see different prices for different attributes on the product page.
We’ve achieved what we set out to achieve, but let’s take it one step further and add swatches to these product attributes.
Step 5 (optional): Add swatches to your attributes
This section will guide you on how to add different color, image, and text swatches to the product attributes you have already created.
To add attribute swatches globally, follow these steps:
- Hover on Products from the WordPress dashboard and click Attributes.
- Click the attribute you want to add swatches to and select Edit.
- Scroll down and go to the Swatch Type section.
- Under this section, you can choose Color Swatch, Image Swatch, Text Swatch, or Radio Button. Select the desired swatch, and you’ll find the following fields below the Swatch Type.
- Swatch Shape indicates the shape of the swatches displayed on the product page. You can choose from round or square swatches by clicking the dropdown menu.
- Swatch Size (px) defines the dimensions of your swatches. It has weight and height fields that you can edit to determine the size of the swatches.
- Enable Tooltips? If this option is enabled, a text description about the swatch will appear when a customer hovers on it.
- Show Swatch in Catalog? If you want to display the swatches on the product catalog, enable this option.
- After all the inputs are okay, click Add Attribute or Update button.
- Next, go back to the Attributes page and click Configure Terms in the attribute table.
- Here you’ll be able to click and edit each attribute and add image or color swatches.
Add a price to your WooCommerce attributes today
That’s it! You’ve now learnt how to add a price to an attribute in WooCommerce.
This technique will provide customers with a hassle-free and transparent shopping experience and let them choose their desired attributes while keeping the price in mind.
Make these changes quickly with WooCommerce Attribute Swatches.
WooCommerce Attribute Swatches
Replace the default WooCommerce variation dropdown menu with variation swatches for WooCommerce. Add color swatches, image swatches, and modern text buttons to your variable product pages.

Gina Lucia is our in-house Content Manager at Orderable. She writes articles, user guides, technical documentation, and creates videos on everything WooCommerce and Orderable.
Gina has been working in the WordPress/WooCommerce space since 2012 when she developed WordPress websites for clients large and small.
For the past 8 years, she’s been writing about everything WordPress and WooCommerce, becoming an expert in what makes a WooCommerce store succeed.
When not writing, Gina loves to tend to her vegetable garden, read, or travel to mainland Europe.