
Are you looking to add WooCommerce swatches to your ecommerce store and create a better user experience for your customers? This guide is for you.
WooCommerce variation swatches create a smooth shopping experience for your customers. They allow them to spend less time finding products and more time purchasing.
👋 In this guide, we’ll walk you through how to add this powerful customer experience tool to your WooCommerce store.
Here are the specifics of what we’ll cover:
- What are the variation swatches, and why should you add them to your WooCommerce store?
- What is the best WooCommerce variation plugin?
- How to add swatches to WooCommerce.
To begin, let’s understand what swatches are and why you should add them to your WooCommerce shop.
WooCommerce Attribute Swatches
Replace the default WooCommerce variation dropdown menu with variation swatches for WooCommerce. Add color swatches, image swatches, and modern text buttons to your variable product pages.
Why should you add variation swatches to your WooCommerce store?
WooCommerce swatches are useful customer experience tools. But, before we can look at how to add them to your WooCommerce store, let’s first address what they are so we’re on the same page from the get-go.
What are variation swatches in WooCommerce?
WooCommerce swatches are a feature that allows you to visually present product attributes, typically on the product page. Suppose you have a v-neck t-shirt in different colors and with different patterns printed on it.
In the default WooCommerce setup, this variable product’s color and pattern options would be presented in a dropdown menu. Customers would have to click the menu to expand it, see the options available to them and then click on the options to see what they look like.
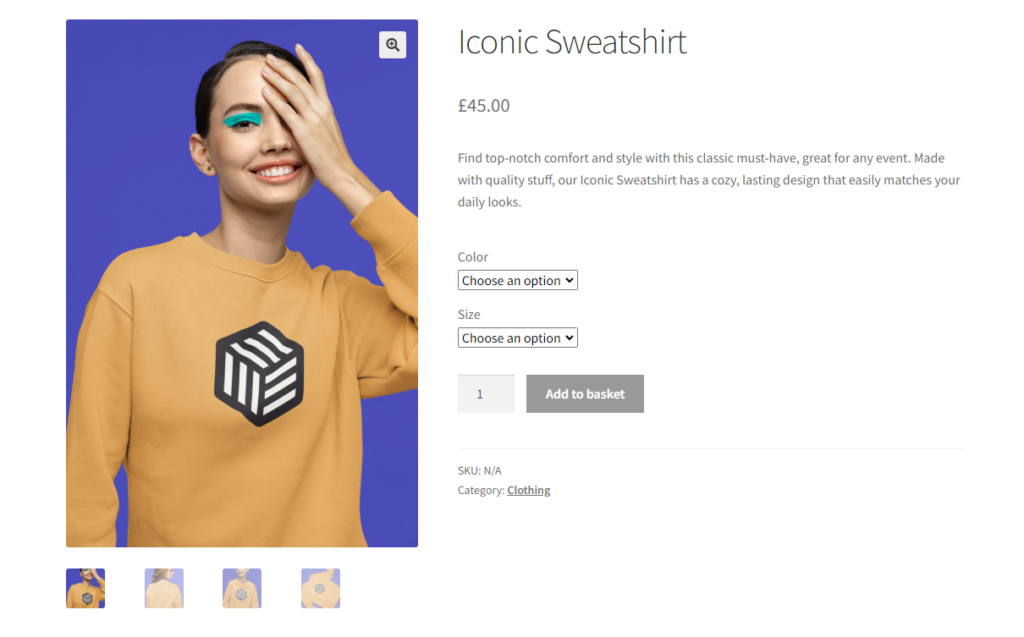
With WooCommerce swatches, you can replace these product variation dropdowns with their respective color and image samples. When customers get to your product page they will see the color samples (in the color swatches) and small images of the patterns, materials, etc., (image swatches) instead of the dropdowns.
Now we have a pretty good idea of what swatches are, let’s go over why you should add them to your WooCommerce store.
Why use variation swatches in your WooCommerce store
Wondering if you should use variation swatches in your WooCommerce store? Upgrading the default WooCommerce product variation dropdowns into color, image, and text button swatches has several benefits.
Swatches improve your customer’s shopping experience
Dropdown menus are an undesirable way to present your variable product options. They require users to go through a bunch of clicks to open them up and see what the available product options look like.
If you have tons of attributes and variations, looking through all the options in the dropdown can easily overwhelm them. Ultimately, dropdowns don’t provide the best possible experience for customers.
📈 Seeing as a bad user experience drives away 90% of customers, we need to do better.
With variation swatches, you present customers with a visual way to look through your product variations. Users can quickly and easily see the available variations and select their preferred option with a simple click.
They can boost your conversions
Variation swatches simplify the product variant selection process for your customers. This allows them to easily compare and choose the option they want.
Customers are more likely to convert if the path to their desired product is shorter, easier, and when they have a great experience finding it.
📈 One study found that a great shopping experience significantly influences the purchase decisions of 73% of consumers.
Variation swatches improve the design and visual appeal of the product page
The product page is where you win customers. So you want to put your efforts into making this page as appealing to customers as you can. Instead of plain, boring text and dropdowns, swatches allow you to upgrade this page visually with color pickers, text buttons, and image swatches.
Swatches make good use of the whitespace available on the product page to display interactive elements, making this page visually appealing to potential customers.
In essence, product variation swatches improve your customer’s shopping experience, allowing them to visually browse through variable product options. They can find what they’re looking for in fewer clicks. Because of this, they’ll spend less time finding products and more time purchasing.
On its own, WooCommerce doesn’t allow you to add swatches to your online store. You’ll need a WooCommerce variation swatches plugin to get it done.
What is the best WooCommerce variation plugin?
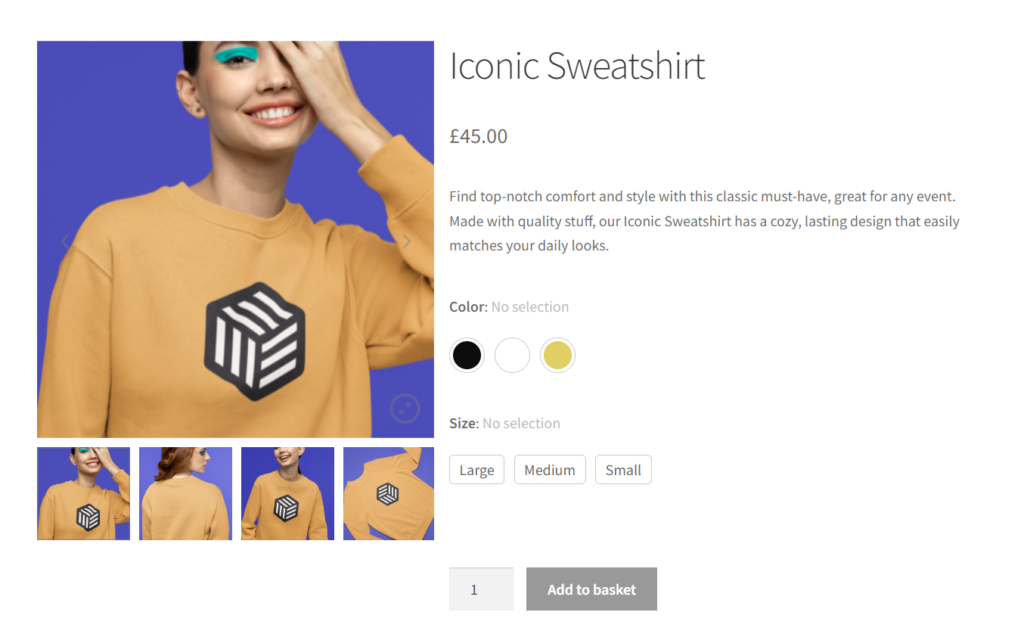
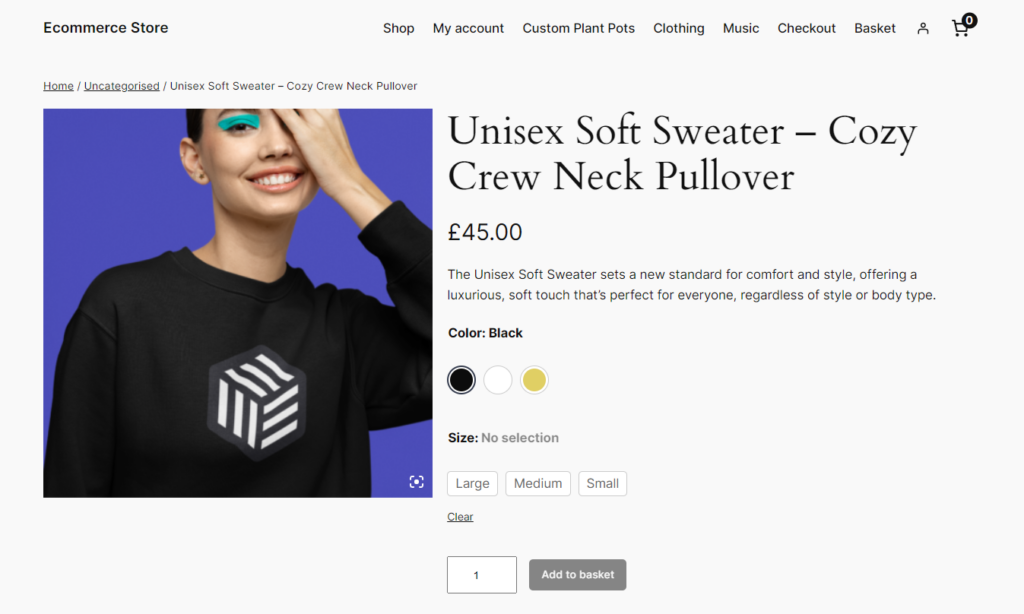
WooCommerce Attribute Swatches is the best variation swatches plugin for WooCommerce. It allows you to replace the standard WooCommerce product variation dropdowns with color, image, text (or label swatches), and radio button swatches.
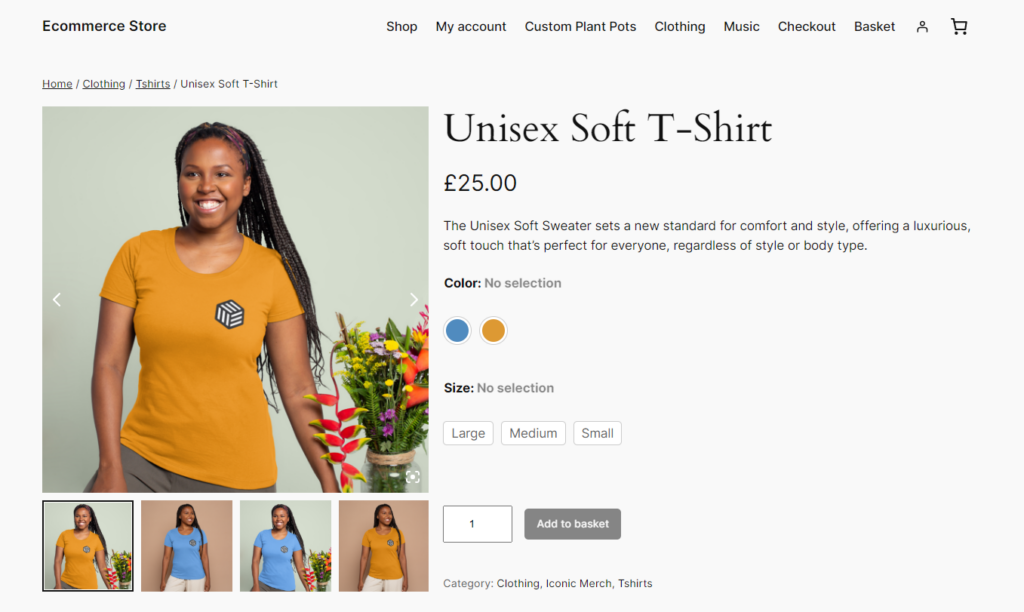
When customers get to your product page, here’s what a customer will see on the front-end:
- A user-friendly color swatches. For individual color variations such as red, black, or white t-shirts. These colors will be displayed separately in clickable color variation swatches.
- Image variation swatches. Small images showing a preview of the patterns, designs, materials, or finishings of a variable product.
- Text buttons. An upgrade of your text-based swatches that adds square shapes around it to look like a button.
- Radio buttons. With clean text and an upgraded design.
When you have swatches like this on your WooCommerce site, your customers can quickly click through the variation options and find the product they want to buy easily. By now we know that if they are able to find their preferred product more quickly, they’re more likely to buy.
Now let’s see what WooCommerce Attribute Swatches can do for you and what makes it such a great plugin for adding variation swatches to your store.
WooCommerce Attribute Swatches
Replace the default WooCommerce variation dropdown menu with variation swatches for WooCommerce. Add color swatches, image swatches, and modern text buttons to your variable product pages.
You’ll save time creating variation swatches
If you have numerous products each with several variations, creating swatches for each variation would take up a lot of your time. With WooCommerce Attribute Swatches, you don’t have to go through this hassle.
It allows you to create global attribute swatches. This means that you can create swatches once and use them across different variable products. So if you have a shirt, a piece of furniture, sneakers, etc., with the color attribute, you’ll only have to create this swatch once.
Improve your customer’s shopping experience with interactive swatches
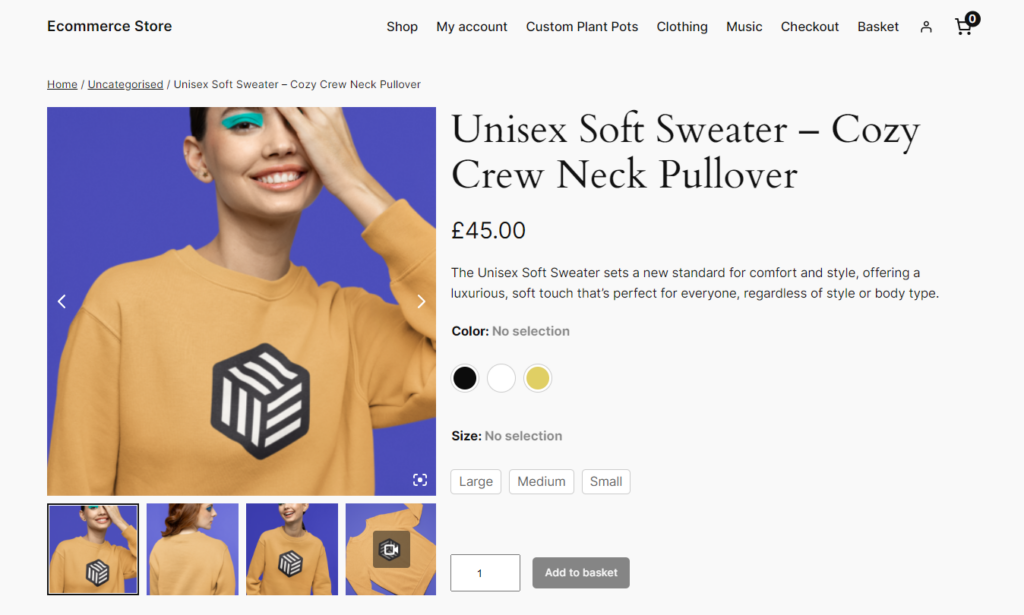
WooCommerce Attribute Swatches allows you to add clickable swatches to your online store. Once customers click on these swatches, the product image updates instantly to reflect the selected variation. This creates a satisfying experience for your customers as they browse through product variations.
In addition, this plugin spaces out the swatches well to make it easy for mobile users to interact with them.
📈 This is important because mobile shopping is on the rise, with one study reporting that more than 50% of online shopping traffic comes from mobile devices.
Allow customers to preview product variations on the shop and category pages
Apart from the single product page, you can also add variation swatches to the shop and catalog pages. Customers will be able to see what’s available before they visit the product page.
Customers who are already well-informed about your product and want to make a quick purchase will love this feature. They can simply select a variation and add it to their cart without leaving the shop page.
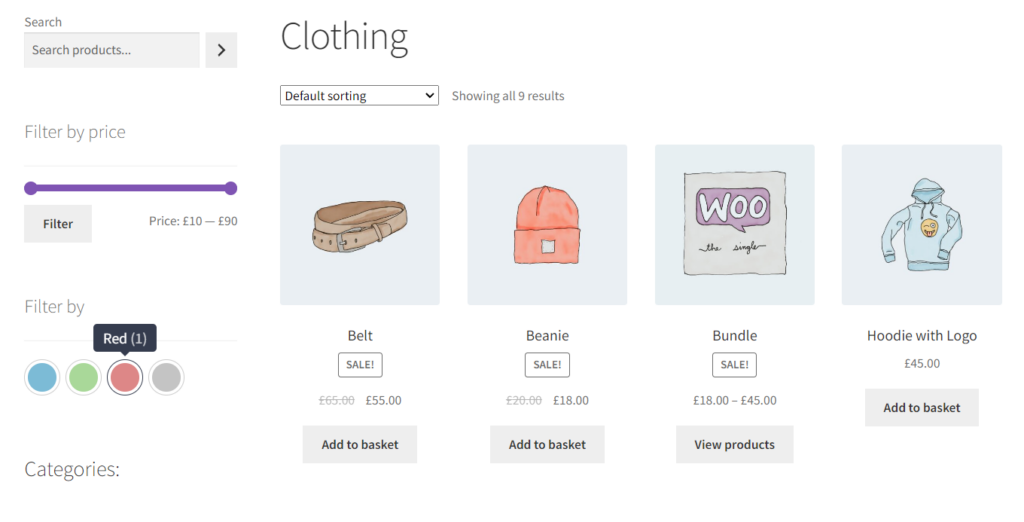
Allow customers to filter products visually
With WooCommerce Attribute Swatches, you can also replace product attribute dropdowns in the product filters on the shop page. This saves customers extra clicks they would otherwise have to go through to filter your products by attribute.

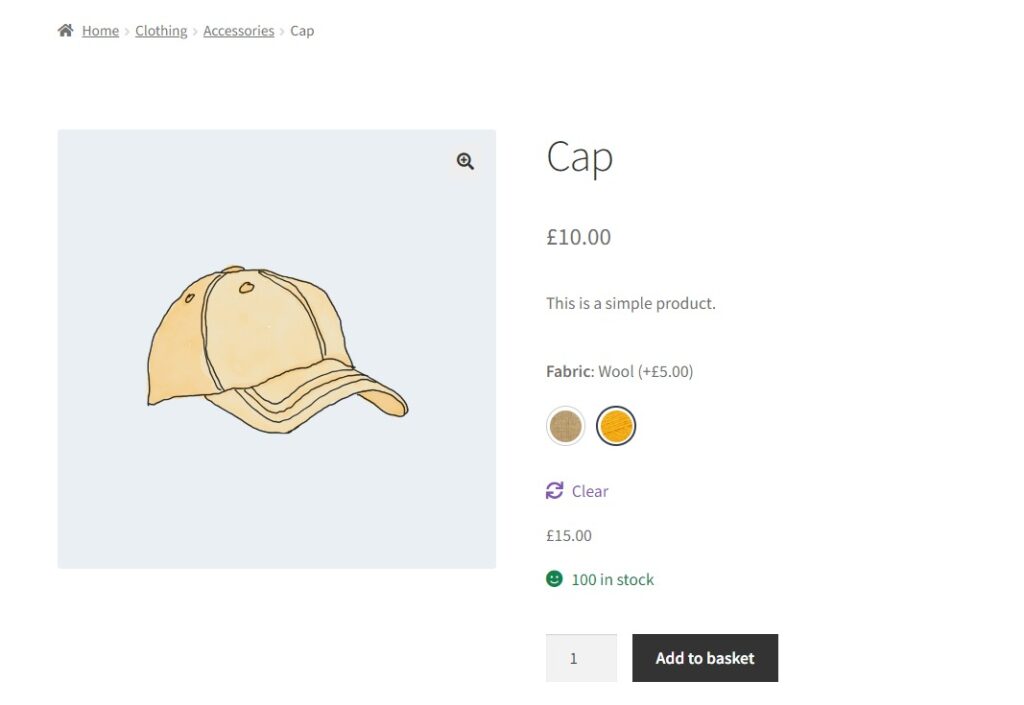
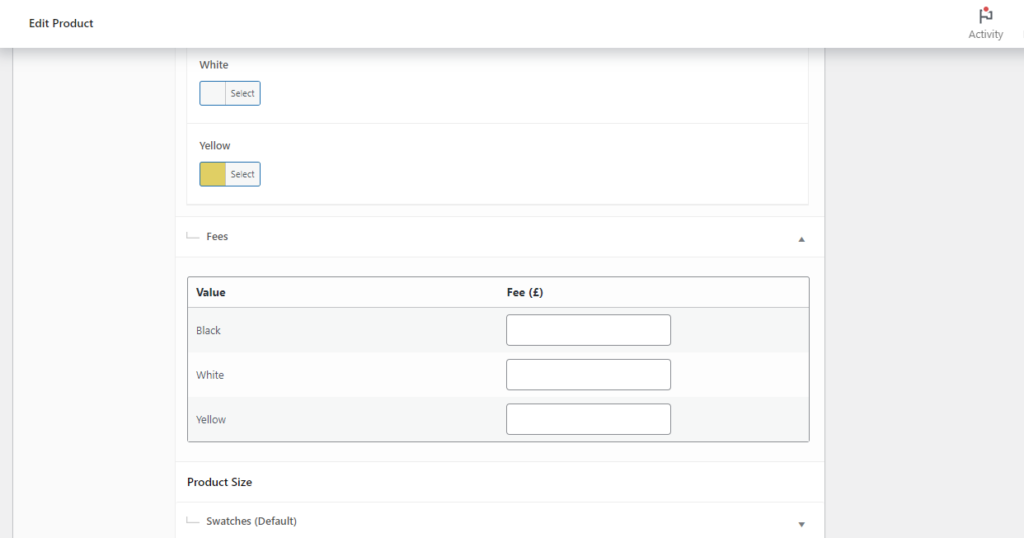
Add prices to your attributes
WooCommerce Attribute Swatches makes attribute pricing a breeze. You can add fees to some or none of your product attributes. Let’s say you have a watch with leather and plastic straps as your variable product.
You can add an extra $15 to the price of the leather straps variation. When customers click on this variation, the price will update automatically. This way, WooCommerce Attribute Swatches allows you to set complex pricing structures effortlessly.
Compatibility with major page builders
This plugin works with major page builders such as Elementor and Divi. As a result, you can edit the swatches to fit seamlessly with the rest of your store’s design using your favorite tools. It also works with WPML so your text swatches will be available across different languages.
Now we’re up to speed on what WooCommerce Attribute Swatches can do. Let’s set it up and add product variation swatches to your WooCommerce store.

How do I add swatches in WooCommerce?
In this section, we’ll walk you through a tutorial on how to add swatches to your WooCommerce store using the WooCommerce Attribute Swatches plugin.
The first thing you’ll need to do is install WooCommerce Attribute Swatches in your WordPress website. To do this, go to the Iconic website: iconicwp.com/woocommerce-attribute-swatches and purchase the pro plugin.
WooCommerce Attribute Swatches
Replace the default WooCommerce variation dropdown menu with variation swatches for WooCommerce. Add color swatches, image swatches, and modern text buttons to your variable product pages.
After completing your purchase, you’ll receive two emails: one with an invoice of your purchase and the other with your license key.
Then follow these steps to install it in your WordPress website:
- From your WordPress dashboard go to Plugins > Add New and click the Upload Plugin button at the top.
- Select the zip you downloaded it, upload it, and then click Install Now. Once this is done, click Activate.
- You’ll be directed to the license activation page. Add your license key and click Agree & Activate License.
WooCommerce Attribute Swatches is all set up, now let’s use it to add variation swatches to your store.
How do I create custom swatches for WooCommerce products?
Color, size, and material swatches are the most common swatch types you’ll set up on your WooCommerce store. You can create them as global swatches for use across different products and in your product filters.
However, some products have attributes that are specific to them or they don’t necessarily follow the same style as the global swatches you’ve created. For example, a crewneck, turtleneck, or v-neck T-shirt, or a chair with a modern, vintage, or rustic design.
WooCommerce Attribute Swatches allows you to create custom swatches, specific to these types of products.
Creating custom product-specific swatches with WooCommerce Attribute Swatches
If you want to create product-specifc swatches with this plugin, here’s how to go about it.
Note: This guide presumes you’ve already set up variable products with their attributes. If you haven’t check out our WooCommerce variable product guide to learn how to get it done.
- Log into your WordPress dashboard, go to Products > All Products, and click on the individual product you want to add custom swatches to.
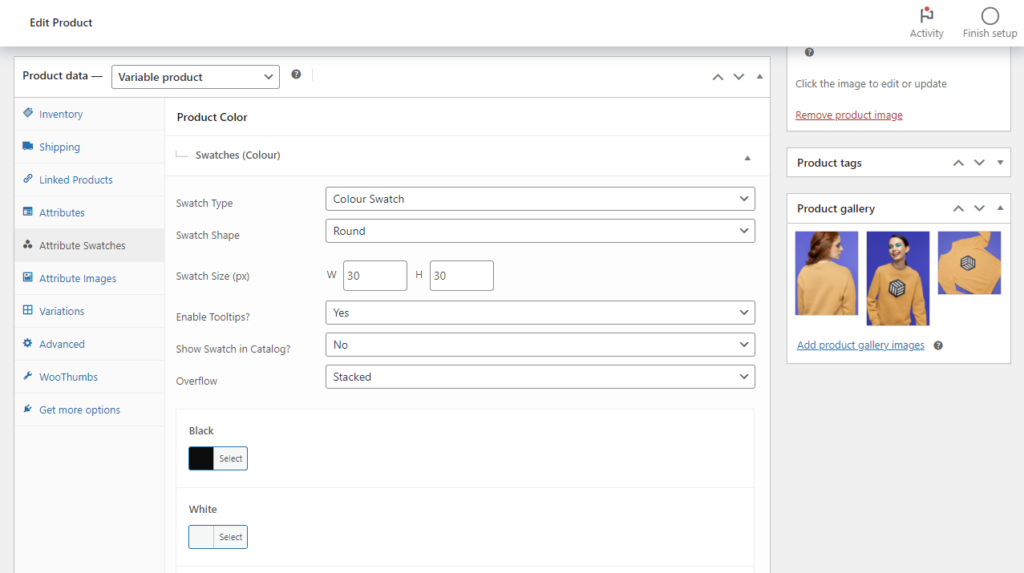
- Scroll to the Product data section and click on the Attribute Swatches tab. Here, you’ll see all the attributes assigned to your variable product with a section underneath each attribute for managing swatches.
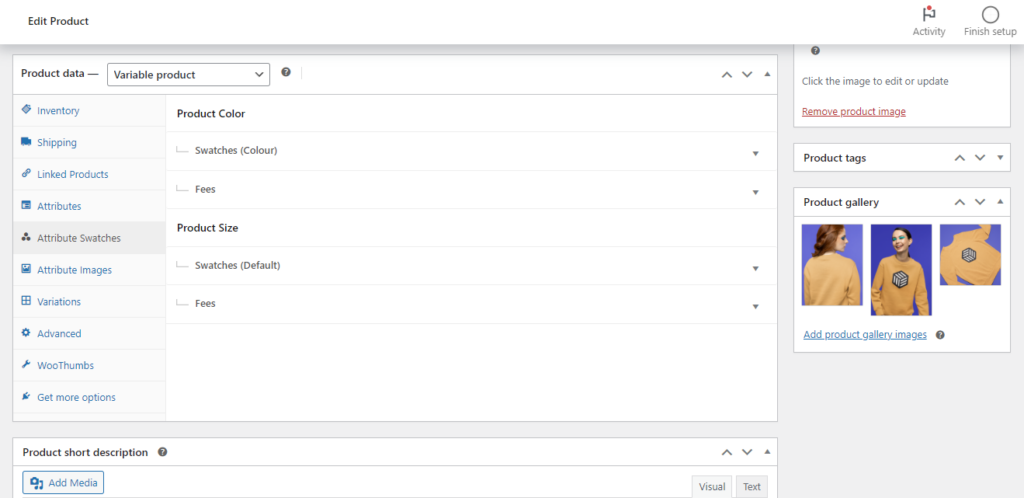
- Click on the Swatches section under the attribute name. You can also hover over this entire section and click the black down arrow to see more information.
- If you haven’t created product-specific swatches for this attribute, the preselected option in the Swatch Type dropdown will be Default. Change this to the type of swatch you want to create (color, image, etc.), then all your custom swatch settings will appear.
- Here, you can change everything including:
- Configuring its shape.
- Image size, if it’s an image swatch.
- Enabling tooltips.
- Showing it on the catalog page.
- Once you’re satisfied with your changes, click on Publish/Update.
So, that’s how you set up custom swatches. Next, we’ll go over how to set up image image variation swatches.
How to set up image swatches for WooCommerce product variations?
If you have pattern variations or material variations on your products, you would want to create image swatches for them. Image swatches will enable your customers to see a visual preview of what’s available.
Create your image swatches
You can set this up in a few steps using WooCommerce Attribute Swatches. Here’s how to do it.
- Go to Products > Attributes on your WordPress dashboard. If you’ve already created the attribute for which you want to add image swatches, skip to step 3. If not…
- Add a name for your attribute in the Name field (for example, fabric) and fill out the rest of the fields as needed.
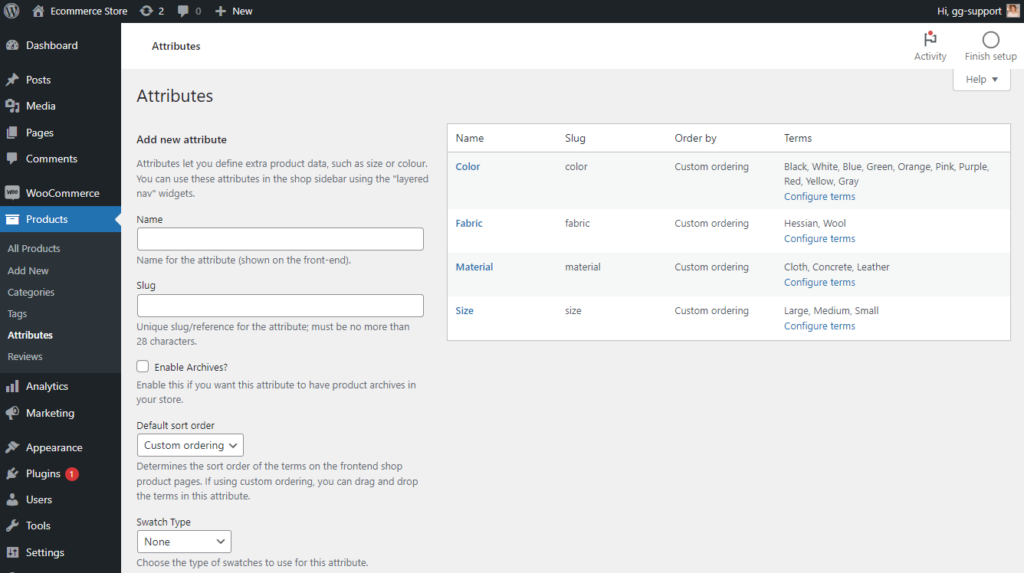
- Next, scroll down until you see Swatch Type. Change this to Image Swatch and complete the following settings:
- Set the size and shape.
- Choose whether to enable tooltips or not.
- Choose whether to display swatches on the catalog page or filters, etc.
- After this is done, click the Add Attribute or Update button.
Upload your images
Next, we’ll add the images to be displayed in the image swatches.
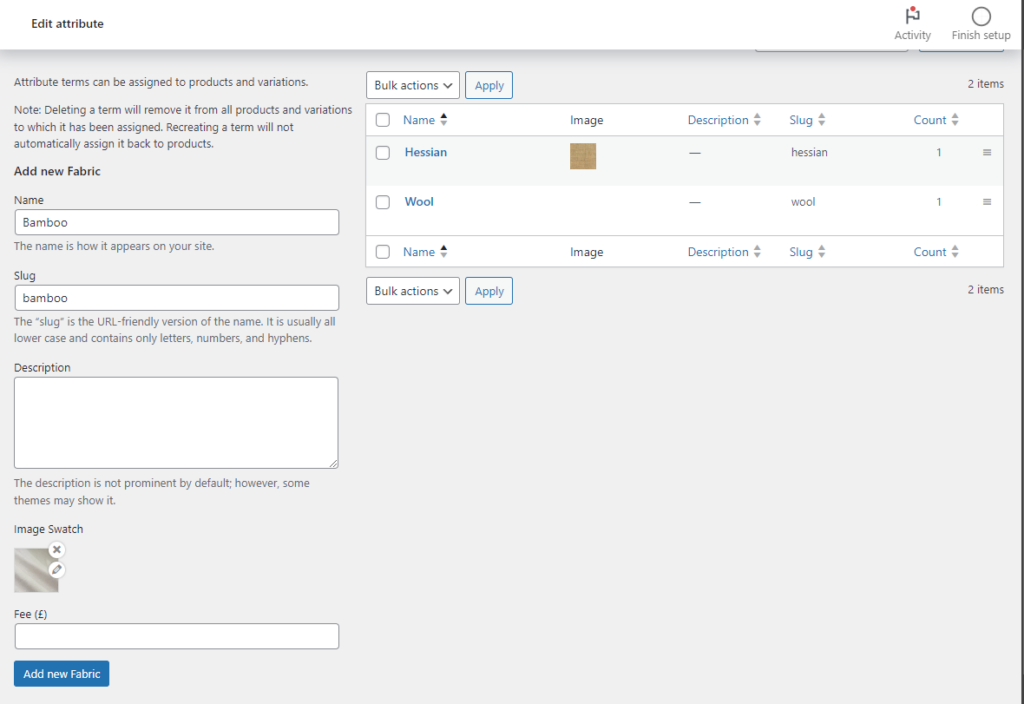
- Still on the Attributes page, click on the Configure terms link under the Terms column.
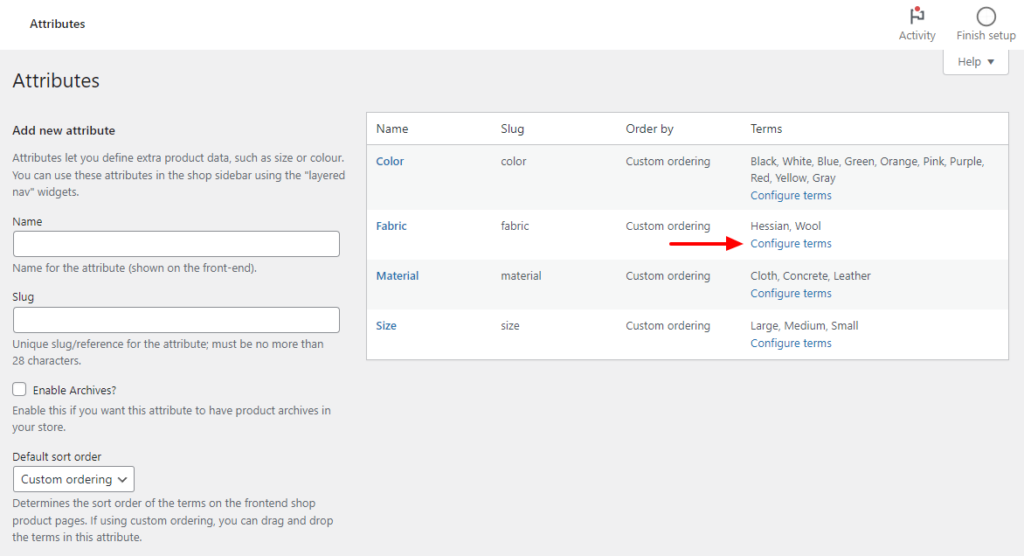
- Enter a name for the swatch type (for example, Hessian) and fill out a description for it.
- Under the description, click the plus (+) button and upload an image of this variation.
- After uploading your image, click on the Add New [attribute name] button at the bottom to finish.
The swatches you’ve added will automatically be displayed on the product page. But, if you want to display them on the archive page or shop page, follow the steps in the next section.
How to display variation swatches on archive or shop page for WooCommerce?
So you’ve created your swatches, and you want to display them on the shop or archive page. With WooCommerce Attribute Swatches, you can set this up and have your swatches display just above the ‘Add to Cart’ button of products on the shop page.
To set this up:
- From your WordPress dashboard, go to Products > Attributes.
- Select the product attribute whose swatches you want to display on the shop page and click on Edit.
- Scroll down until you see ‘Show Swatch in Catalog?’. Click on the dropdown next to it and select Yes.
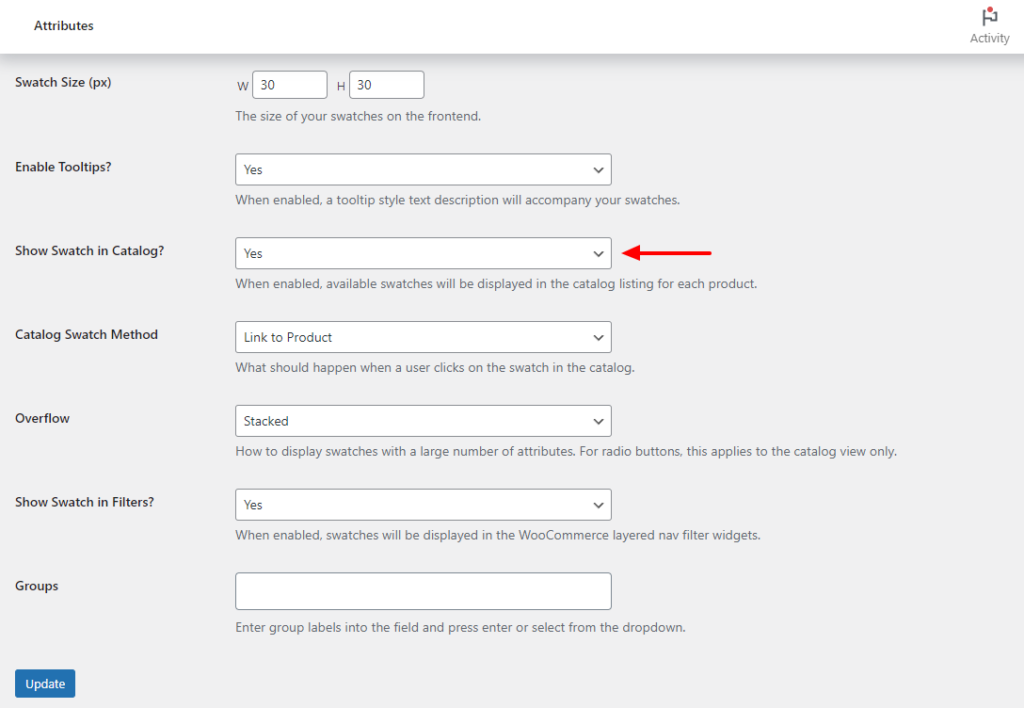
- This opens up more customization options where you can:
- Choose to link the swatch to the product page or change the product image.
- Change the display pattern on this page, for instance, stacking the swatches on top of each other or placing them in a single line.
- Scroll to the ‘Show Swatch in Filters?’ dropdown and select Yes as well.
- Once done, scroll down and click the Update button.
That’s it. When customers visit your shop page, they will see these swatches displayed just above the ‘Add to Cart’ button on each product and your product filters.
Get to grips with WooCommerce swatches today
WooCommerce swatches are a powerful way to improve your customer’s experience when they shop for variable products. They can visually browse every product variation using color, image, text, and radio button swatches.
By default, you can’t add swatches to your WooCommerce store. But, you’ll have all the help you need to do this with the best WooCommerce variation swatches plugin, WooCommerce Attribute Swatches.
With this plugin, you can add visually appealing swatches not just on the product page alone, but also on the shop page and product filters. You’ll have complete control over where and how you display your swatches to provide your customers with the best shopping experience possible.
WooCommerce Attribute Swatches
Replace the default WooCommerce variation dropdown menu with variation swatches for WooCommerce. Add color swatches, image swatches, and modern text buttons to your variable product pages.

Gina Lucia is our in-house Content Manager at Orderable. She writes articles, user guides, technical documentation, and creates videos on everything WooCommerce and Orderable.
Gina has been working in the WordPress/WooCommerce space since 2012 when she developed WordPress websites for clients large and small.
For the past 8 years, she’s been writing about everything WordPress and WooCommerce, becoming an expert in what makes a WooCommerce store succeed.
When not writing, Gina loves to tend to her vegetable garden, read, or travel to mainland Europe.