
If you’re looking to get to grips with WooCommerce product variations without all the jargon, this guide is for you.
Perfect for variable product beginners and anyone who needs a refresher.
Here’s what we’ll cover:
- What a WooCommerce variable product is – including product variations and attributes.
- How to create a variable product in WordPress/WooCommerce.
- How to display product variations on the shop page.
- How to improve your product variations with some variation plugins/add-ons.
- Troubleshooting and common issues with WooCommerce variations.
First, let’s get our foundations right and outline what a WooCommerce variable product is.
What is a WooCommerce variable product?
A variable product in WooCommerce is essentially a type of product you can sell in your online store that comes in different forms or types. Imagine you own a store and sell a shirt that comes in different sizes and colors. Each of these sizes and colors is a different variation of your product.
In a physical store, you might see separate shelves or sections for each size and color. Online, using WooCommerce, you can simplify this by creating a single product page where customers can select their preferred size and color from drop-down menus. This is a variable product.
What are attributes?
Attributes are the options customers have to pick from on the variable product page.
For example, ‘Size’ and ‘Color’ are attributes. ‘Small, Medium, Large’ are the options under the ‘Size’ attribute, and ‘Red, Blue, Green’ might be options under the ‘Color’ attribute.
The variable product shopping experience in WooCommerce
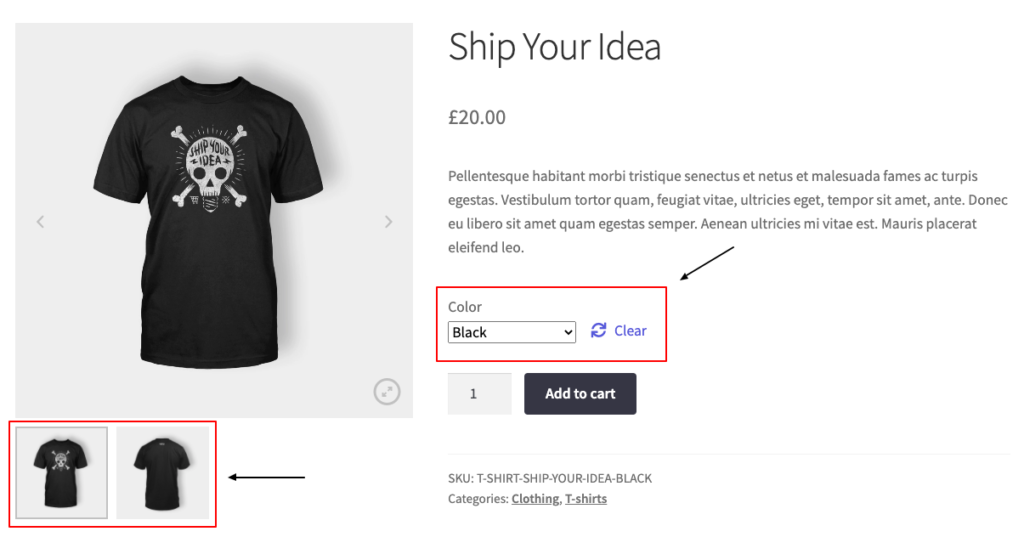
When shopping in a WooCommerce store, customers can conveniently select their desired variation using drop-down menus on the single product page.
These menus display all the available variation options for each attribute. For a t-shirt product, there would be a drop-down menu for color and another one for size.
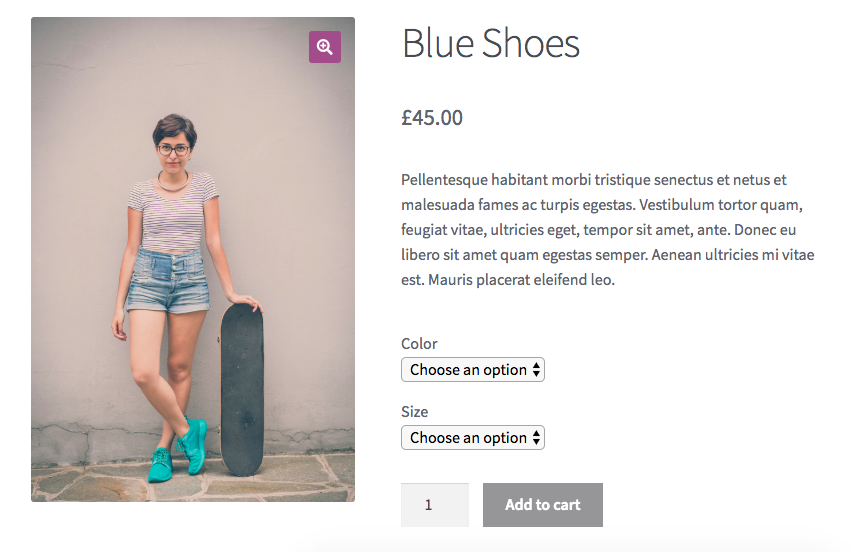
Customers can select their preferred color and size from these menus, allowing them to choose the exact variation of the t-shirt they want to purchase.
This enhances the shopping experience by making it more personalized and user-friendly, as customers can easily find and select the exact product they’re looking for.
Variations at the checkout
When a customer has chosen their specific product variation and added it to their cart, they’re ready to proceed to the checkout. At the checkout, the specific variation they’ve chosen is clearly detailed with product details.
For instance, if a customer has selected a medium-sized red t-shirt, the checkout page will reflect this. The product name will typically be followed by the chosen attributes, such as ‘T-Shirt – Red, Medium.’ This allows the customer to review their selection before finalizing the purchase.

So now we know what WooCommerce product variations are, let’s take a look at how to add them to your WooCommerce store.
How to add a variable product in WooCommerce
Now we’ve outlined the basics of WooCommerce variable products. It’s time to put that knowledge into action.
The following step-by-step tutorial will help you create variable products in your WooCommerce store.
Step 1: Add global product attributes
Your first step is to create some global product attributes. These can then be applied later to any new or existing products. Before we get into how to create global attributes, let’s outline what they are.
? For a more in-depth look at attributes, see our WooCommerce product attribute guide.
There are two different types of attributes in WooCommerce:
Don’t forget: attributes are configurable properties of a variable product, like color, size, and SKU, allowing you to add a large number of product variations.
- Custom product attributes – these are created per product and should be used when the attribute is specific to only this product and not used on any other product in your store. Also, note that you can’t filter products on the shop page by custom product attributes.
- Global product attributes are best used when they apply to more than one product in your online store and if you want to use them for filtering on the shop page. For example, size and color are usually set up as global attributes because the values are shared across multiple products on your WordPress site.
To set up a WooCommerce variable product, we first need to define any global attributes.
If your attributes only apply to one product (custom product attributes), skip to section 3; Add attributes to your product.
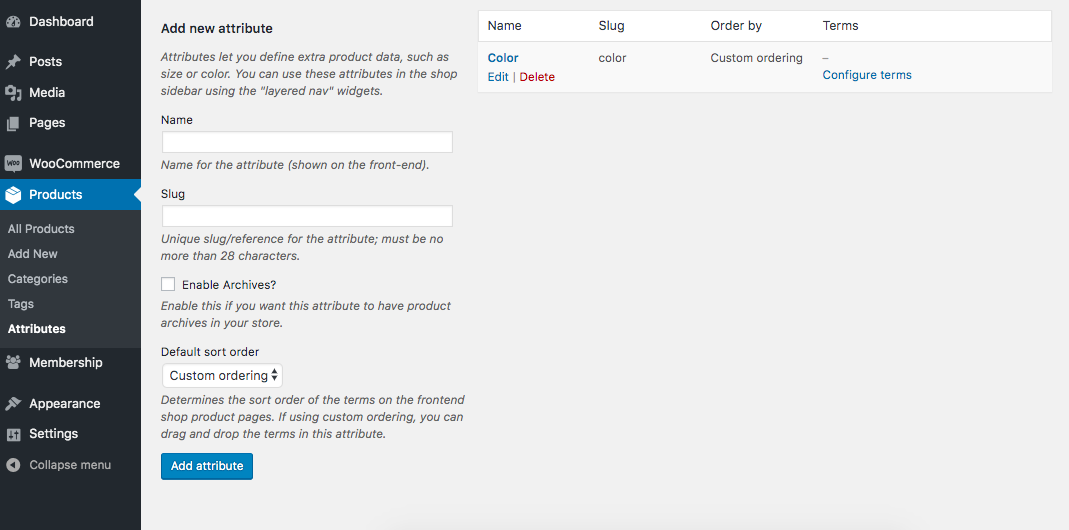
- Go to Products > Attributes.
- In the Add new attribute section on the left, enter the name of your attribute in the Name field (e.g., Color).
- Click Add attribute.

Your new attribute will now appear in the table to the right.
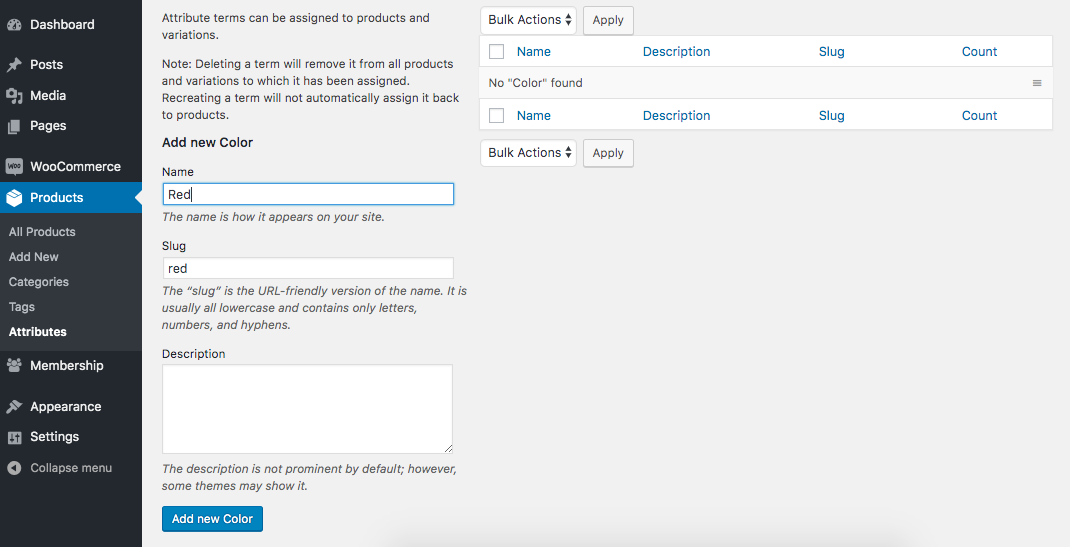
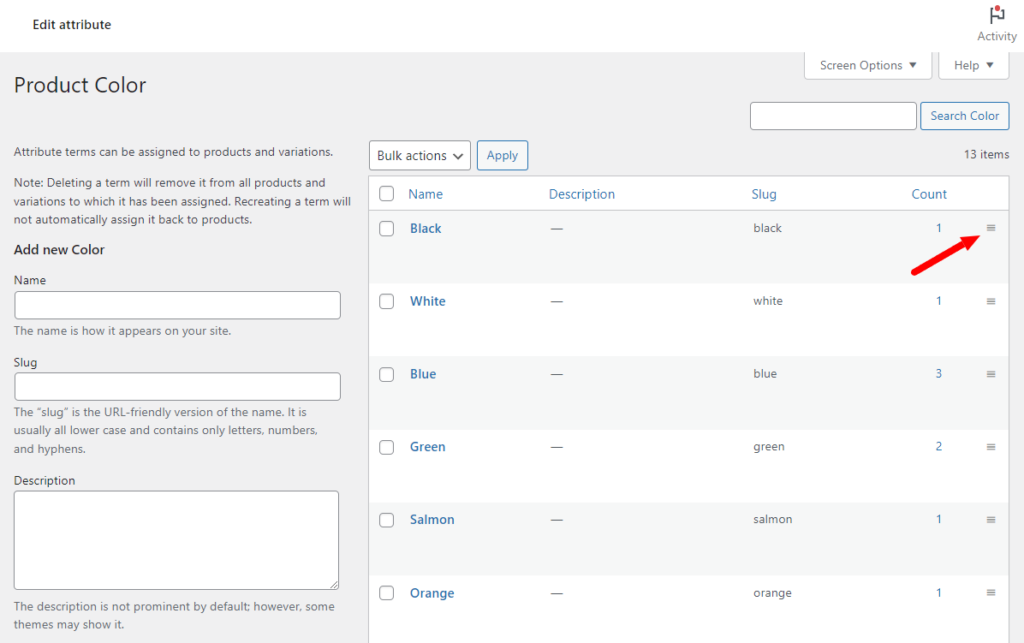
Now we need to add the attribute terms. These are specific values of an attribute, like red or different colors.
- Click Configure terms in your attribute’s Terms column.
- In the Add new Color form on the left, enter the name of your first term (e.g., Red).
- Click Add new Color.
- Keep repeating for each term until you’re done.
By this point, you should know what global attributes are, have your global attributes set up, and have taken the time to configure terms. Once you’re satisfied with your results, we can move on to the next step.
Step 2: Select your product type and create your product
Once you’ve added any global product attributes, you’re ready to configure your variable product. This section will take you through setting up the basics of your WooCommerce variable product.
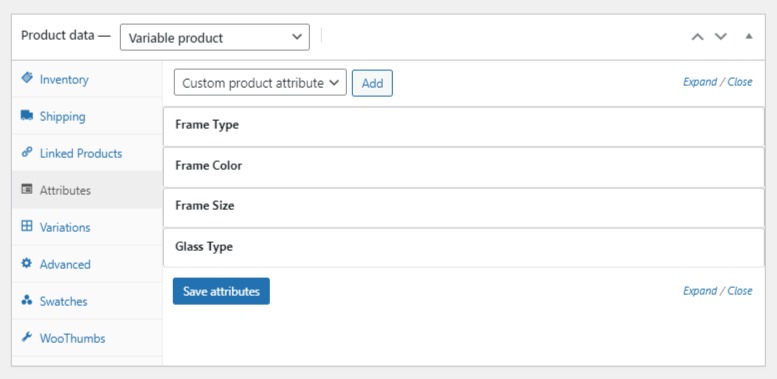
To add a WooCommerce variable product, you must first set the product type to Variable product:
- Go to Products > Add New.
- Scroll down the page to the Product Data section.
- Select Variable product from the product data dropdown.

Step 3: Add attributes to your product
Your WooCommerce variable product has been set up and is now ready for you to start adding the attributes we set up earlier. In this section, we’ll outline how to add global attributes to your product and create custom attributes.
First, add the attributes we set up earlier to your product.
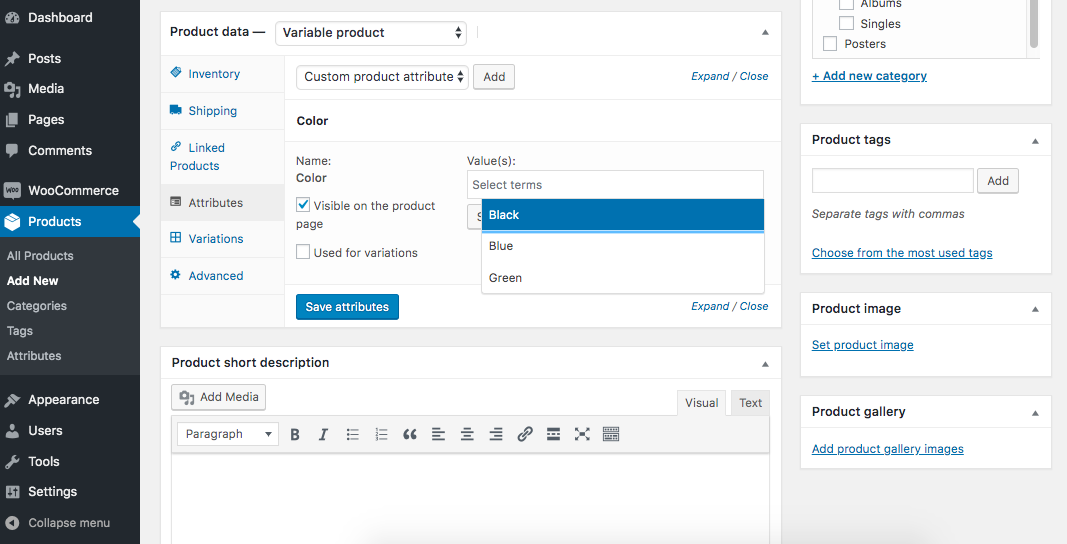
- Click the Attributes tab in the Product Data section.

- If you’re adding global attributes:
- In the Custom product attribute dropdown, select one of the attribute names you created and click Add.
- Click the Value(s) menu and select any attribute values you’d like to display as options for the product (you can select more than one). This is how you can add new product variations to your ecommerce options.
- If you’re adding custom product attributes:
- In the Custom product attribute dropdown, keep this selected and click Add.
- Enter the name of your attribute in the Name field (e.g., Color).
- In the Value(s) section, enter the name(s) of your terms (e.g., Red).
- Make sure to separate each term with a pipe symbol (|).
- Make sure that Used for variations is checked for each custom attribute you want to include as a dropdown on the product page.
- Then click Save attributes.
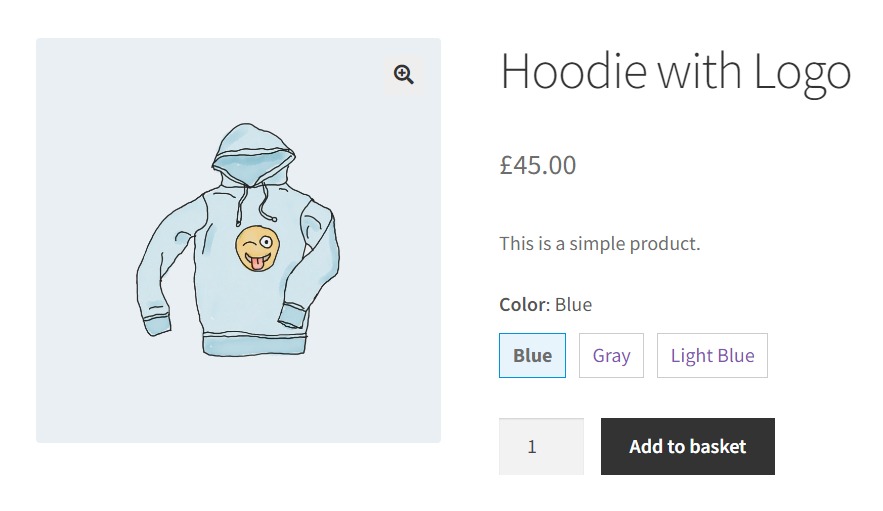
Iconic tip: Often, displaying these product options to your customers in a dropdown isn’t the best user experience for your customer. For example, wouldn’t it be better to display product colors as color swatches?
Fortunately, you can use our WooCommerce Attribute Swatches plugin to do this.
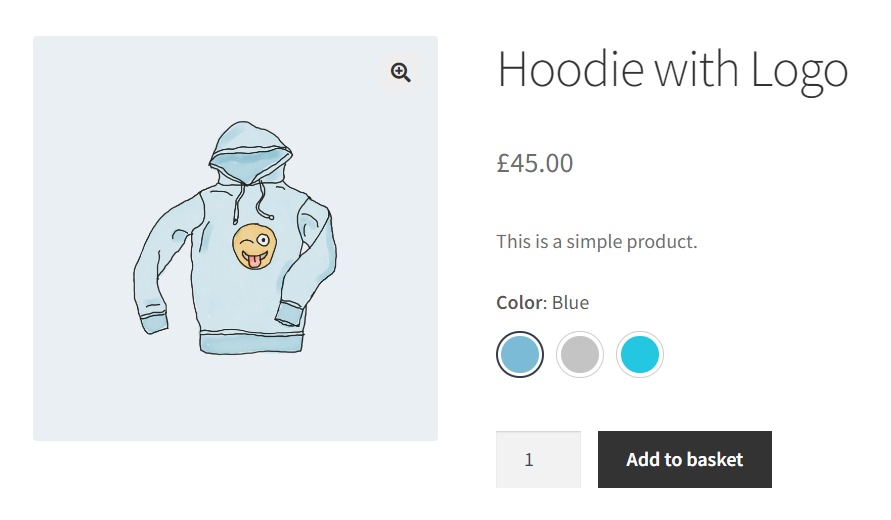
Using WooCommerce Attribute Swatches makes it easy to display your product options as color swatches, image swatches, text buttons, and a radio button list. You can also charge additional fees based on the selected attribute values and use the swatches in your product filters.
WooCommerce Attribute Swatches
Replace the default WooCommerce variation dropdown menu with variation swatches for WooCommerce. Add color swatches, image swatches, and modern text buttons to your variable product pages.
At this point, you should have added global, or custom product attributes to your product and made them more user-friendly with WooCommerce Attribute Swatches.
Now let’s move on and add different variations to your WooCommerce product.
Step 4: Add WooCommerce variations to your product
The following is broken down into sections. Here we’ll cover how to create a single ‘catch-all’ variation, create multiple variations manually, and create variations in bulk. But first, let’s talk about what a variation is:
A variation is a final product your customer will add to their cart. It is a single product tied directly to your customers’ attribute choices. For example, a Small, Red T-Shirt is the final selected variation of a variable product.
Note: It’s important to ensure your product variations have a price and are In stock. If not, they won’t show on the product page for your customers.
Now that you’ve added the attributes let’s look at how you create product variations.
4.1: Create a single ‘catch-all’ variation
You can go as in-depth as you like when defining variations.
You could create a single variation for your variable product, which covers all combinations of the selected attributes.
This is ideal if you don’t need to:
- Track stock per variation.
- Change the price based on the selected variation.
- Change the product image based on the selected variation.
- Or your variations don’t have unique SKU numbers.
To create a single ‘catch-all’ variation:
- Click to edit your variable product.
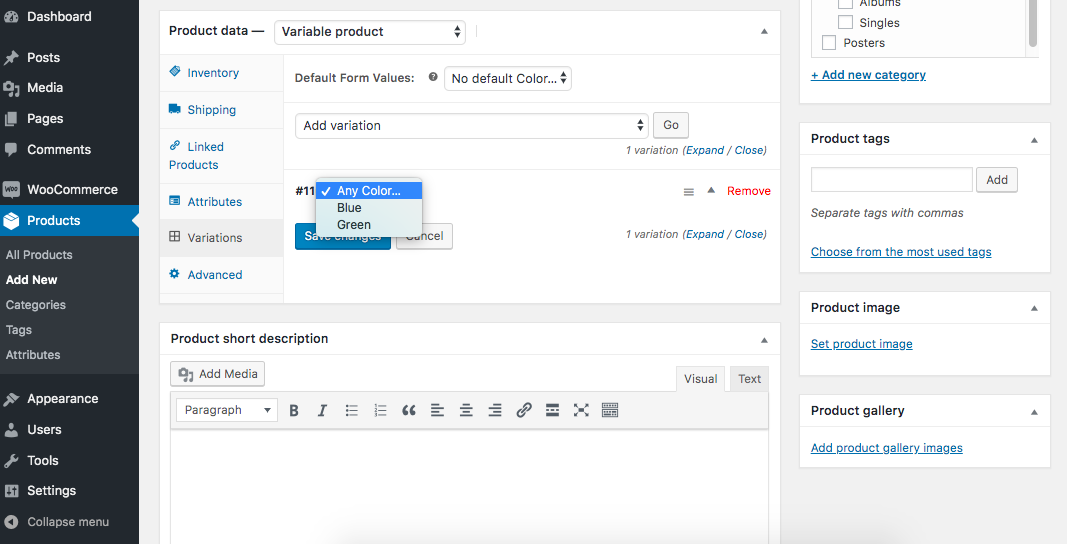
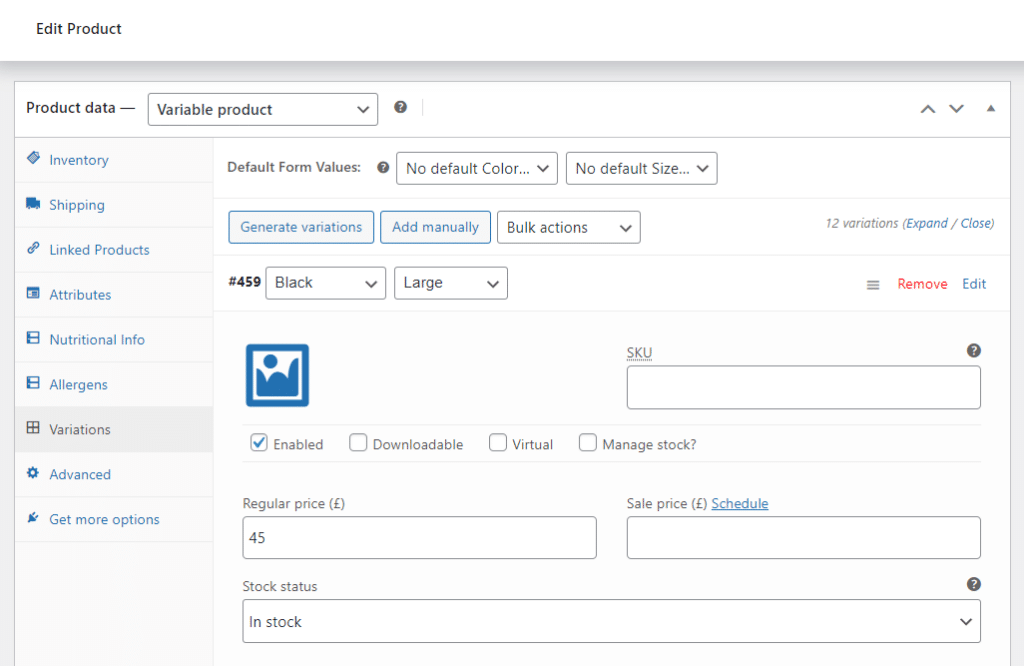
- In the Product Data section, click the Variations tab on the left.
- In the drop-down, select Add variation and click Go.
- When your variation is created, leave the attribute dropdowns on Any…
- Click the row to expand the variation details.
- Ensure you have entered a Regular Price for the variation.
- Ensure the variation is set to In Stock.
- Click Save changes.
Now when your customers select the product options from a dropdown menu on the product page, this is the variation they will add to their cart.
4.2: Manually create multiple variations
However, it’s common for variations to require their own stock settings, like the stock status or stock quantity or simple product imagery.
In this case, you’d need to create multiple variations – one for each, which requires different settings.
The process is much the same as before. However, this time, you want to select the attributes for each variation rather than leaving them as Any…
Iconic tip: By default, WooCommerce only allows you to give each variation one image. This image is then displayed when your customer selects the product options.
This isn’t always enough for the majority of store owners.
Fortunately, our WooThumbs plugin allows you to add multiple images to each variation.
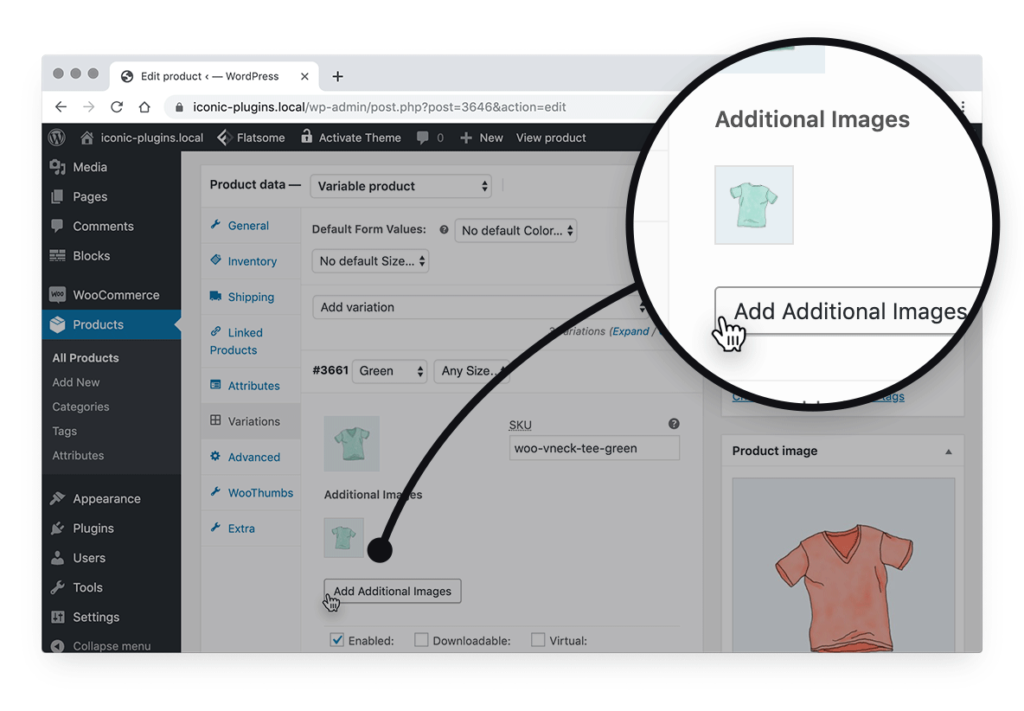
Now your customers can see a full gallery of images related specifically to the variation they’ve selected.
WooThumbs for WooCommerce
Customize your WooCommerce product image gallery in minutes with a new layout, embedded video, multiple images per variation, and more.
4.3: Creating variations in bulk
If you want to create a variation for every possible combination of attributes, then you can run a bulk process to create them.
- Click to edit your variable product.
- In the Product Data section, click the Variations tab on the left.
- From the Add variation dropdown, select Create variations from all attributes and click Go.
- This will create a maximum of 50 variations at a time. Click to run it again until no more variations are created.
If you’ve created many variations and don’t want to set a price for each one, WooCommerce has you covered.
- Again, click the Add variation dropdown.
- Select Set regular prices.
- Enter your price and click OK.
Note: If you have different prices between product variations, you’ve no choice but to enter the price individually for each variation.
It’s worth looking at the other options in the ‘Add variation’ dropdown to see which other actions might save you some time. You can also set the sale price for individual variations here.
By this point, you should have added variations to your product by either creating a single ‘catch-all’ variation, manually creating multiple variations, or creating variations in bulk. You also know how to add multiple images to each variation with WooThumbs.
Now it’s time to give your shop a boost and improve the standard way of showing WooCommerce variations with a WordPress plugin.
Step 5: Display WooCommerce variations on the shop page
We’ve gone through how to set up a WooCommerce variable product. Now, let’s talk about having a little more control over product variations. Here we’ll outline how to improve WooCommerce’s standard product display on the front end with a product variations WooCommerce plugin.
WooCommerce Show Single Variations allows you to display individual product variations on the shop page.
Usually, a WooCommerce variable product is shown as only one item on the shop page front-end, with a generic screenshot image to cover all possible product combinations. This means the customer will only see a small amount of what your shop offers. With WooCommerce Show Single Variations, you can display each variation of a variable product as though they are separate products.
As well as this, you can decide which variations to show on the shop page and customize their titles for a better customer experience.
When your customers filter or browse your product collection, the products they see are highly relevant regarding selected options, product imagery, and product titles.
To get started, purchase Show Single Variations from the Iconic store: iconicwp.com/woocommerce-show-single-variations
WooCommerce Show Single Variations
Show WooCommerce variations as single products on the shop page, category pages, search results, and filtered results with WooCommerce Show Single Variations.
Then follow these steps:
- Go to Plugins > Add New > Upload Plugin.
- Choose the zip file you downloaded, upload it, and click Activate.
- Once activated, you’ll need to enter your license key.
- Once done, you’ll be on the general settings page.
- Click the Process Product Visibility button – this will go through all of your products and different variations and set their default visibility settings for the front end.

- Navigate to Products and then choose one of your variable products to edit.
- Click the Variations tab and select the variation you want to enable.
- Check any settings you want and simply save the variations.

- You’ll now see them appear throughout your store based on your settings.
Now your customers can see a full gallery of images related specifically to the variation they’ve selected.
There you have it. Your product variations should display each variation of a variable product as separate products. This not only enhances simple product browsing but improves customer experience too.
The best WooCommerce plugins to optimize WooCommerce product variations for sales
WooCommerce product variations are a powerful tool for boosting your online store sales. But, in a standard WooCommerce install, they lack some of the amazing sales features that give your store a boost.
The following plugins enhance WooCommerce product variations. Here’s how:
Add variation swatches to WooCommerce
Adding image and color swatches to your WooCommerce product variations gives your customers a much better visual experience.
WooCommerce Attribute Swatches allows you to add these WooCommerce variation swatches (image, color swatches, text, and radio buttons) to make shopping for your variations quicker and easier.
WooCommerce Attribute Swatches
Replace the default WooCommerce variation dropdown menu with variation swatches for WooCommerce. Add color swatches, image swatches, and modern text buttons to your variable product pages.
Visual learner? See this technique in action in our video:
Add extra variation images to your WooCommerce products
In a standard WooCommerce install, you can only add one variation image to each variable product’s image gallery. This can be quite frustrating for WooCommerce store owners who want to add additional variation images to their products.
WooThumbs for WooCommerce allows you to do just this and customize your entire WooCommerce product gallery from image zoom to layout.
WooThumbs for WooCommerce
Customize your WooCommerce product image gallery in minutes with a new layout, embedded video, multiple images per variation, and more.
Show variations on the WooCommerce shop page
By default, WooCommerce shows your variable products as products with multiple variations on the shop page.
But as a store owner, you might want to display each variation as an individual product on the shop page instead. You can display your whole product catalog, reduce customer clicks, and increase sales.
WooCommerce Show Single Variations allows you to do this, allowing customers to filter by each variation and browse all products as if they were individual items.
WooCommerce Show Single Variations
Show WooCommerce variations as single products on the shop page, category pages, search results, and filtered results with WooCommerce Show Single Variations.
We go into each of these in more detail in the article, but for now, let’s get back to the basics.
Troubleshooting common issues with variable products and product variations
Even with the most detailed guides, you might encounter some issues when setting up variable products and product variations in WooCommerce. Here are some common problems and their solutions:
Issue: Variations are not showing on the product page
If your product variations are not appearing on the product page, it could be due to one of the following reasons:
- Missing prices: Each variation must have a price. If a variation does not have a price, it will not appear on the product page.
- Out of stock: If a variation is marked as ‘Out of Stock’’ it will not appear on the product page. To fix this, check your inventory settings for each variation.
- Attributes not used for variations: Make sure the ‘Used for variations’ checkbox is checked for each attribute in the ‘Attributes’ tab.
Issue: The ‘Add to Cart’ button is not appearing
If the ‘Add to Cart’ button is not appearing on the product page, it could be because:
- No default variation selected: If you haven’t selected a default variation, the ‘Add to Cart’ button will not appear until the customer has made their selection. You can set a default variation in the ‘Variations’ tab.
- Variation has no price: As mentioned above, each variation must have a price. If a variation does not have a price, the ‘Add to Cart’ button will not appear.
Issue: Changes to variations are not saving
If changes to your variations are not saving, try the following:
- Save attributes first: If you’ve added new attributes, make sure to save these first before adding them to variations.
- Limit on variations: Some servers limit the number of variations that can be saved at once due to a low PHP max_input_vars value. If you have a large number of variations, try saving them in smaller batches.
Issue: Variations are not appearing in the correct order
If your variations are not appearing in the order you want them to, it’s likely because WooCommerce displays variations based on the order of the attributes. Here’s how to fix this:
- Reorder attributes: Go to ‘Products’ > ‘Attributes’ in your WordPress dashboard. Click on the ‘Configure terms’ link for the attribute you want to reorder. Here, you can drag and drop the terms into your desired order. Remember to click ‘Update’ to save your changes.
- Set default order: If you want a specific variation to be selected by default, you can set this in the ‘Variations’ tab of the product data. Simply select the variation you want from the ‘Default Form Values’ dropdown.
Manage your WooCommerce product variations
In this guide, you’ve learned the basics of a WooCommerce variable product, step-by-step instructions on how to set one up, and improve your store’s customer experience using the variable product WordPress plugin Show Single Variations.
Once you get used to it, WooCommerce variable products are fairly easy to set up and use. This guide should have helped you get to grips with them.
Plugins featured in this guide:
- WooCommerce Attribute Swatches – Display variable product options such as color swatches, image swatches, text buttons, or radio buttons.
- WooThumbs for WooCommerce – Help customers make a buying decision with more than 1 image per product variation.
- WooCommerce Show Single Variations – Display individual variations as products on the shop page.

Gina Lucia is our in-house Content Manager at Orderable. She writes articles, user guides, technical documentation, and creates videos on everything WooCommerce and Orderable.
Gina has been working in the WordPress/WooCommerce space since 2012 when she developed WordPress websites for clients large and small.
For the past 8 years, she’s been writing about everything WordPress and WooCommerce, becoming an expert in what makes a WooCommerce store succeed.
When not writing, Gina loves to tend to her vegetable garden, read, or travel to mainland Europe.