Looking for a solution for how to add color swatches in WooCommerce? Sure, the default variant drop-down selectors work, but they’re not especially user-friendly.
By adding WooCommerce color swatches or images, you’re able to let shoppers click on a visual representation for each product variant, rather than a generic drop-down.
Basically, WooCommerce color swatches help you turn this…
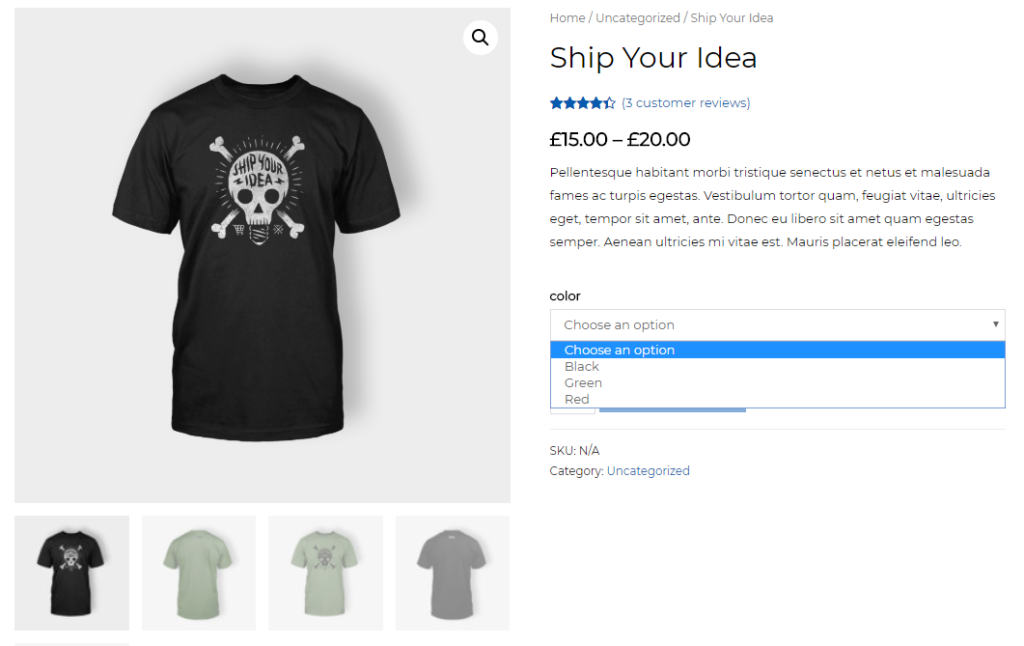
…into this…
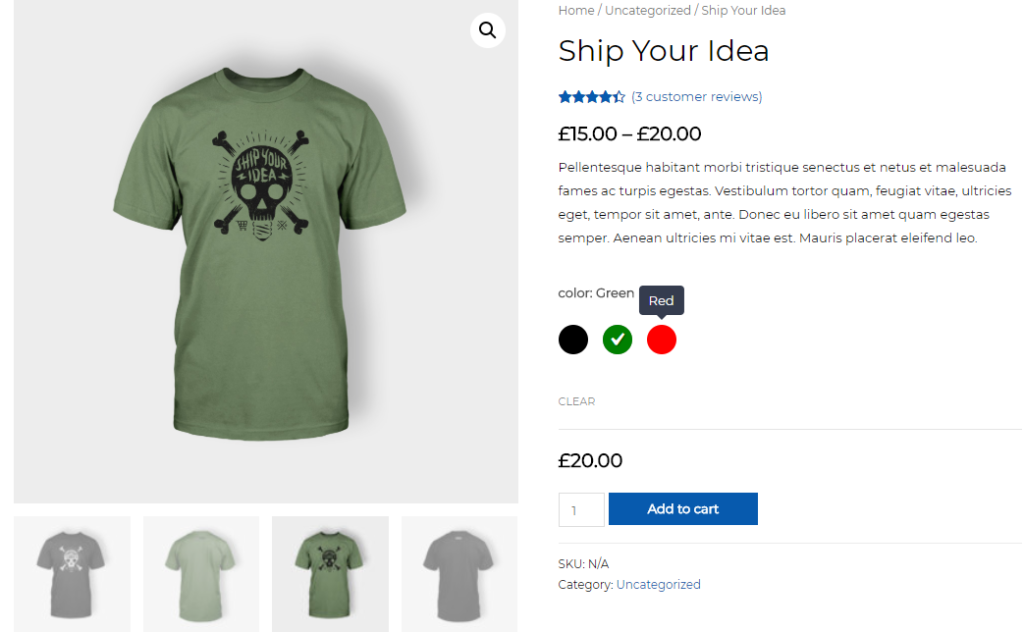
…in just a few minutes.
In this article, I’ll show you how to add color swatches in WooCommerce the easy way. Beyond static colors, you’ll also learn how you can add WooCommerce image swatches to account for non-standard attributes – like a fabric or type of leather.
Visual learner? Watch the video instead:
How To Add Color Swatches In WooCommerce
To add color swatches in WooCommerce, you’ll need the WooCommerce Attribute Swatches plugin. This is a premium plugin, but it offers a 14-day free trial so that you can test it before you need to pay for anything.
With the plugin, you can add both color swatches or image swatches to WooCommerce products. If desired, you can also create text swatches (helpful for product sizes) or radio buttons.
[click_to_tweet tweet=”Easily add color swatches or image swatches to #WooCommerce products.” quote=”Easily add color swatches or image swatches to WooCommerce products.”]
Beyond that, you can configure other nitty-gritty details like:
- Whether to use square or circular swatches
- The size of your swatches
- Whether or not to show swatches on your catalog pages
Here’s how to add color and image swatches for variable product attributes in WooCommerce, step-by-step:
Step 1: Configure Global Product Swatch Settings
Once you’ve installed and activated the plugin, you can configure how your product swatches function on a global level by going to Products → Attributes.
If you create a new attribute or edit an existing one, you’ll see a new Swatch Type drop-down below the regular attribute options. If you select something other than “None” from the drop-down, you’ll further open another set of options that lets you control how your swatches function:
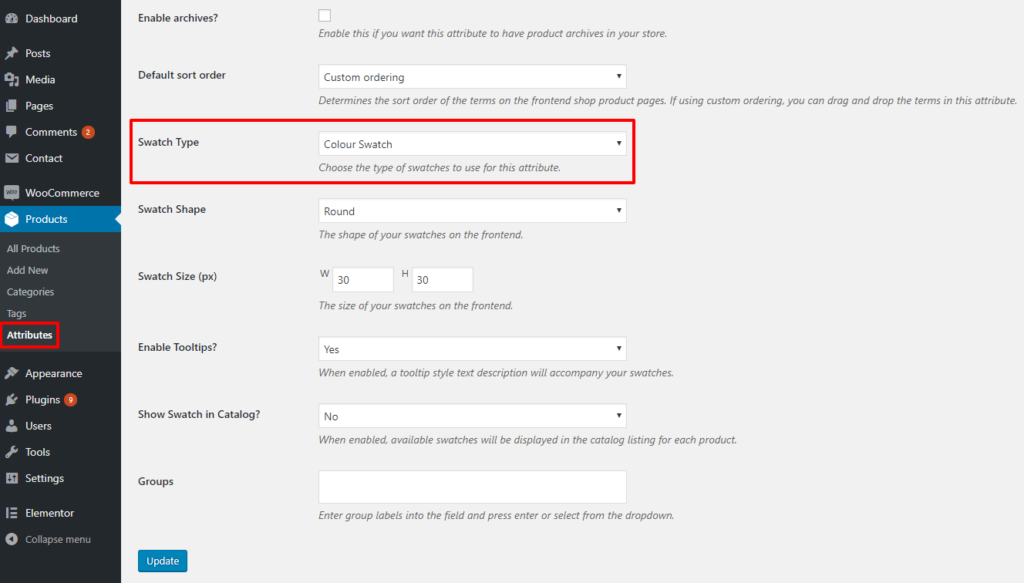
Essentially, this lets you configure what type of swatch (if any) should be applied to the different product attributes at your store.
You can always override the settings here on a per-product basis, if needed.
Step 2: Assign Swatches To Individual Attribute Terms
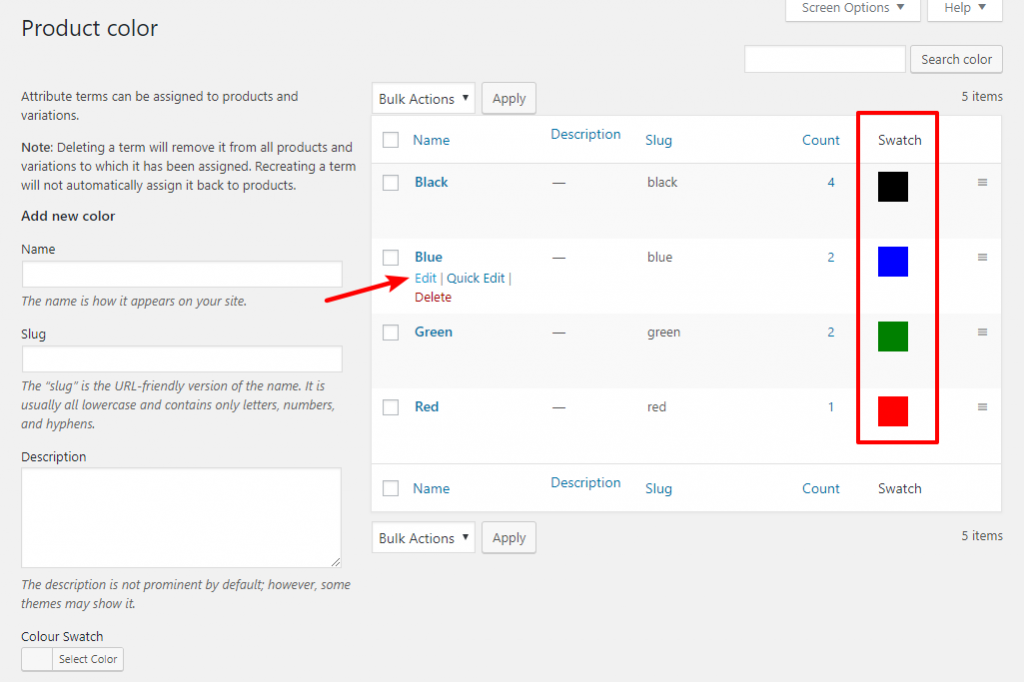
Once you’ve chosen a swatch type, you can assign swatches to individual attribute terms by clicking the Configure terms option in the Attributes area:
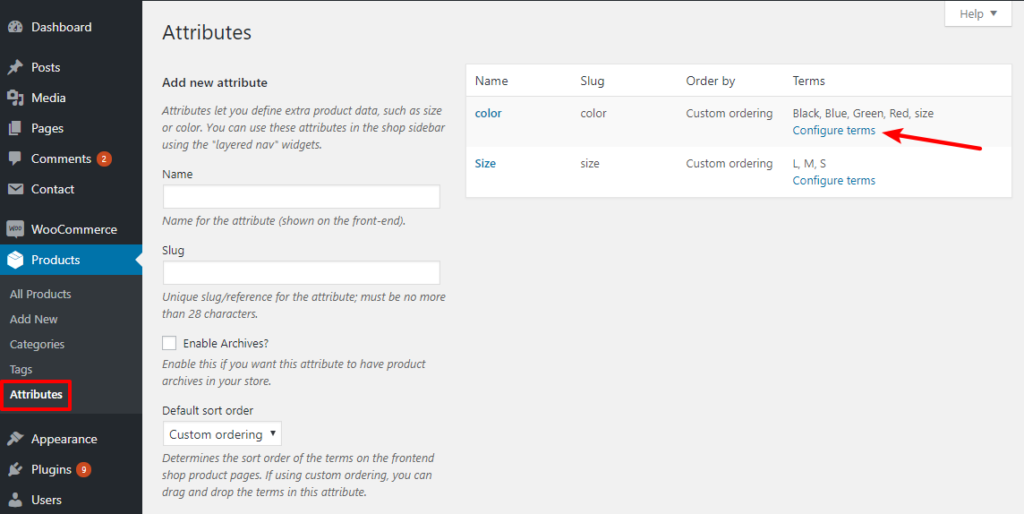
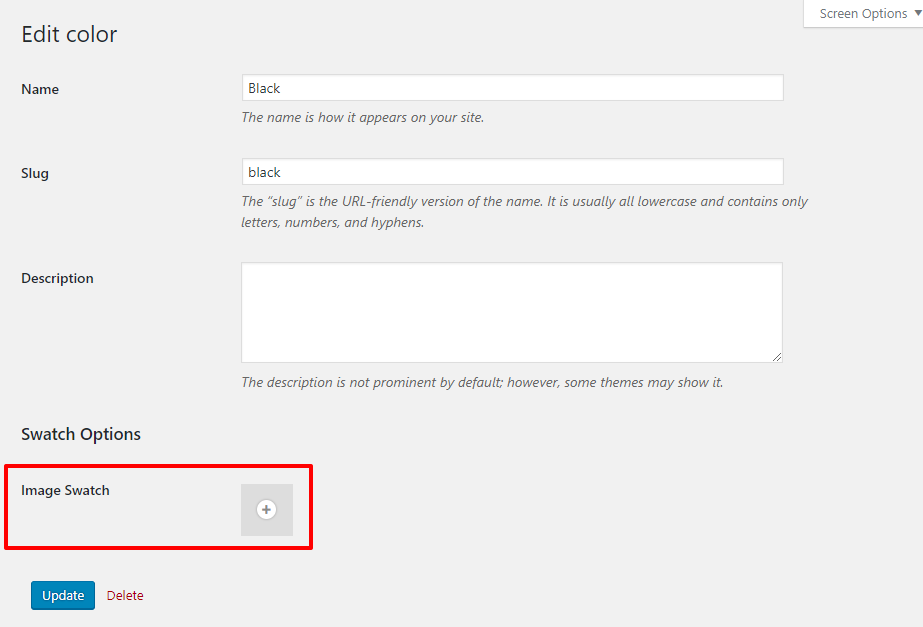
By editing individual terms, you’re able to select the swatch for each:
If you’re using image swatches instead of color swatches, you’ll similarly be able to select which image to use via the normal WordPress Media Library:
And that’s it! You should now see your product swatches on the front-end of your site. You just learned how to add color swatches in WooCommerce.
Now, let’s take things a couple steps further…
How To Configure WooCommerce Color Swatches On A Per-Product Basis
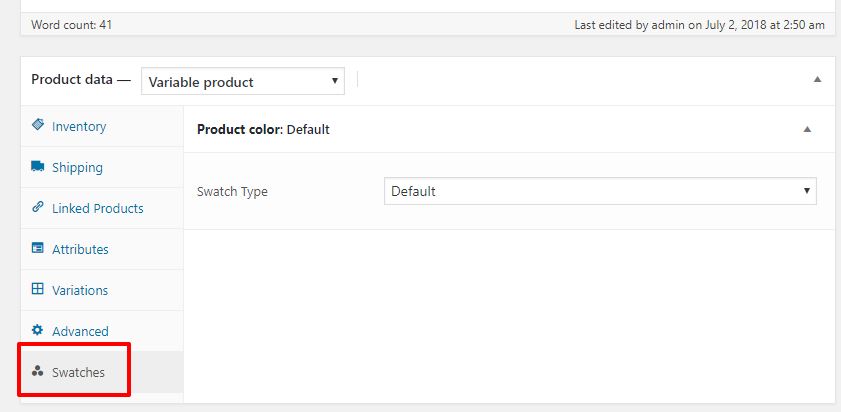
Above, you configured the default functionality for all products with those attributes. But if you ever want change how swatches function for a specific product, you can use the Swatches tab in the Product data box while editing an individual product:
How To Create WooCommerce Color Swatch Groups
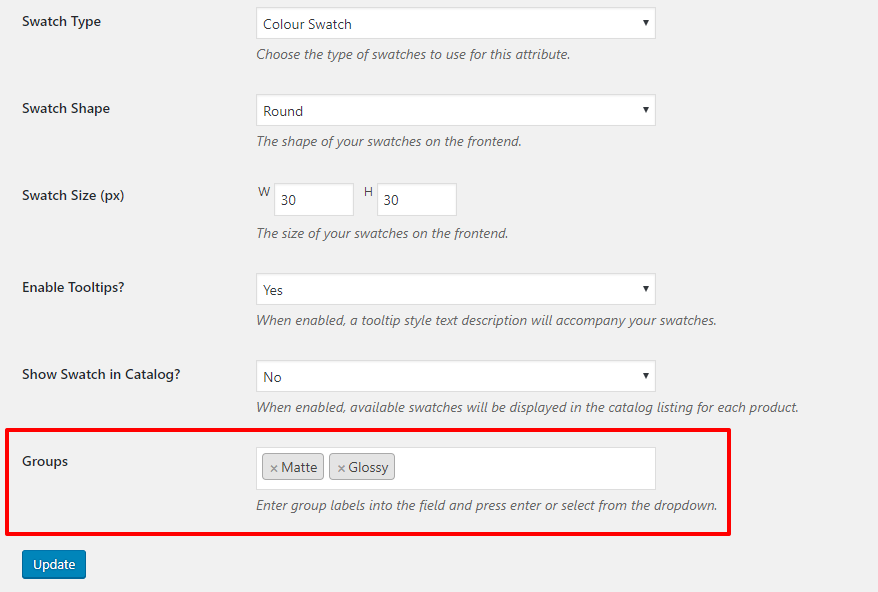
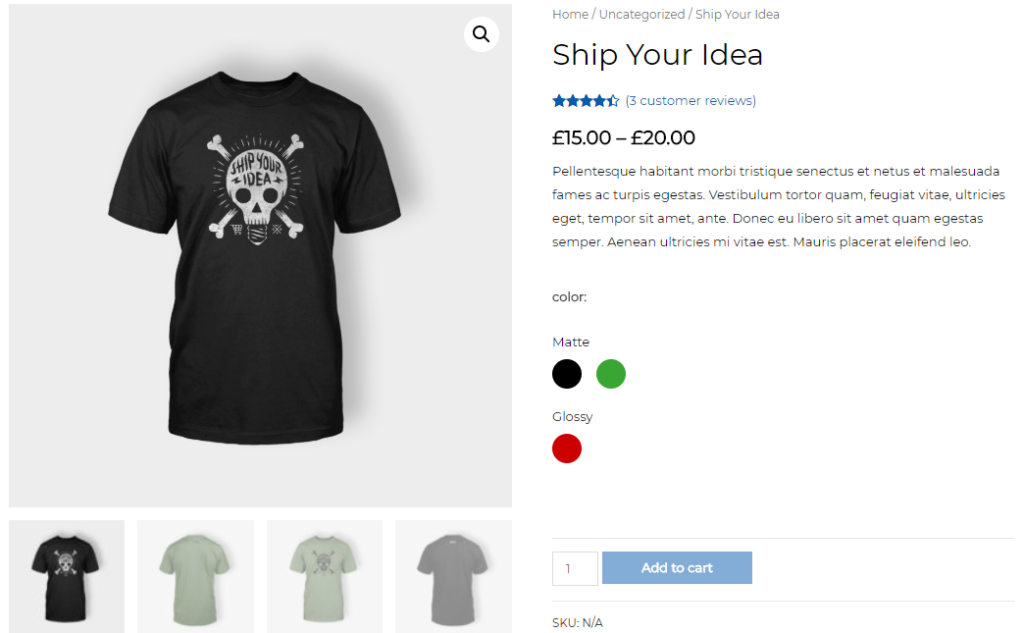
If you have a number of different swatches, WooCommerce color swatch groups can help you provide a more user-friendly product page by grouping together similar attributes. For example, maybe you have one set of matte colors and another set of glossy colors. Groups let you divide them to help your shoppers notice the difference.
[click_to_tweet tweet=”#WooCommerce color swatch groups can help you provide a more user-friendly product page by grouping together similar attributes.” quote=”WooCommerce color swatch groups can help you provide a more user-friendly product page by grouping together similar attributes.”]
To create WooCommerce color swatch groups, edit the attribute for which you want to create your group and add your group labels in the Groups box:
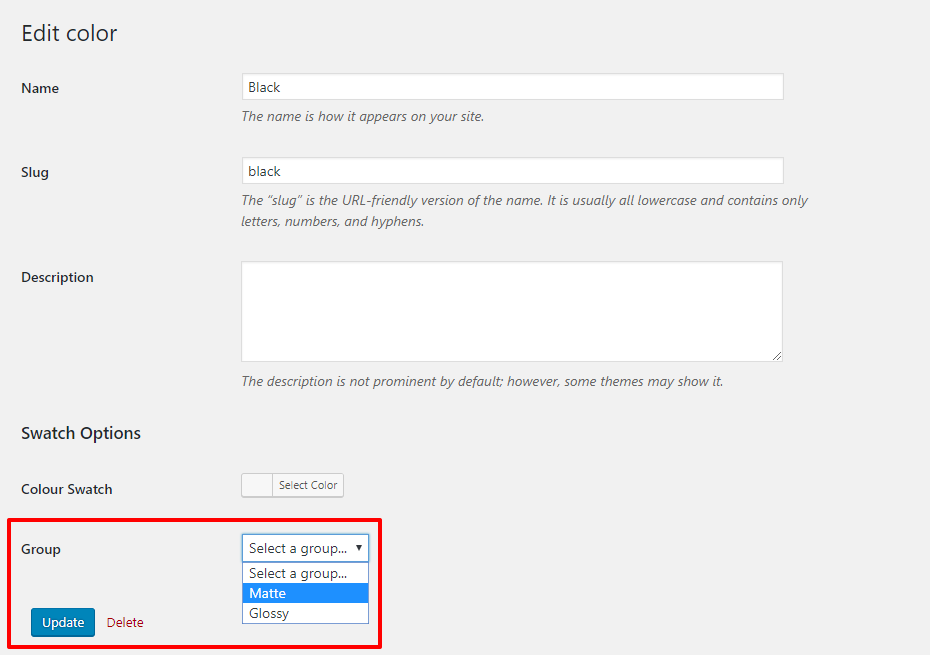
Then, you can edit the individual terms and assign them to a swatch group:
Once you finish, your product swatches will be divided into different groups on the front-end like so:
Final Thoughts On How To Add Color Swatches In WooCommerce
When you add color and image swatches for variable product attributes at your WooCommerce store, you make it easier for shoppers to find the exact product that they want.
It only takes few minutes to add this feature to your store, and all new products with those attributes will automatically use the swatches that you’ve configured (unless you choose to manually override this functionality).
With a 14-day free trial, it’s easy to try WooCommerce Attribute Swatches for yourself.
Have any other questions about how to add color swatches in WooCommerce? Leave a comment and we’ll try to help out!
