
In this article, we’ll walk you through how to customize the WooCommerce checkout page.
We’ll include everything from the checkout page design to adding extra fields, add-ons, and more.
Plus, we’ll talk about one of the best ways to completely overhaul your checkout without any coding knowledge – using the WooCommerce plugin Flux Checkout for WooCommerce.
Flux Checkout for WooCommerce
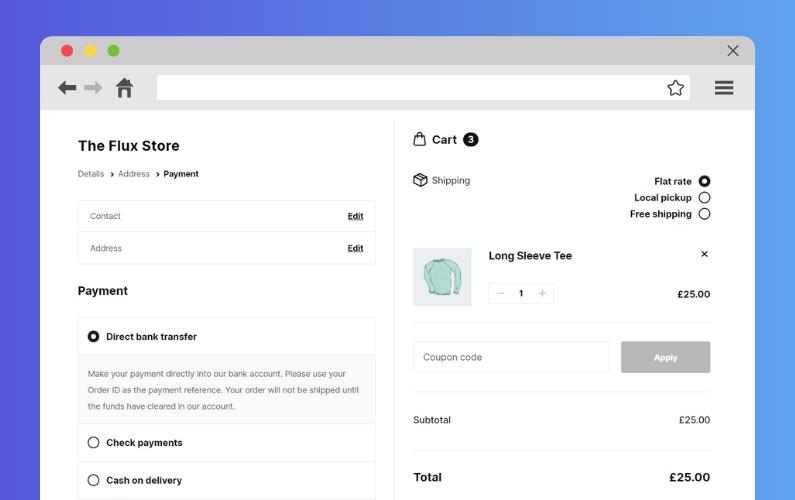
Flux Checkout transforms the default WooCommerce checkout into one that’s lightning-fast, distraction-free, and reduces checkout abandonment.
The WooCommerce checkout page is one of the most important pages in any WooCommerce store. Its role is crucial in ensuring customers are guided through completing their purchase without friction.
So, if you’d like to improve your WooCommerce checkout page because you’re unsatisfied with the default WooCommerce checkout page, then we’re here to help.
How to edit the WooCommerce checkout page
Improving your WooCommerce checkout page is crucial to improving the checkout experience and reducing checkout abandonment significantly.
So we’ve put together a selection of the most important things you can do to improve this part of your store.
If, however, you’d like a quick and all-in-one solution. We recommend using one plugin to do all of the work for you. Specifically, Flux Checkout for WooCommerce.
Introducing Flux Checkout for WooCommerce
Flux Checkout for WooCommerce transforms the default WooCommerce checkout page into one that’s lightning-fast, distraction-free, and specifically designed to help you reduce cart abandonment.
It improves the default WooCommerce checkout by:
- Removing unnecessary checkout fields to reduce overwhelm.
- Auto-populates address fields to save customers time and frustration.
- Transforms the standard one-page checkout into a super-fast multi-step checkout.
- Hides your site’s header, footer, sidebars, and more to remove all distractions.
- Has multiple checkout design templates for you to pick from and customize.
- Auto-apply coupons at the checkout.
- Upgrades the default WooCommerce thank you page into one that’s modern, customizable, and much more user-friendly
- and so much more.
Flux Checkout has been designed to help customers move from the WooCommerce cart page, to checkout, and order complete without fuss.
So, if you want to skip the rest of the article and start seeing your checkout conversions improve – give Flux Checkout a try.
Flux Checkout for WooCommerce
Flux Checkout transforms the default WooCommerce checkout into one that’s lightning-fast, distraction-free, and reduces checkout abandonment.
The following are some of the key things you can change within your WooCommerce checkout. Each requires a plugin to complete and takes only a few steps to set up.
Improve your checkout process with a multi-step checkout
The default WooCommerce checkout page has all checkout fields (shipping address, billing address, order information, customer details, and more) displayed on one page.
Because of this, the checkout can be overwhelming and distracting for customers – potentially resulting in an abandoned checkout.
Want to see what other important metrics you should be tracking in your ecommerce store? Read our ecommerce metrics guide.
When customers reach your checkout, you want to guide them through the process in the simplest way possible without distraction. This is where Flux Checkout steps in.
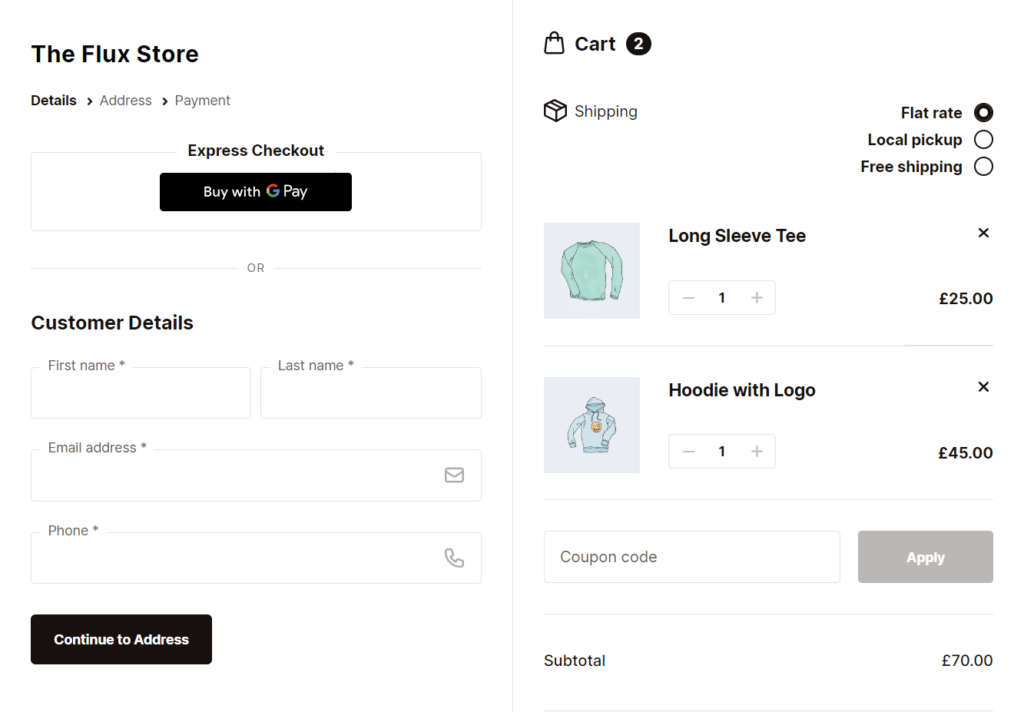
Flux Checkout for WooCommerce switches the WooCommerce checkout from a one-page checkout to a multi-step checkout. It also removes unnecessary additional fields like company/business name (which you can turn back on if you want) and condenses the address field to save space.
Flux also improves the checkout experience with address autocomplete, so customers spend less time tediously typing in their address and more time completing the checkout process. Helping you to improve your conversion rate.
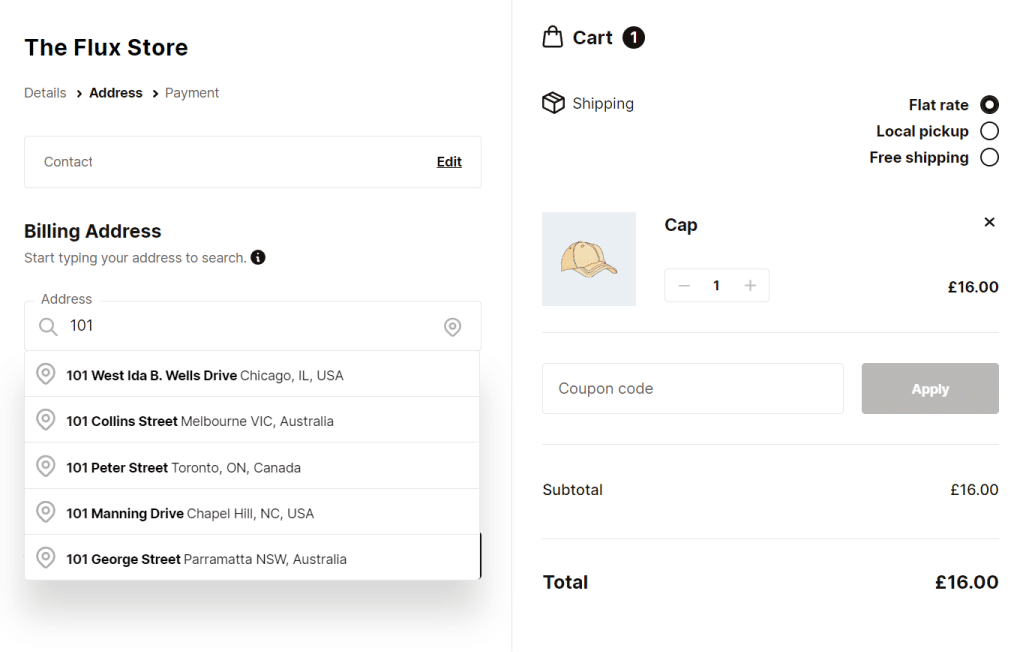
Edit/Customize the WooCommerce checkout fields
One of the key things you might want to do when customizing your WooCommerce checkout page is to edit, or add new checkout fields.
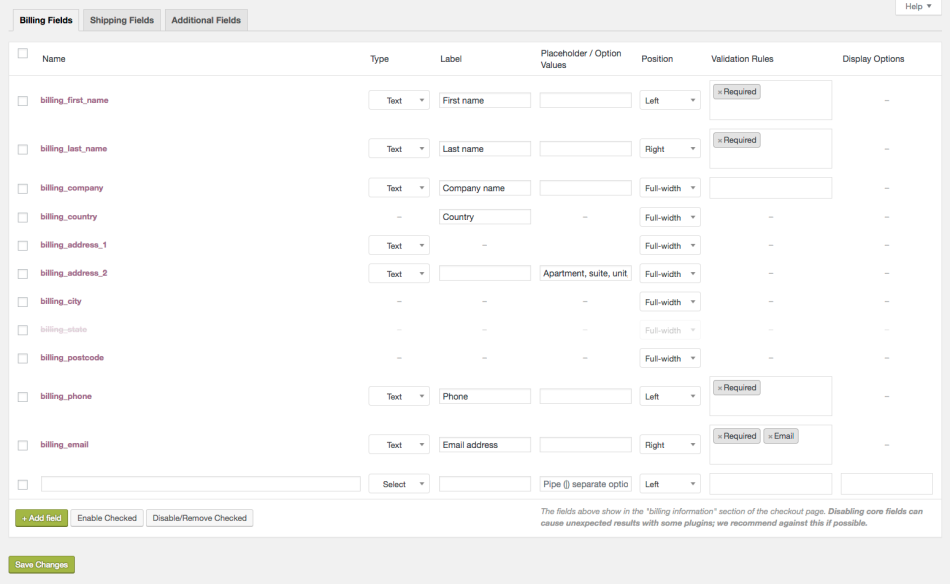
You might want to change the required fields, field type, add validation, change the shipping fields, add new fields, and more. If so, you can do all of this with the plugin, the Checkout Field Editor.
With this plugin, you can make significant changes to your checkout’s input fields, creating new drop-down menu options, checkboxes, radio buttons, or simple text fields for anything you want to add to your WooCommerce checkout.
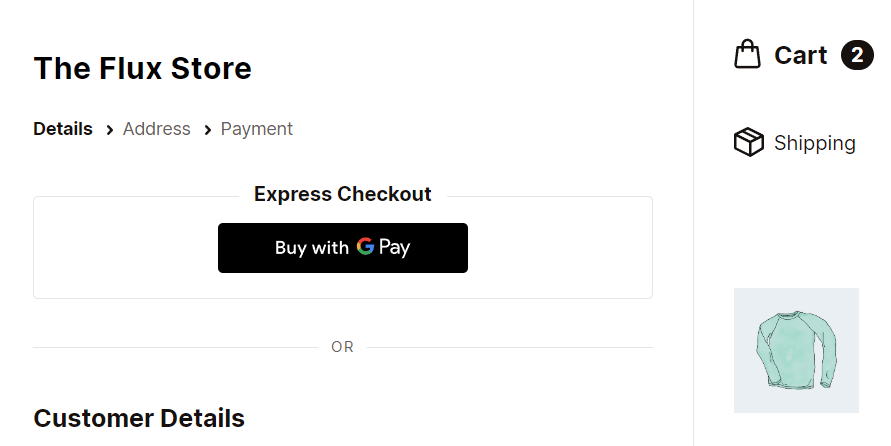
Improve your WooCommerce checkout page design
The design of your WooCommerce checkout page is more important than you think. The main aim of this page is to lead customers through the checkout process as quickly as possible. So your checkout design should be optimized for that alone.
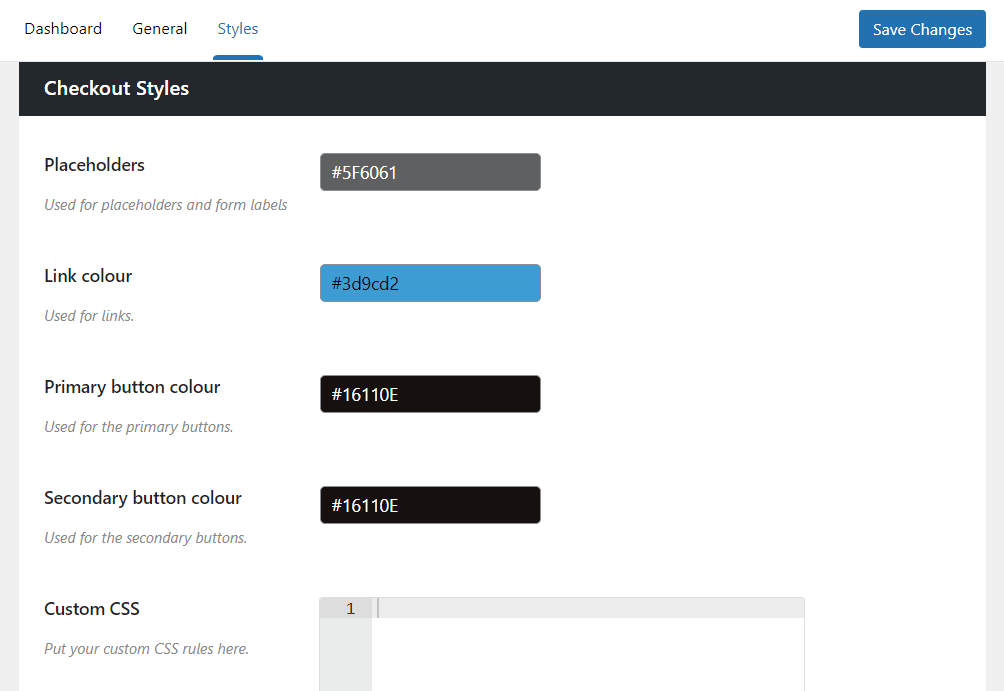
This is where Flux Checkout comes in. You’ll be able to transform the design of your checkout without needing any CSS, coding knowledge, or custom code. You won’t even need a page builder like Elementor or Divi. Instead, you’ll be able to pick between a few different checkout design templates that have been tested to reduce checkout abandonment.
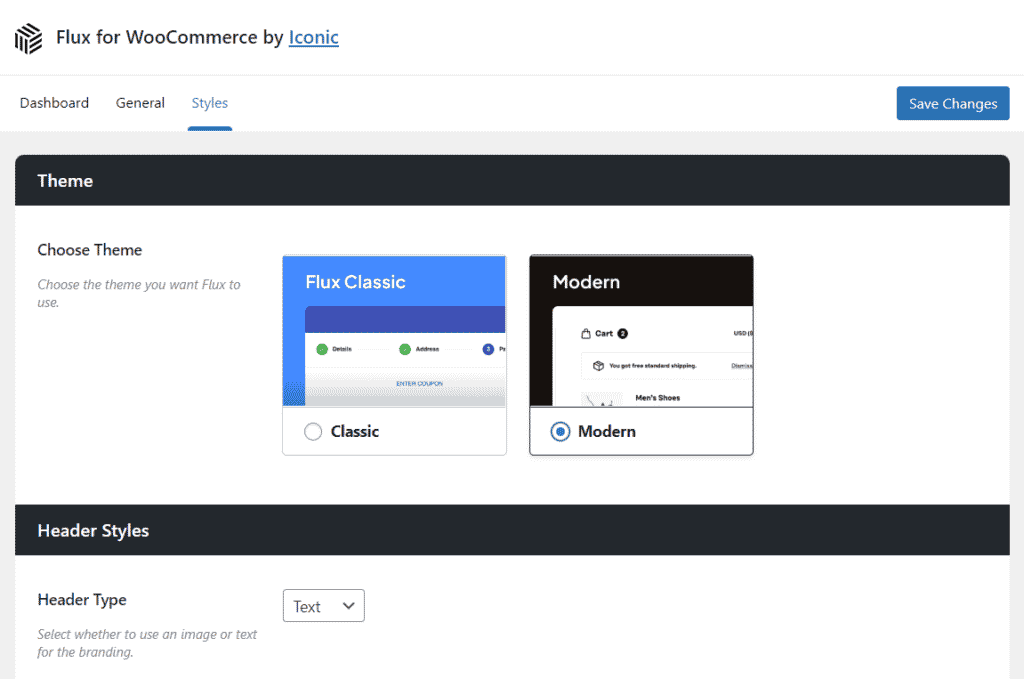
These checkout page templates will change your checkout form’s look and feel. Including the background color, checkout fields, button colors, style, and more. Plus, you’ll be able to customize these to fit your ecommerce store perfectly.
Create conditional checkout fields
While the plugin we mentioned earlier lets you add new checkout fields to your WooCommerce checkout page, Conditional Checkout Fields for WooCommerce allows you to take this one step further.
Suppose you have multiple products requiring specific form fields to appear at checkout (for example, order notes, gift messages, extra details, or specific delivery information). In that case, you might want a way for these to only display for specific WooCommerce products.
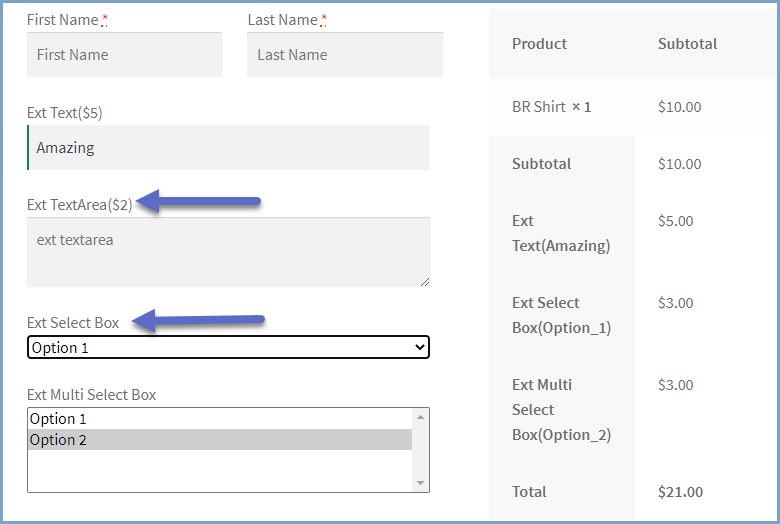
By installing Conditional Checkout Fields for WooCommerce, you’ll be able to add custom fields ranging from simple text areas to image uploads and color pickers.
Add a delivery date or date picker to your checkout
If you’re looking to get a little more specific on when you deliver your products to customers, you might want to add the ability to select their own delivery date at checkout.
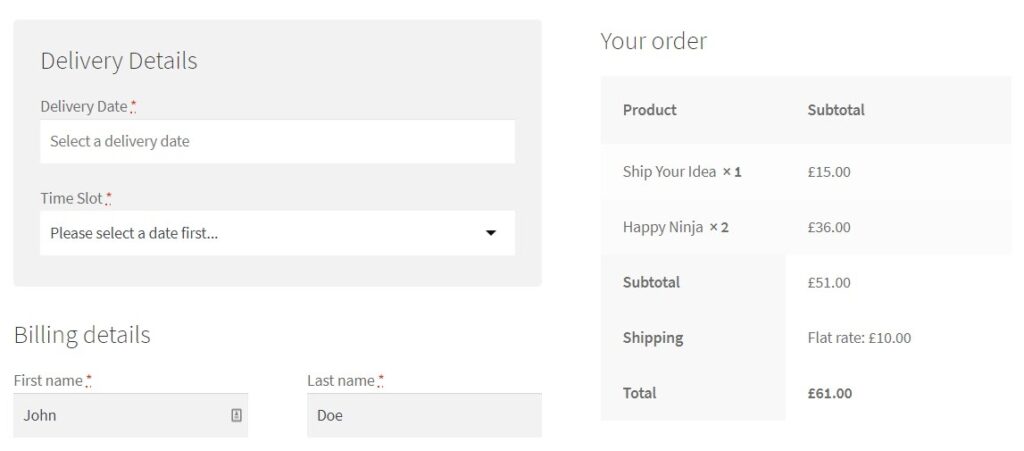
If that’s the case, by using the plugin WooCommerce Delivery Slots, you’ll be able to not only allow customers to select their own delivery date but also create a custom delivery schedule to suit you.
Allowing customers to select their own delivery date and time at the checkout will improve their user experience significantly. If a customer knows when their delivery is arriving, they’re more likely to shop with you again.
Get the plugin here or view our tutorial to get it set up on your site.
Add a local pickup option to your WooCommerce checkout
Your online store might operate locally or offer local pickup. If this is the case, the standard WooCommerce checkout page doesn’t cater to this well.
If you’re looking to offer local pickup to customers with the flexibility of creating a schedule to suit you, then WooCommerce Delivery Slots can help.
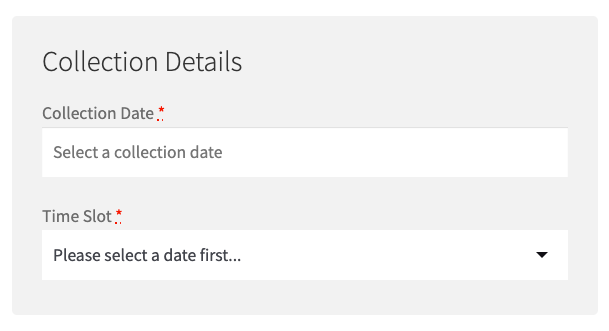
Read our tutorial to see how you can customize your checkout page and store for local pickup. Or, get the WooCommerce Delivery Slots plugin here: iconicwp.com/woocommerce-delivery-slots
Add cross-selling to your checkout
Your checkout page doesn’t just have just to process payments. It can also work hard to increase sales with the addition of cross-selling.
In fact, customers are more likely to be convinced to buy additional items while at your checkout. Making it one of the highest-converting locations in your store.
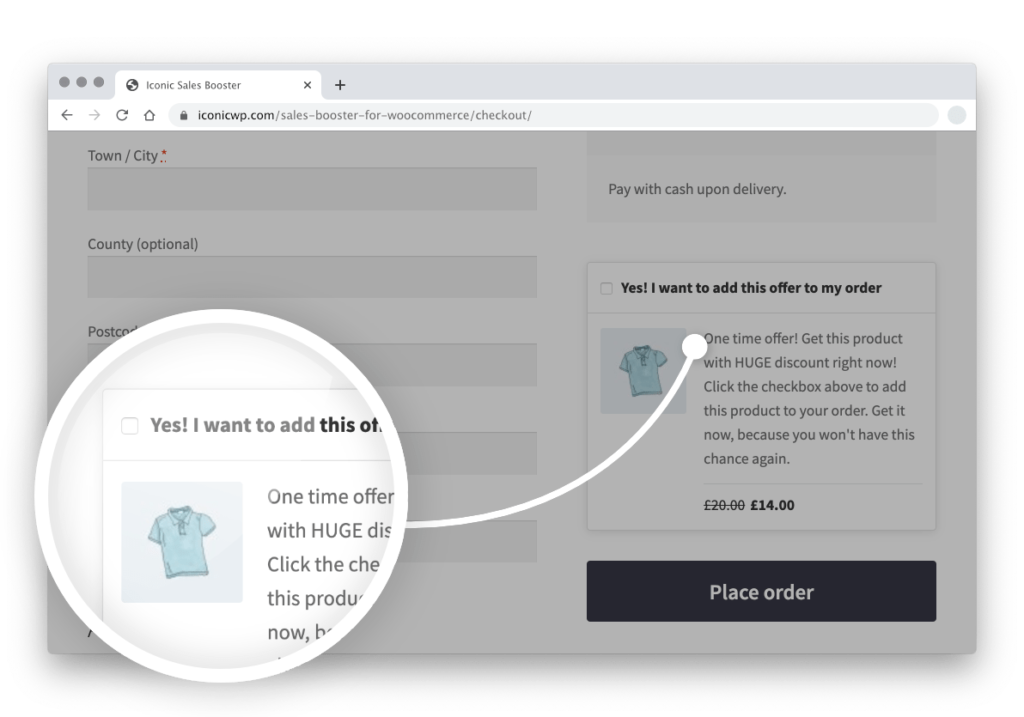
With Sales Booster for WooCommerce, you can add an ‘order bump’ within the checkout.
Depending on the items in the customer’s cart, you can change the offer you include. Or simply create one which appears store-wide.
Adding cross-selling to your WooCommerce checkout page has been proven to increase sales significantly for some of the biggest ecommerce stores out there. The good news is, you can add it to your store with just a few clicks and no coding knowledge whatsoever.
Get the plugin here: iconicwp.com/sales-booster-for-woocommerce
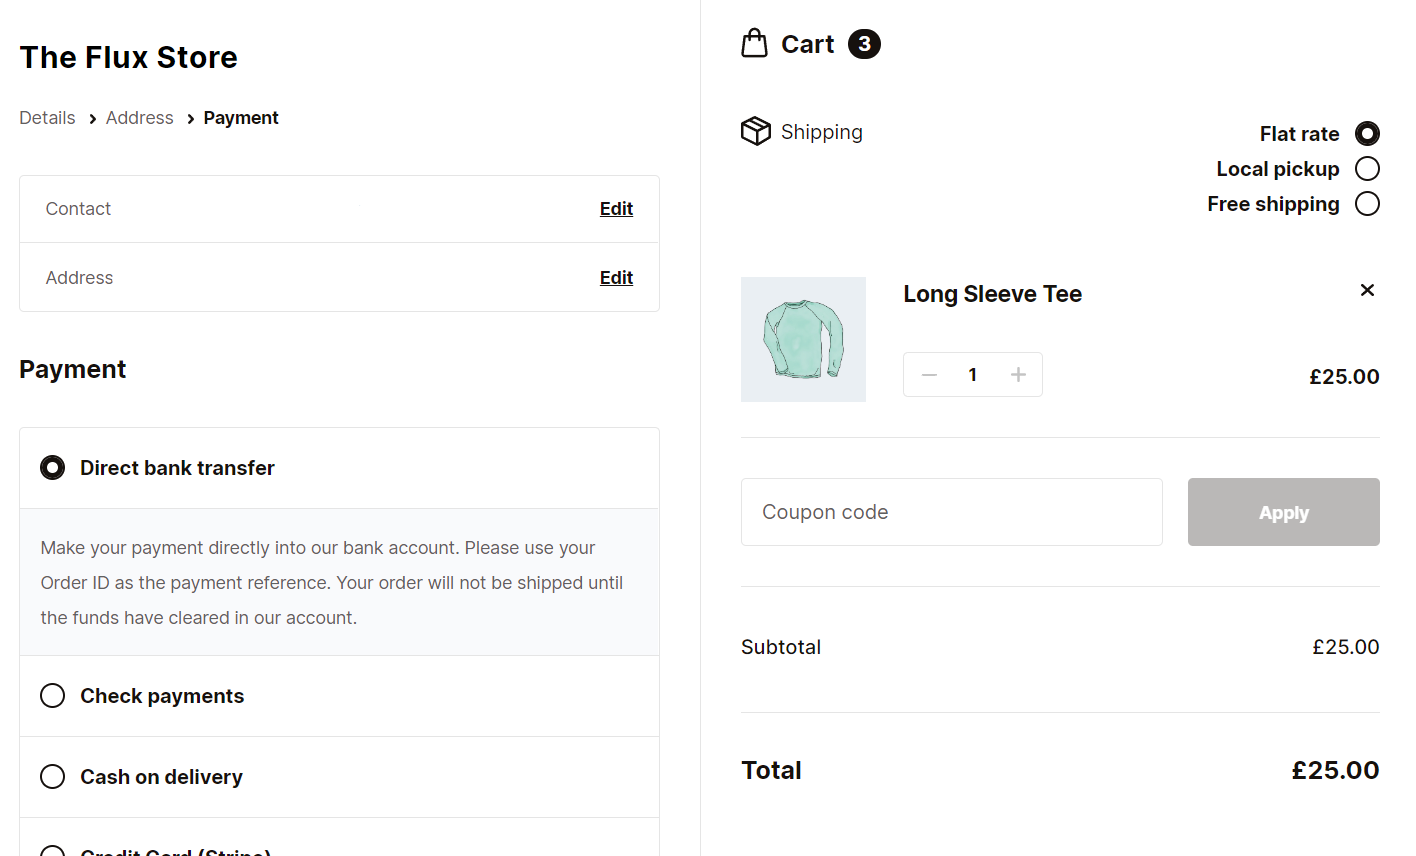
Include additional payment options on your WooCommerce checkout page
The default WooCommerce checkout allows you to add a few default payment methods. But if you really want to save customers time, reduce checkout abandonment, and keep customers coming back, you’ll need to offer better payment methods.
It goes without saying that the best payment gateways for your store are ones that you know your customer uses the most anyway. But if you really want to reduce checkout abandonment, then using specific payment methods designed to save customers as much time as possible is the way to go.
Payment methods like PayPal, Apple Pay, Google Pay, and more are all designed to cut out the time it takes to enter payment information and sometimes even address fields – so that your customers can checkout even faster.
Many of these payment options require an additional plugin to be added to your WordPress site. You can find a list of these on the WooCommerce marketplace.
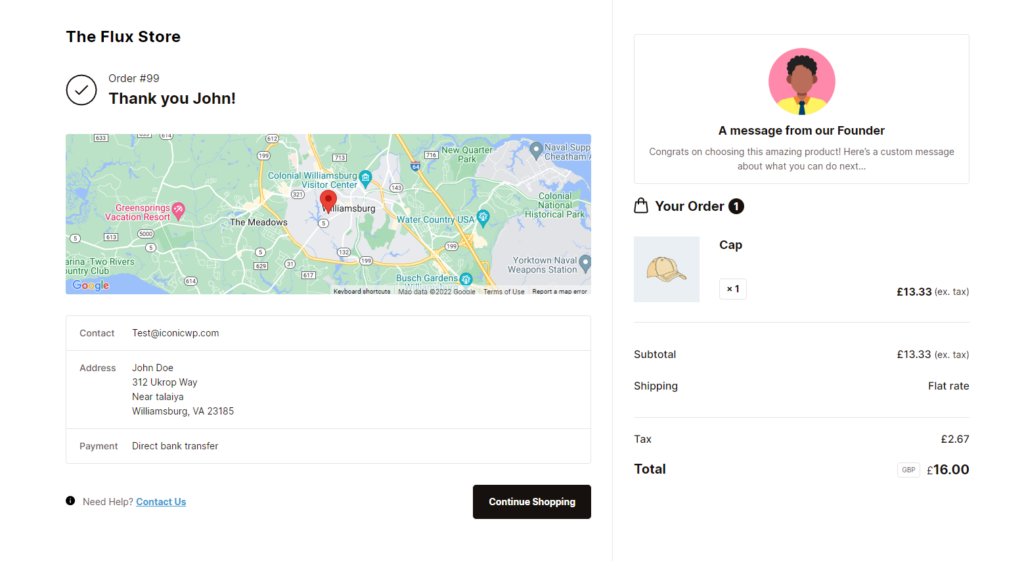
Upgrade the WooCommerce order confirmation page
The default WooCommerce order confirmation/thank you page is pretty basic. It contains a table with all your customer’s order details, and that’s about it. It does the job of giving customers information, but it could be so much more user-friendly.
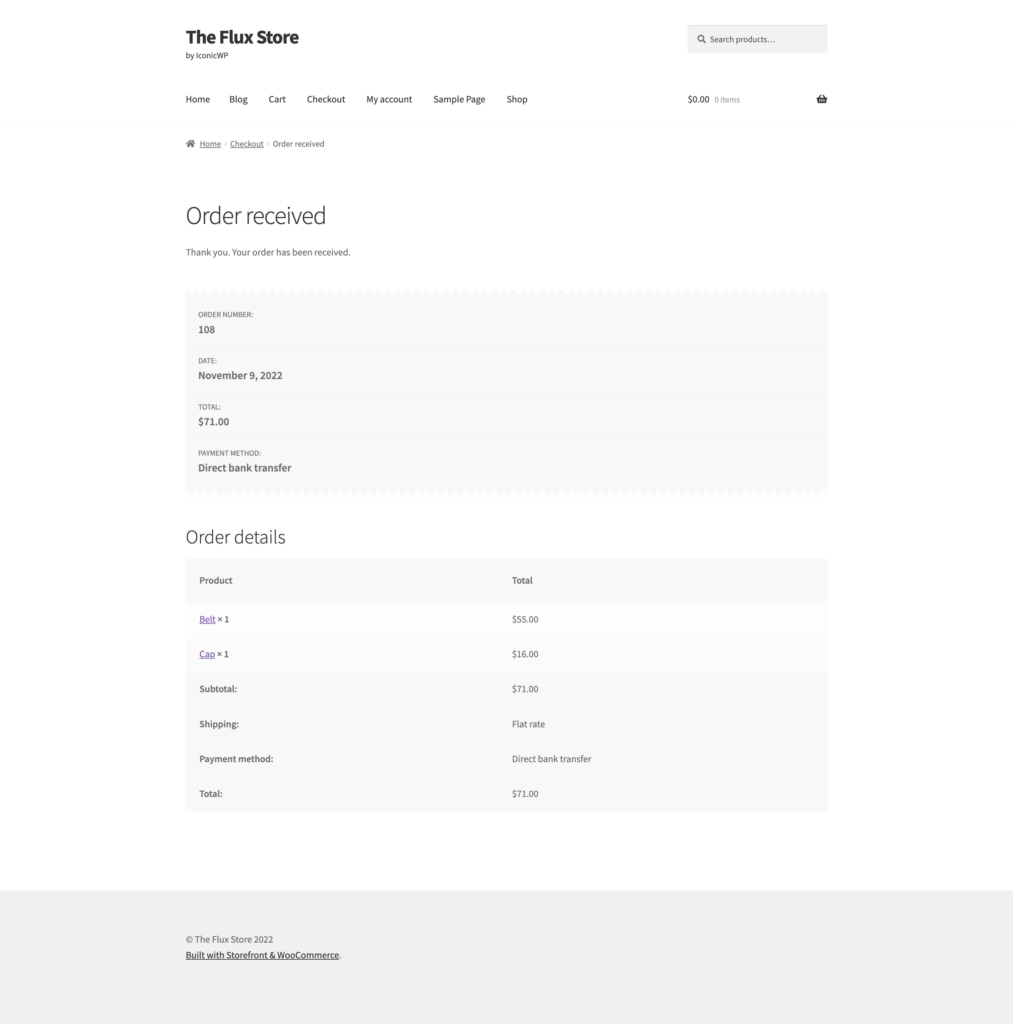
With an upgraded thank you page, you’ll have a much more slick and modern way to confirm a customer’s order. Flux Checkout for WooCommerce can help make this possible.
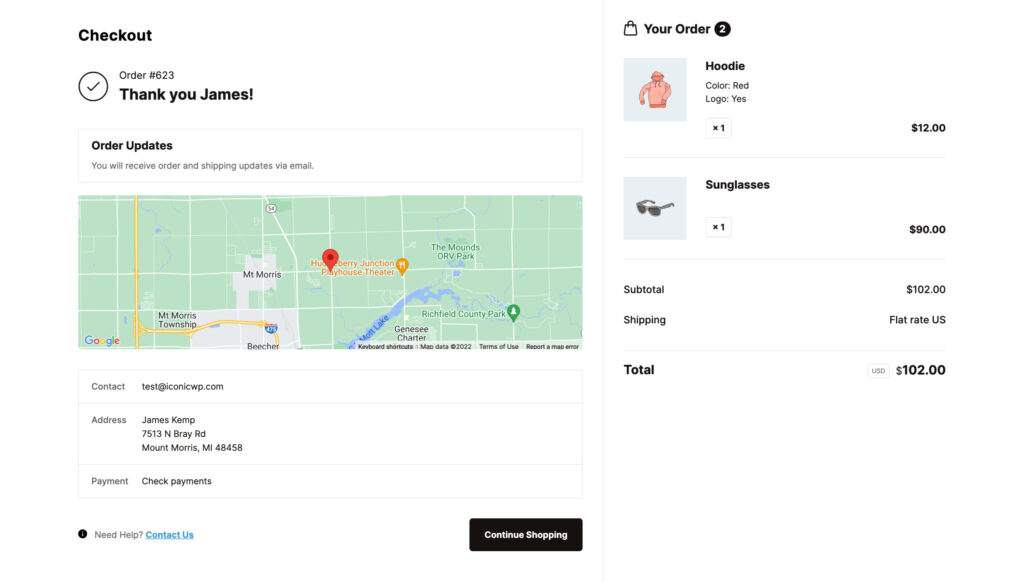
It allows you to:
- Visually confirm order contents with product images and names.
- Visually confirm the customer’s delivery location with a map.
- Allow customers to get in touch with you with a contact us link.
- Help customers see their order info easily and at a glance.
- Customize the thank you page to suit you – with a content area for images, video, text, and more.
By upgrading your thank you page in this way, you’ll give customers a better post-purchase experience and keep them coming back for more. Trust plays a huge role in retaining customers, and your thank you page has a huge role to play.
Flux Checkout for WooCommerce
Flux Checkout transforms the default WooCommerce checkout into one that’s lightning-fast, distraction-free, and reduces checkout abandonment.
Customize the WooCommerce checkout using default WooCommerce settings
WooCommerce offers a range of customization options that can help you tailor the checkout process without additional tools.
Let’s delve into these built-in settings and see what WooCommerce can do without any help.
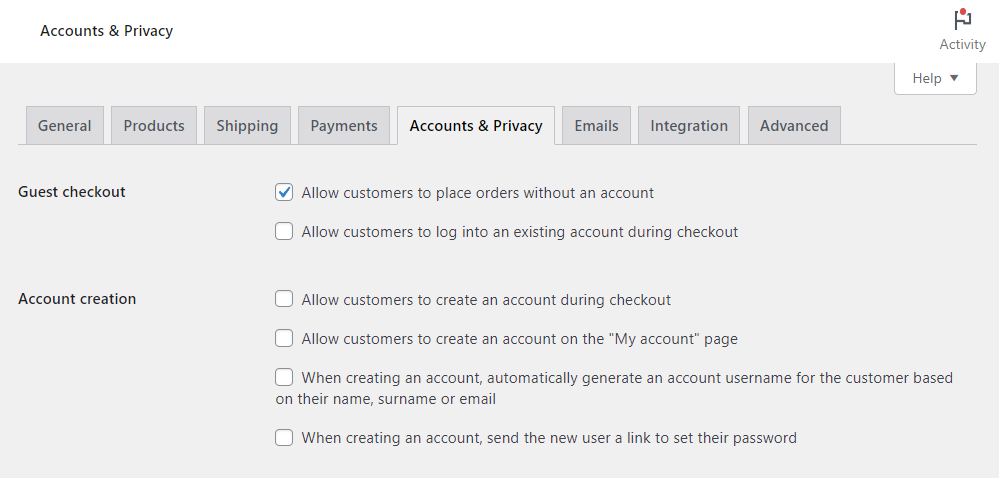
Setting up guest checkout
Managing guest checkout settings ensures a balance between user convenience and data protection, allowing customers to purchase without creating an account while still maintaining their privacy.
- Navigate to WooCommerce > Settings > Accounts & Privacy.
- Guest Checkout: Here, you can enable customers to place orders without an account. This can be beneficial for one-time shoppers whom the registration process might deter.
- Account Creation: You can allow customers to create an account during checkout, providing them with the option to save their details for future purchases. Additionally, you can choose to generate usernames and passwords for easier account creation automatically.
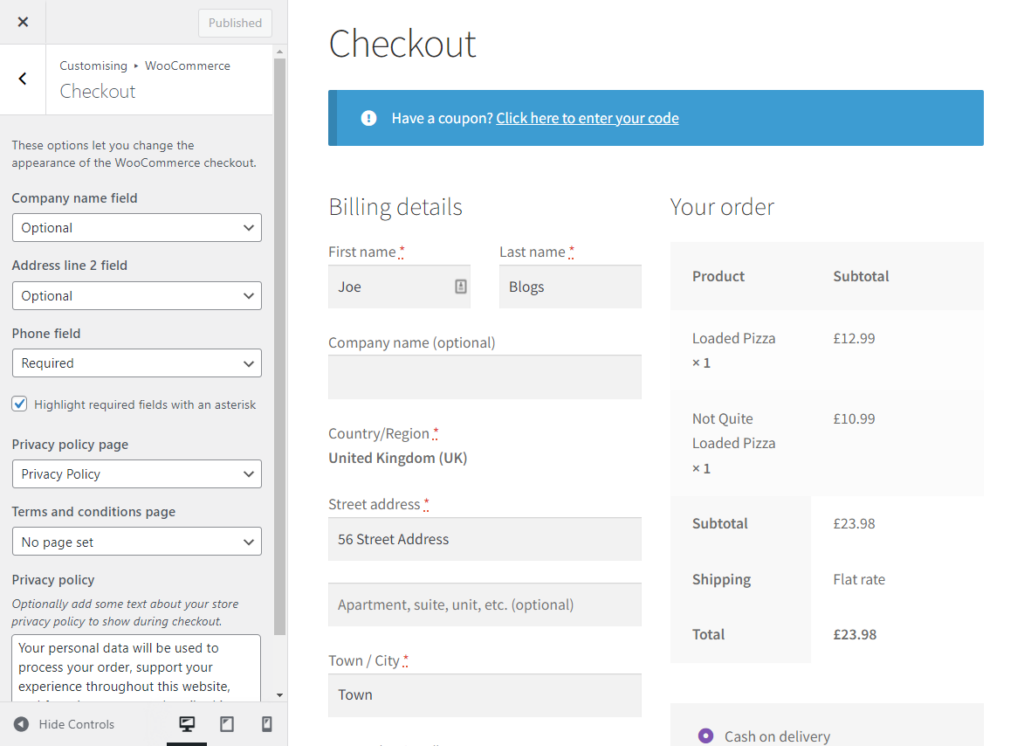
Customizing checkout with WooCommerce customizer
The WooCommerce Customizer provides a user-friendly interface to make various tweaks to your checkout without coding.
- Navigate to Appearance > Customize > WooCommerce in your WordPress dashboard.
- Select the Checkout option.
- Here, you can make several adjustments:
- Company Name Field: Choose to hide it, make it optional, or require it.
- Address Line 2 Field: Decide if you want to hide it or keep it visible.
- Phone Field: You can hide it, make it optional, or require it.
- Highlight Required Fields: Toggle the option to highlight mandatory fields for the customer to fill out visually.
- After making your desired changes, click Publish to save and apply them.
We’ve looked at plugins and default WooCommerce settings. Now, let’s take a quick look at an advanced technique you can use to customize the WooCommerce checkout page.
Customizing the WooCommerce checkout page using a child theme
Using a child theme is a recommended approach when making changes to your WooCommerce store’s design or functionality if you have coding knowledge.
It ensures that your customizations remain intact even after updating the parent WordPress theme, providing a safe environment for modifications without risking the loss of your changes.
Setting up a child theme
Before diving into customizations, ensure you have a child theme in place. A child theme inherits the look and functionality of the parent theme but allows for modifications without altering the original theme files.
Overriding WooCommerce templates
With a child theme, you can override specific WooCommerce templates. This means you can adjust the layout, order, and appearance of elements on the checkout page to fit your brand or desired user experience better.
Customizing the checkout page
Dive into the relevant template files in your child theme. With the right coding knowledge, you can rearrange fields, introduce new content, or even remove certain elements to streamline the checkout process.
Styling your adjustments
Beyond structural changes, you can also tweak the visual appearance of your checkout page. You can adjust colors, fonts, spacing, and more through your child theme’s custom CSS to ensure your checkout page aligns with your brand’s aesthetic.
Customizing your WooCommerce checkout page today
So there we have it, a whole host of ways to improve your WooCommerce checkout and increase sales in your WooCommerce store as a result.
Creating a custom checkout page for your WooCommerce store has never been easier with a little help from a few great plugins.
But if you’d like to cut out all the hard work and still see amazing results in your WooCommerce store, install Flux Checkout for WooCommerce today and transform your checkout in just a few clicks.
Flux Checkout for WooCommerce
Flux Checkout transforms the default WooCommerce checkout into one that’s lightning-fast, distraction-free, and reduces checkout abandonment.
Disclaimer: This post contains affiliate links.

Gina Lucia is our in-house Content Manager at Orderable. She writes articles, user guides, technical documentation, and creates videos on everything WooCommerce and Orderable.
Gina has been working in the WordPress/WooCommerce space since 2012 when she developed WordPress websites for clients large and small.
For the past 8 years, she’s been writing about everything WordPress and WooCommerce, becoming an expert in what makes a WooCommerce store succeed.
When not writing, Gina loves to tend to her vegetable garden, read, or travel to mainland Europe.