
This guide will show you how to customize the WooCommerce checkout page design with a few different techniques, including:
- How to customize the WooCommerce checkout page with default settings.
- How to customize the WooCommerce checkout page design with a plugin.
The checkout page is one of the most important pages on your online store. After all, it’s where the customer completes their order and money exchanges hands. For this reason, making sure WooCommerce checkout page design increases conversions and boosts sales is incredibly important.
In this guide, we put that priority first. So you’ll have a checkout page that looks good and reduces checkout abandonment, and increases sales with the best checkout flow possible.
Want to skip the article? Get straight to customizing your WooCommerce checkout page design with Flux Checkout for WooCommerce.
Flux Checkout for WooCommerce
Flux Checkout transforms the default WooCommerce checkout into one that’s lightning-fast, distraction-free, and reduces checkout abandonment.
But you might be wondering, why bother improving the default WooCommerce checkout page? Is it really worth it?
Why improve the default WooCommerce checkout page design?
The default features that come with WooCommerce are one-size-fits-all. They’re designed to get you off the ground, no matter what your online store sells. Because of this, things like the checkout page are made to appeal to everyone.
For this reason, the default WooCommerce checkout page could be improved. Here’s why:
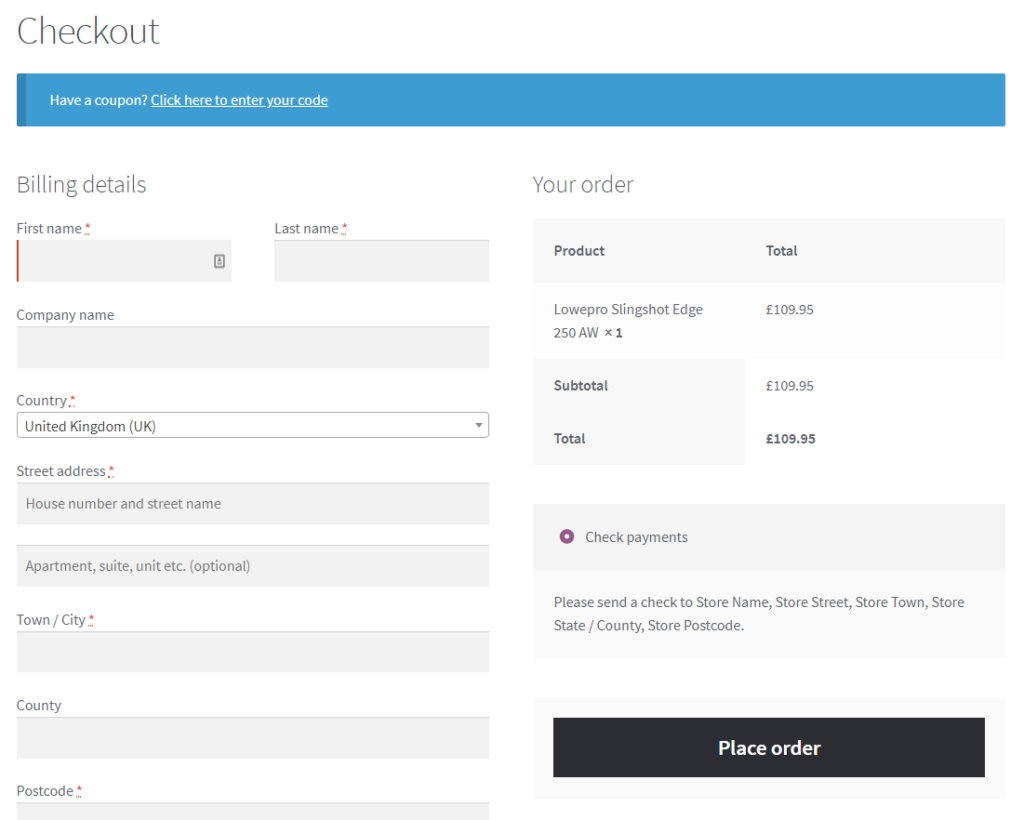
- It has several optional fields, such as ‘Company name,’ ‘Phone number,’ lengthy billing details/shipping details, and input fields. These distract and frustrate customers who just want to complete their purchase.
- The default WooCommerce checkout page is a one-page checkout. Which means all the checkout fields are lumped into one step on a single page. This can overwhelm customers and make your checkout seem to take longer than it actually will.
- Your customers’ preferred payment gateway/payment method might be missing, resulting in them abandoning the checkout.
? These shortcomings have consequences in the form of high numbers of cart abandonment. Nearly 70% of customers abandon their shopping carts before they can complete their orders, with 18% of customers attributing this to a complicated checkout.
This is why it’s so important to improve your WooCommerce checkout. Fortunately, you can customize your checkout to reduce the number of fields available in the checkout form. You can also introduce a multi-step checkout and add your customers’ preferred payment gateways.
By customizing the WooCommerce checkout page this way, you’ll:
Reduce cart abandonment with an improved checkout process
Customers have a high standard of experience they expect from using your store. They prefer to get through the process of completing their orders as quickly as possible.
Want to see what other important metrics you should be tracking in your ecommerce store? Read our ecommerce metrics guide.
So if you have a complicated checkout, this will irritate or frustrate most of your customers, and they will abandon their carts before completing the purchase. Only a small percentage will be patient enough to follow through with this process.
After spending a lot of time and resources getting customers to your WooCommerce site, it‘s a concerning loss when they don’t convert.
Instead of having your customers jump through hoops and fill out too many WooCommerce checkout fields. You can allow them to finish the order process in a few simple steps by making your checkout process easier. This way, you’ll reduce the portion of people who abandon their carts.
Improve conversion rate with a distraction-free design
Customers who get to the checkout page intend to purchase your WooCommerce products. You want to ensure they can complete their purchase the fastest way possible.
Additional fields at the checkout could become distractions causing the customer to be irritated and end up not purchasing. Instead, we want to remove fields that aren’t needed.
Similarly, your site’s menu, sidebar, footer, and additional content can all be huge distractions when it comes to customers completing a purchase.
To mitigate this, you can remove all unnecessary information on your checkout page so customers only see the checkout and nothing else.
A concise checkout process eliminates distractions, allowing the customer to focus on completing their order.
Now that we understand why improving your WooCommerce checkout page design is important let’s see how you can do it.
How to customize the WooCommerce checkout page
Customizing the WooCommerce checkout page design, believe it or not, can be done with default WooCommerce settings. But the options are pretty limited.
How to customize the WooCommerce checkout page with default settings
By default, WooCommerce does allow you to make some changes to the checkout page. These might be basic, but if you’re looking to change any of these, the default settings could be a good solution.
You’ll need to use the WordPress customizer to change any of the following settings.
To find this, take the following steps:
- From your WordPress site’s dashboard, go to Appearance > Customize.
- Once clicked, you’ll be taken to the Customizer page. Click WooCommerce on the left-hand menu and then click Checkout.
- Once here, you’ll be able to change the following things.
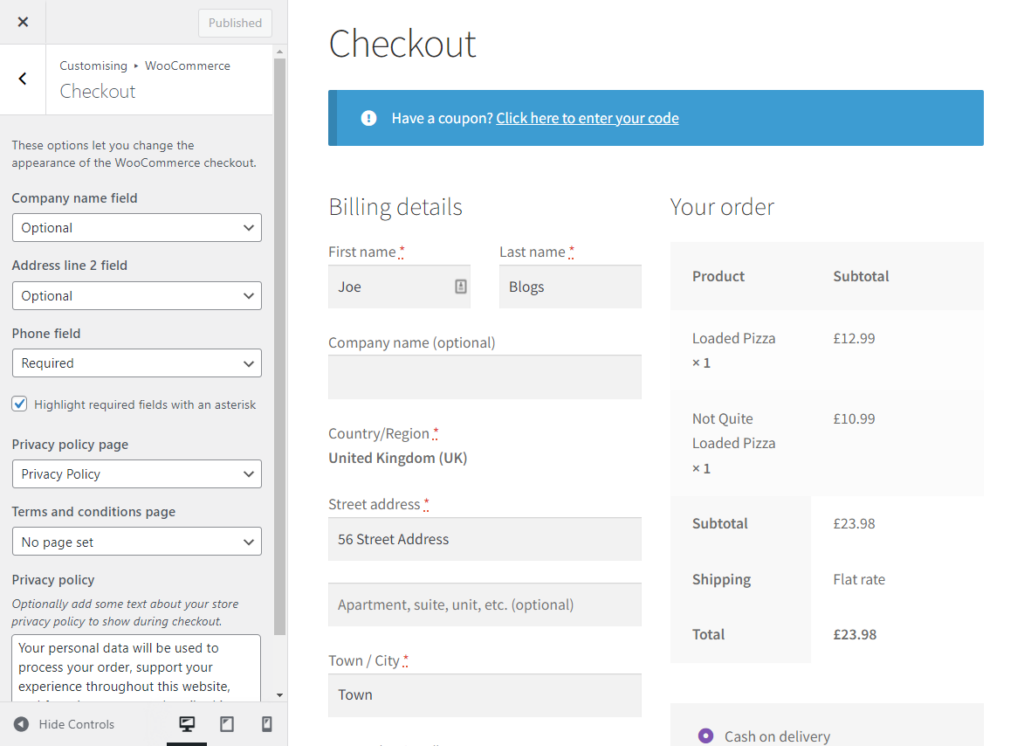
Hide or show checkout fields
You may not be able to create new fields or add custom fields with the default WooCommerce settings, but you can show or hide existing ones.
Specifically, the company name field, address line 2 field, and phone field. If you want to display any of these fields, you can also select if you want them to be required fields or not.
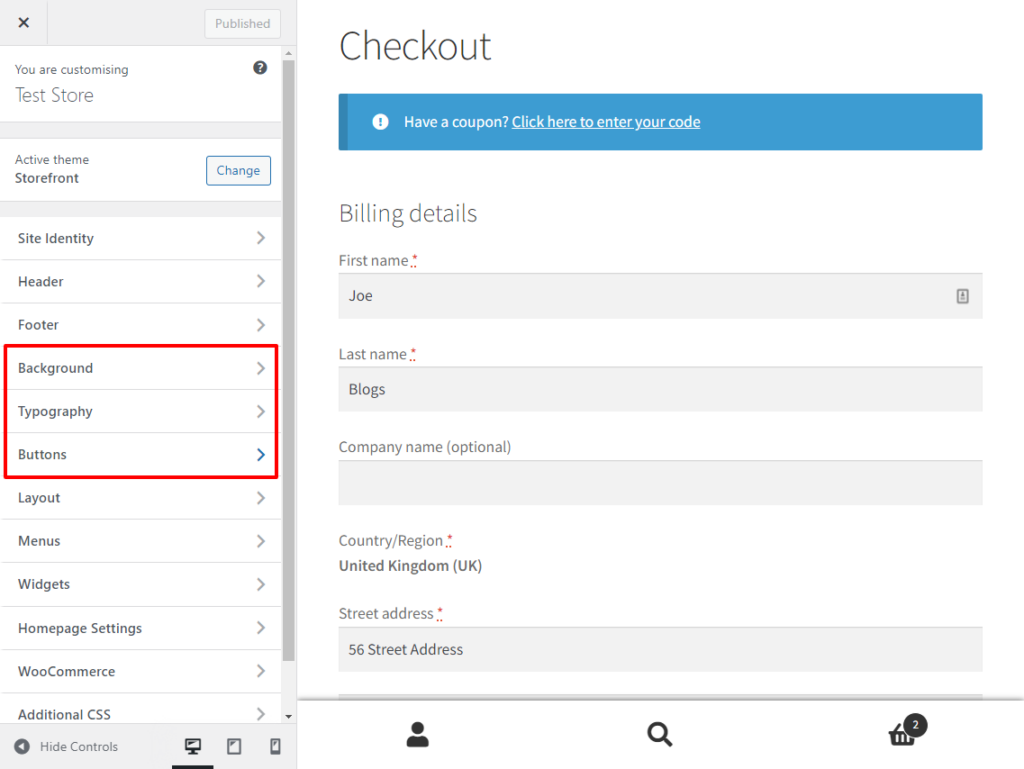
Change some basic design settings
Aside from the settings above, you can also change some basic design settings using the WordPress customizer.
Things like your checkout button colors, background color, font, and more can all be changed with these settings. However, if you were to customize your checkout this way, you would also change the design across your whole store rather than just the checkout.
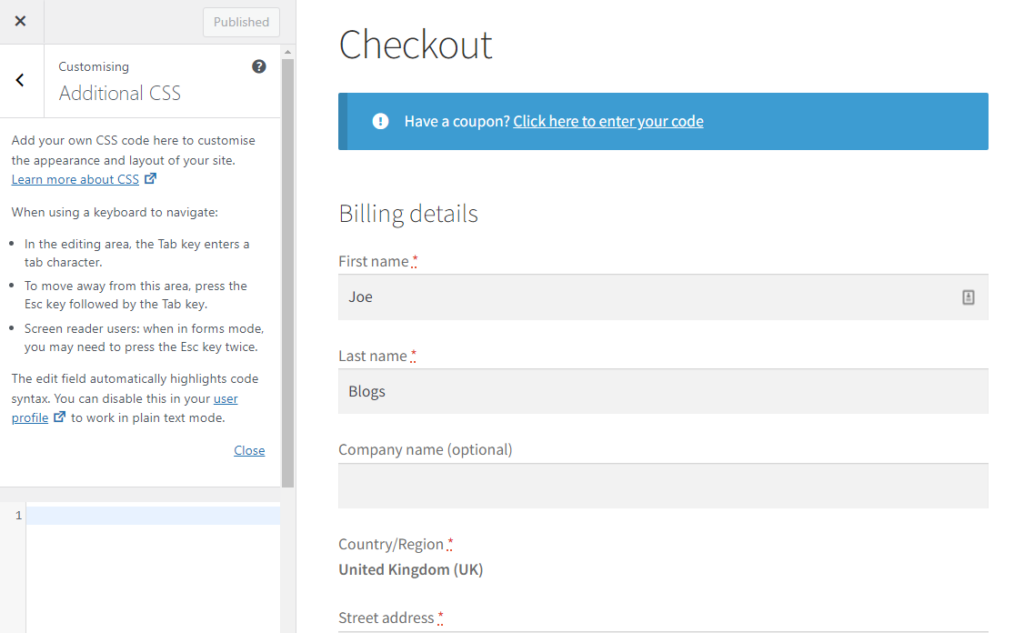
Change your checkout design using custom CSS
As an alternative, and if you have coding knowledge, you can change the basics of the checkout design with custom code.
Within the customizer, there’s a section called Additional CSS. Adding a CSS code snippet into this section can significantly impact the look and feel of your checkout page.
However, if you want to change more than these basic settings and have no coding knowledge, time or experience, customizing your WooCommerce checkout page design is still possible.
In the next section, we’ll walk you through how to customize your checkout with an easy-to-use plugin.
How to customize the WooCommerce checkout page design with a plugin
Customizing your WooCommerce checkout page doesn’t need to be complicated. With the help of a plugin, you’ll be able to customize your checkout design and boost sales in just a few clicks.
Introducing the checkout plugin, Flux checkout for WooCommerce
Flux Checkout for WooCommerce is a checkout plugin for WooCommerce that enables you to upgrade the default checkout page into one that’s distraction-free, super fast, and designed to reduce checkout abandonment.
It holds your customers’ attention by limiting distractions. As a result, your checkout process will be quick, easy, and straightforward.
Flux Checkout for WooCommerce
Flux Checkout transforms the default WooCommerce checkout into one that’s lightning-fast, distraction-free, and reduces checkout abandonment.
Of course, that’s not all. Flux Checkout for WooCommerce is packed full of the following sales-boosting features:
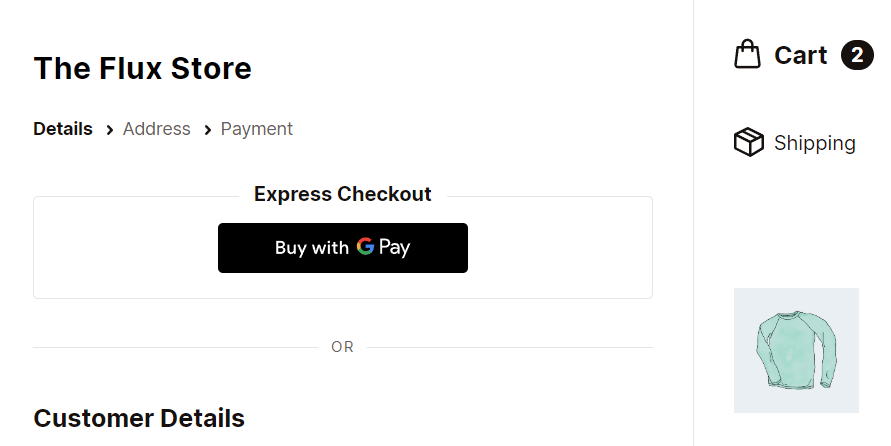
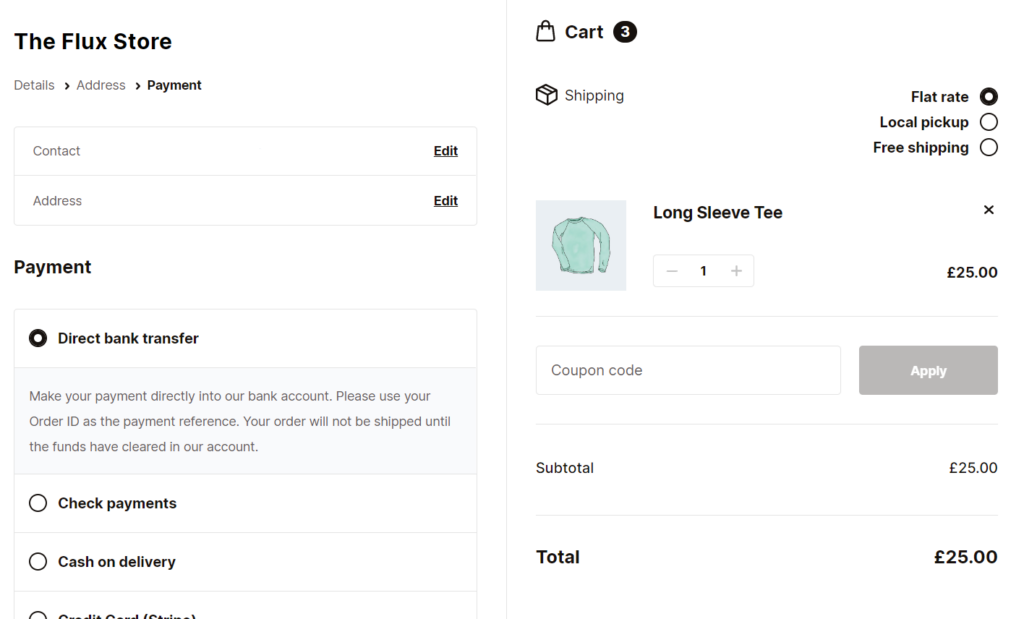
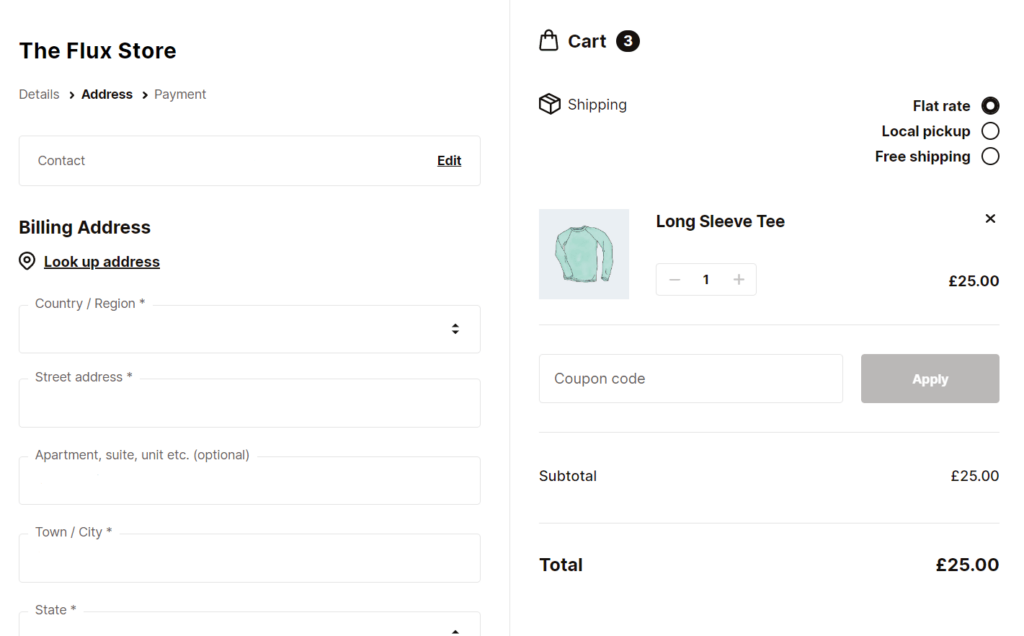
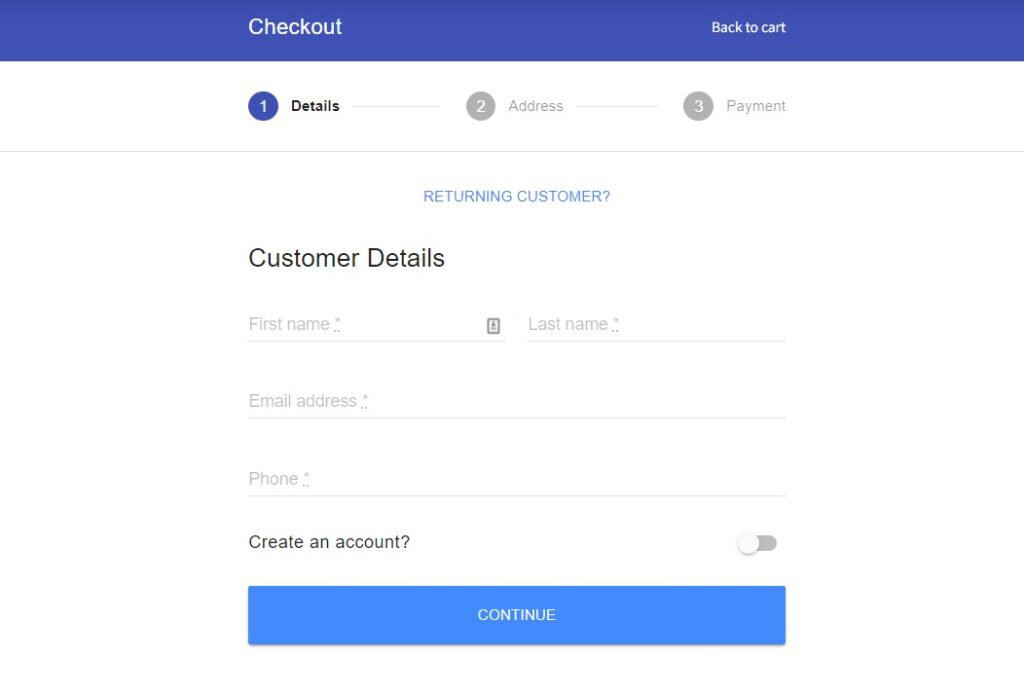
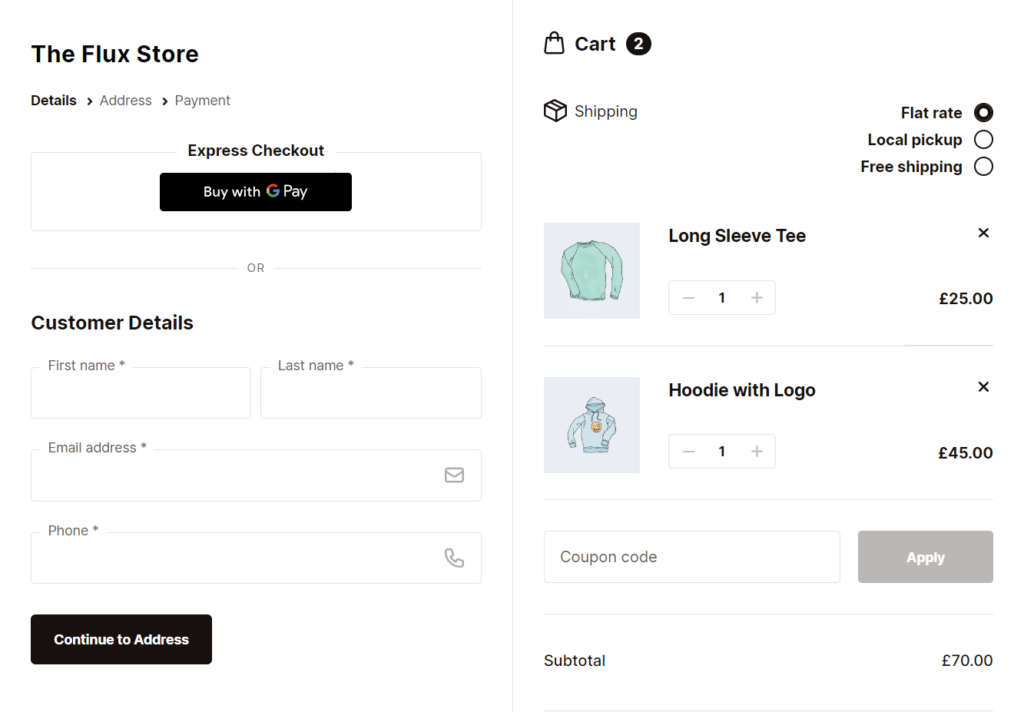
A multi-step checkout
Flux Checkout replaces the standard bulky WooCommerce checkout with a multi-step checkout.
When customers see the steps they need to take to complete their order, it immediately reduces overwhelm. By making each step simple, Flux speeds up the buying process tenfold.
It does this by reducing and condensing the number of visible fields. This enables your store to have a concise, quick, and easy checkout experience that helps to convert more customers.
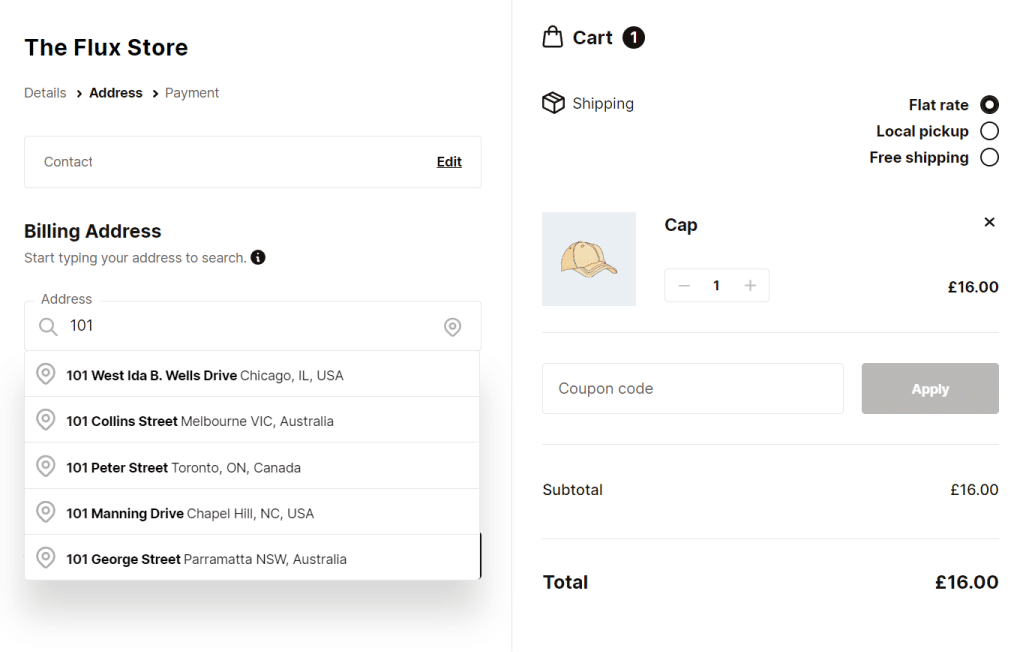
Auto-filling address fields
Flux Checkout for WooCommerce relieves your customers from having to fill out their whole billing address. It auto-populates the rest of the address form fields effortlessly once a customer has selected their address from the list.
This helps you to minimize customer frustration by enabling them to complete this step quickly.
A custom order completion page
Complete the checkout process with a customized order thank you page. Flux Checkout’s Thank You page blends seamlessly with Flux’s modern design, giving you the most up-to-date thank you page possible.
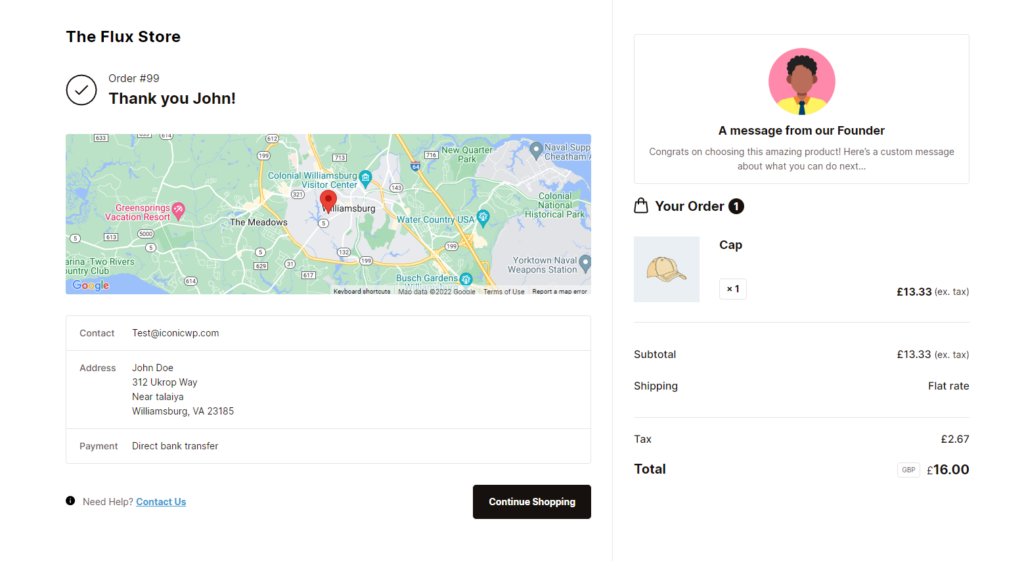
You’ll also be able to customize it to suit you – with images, text, and even video. So you can give your customers the next experience possible.
Compatibility with your current theme
Flux Checkout fits seamlessly with your current WordPress template/WordPress theme/page builder (such as Elementor). In addition, it allows you to customize it to be consistent with your brand’s design (this includes color schemes, typography, heading texts, etc.).
Using a child theme, you’ll also be able to completely customize your checkout’s design using Flux as your framework.
Customize your WooCommerce checkout with Flux Checkout for WooCommerce
Knowing what Flux Checkout for WooCommerce can do for your checkout, let’s see how you can set it up in your WooCommerce store with the following tutorial.
Step 1: Install Flux Checkout for WooCommerce
Start by purchasing the Flux Checkout for WooCommerce plugin from the Iconic site: iconicwp.com/flux-checkout-for-woocommerce
Flux Checkout for WooCommerce
Flux Checkout transforms the default WooCommerce checkout into one that’s lightning-fast, distraction-free, and reduces checkout abandonment.
Once purchased, you’ll get an email containing your plugin.
Then follow these steps:
- Go to Plugins > Add New > Upload Plugin from your WordPress dashboard.
- Choose the ZIP file containing your downloaded plugin, upload it, and click Activate.
After activating the plugin, you‘ll be directed to the license activation screen, where you’ll need to verify your purchase.
- Enter the license key and click on Agree & Activate license.
Now that Flux Checkout for WooCommerce has been installed and activated on your site let’s use it to customize your WooCommerce checkout page design.
Step 2: Customize your WooCommerce checkout design
Follow these steps to customize the checkout of your WooCommerce store.
- From your WordPress dashboard, go to WooCommerce > Flux Checkout.
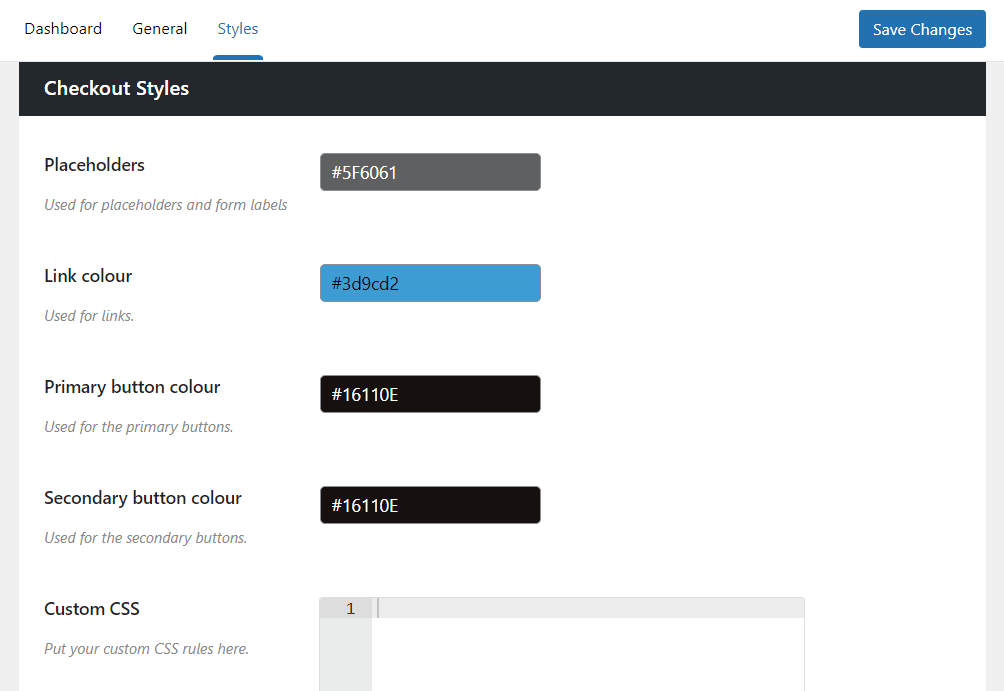
- Then click the Styles tab at the top of the page.
- Here you’ll see Flux’s theme options. Click the radio button next to the theme name to select the theme you want.
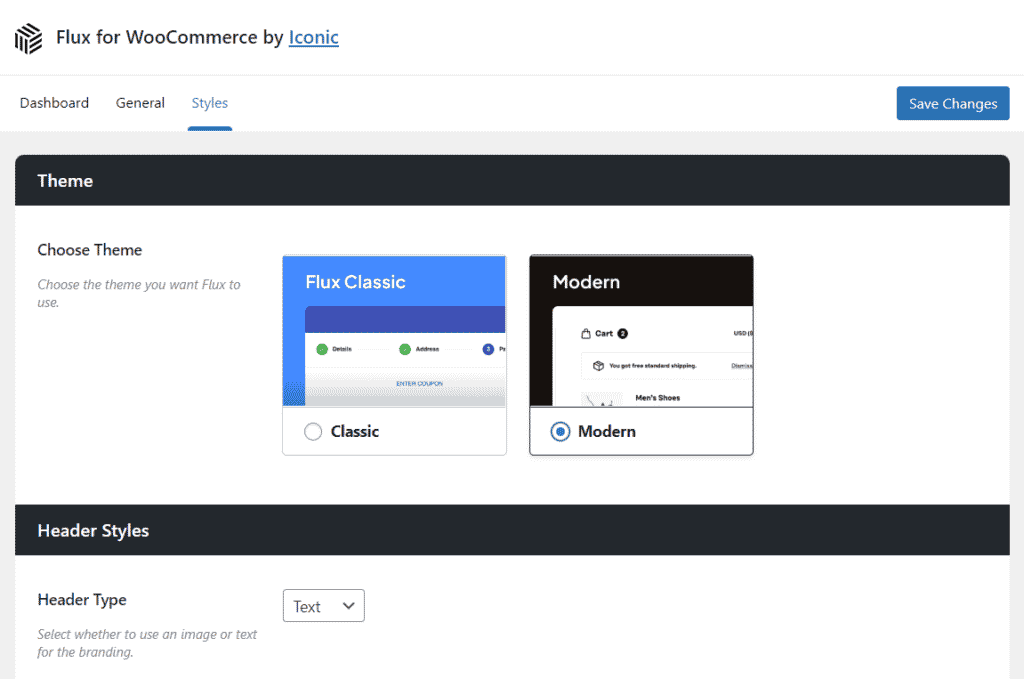
- Depending on which theme you select, the settings below will change.
If you select Classic, you’ll be using Flux’s app-like theme as a base.
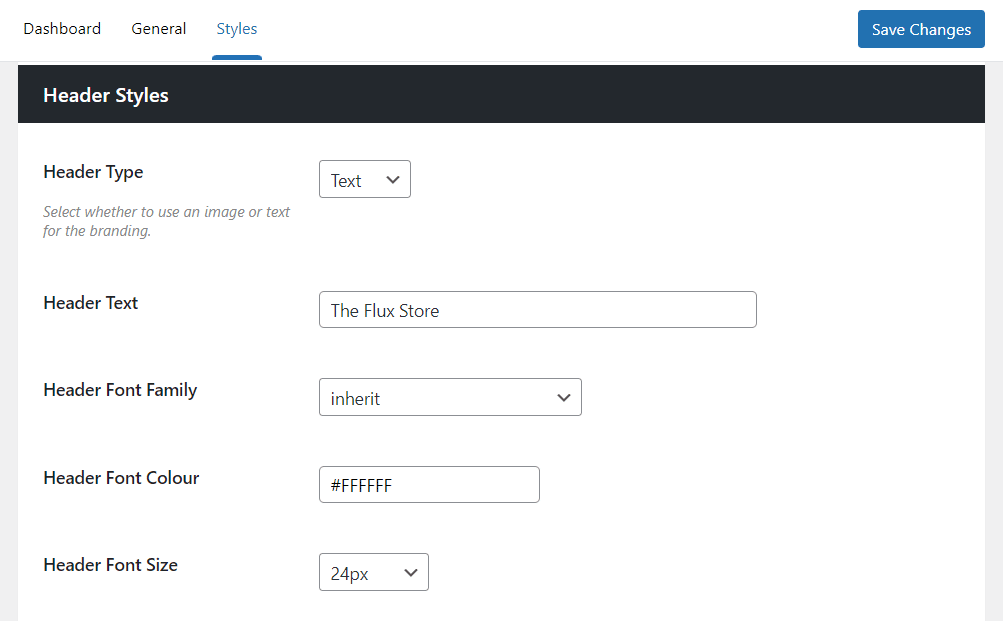
You’ll then be able to customize everything from the theme’s fonts, colors, button styles, and more using the drop-down menus in this section.
If you select Modern, you’ll be using Flux’s stylish Modern theme as a base.
You’ll then be able to customize this theme’s header styles, button colors, and more using the dropdowns in this section.
With both of these themes, you’ll also be able to include additional CSS, should you want to tweak the code to your liking.
After completing this, your store will have a concise multi-step checkout that guides customers from the single product page, to the WooCommerce cart, and finally to finish their purchase with ease.
Customizing your checkout doesn’t just end here, though. You can take additional steps to ensure your checkout helps you to boost sales.
How to boost sales with your WooCommerce checkout
Optimizing your WooCommerce checkout page design is a great start. But there is so much more store owners can do to boost sales in this section of your store.
Here are just a few additional techniques you can use with your improved checkout design to see sales skyrocket.
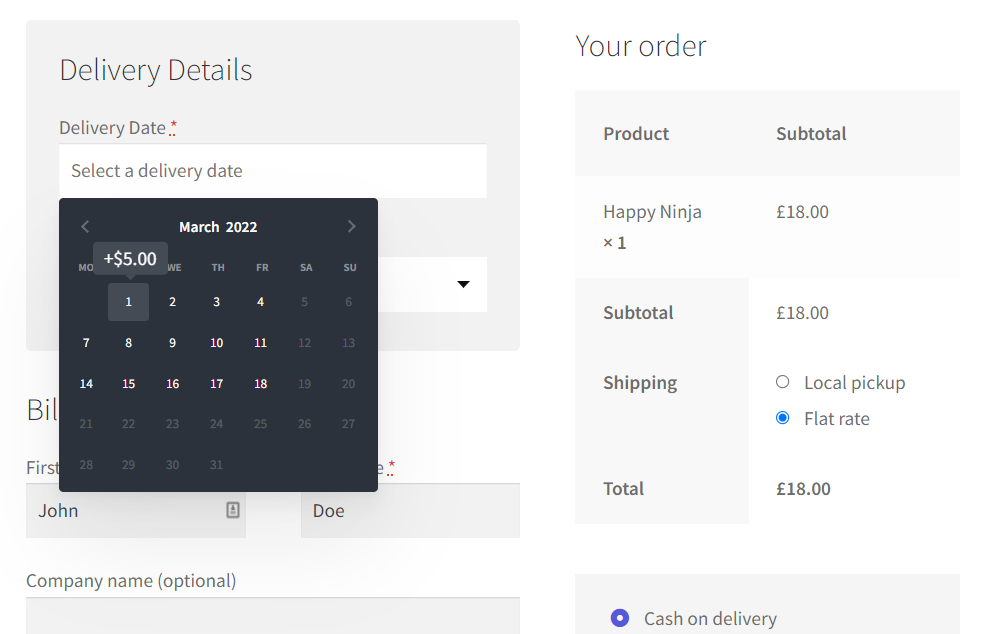
Allow customers to select their own delivery/pickup date
One of the problems customers face is they simply don’t know when their order will arrive. They fill in the shipping fields and wait for a delivery email to know when they should re-arrange their schedule.
Giving them the option to choose their own delivery and pickup could make a huge difference in sales.
This technique has the following benefits:
- Customers are more likely to buy if they can control when their order will be delivered.
- You can meet your customer halfway and alleviate delivery concerns by allowing them to select their own delivery date and time.
- You’ll have more control over your delivery schedule, setting the dates they can pick from.
- Customers are more likely to return and repeat-buy if they know you can be trusted.
The default WooCommerce install doesn’t allow you to do the above. Fortunately, there’s a plugin for this.
WooCommerce Delivery Slots allows you to add delivery/pickup time and date slots to your checkout. Customers can then use these slots to select their own delivery/pickup time/date.
WooCommerce Delivery Slots
Let customers choose their preferred WooCommerce delivery date and time right from your WooCommerce checkout page. With WooCommerce Delivery Slots, you can set a flexible delivery schedule to suit you and your customers.
You set the schedule, though. You’ll be able to create unlimited slots for customers to pick from, set additional fees, lead time, holidays, and so much more.
By using this technique, you’ll not only make it easy for customers to say yes when shopping with you, but you’ll reduce checkout abandonment and increase conversions at the same time.
Add cross-selling to the checkout
Once a customer reaches the checkout, they’re not necessarily done shopping. This space is an excellent place to include additional offers because your customer has already expressed their intent to buy.
In this case, adding cross-sells and upsells to the checkout could have a massive impact on sales and increase your average order value.
The default WooCommerce install allows you to only cross-sell on the individual product page. To cross-sell at checkout, you will need a plugin.
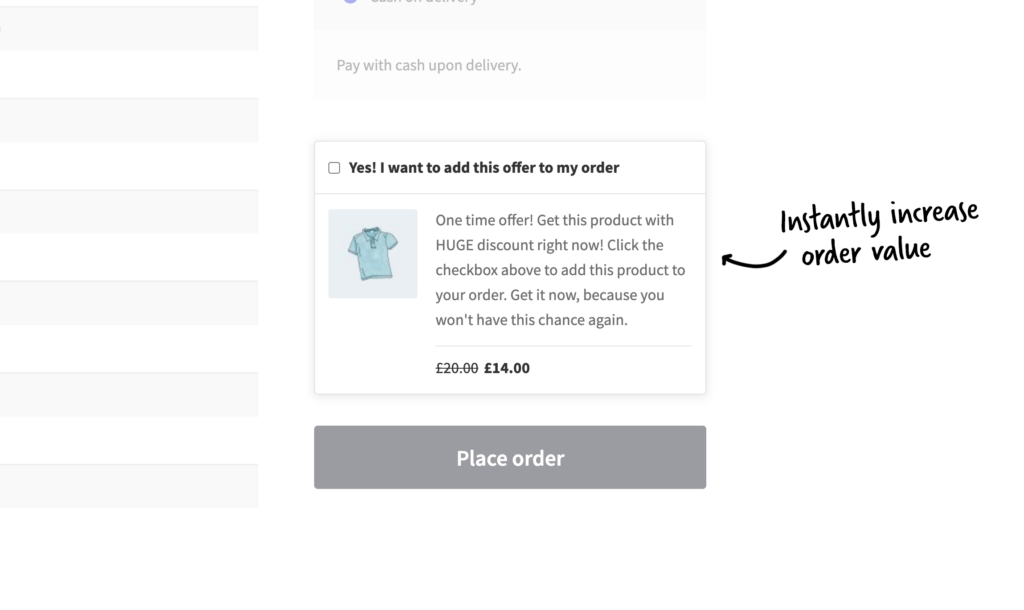
Iconic Sales Booster for WooCommerce is an easy-to-use WooCommerce plugin that allows you to offer cross-sells throughout a customer’s journey in your store. This includes the checkout. With this plugin, you can add an order bump at checkout, a proven technique used by ecommerce giants like Amazon.
Iconic Sales Booster for WooCommerce
Add cross-selling to your entire WooCommerce store in minutes with Iconic’s WooCommerce cross-sell plugin, Iconic Sales Booster for WooCommerce.
You‘ll be able to display one-time irresistible offers for products related to those already in the customer’s cart.
Iconic Sales Booster for WooCommerce also allows you to add a cross-sell post-checkout. Here you can also include a heavily discounted one-time offer via a popup that customers can add to their order in a single click.
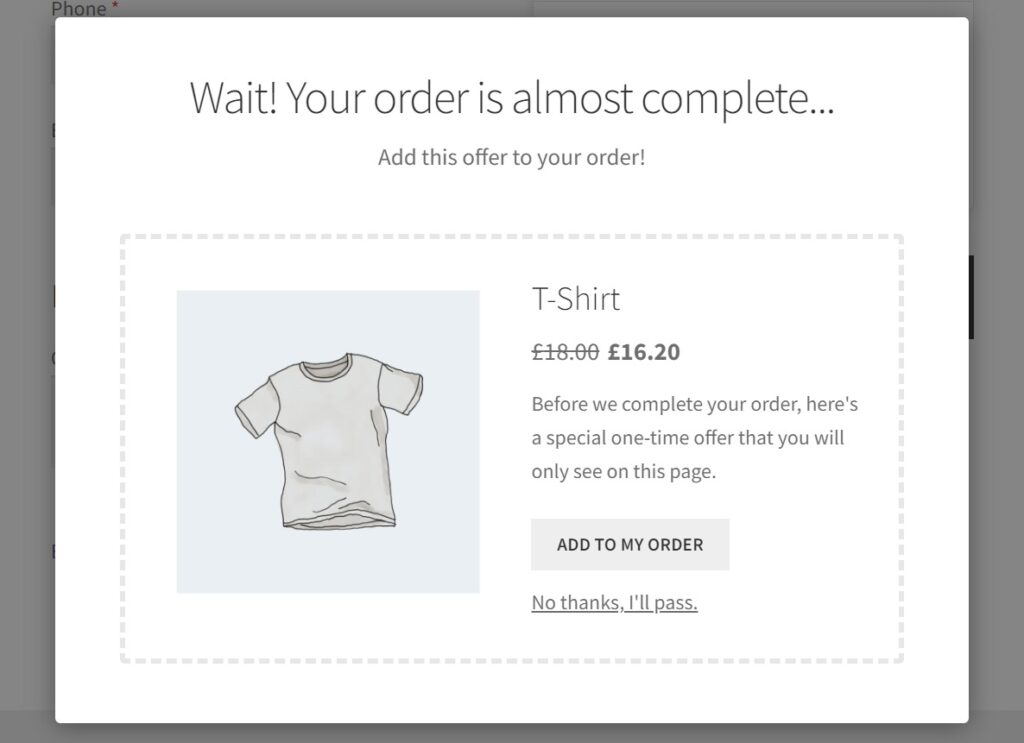
They will then add this offer directly to their order without re-entering checkout details, such as their card number.
Customize your WooCommerce checkout today
Improving your WooCommerce checkout page design and checkout process might sound like a lot of work. So how can you achieve all of the results within this guide?
The best way to do this effectively is with our WooCommerce Local Delivery Bundle. This bundle contains all the plugins mentioned in this article, which together will improve your WooCommerce checkout and boost sales with just a few clicks.
WooCommerce Local Delivery Bundle
Add local delivery and local pickup to WooCommerce with ease. Includes Delivery Slots, Flux Checkout, and Sales Booster.
Or, buy each plugin individually below:
- Flux Checkout for WooCommerce – optimize the standard WooCommerce checkout and reduce abandoned carts with this mobile-friendly multi-step checkout.
- WooCommerce Delivery Slots – allow customers to select their own delivery/pickup date and improve your user experience.
- Iconic Sales Booster for WooCommerce – boost your average order value by adding cross-selling order bumps at the checkout.

Gina Lucia is our in-house Content Manager at Orderable. She writes articles, user guides, technical documentation, and creates videos on everything WooCommerce and Orderable.
Gina has been working in the WordPress/WooCommerce space since 2012 when she developed WordPress websites for clients large and small.
For the past 8 years, she’s been writing about everything WordPress and WooCommerce, becoming an expert in what makes a WooCommerce store succeed.
When not writing, Gina loves to tend to her vegetable garden, read, or travel to mainland Europe.