
If you’re looking to setup shipping in WooCommerce for your online store, then this article is for you.
👋 In this article, we’ll walk you through how to set up and manage WooCommerce shipping. We’ll also show you how to add time and date slots to your checkout so your customers can select their shipping date and time with the WooCommerce Delivery Slots plugin.
Shipping is a critical component of any ecommerce store. So, as an ecommerce store owner, why should you care about shipping? Simply because customers care about it too!
You can do everything from having the best prices, shopping experience, and customer service, but shipping ultimately gets your products to customers. For this reason, it can play an important role in the success or failure of your WooCommerce store.
WooCommerce Delivery Slots
Choose a delivery date and time for each order. Add a limit to the number of allowed reservations, restrict time slots to specific delivery methods, and so much more.
We’ll start with setting up shipping in WooCommerce using the default settings.
How to setup shipping in WooCommerce (using default settings)
One of the main reasons for having an ecommerce store is to reach customers far away from your premises. And if you sell physical products, such as shoes, food, home appliances, etc., you need to work out a way to get these products to your customers.
You can deliver products to branches closer to your customers or their doorsteps through shipping. In WooCommerce, you can set up shipping using the default settings.
These options allow you to determine the WooCommerce shipping methods available for customers and the rates that will be applied. Your customers can pick their preferred shipping method and know the cost upfront.
👋 In this section, we’ll guide you through a step-by-step process on how you can setup shipping in WooCommerce using the default settings.
Step 1: Create your shipping zones
A shipping zone in ecommerce is a geographic region where you can deliver products to customers. Shipping zones are important because they determine the shipping cost and help optimize the shipping process.
WooCommerce allows you to add as many shipping zones as you want.
To create a WooCommerce shipping zone, follow these steps:
- From your WordPress dashboard, go to WooCommerce > Settings.
- In the General settings tab, scroll down to the General options area and make sure you’ve set your selling location(s), sell to specific countries, and shipping location(s) appropriately.In the shipping location(s) field, select any other option other than Disable shipping & shipping locations.

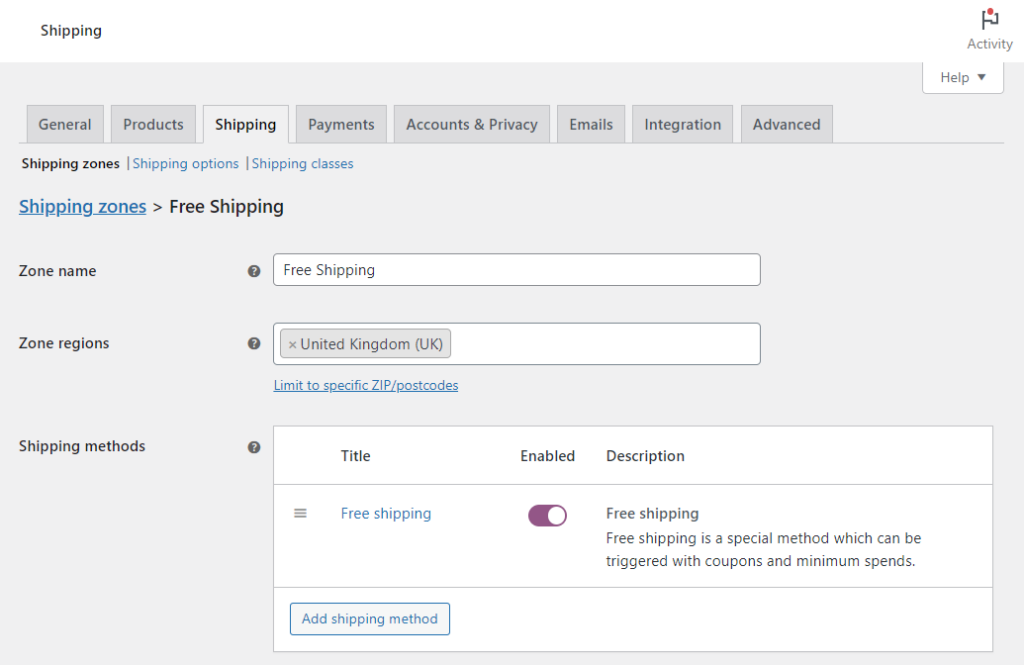
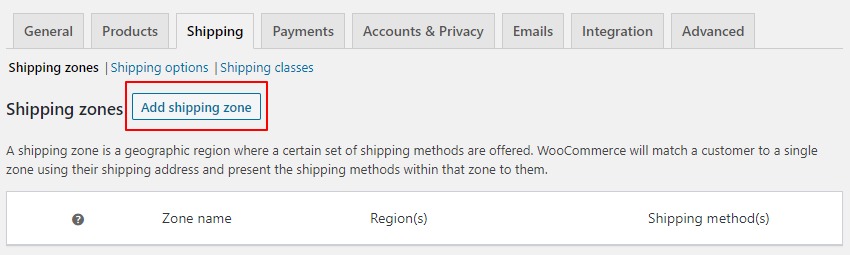
- Next, go to the Shipping tab and click Add shipping zone.
- You’ll be prompted to add a zone name. This is usually the name of the zone you’ll be shipping to, for example, a state in the United States.
- You’ll also be required to add zone regions. This can be a continent, country, or state/province within your chosen zone.

- You can also limit your zones to specific ZIP/postcodes by clicking the limit ZIP/postcodes link and listing individual postcodes. This is optional.
- When you’re done, click the Save changes button to save your shipping zone.
After creating a shipping zone, the next step is to add shipping methods to it.
Step 2: Add your shipping method
Once your shipping zone settings are all in place, you can take the following steps to add shipping methods to a zone:
- Click Add shipping method. A popup window will appear that allows you to choose from the available shipping methods.
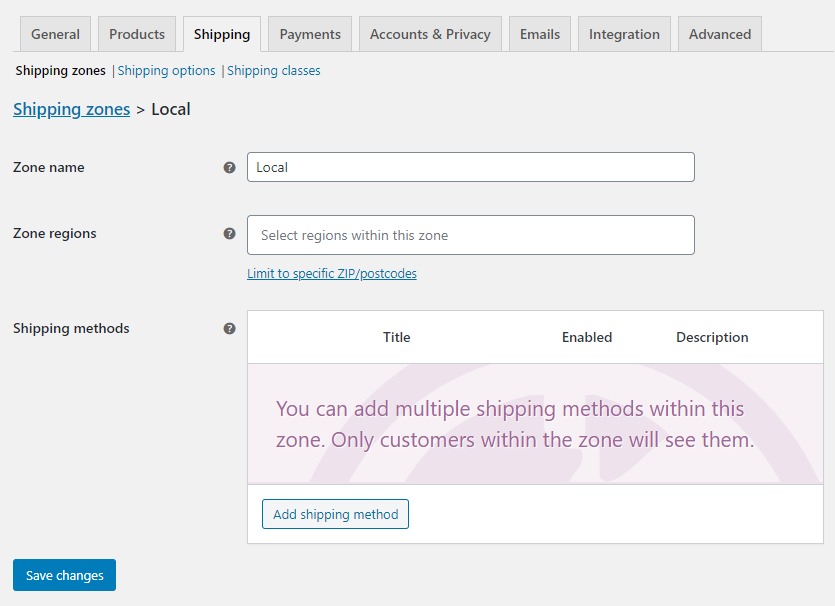
- Select any option and then click Add shipping method again.

- You can repeat these steps and add all the other two shipping methods available to a zone.
- Once you’re done, click the Save Changes button.
The shipping methods in WooCommerce
WooCommerce only has three shipping methods by default: flat rate, free shipping, and local pickup.
- Flat rate shipping – refers to charging a fixed shipping fee regardless of the weight or size of the products ordered and distance. Both you and your customer will know exactly how much they will pay for shipping. Flat-rate shipping enables you to share the shipping costs with your customers. This ensures you’re not eating into the business’s profits to cover shipping costs. Although, you should not set high shipping prices since 55% of customers will likely abandon their carts if extra costs are too high.
- Free shipping – this WooCommerce shipping option is exactly as it says. Your customers don’t have to pay anything to deliver their orders. Free shipping influences online buying decisions and can increase your store’s conversions. According to Invesp, 9 out of 10 customers report that free shipping is the leading incentive for shopping online. Because of this, 58% of consumers are willing to add more items to their cart to qualify for free shipping.In WooCommerce, you can set up conditions to be met for free shipping, such as orders containing a certain number of items, when a customer has a coupon or a combination of the two.
- Local pickup – with this option, you can allow your local customers to come and pick up their orders directly from your store’s premises. You don’t need courier services like USPS or FedEx. Since local pickups are free, you can save on shipping costs, and your local customers can pick up their orders at their convenience.
📈 You should offer multiple shipping options on your store as 3 out of 5 shoppers prefer to buy from a retailer with multiple shipping options. This is because it gives them the flexibility to choose the option that best suits them.
Apart from what we’ve just discussed, there are more shipping settings you can make to ensure your shipping is more reliable and efficient.
Additional shipping settings in WooCommerce
You can adjust a few additional default WooCommerce shipping settings to suit your store. These include:
- Enabling the shipping calculator.
- Hiding the shipping cost until the customer enters the address.
We’ll have a look at each of them in this section.
How to enable a shipping calculator on the cart page
A shipping calculator lets customers know exactly what each shipping method will cost them. They can use it to compare shipping rates and select the most suitable option within their budget.
This is important because customers tend to abandon their carts if unsure of the shipping costs.
📈 A study by Barilliance revealed that 60% of shoppers cite unexpected shipping costs as one of the reasons for cart abandonment.
By enabling a shipping calculator, you will increase the chances of your customers completing their purchases and improving their experience.
So, to enable the shipping calculator on the cart page, take the following steps:
- Go to WooCommerce > Settings from your WordPress dashboard.
- Click on the Shipping tab, then select the Shipping options sub-tab.
- Check the box next to Enable the shipping calculator in the Calculations section on the basket page.

- Click the Save changes to enable your shipping calculator.
In addition, as an ecommerce store owner, you can accurately calculate shipping costs and minimize the likelihood of undercharging or overcharging your customers.
How to hide shipping costs until an address is entered
A shipping address is used to calculate shipping costs. To avoid showing customers an estimated shipping cost at checkout, you can hide it until they enter their address.
This way, customers will only see the exact shipping costs after they enter their shipping address.
To do this, take the following steps:
- While still in the shipping options tab, check the box Hide shipping costs until an address is entered in the Calculations section to enable this feature.

- Hit the Save changes button to update the changes you’ve made.
We’ve seen that you can set a fixed shipping fee for all goods shipped to your customers with the flat rate shipping option.
But what if you want to create different flat rate shipping costs for different product types using the same option? You can do this using shipping classes.
How to use shipping classes
Shipping classes in WooCommerce let you group similar products and assign the same shipping rates and methods to products in the same group.
For instance, you can use shipping classes to group products based on weight. Then offer different flat-rate shipping charges for different weight classes. This lets you offer different shipping fees for different product types with the flat rate shipping method.
To use shipping classes, follow the steps below.
Step 1: Add shipping classes
- In your WordPress dashboard, go to WooCommerce > Settings > Shipping and click the Shipping classes sub-tab.
- Next, click on the Add shipping class button.

- Now, if desired, you can fill in the name for your shipping class, slug, and a short description. A slug can be something unique you can use to identify your shipping class.

- When you’re done, click the Save shipping class button to save.
Note: if you want to edit or delete a shipping class, hover over the shipping class name and click on either Edit or Remove.
You can also add multiple shipping classes by clicking the Add shipping classes multiple times and then saving them.
Step 2: Assign each shipping class to specific shipping rates
After you’ve created your shipping classes, you can add shipping charges to each class. To do this:
- Go back to WooCommerce > Settings > Shipping > Shipping zone.
- Hover any existing shipping zone and click Edit.
- On the next page, choose your preferred shipping method and click Edit.
- You can see additional shipping cost rules for your created shipping classes.

For example, for flat rate shipping, you can choose if you want to tax it, type in a fixed amount in the cost field, and set different fixed rates for your shipping classes below.
- When you’re done, click Save Changes, and now, you’re ready to assign shipping options to individual products.
Step 3: Assign your shipping classes to a product
- In your WordPress dashboard, go to Products > All products and select the product you want to assign a shipping class to.
- Since we’re only interested in shipping, scroll down to the Product Data section on the product page and click the Shipping tab.
- Click the dropdown menu for the Shipping class and select a class of your choice for your product.

- Click Update, and your shipping class and shipping rates will be applied to the product.
You can also assign a shipping class to multiple products by bulk editing.
Step 4: How to bulk-edit shipping classes
To do this, take the following steps:
- On your products pages, select multiple products you want to assign a shipping class, and then select Edit from the Bulk Actions dropdown and hit Apply.
- In the Bulk Edit box, choose a shipping class you want to assign from the Shipping class dropdown menu in the product data section and click Update to save your changes.

Up to this point, we’ve covered nearly everything about setting up shipping in WooCommerce using the default settings.
You can go the extra mile and allow your customers to choose when they are available to receive their orders using shipping time and date slots.
How to add shipping time and date slots to the checkout page
If you want to give your customers the freedom to select their own delivery date and time for shipping, you can easily do so with the help of the WooCommerce Delivery Slots plugin.
Why add shipping time and date slots to the checkout?
Shipping time and date slots enable you to show your customers the days you’re available to ship their orders and allow them to pick a time when they can receive them.
The time and date slots feature is an important feature on your checkout because it improves the customer experience in your store.
📈 In a survey done by Post & Parcel, 83% of the respondents reported that they expected a guaranteed delivery date, while 80% expected a time slot on an ecommerce store’s checkout.
Adding this feature to the checkout has several benefits, including:
- It helps you improve customer satisfaction – With shipping time and date slots enabled on your store, customers can choose when it is most convenient for them. Convenience is key to customer satisfaction, and 70% of shoppers cite it as one of the main reasons they would shop from an ecommerce store.
Customers who are satisfied with your service will likely return to buy from you again.
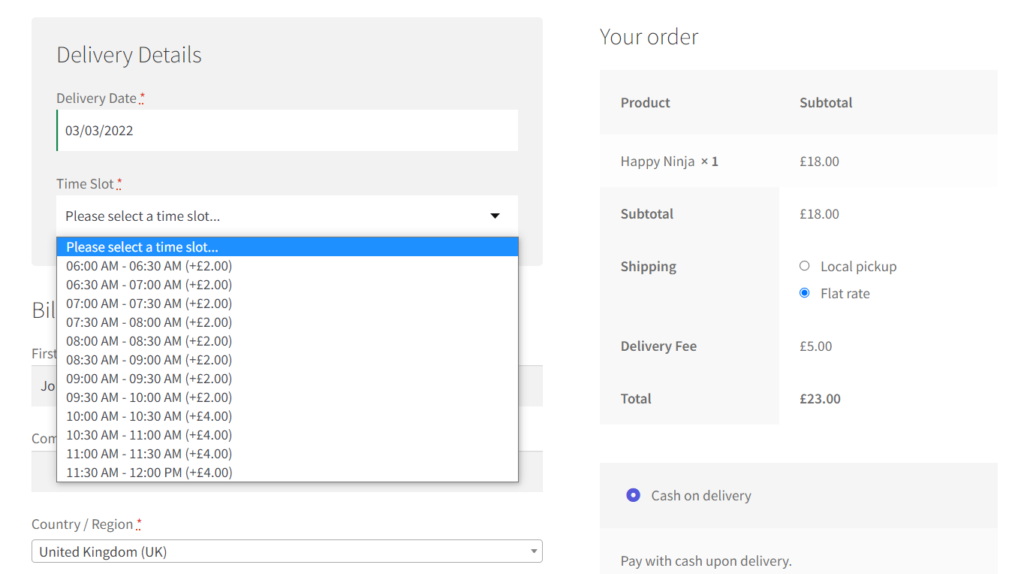
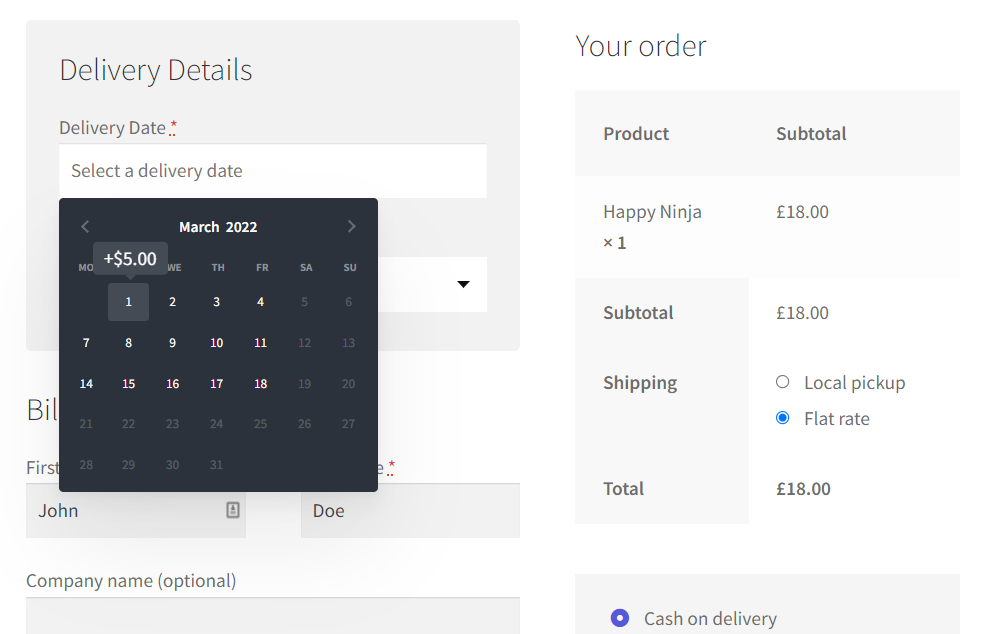
- You can increase your average order value(AOV) – You can add charges to your shipping dates and time slots and charge additional fees for slots that are closer to the time of ordering. This can help you to increase your AOV as 24% of online shoppers are willing to pay more to receive deliveries within a 1 or 2-hour window of their choosing, according to PWC.
- You’ll take control of your shipping schedule – You’ll be able to manage your deliveries better by creating a shipping schedule that matches your working hours and available staff. This way, you can have a well-organized schedule which helps you to run shipping operations more smoothly.
Time slots are especially important to online stores that sell perishable products like groceries, flowers, and food. They help these stores to conduct same-day deliveries more efficiently, and customers will get products when they’re still fresh.
You can do all of this on your WooCommerce store with the help of the shipping plugin WooCommerce Delivery Slots 👇
WooCommerce Delivery Slots
Choose a delivery date and time for each order. Add a limit to the number of allowed reservations, restrict time slots to specific delivery methods, and so much more.
Add shipping time and date slots to the checkout
WooCommerce Delivery Slots is a WooCommerce plugin that allows you to add shipping time and date slots to the checkout. You can improve customer experience by allowing them to select a convenient time frame for their order.
With WooCommerce Delivery Slots, you’ll be able to:
- Set delivery or pickup schedules only when you’re available.
- Assign time slots to specific shipping zones or methods.
- Limit the number of orders placed per day and time slot to avoid overbooking.
- Charge flexible scheduling fees for delivery and pickup on the same day and the next day and increase your AOV in the process.
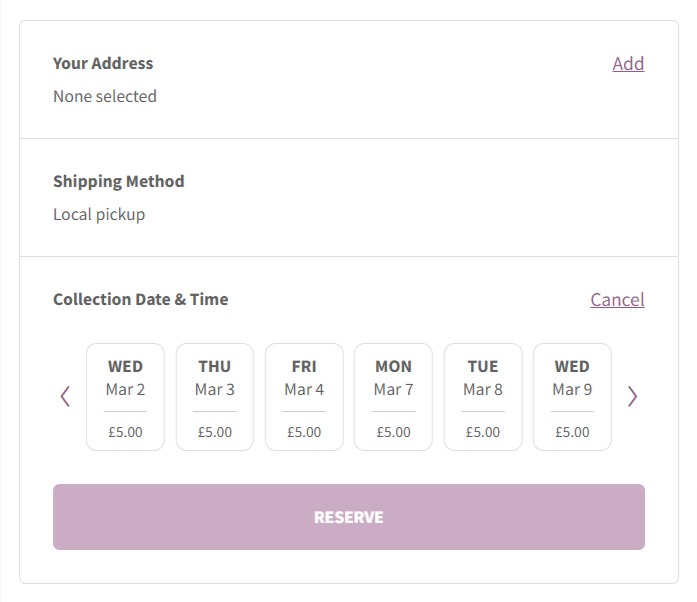
The best part about using WooCommerce Delivery Slots is that it enables your customers to reserve a delivery slot even before they start shopping. You can customize this reservation table to fit your store’s design.
Follow the steps below to add and configure shipping time and date slots on your WooCommerce store.
Step 1: Install WooCommerce Delivery Slots
Purchase WooCommerce Delivery Slots from the Iconic website, then follow these steps to install it on your WordPress website.
WooCommerce Delivery Slots
Choose a delivery date and time for each order. Add a limit to the number of allowed reservations, restrict time slots to specific delivery methods, and so much more.
- From your WordPress dashboard, go to Plugins > Add New > New Upload Plugin.
- Upload the .zip file of the extension and click Install Now > Activate.
- You will be redirected to the activation screen. Enter your license key and click Agree & Activate License.
With WooCommerce Delivery Slots installed, you can now set up time slots.
Step 2: Set up time slots
You’ll first need to enable time slots. To do this:
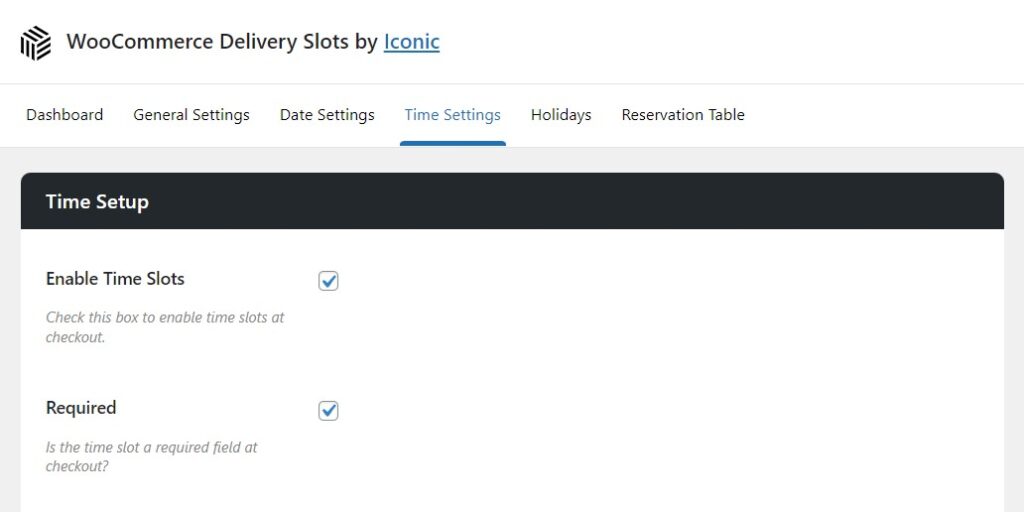
- From your WordPress dashboard, go to WooCommerce > Delivery Slots and click the Time settings tab.
- In the Time Setup section, check the Enable time slots box to enable time slots for your store.
With time slots enabled for your store, it’s now time to create your time slots. To do this:
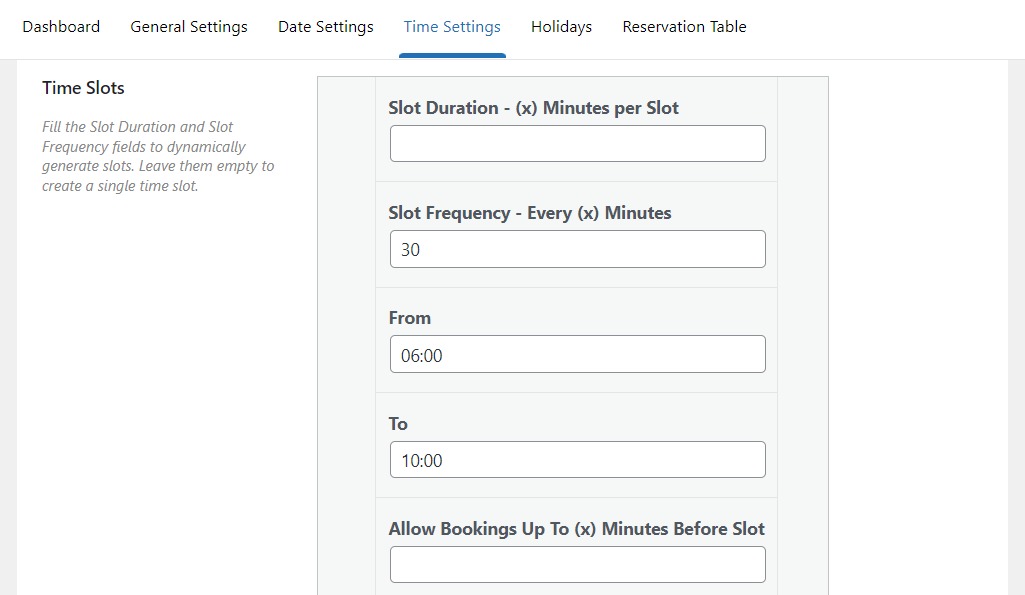
- On your Time settings page, scroll down to the Time Slots in the Time Slot Configuration section.
- Here, you’ll be able to set Slot duration and Slot frequency to create your time slots on the fly.
- Slot duration – lets you allocate a specific amount of time for shipping.
- Slot frequency – enables you to determine the intervals in which you will have an available time slot. It can be 15 minutes, 30 minutes, etc.
You can also use the From and To fields to set the start and finish times for the time slot.
- Next, if you’d like to prevent orders from being placed before a time slot starts, you can disable booking just before a lot starts in the Allow Bookings Up To (x) minutes Before Slot.
Note: You can have a look at our data settings guide if you want to prevent your customers from ordering same-day or next-day shipping or pickup.
- You can also limit the number of deliveries available to one of your time slots in the Maximum Orders per Time Slot field.
- You’ll also be able to add additional fees for these time slots in the Fees section.
- Lastly, in the Days section, you’ll be able to select the days of the week this time slot refers to.
You can create additional time slots by clicking the blue + button at the bottom of your current time slot and filling out all the necessary information.
Step 3: Assign time slots to specific shipping zones/methods
You can assign time slots to specific shipping zones/methods by taking the following steps:
- Navigate to WooCommerce > Delivery Slots in your WordPress dashboard and click on the Time settings tab.
- From there, scroll down to the Time Slot Configuration section to view your existing Time Slots.
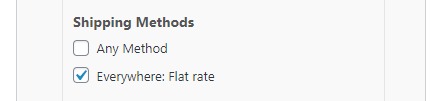
- Within your Time Slots section, you’ll find the Shipping Methods section, where you can choose which shipping method to apply to each time slot by selecting the corresponding checkbox.
- After making your selections, save your changes by clicking the blue Save Changes button located at the bottom of the page. This will update your Time Slots accordingly.
There we have it! You’ve just set up shipping time and date slots and assigned them to shipping methods.
Setup WooCommerce shipping today
Shipping is a crucial part of any ecommerce website. By default, WooCommerce allows you to set up the zones to which you would like to ship products and add different shipping methods to each zone. You can also add a shipping calculator and hide the shipping costs until the customer enters their shipping address.
You can also allow customers to select a convenient shipping date and time slot for their orders. To do this, you’ll need the WooCommerce Delivery Slots plugin.
This WooCommerce plugin allows you to add shipping time and date slots to your checkout easily. This feature makes your shipping operations more efficient and reliable while improving customer experience.
WooCommerce Delivery Slots
Choose a delivery date and time for each order. Add a limit to the number of allowed reservations, restrict time slots to specific delivery methods, and so much more.