
Looking to edit the cart page in WooCommerce? This article will teach you how to edit your WooCommerce cart with absolutely no coding knowledge whatsoever!
The cart page in your WooCommerce store might be a quick stop-off point for many customers. But it’s an important step on your customer’s journey. This page can either:
- Encourage customers to take the next step and complete their order.
- Tempt customers with additional related products to add to their cart.
- Or, contribute to checkout abandonment.
While editing this page of your store, we want to make sure we improve the customers’ journey. So before we get to the how, let’s go over the ‘why’.
Why edit the cart page in WooCommerce?
Editing or customizing the cart page in WooCommerce has numerous benefits. Here are a few of our favorites:
You’ll reduce checkout abandonment
The cart page is a prime spot for customers to second-guess their order. All the products they’ve added to their cart are sitting in one place – with the total cost.
At this point, customers have a choice to make. Do they continue to the checkout, edit their order, or abandon it?
The last thing we want is for customers to abandon their order. So by editing this page and adding a few prompts, you’ll be able to encourage them to keep going.
For example, on this page, you could add a set of icons that remind the customer of your returns policy, your extra fast shipping, and any deals you do. You could also add icons here for payment methods you accept.
By adding these, you’re reassuring the customer their transaction will be smooth, without overwhelming them with too much information.
You’ll increase your average order value
This section of your store could also be used to increase your average order value. Customers are almost ready to checkout. But, by adding some smaller products to the cart page, you could take advantage of some last-minute sales.
These products could be at a lower price point and a no-brainer for customers to add to their order.
So now we know the benefits of editing the cart page in your WooCommerce store, let’s get to actually doing it.
How to edit the WooCommerce cart page
In this section, we’ll walk you through how to make some simple changes to the cart page in WooCommerce. The best part? You don’t need any coding knowledge to make these changes!
First thing’s first, to make these changes as easy as possible, we’re going to need the help of a (free) plugin.
Gutenberg Blocks by Kadence Blocks is a WordPress plugin that allows you to add pre-made ‘blocks’ to your pages. These blocks include things like headings, buttons, icons, forms, tabs, and more.
Each of the blocks is customizable, so you can change everything from the font to colors, shape, size, spacing, and more.
We’ll walk you through how to use these blocks with a specific example. But first, let’s get Kadence Blocks set up.
Step 1: Install the free plugin, Kadence Blocks
To install the Kadence Blocks plugin, take the following steps:
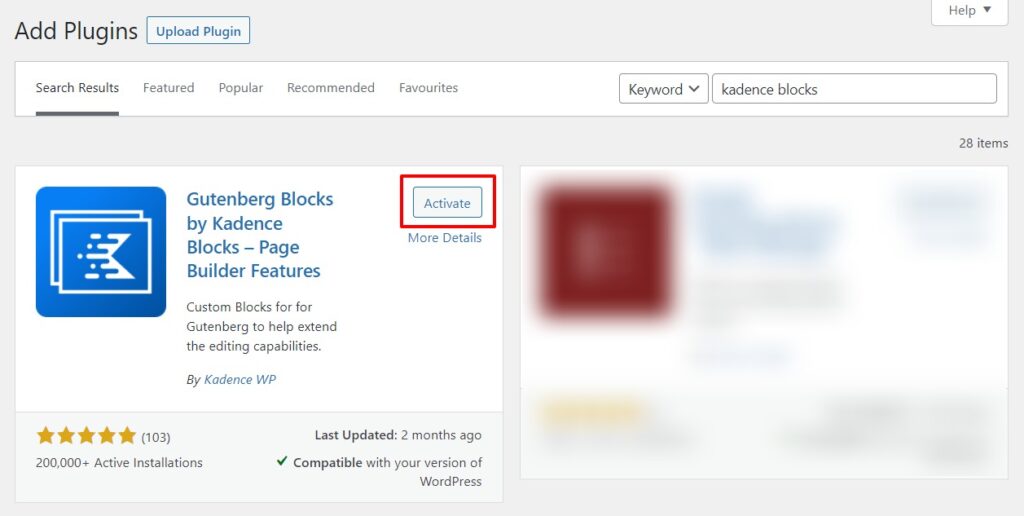
- Go to your WordPress dashboard and click Plugins > Add New.
- Type ‘Kadence Blocks’ in the Search plugins search field. ‘Gutenberg Blocks by Kadence Blocks – Page Builder Features’ should appear.
- Click the Install Now button. Then click Activate.
Now the Kadence Blocks plugin is installed, let’s put your new cart page together.
Step 2: Create your new cart page
By default, WooCommerce doesn’t allow you to edit the cart page. So, we’re going to need to create a new one that will contain our changes. Then we’ll need to ask WooCommerce to use that instead.
So first thing’s first, to create your new cart page, take the following steps:
- From your WordPress dashboard, go to Pages > Add New.
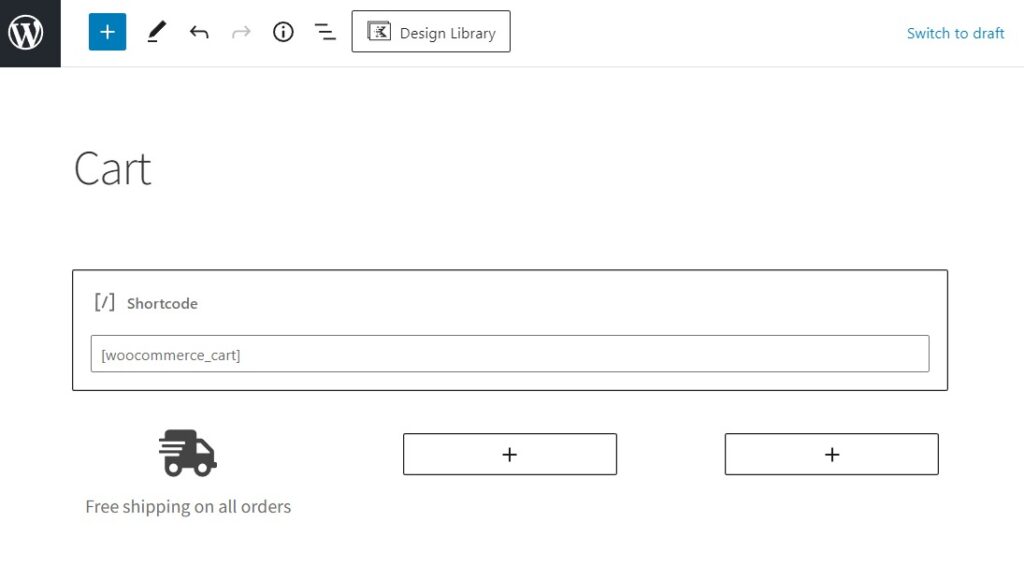
- Give your page a name. In this case, we’re calling it Cart, but you could call it Basket.
Next, we’ll need to add a shortcode to the page which will contain the WooCommerce checkout. Don’t worry, this is straightforward.
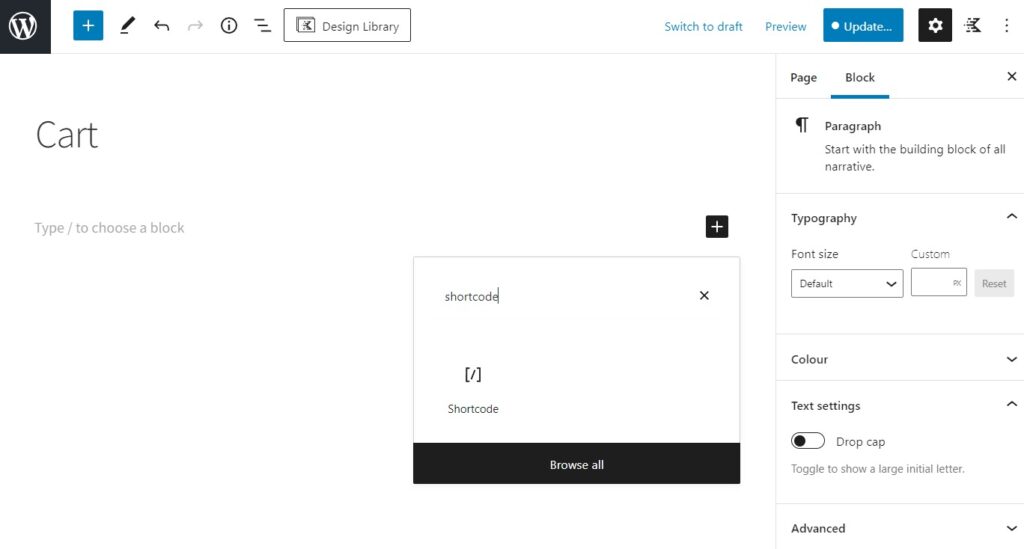
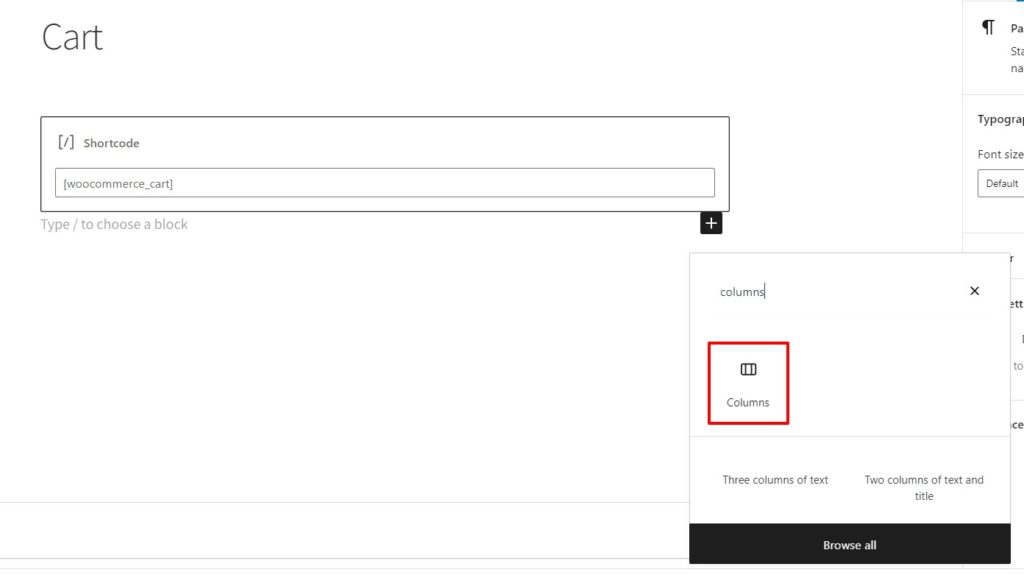
- Hover over the page editor and click the black + icon, this should pull up the Add a block popup.
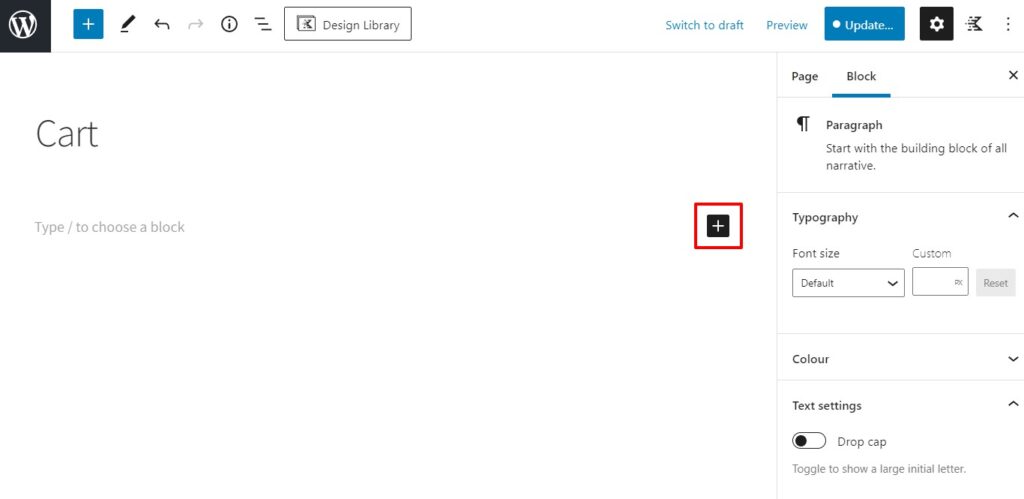
- In the Search field, type ‘shortcode’, then click the Shortcode icon to add.
- Next, paste the following shortcode into the Write shortcode here field:
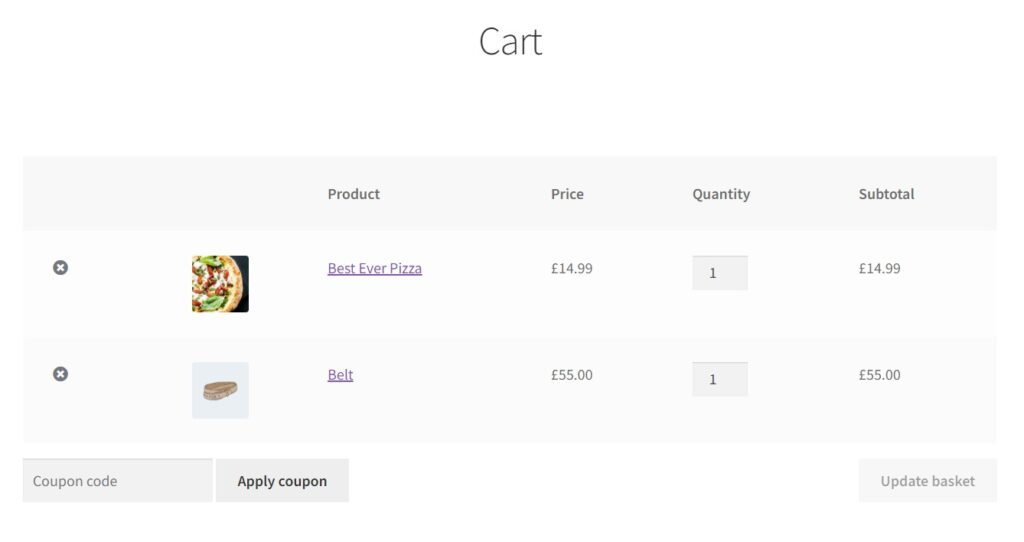
[woocommerce_cart].
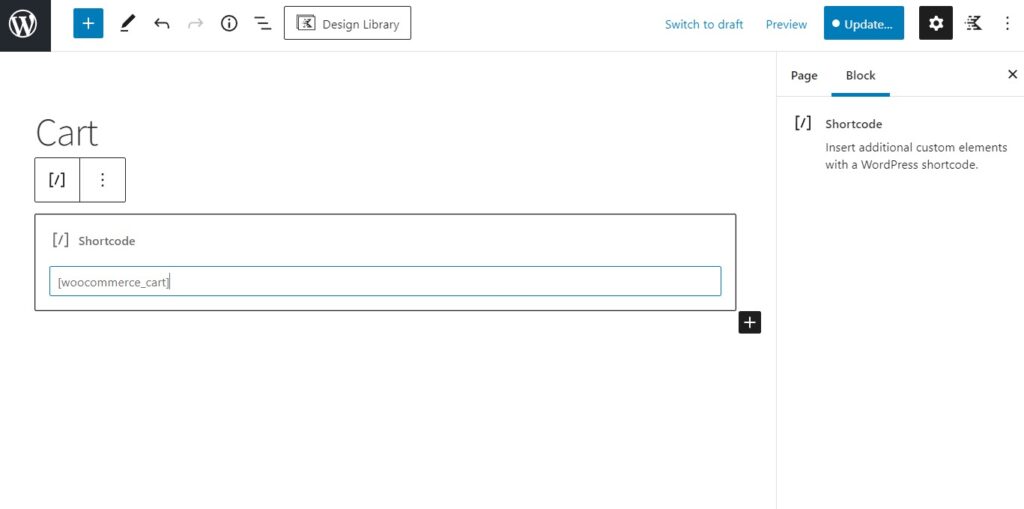
This shortcode contains the WooCommerce cart. To see it in action, click Preview at the top of the page.
Add extra elements with Kadence Blocks
Now we have the basic cart page set up, we can start adding extra elements. For the purposes of this guide, we’re going to add some icons which will encourage customers to checkout.
To add these icons, take the following steps:
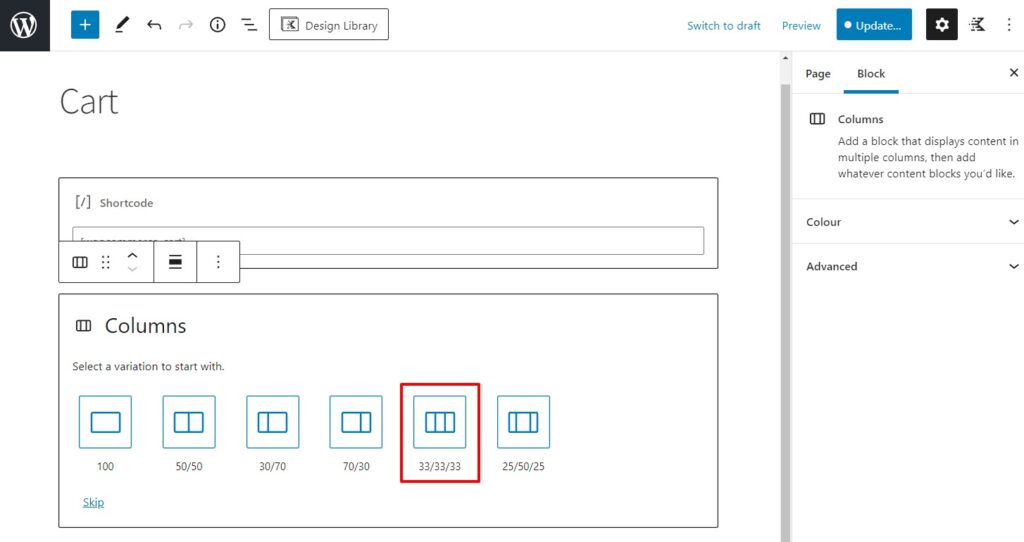
- Hover over the page editor and click the black + icon, this should pull up the Add a block popup.
- In the Search field, type ‘columns’, then click the Columns icon to add.
- You’ll see a section pop up with some options for your columns. In this case, we’re going to pick 33/33/33.
- Once clicked, you’ll see three new sections with + symbols inside. We’re going to add our icons and some text here. Click a + symbol and a popup will appear.
- Type ‘icon’ into the Search field. Click on the blue icon with the word Icon underneath (this is one of the Kadence Blocks).
- You’ll see a default icon appear in your column. On the right-hand side of your screen, you’ll also see a bunch of options. You’ll be able to change the icon itself, its size, color, and more.
- Once we’ve customized the icon, we next want to add some text underneath. Click the + underneath the icon in your column.
- Search ‘paragraph’ and click the Paragraph icon. This will add a text area for you to type in underneath your icon.
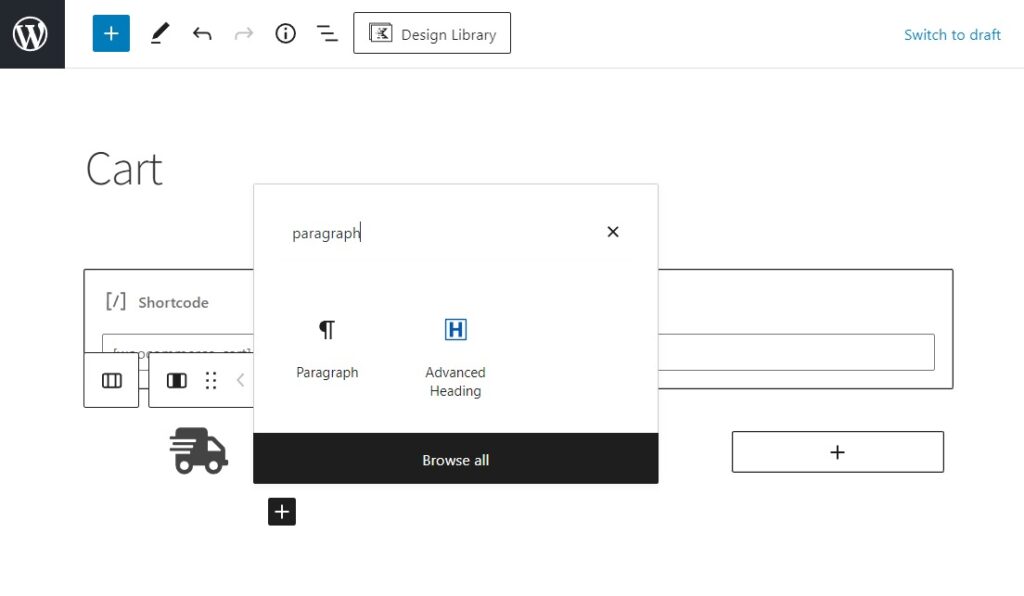
- We’ll add ‘Free shipping on all orders’ here.
- You can change the size, color, and other settings for this on the right-hand side of your screen.
- Do the same for each of the columns and once happy, click the blue Publish button at the top of the page.
Of course, this isn’t all you can do, with Kadence Blocks, you can add a whole host of additional things to your cart page in WooCommerce. You could add specific categories of products, a FAQ section, testimonials, and more. Have an explore and test things out.
Next, we’ll need to tell WooCommerce to use our new cart page, instead of the default one.
Step 3: Swap your old cart page with the new
To get WooCommerce to use our new cart page, we need to change a simple setting. To do this, take the following steps:
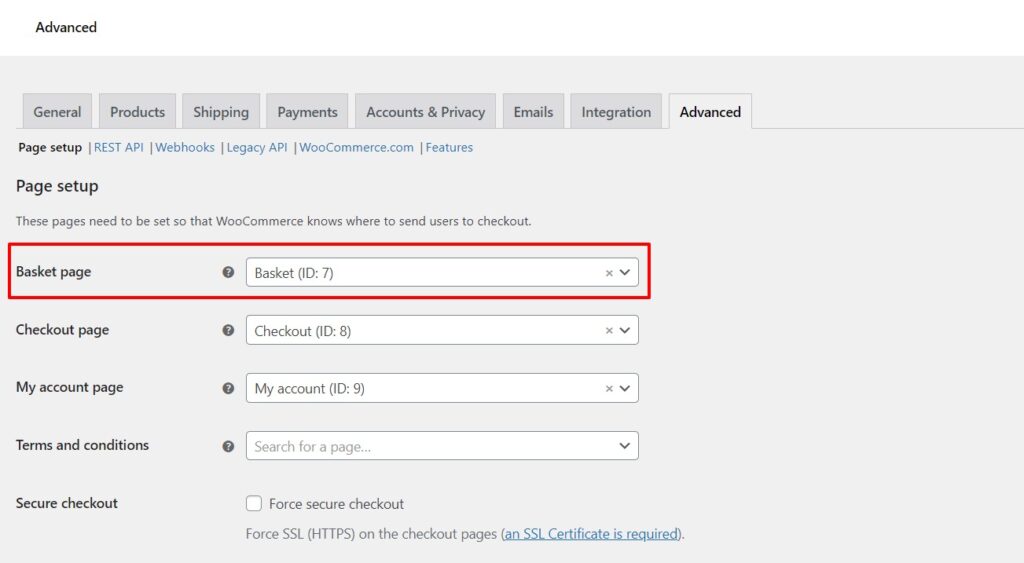
- From your WordPress dashboard, go to WooCommerce > Settings, then click the Advanced tab at the top of the page.
- On this page, you’ll see your store’s key pages in the Page setup section.
- Locate the Basket or Cart page (this is usually at the top). Then click the dropdown next to it.
- Type in the name of the page you just created and click on it to add.
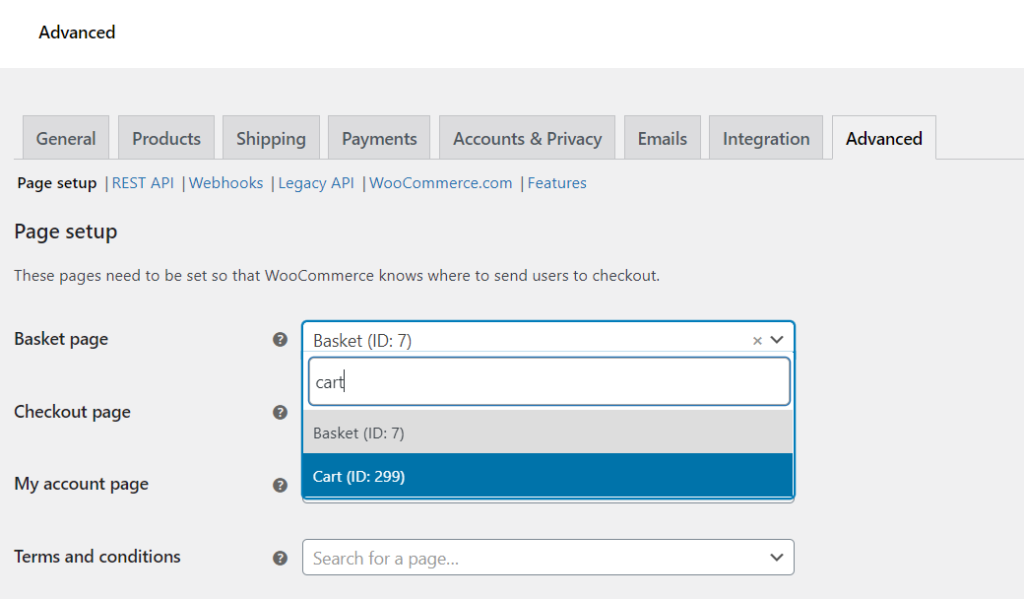
- Scroll down to the bottom of the page and click the blue Save changes button.
That’s it, your WooCommerce store will now display your new cart page. This may take a few minutes to show, so make sure to refresh the page a few times to see it in action.
So now we have the cart page edited, let’s complete the process by improving the checkout.
Don’t forget the checkout
Editing the cart page is a fantastic way to reduce checkout abandonment, but it’s only one piece of the puzzle. Your customer’s next step is the checkout. If this page is overwhelming, slow, or simply not working well – you could lose the customer anyway.
So let’s make sure your customers’ journey is complete and give your checkout flow an upgrade too.
Introducing Flux Checkout
Flux Checkout is a plugin that improves your checkout for you by transforming it into a multi-step app-like experience.
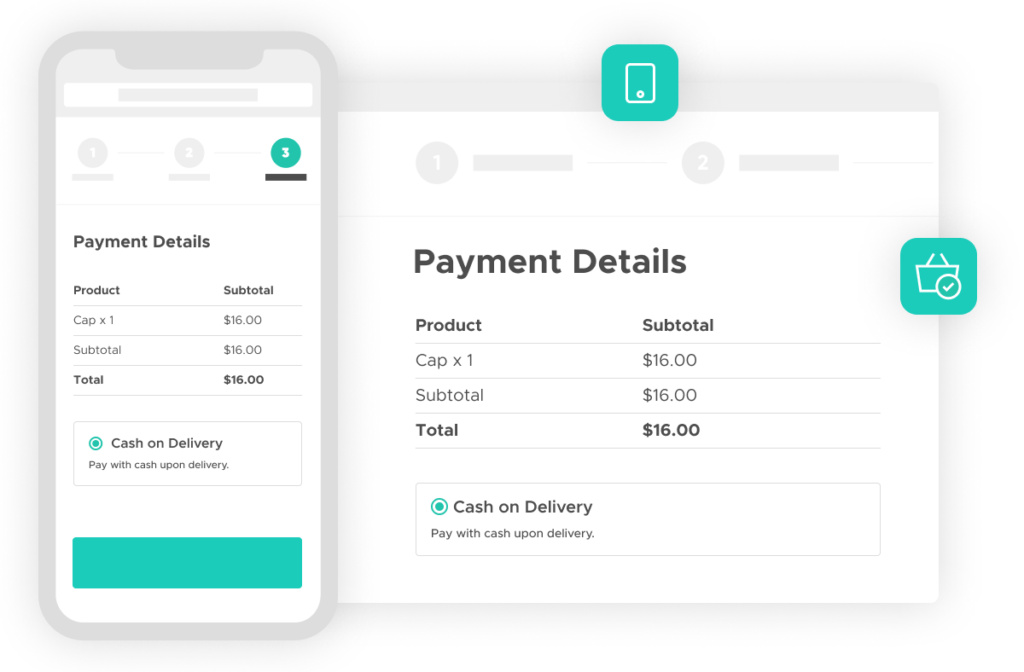
Flux removes distractions, unnecessary fields and makes the process so easy for the customer – they’ll be done in no time. It’s specifically designed to reduce checkout abandonment and just like the rest of the changes in this article, requires no coding knowledge whatsoever.
Flux Checkout for WooCommerce
Flux Checkout transforms the default WooCommerce checkout into one that’s lightning-fast, distraction-free, and reduces checkout abandonment.
Customize your WooCommerce cart page today
So there we have it, an improved cart page for your WooCommerce store. Experiment with Kadence Blocks to add different elements to this page and complete the process by improving your checkout with Flux.

Gina Lucia is our in-house Content Manager at Orderable. She writes articles, user guides, technical documentation, and creates videos on everything WooCommerce and Orderable.
Gina has been working in the WordPress/WooCommerce space since 2012 when she developed WordPress websites for clients large and small.
For the past 8 years, she’s been writing about everything WordPress and WooCommerce, becoming an expert in what makes a WooCommerce store succeed.
When not writing, Gina loves to tend to her vegetable garden, read, or travel to mainland Europe.