
Want to add extra WooCommerce fees for certain products, shipping methods, or payment options but don’t know how to do it? You’ve come to the right place.
Running an ecommerce store comes with additional costs that your product’s base price may not cover. To remain profitable, you have to charge extra fees to offset them.
In this guide, we’ll show four effective ways to add extra fees to your WooCommerce store.
Here’s what we’ll cover:
- Why you might want to add additional fees in WooCommerce.
- Four ways to include extra fees, using both built-in features and plugins.
- How to get started and choose the right approach for your store.
To start us off, let’s understand why you might want to add additional WooCommerce fees in your online store.
Why might you want to add additional fees to products in WooCommerce?
Margins in ecommerce are usually thinner compared to traditional retail. According to Shopify, they average around 10% after all expenses.
This is due to factors like shipping costs, transaction fees, and other expenses that reduce profits.
So, if you want to protect your margins, adding extra fees for things like shipping or payment methods to offset these costs could be an option.
However, protecting margins isn’t the only reason to add additional WooCommerce fees. Here are a few more reasons why your online business might need extra fees.

To cover additional costs
Online stores can charge additional WooCommerce fees when certain services or product variations add costs that don’t apply to every customer. These include:
Customization or special product attributes
For instance, if a customer wants their name engraved on a leather wallet, that requires additional labor and materials. Charging an extra fee for attributes keeps the base price fair for those who don’t need customization.
Specific delivery or pickup time slots
A food delivery service can create premium slots during peak hours because demand is higher and scheduling logistics is more complex.
Shipping method variations
These include standard delivery charges based on location, size, or weight of the product. You can charge extra for express shipping to cover the rates you pay carriers. Customers who want faster delivery will pay more.
Studies confirm that around 65% of customers are willing to pay more for faster delivery options like express shipping.
Payment processing fees add up
Some payment gateways, such as PayPal, Stripe, or credit cards, charge a certain percentage on each sale. Instead of bearing this yourself, you can pass these fees to the customer as an additional charge for credit card payments.
Although a word of warning, customers don’t tend to like this. If you’re going to factor in card fees or transaction costs, build them into your pricing strategy in other ways.
Alternatively, stores can offer discounts to encourage more direct bank transfers, which usually don’t have fees (or charge less).
Note: To avoid abandoned carts or frustrating customers, display extra fees early on product pages, shipping calculators, FAQs, etc. Try to explain why those fees exist. Better yet, break down additional WooCommerce fees in a cart summary before customers proceed to checkout.

To upsell with premium options or add-ons
For example, if you’re a fast-food business, you can provide a basic meal and then charge customers to ‘supersize’ their fries or drinks. Customers looking for more value would be happy to pay for the upgrade.
At the same time, upselling enables stores to keep the base price lower to engage more customers and charge only for extras.
To encourage certain behaviors
Shipping fees push customers to choose affordable options. Some customers may prefer standard shipping because it’s cheaper than express shipping.
Extra fees attached to payment gateways like credit cards (which come with processing fees) may encourage direct bank transfers.
Customization fees ensure that only serious buyers request special features. When they select add-ons, they’re already committed to the purchase and more willing to accept reasonable fees.
Generally, WooCommerce’s default fee settings aren’t flexible enough to apply fees correctly based on specific conditions, which we’ll cover in the next section.
4 ways to include additional fees in your WooCommerce store
WooCommerce provides different ways to add fees depending on the store owner’s needs.
Basic fees like flat rate shipping, tax calculations, or simple extra charges like a handling fee can be set using the default functionality.
However, if your business needs more complex fee structures like table rate shipping, you need WooCommerce plugins.
We’ll cover four methods that provide different ways to implement fees for:
- Product attributes.
- Delivery slots.
- Different shipping options.
- Payment method.
So, how do you implement dynamic pricing and additional charges for different product variations in the WooCommerce ecommerce platform? Let’s see how to do this in four ways.
Add fees to product attributes with WooCommerce Attribute Swatches
Certain products have specific features or attributes that justify extra fees. For instance, premium features like color, size, custom pattern, or material.
Let’s say you’re a clothing store offering embroidery on shirts. When a customer wants to add their name to the chest area, you can charge an additional fee based on text length, font, or thread color.
How attribute prices are applied
This fee is usually added to the base price so the customers can see the total cost upfront. The extra fee can also help cover additional costs like the material used and the work that goes into customizing the t-shirt.
Stores can add product attributes like size, color, or premium material with the standard WooCommerce setup. But, if you want to charge extra fees based on attribute selections, you’ll need the WooCommerce plugin, WooCommerce Attribute Swatches.
It’s the best tool for the job in two significant ways.
Why use WooCommerce Attribute Swatches
WooCommerce Attribute Swatches allows you to add fees to all, some, or none of your selected product attributes.
For example, when the thread material is ‘Gold,’ you can charge an additional $10 to the product price. Customers who select this option will see the accurate price update inline for transparency even as they explore more product options in your store.

Upgrade WooCommerce attributes design
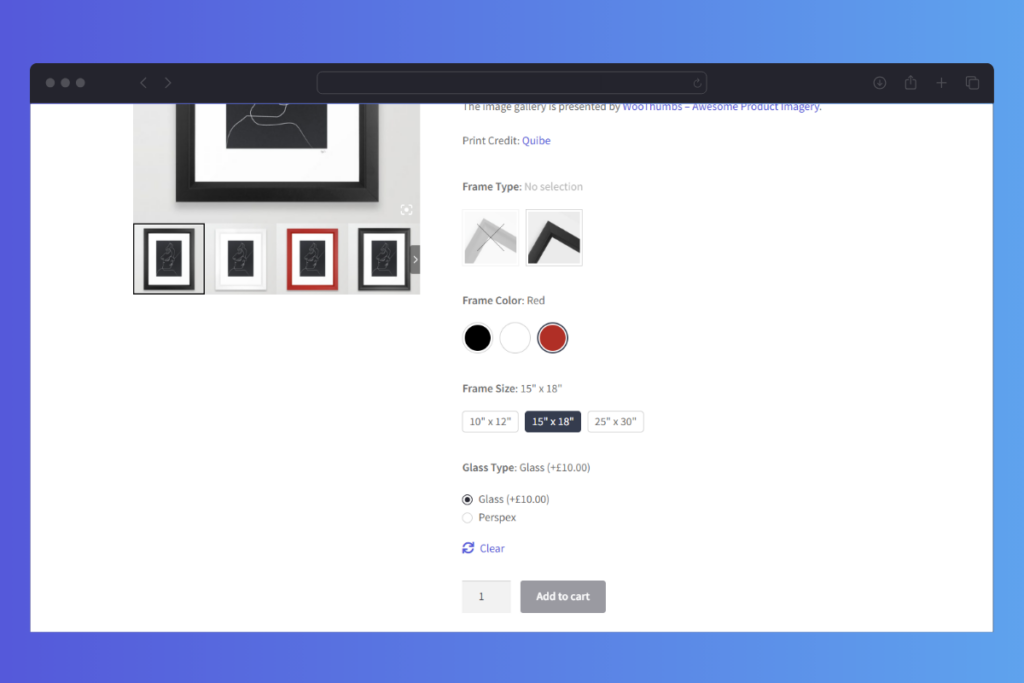
WooCommerce Attribute Swatches also lets you replace the standard WooCommerce product variation dropdowns with:
- Color swatches. It’s a user-friendly color picker that shows customers the different colors a product comes in visually.
- Image swatches. Replaces dropdowns with preview images for patterns, designs, or materials.
- Text buttons. You can display text-based attributes in styled square buttons for a cleaner, more refined look.
- Radio buttons. With a clean and upgraded design.
These swatch replacements improve customer experience by making your WooCommerce store more interactive. As the product image updates, customers can select and compare variations. This increases the likelihood that customers will select product attributes and proceed with the price.
How to add fees to attributes with the Attribute Swatches plugin
To get started, purchase WooCommerce Attribute Swatches from the Iconic store: iconicwp.com/woocommerce-attribute-swatches/
WooCommerce Attribute Swatches
Replace the default WooCommerce variation dropdown menu with variation swatches for WooCommerce. Add color swatches, image swatches, and modern text buttons to your variable product pages.
Then, upload the zip file you downloaded to WordPress and activate it with your license key as you would any WordPress plugin.
Once the plugin is installed, we can move along to add fees to your attributes via the following steps:
- Go to WordPress > Products in your WordPress dashboard.
- Find the variable product you want to edit, and click Edit.
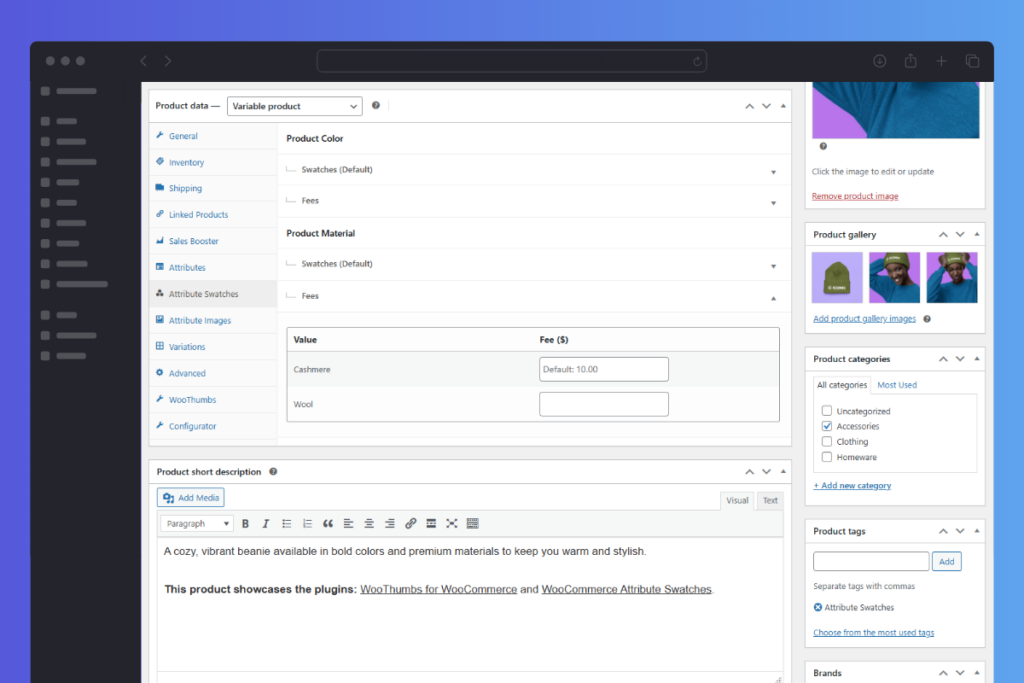
- Scroll down to the Attributes tab in the Product Data section.
- Expand the attribute you’d like to add fees to.
- Scroll to the Fees section and enter the additional fee you want to charge.
- Click Save attributes and then click Update (at the top right-hand side of the page) to update your product.
When viewing the product in your store, these attribute values will have additional fees.
Next, let’s see how to add fees to delivery or pickup time slots.
Add fees to delivery/pickup time slots with WooCommerce Delivery Slots
A time slot is a specific time frame in which a business schedules a delivery or an order for pickup. Customers usually select and book from available slots when it suits them.
Because of this, some slots are usually more popular than others, depending on factors such as time of day, demand, and convenience.
Some popular examples of time slots
For example, if you’re a local restaurant, popular slots can be for early morning, lunchtime, dinner, or late evening when demand is high. Because peak slots become a limited resource, you can charge a premium to cover additional operating costs at that time.
If you’re looking to add additional fees for time slots, the WooCommerce plugin, WooCommerce Delivery Slots can help.
Note: This model is most common for restaurants and grocery stores, but other types of businesses use it, too. Think furniture stores, flower shops, and specialty coffee roasters.
Charge extra fees for peak slots using WooCommerce Delivery Slots
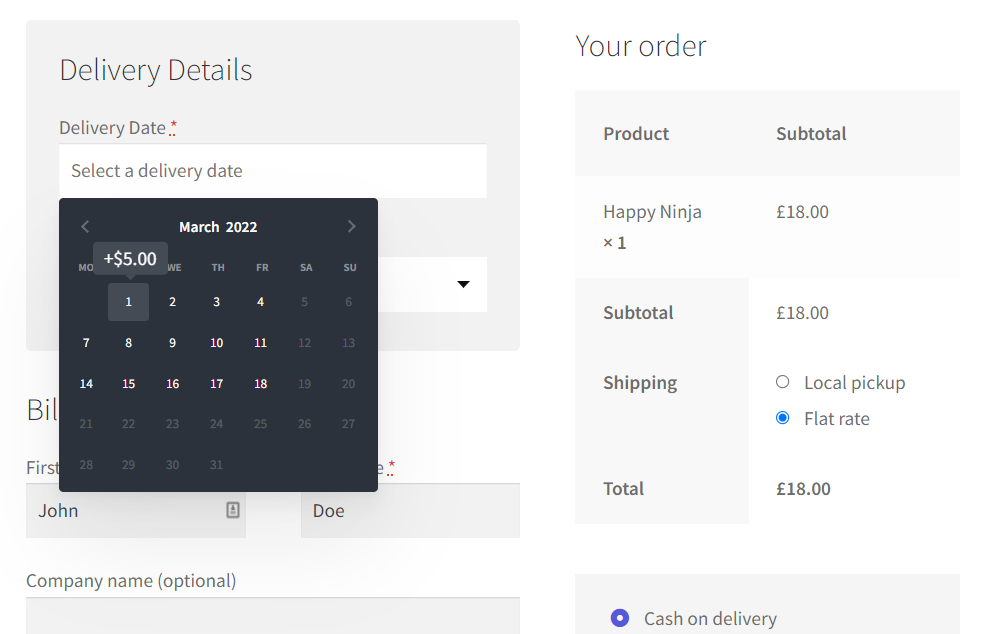
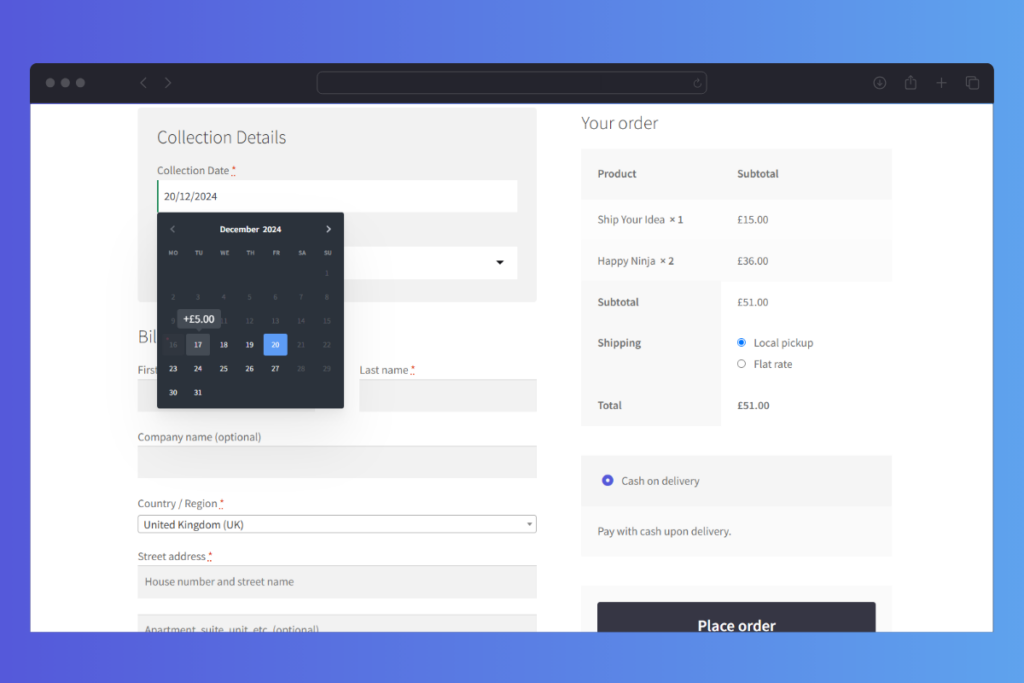
Generally, WooCommerce Delivery Slots adds a delivery calendar and time slot selection to your checkout page. It allows customers to pick their preferred pickup or delivery date and time.
More specifically, this plugin allows you to charge additional delivery fees depending on the day of the week or time slot. Additional fees appear next to the time slots you charge extra for the customers to see when they select available slots.
Charging additional delivery fees for same-day and next-day deliveries is possible. Or disable same-day and next-day delivery based on the time.

How to charge additional fees for time slots
Let’s start with installing the WooCommerce Delivery Slots plugin after purchasing it from the Iconic site: iconicwp.com/woocommerce-delivery-slots/. Then, follow these steps to install.
WooCommerce Delivery Slots
Let customers choose their preferred WooCommerce delivery date and time right from your WooCommerce checkout page. With WooCommerce Delivery Slots, you can set a flexible delivery schedule to suit you and your customers.
- Login to your WordPress dashboard.
- Go to Plugins > Add New and click Upload Plugin.
- Choose the zip file you downloaded, upload it, and click Activate using the license key sent to you via email.
Before we can set additional fees, go to WooCommerce > Delivery Slots Date settings tab to create your delivery date schedule. Then, set up time slots and limit the maximum number of orders you can fulfill comfortably.
Charge additional WooCommerce fees to time slots
While setting up your time slots, you can charge additional fees for some of them. Again, this is particularly useful if you’d like to charge more for a particular time of day.
To set up your time slot fees, take the following steps:
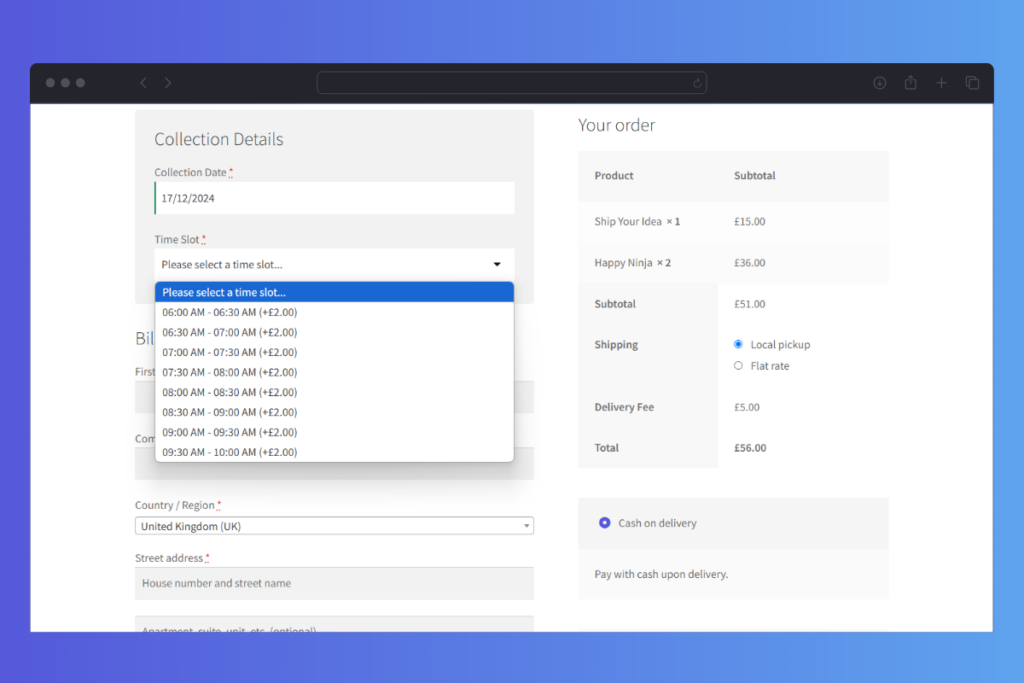
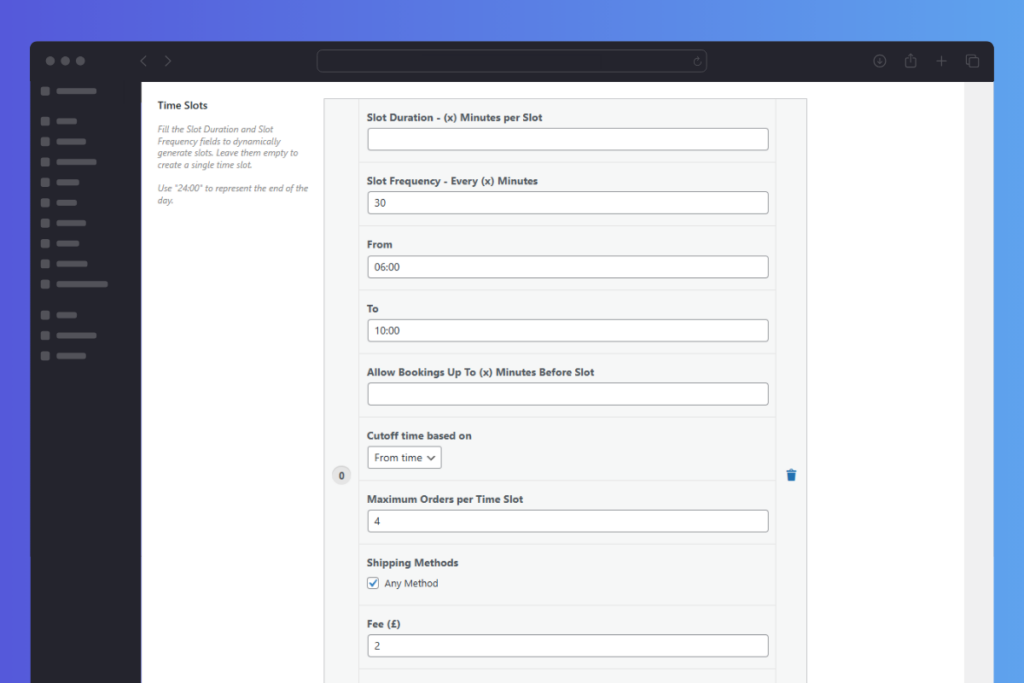
- Go to WooCommerce > Delivery Slots on your WordPress site dashboard and click on the Time Settings tab.
- Scroll down to the Time Slot Configuration section and view your Time Slots.
- Within one of your time slots, you’ll see the Fee section. Add a numerical value here to charge the customer that amount when they select the time slot.
- Leave this blank to make no additional charge.
Charge extra for specific days and dates
During holidays like Valentine’s, the demand for deliveries can shoot up. With WooCommerce Delivery Slots, you can also charge an additional fee for these days and dates to boost your order value.
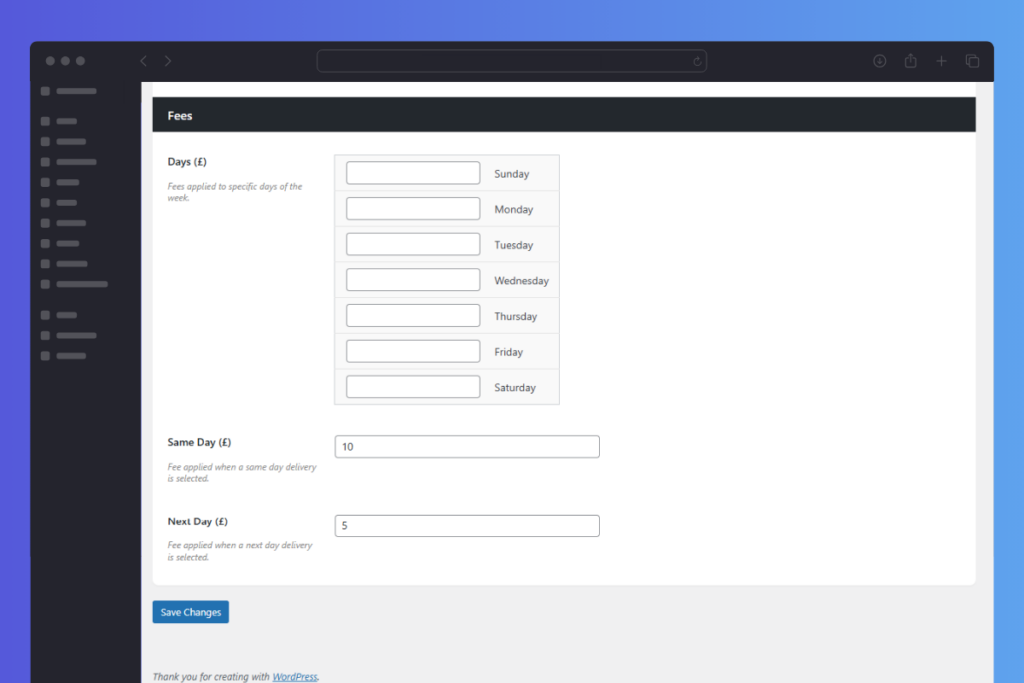
- Open Delivery Slots again and navigate to the Date Settings tab.
- Then, scroll down to the Fees section. Here, you’ll see a blank area next to each day of the week.
- Type whatever fee you’d like to add in each area and then hit the blue Save Changes button at the bottom of the page.
- Repeat the same steps for specific delivery dates.
An extra fee will be applied at the checkout whenever someone selects one of these delivery days or dates.
While delivery slots focus on the time of the day or date, shipping methods focus on the mode of transportation used to deliver the product. WooCommerce lets you charge extra for different shipping methods within the core system.
Include additional fees for different shipping methods
Let’s say you’re a furniture store in the shipping business. Because of the weight difference, shipping a small chair isn’t the same as delivering a large, fragile dining table. Fragile items require more padding and specialized transportation to prevent damage.
Charging extra for handling fragile items, oversized furniture, or express shipping can help you recoup these expenses.
You’ll also give customers more choices by letting them pick the shipping option that fits their needs and budget.
Use the default WooCommerce shipping settings
Generally, the built-in WooCommerce shipping settings allow businesses to set custom shipping fees based on location and shipping method.
Store owners can:
- Use flat-rate shipping to add handling charges for certain shipping methods.
- Create shipping classes to apply different fees for specific product types, like heavy or fragile items.
- Offer multiple shipping methods (e.g., standard vs. express) with different rates.
Here’s how you can go about this.
How to charge fees for different shipping options
The following are simple steps to charge fees for different shipping options using the default WooCommerce settings:
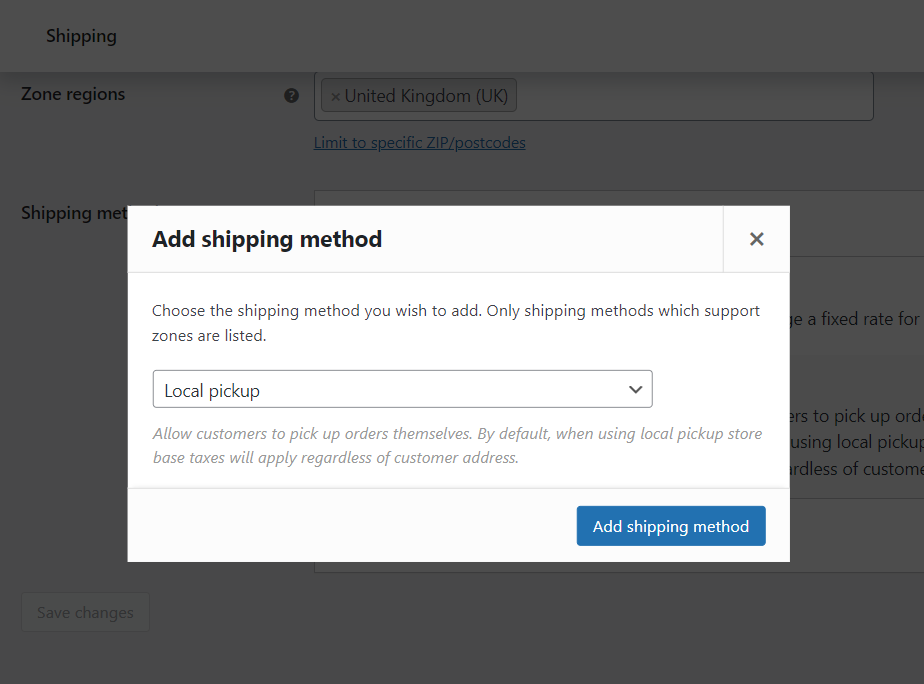
- Navigate to WooCommerce > Settings > Shipping.
- Click on Shipping Zones to add a new zone. A zone is a region you’d like to ship to, including the name, regions, and shipping method.
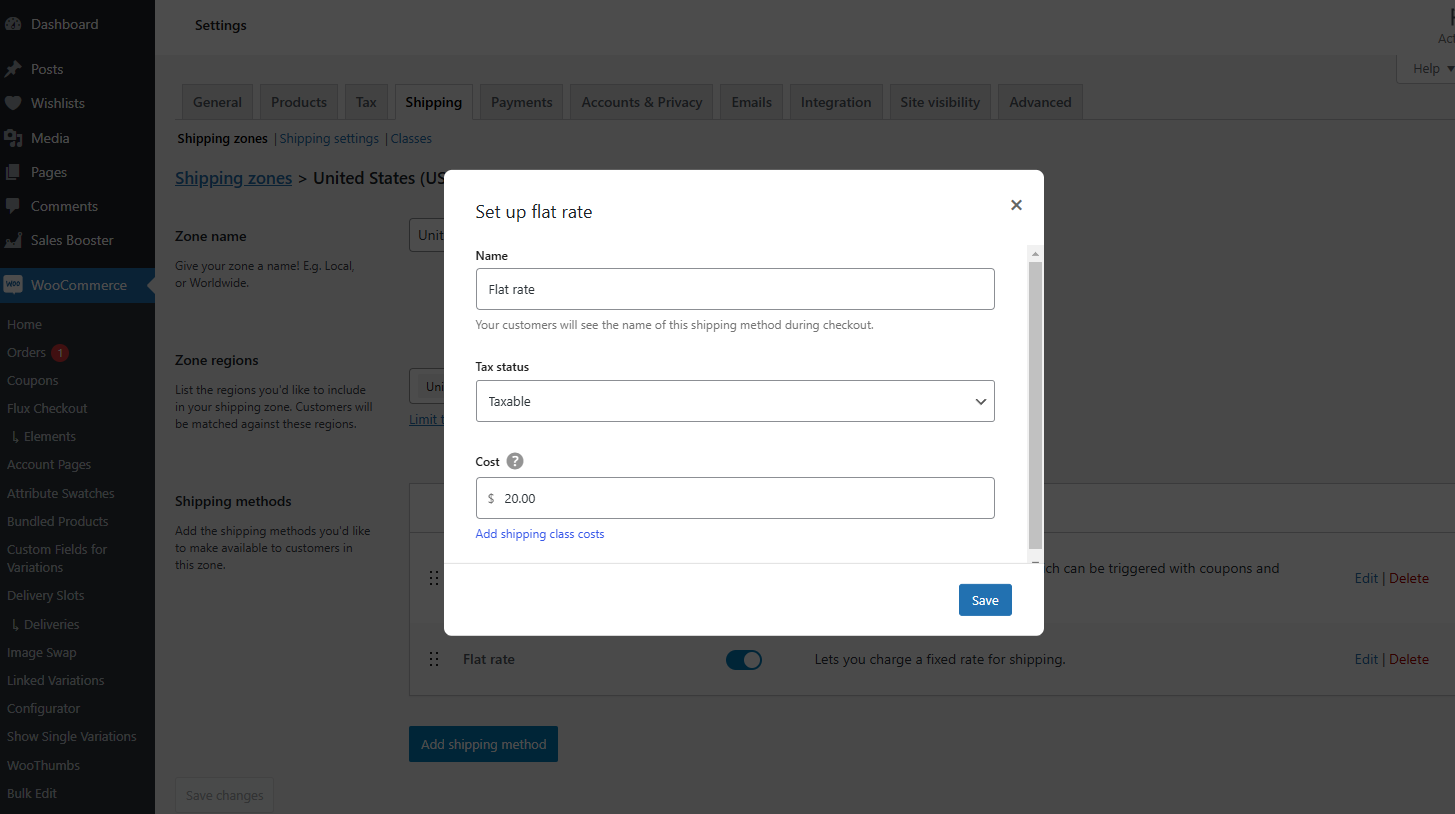
- Inside the zone, click Add Shipping Method and choose Flat Rate.
- Click Edit on the flat rate method to set the base shipping cost in the Cost field and save.
Create shipping classes
We’ll need to create Shipping classes to be able to charge additional costs for handling heavy or fragile items. Create them as classes first (e.g., fragile, oversized, etc).
Note: For weight-based pricing or more complex rules, you can use Table Rate Shipping which is a WooCommerce extension.
- Back to the shipping zone we created earlier to edit the Flat Rate method.
- Below the Cost field, find those Shipping Classes and add the additional cost for each class. For example:
- Fragile: 5 (adds $5 for fragile items)
- Oversized: 10 (adds $10 for oversized items)
- Go to the product page for each product. In the Product Data meta box, under the Shipping tab, assign the appropriate shipping class.
Once you’re happy with the changes, click Save to apply all fee settings during checkout.
Ensure clear, accurate shipping costs at checkout
Above all, after adding extra shipping fees, test the checkout process to ensure these costs are accurately displayed on the page. This transparency can help you prevent surprises during checkout and build trust.
48% of abandoned carts are because of unexpected shipping fees, taxes, or other charges that aren’t displayed clearly during checkout.
Want to know how to offset payment processing fees? Read on.
Add fees for different payment methods
Popular payment providers for credit cards and digital wallets like Woopayments or PayPal usually charge 2-3% transaction fees.
While providing a variety of payment methods is important, processing fees can eat into your profits. There are two easy ways a store can offset WooCommerce payment fees and reduce their impact on your bottom line.
Incentivize alternative payment methods
You can offer a small discount to customers who pay with cash or other preferred methods, such as debit cards, checks, or direct bank transfers. These options don’t incur processing fees, and discounts make them more appealing to customers while helping cut costs.
Pass them on to the customers
Alternatively, you can apply a small surcharge to cover transaction fees for credit card payments. For instance, add a 2.5% fee for PayPal or credit card transactions so you don’t pay these charges yourself.
The WooCommerce plugin, Extra Fees for WooCommerce can help you set up additional charges for specific payment methods.
As a word of warning, though, customers don’t tend to favor this as a method, so use with caution.

Set up payment gateway fees using Extra Fees for WooCommerce
Extra Fees for WooCommerce allows you to charge customers a fee for choosing to pay with a specific payment gateway. In this way, you can incentivize buyers to use payment gateways you don’t charge like direct bank transfers.
Here’s how this works:
With this plugin, additional fees are configured separately for each payment gateway.
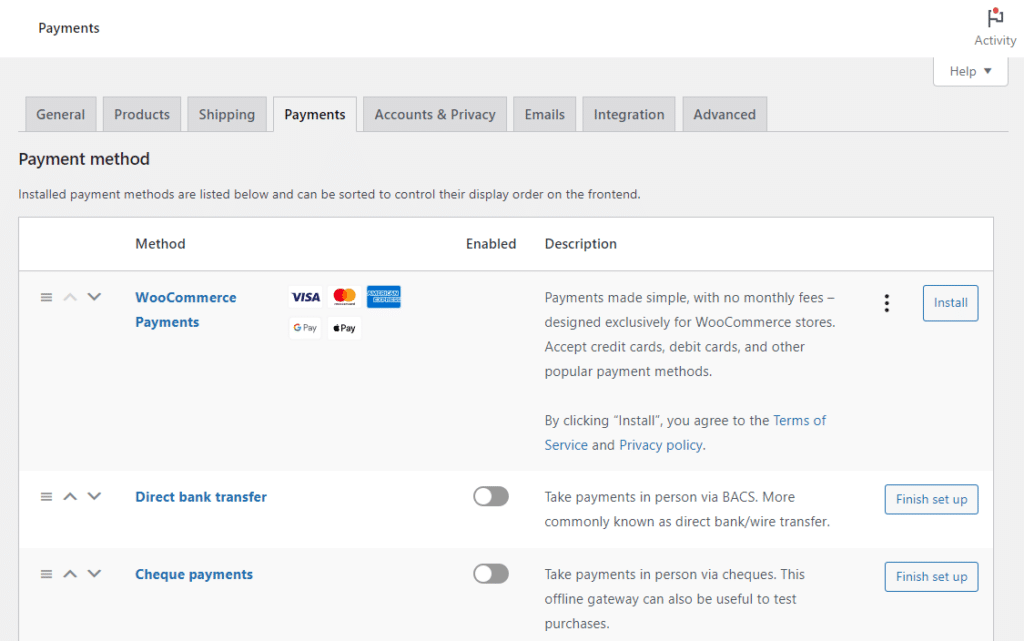
- After installing the plugin, go to WooCommerce > Extra Fees > Payment Gateway Fee tab.
- Check to Enable the payment gateway fee. This will display a list of payment gateways from Woopayment settings. Then, enable fees for specific payment gateway e.g., credit card.
- Use the Fee should apply for the option to choose users for which the fee should be applied.
- Select specific products or categories for the fee and set other options like restricting countries, date ranges, etc.
- Enter the Fee Text, which will display on checkout, and choose a Tax Class for the fee.
- Next, select a Fee Type and enter the value in the respective fields. The following fee types are supported.
- Fixed Fee.
- Percentage of cart subtotal/order total.
- Fixed + Percentage of cart subtotal/order total.
- Alternatively, you can set a minimum and maximum cart subtotal for when the fee applies.
When adding fees, research local laws and regulations regarding surcharging because some jurisdictions or states may restrict it. In addition, you should disclose the surcharge to the customer before the transaction is completed.
Get to grips with WooCommerce fees today
As an online store owner, you charge extra WooCommerce fees to cover for the additional costs you incur when selling to customers. This allows you to remain profitable as you run your business.
For simple fees like adding charges for different shipping methods, the standard WooCommerce works well. More advanced setups like variation prices, payment gateway fees, or premium delivery slots require these WooCommerce plugins:
- WooCommerce Attribute Swatches. Upgrades your product page with color and image swatches and lets you charge extra for premium attributes.
- WooCommerce Delivery Slots. Adds a delivery calendar and time slot selection, some of which are premium slots. You can charge extra for specific delivery dates and days like Valentine’s Day.
Use these plugins to have an easier time adding extra fees, but remember to be transparent with your customers upfront about what they’ll have to pay.
WooCommerce Delivery Slots
Let customers choose their preferred WooCommerce delivery date and time right from your WooCommerce checkout page. With WooCommerce Delivery Slots, you can set a flexible delivery schedule to suit you and your customers.

Gina Lucia is our in-house Content Manager at Orderable. She writes articles, user guides, technical documentation, and creates videos on everything WooCommerce and Orderable.
Gina has been working in the WordPress/WooCommerce space since 2012 when she developed WordPress websites for clients large and small.
For the past 8 years, she’s been writing about everything WordPress and WooCommerce, becoming an expert in what makes a WooCommerce store succeed.
When not writing, Gina loves to tend to her vegetable garden, read, or travel to mainland Europe.