Setting up an online ordering system for restaurants needn’t be complicated. If you’ve been considering adding food delivery to your restaurant but aren’t sure how, then with just 1 day of work and a few easy-to-use tools, you could have an ordering system set up in no time.
In this article, we’ll show you (step-by-step) how to upgrade your WordPress website to offer food delivery using WooCommerce Product Table and WooCommerce Delivery Slots.
Want to skip ahead to something specific? Just click on one of the following links:
Why setting up your own online ordering system benefits you
But first, you might be wondering why setting up your own online ordering system is worth the time and money when you could use a service like Uber Eats or Just Eat.
We know it’s a difficult decision, so we’ve put together some of the benefits of hosting your own delivery system:
- You’ll save money – While 3rd party service (like Uber Eats) might save you a little time (in theory), most of these services will charge you a percentage on each sale(sometimes 30% on each order) or a subscription cost. When setting up your own system, you’ll have some upfront costs, but most of these are one-off or yearly and tiny in comparison.
- You will have the freedom to make changes – Once you’ve built your own ordering system, you can change and update it when you see fit. A 3rd party system will always limit you in terms of how you display your items, how you offer delivery and the system’s look and feel.
- You’ll have the ability to grow and scale – WordPress and WooCommerce offer thousands of plugins for you to add to your website to grow and scale your business. When you host your delivery system yourself, you can add more payment methods, improve product pages, add features, and more.
- You get to keep your customers – Don’t build your house on someone else’s land. In other words, when you use a 3rd party platform to offer delivery, you’re also sharing your customers with your competitors’ and the 3rd party system like Uber Eats. When you keep your system in-house, you’re ensuring you keep your customers loyal and distraction-free.
So if that convinced you, keep reading because we’re going to take you through all the steps you need to set up your own online ordering system for your restaurant in 1 day.
How to set up an online ordering system for restaurants in 1 day
Our aim in this article is to have your restaurant ordering system set up and running within a day. So let’s start with the basics, here’s what you’ll need.
What you’ll need to get started
Getting your restaurant’s online ordering system setup requires the help of a few tools. The good news is these tools will save you time and money in the long run and are quick to set up.
A WordPress website
The likelihood is that you already have a basic website set up for your restaurant. You’ve got your location details, how to get in contact and you may well even have your menu set up. Now all you need to do is add an online ordering system.
WooCommerce (plugin)
WooCommerce is a plugin you can add to your WordPress website which will allow you to have an online store. Don’t worry, we’ll show you exactly how to get this set up and running in this article.
WooCommerce Product Table (plugin)
WooCommerce Product Table allows you to create an online menu in a one-page order form layout. Making it easier for you to make sales and your customers to order their food.
WooCommerce Delivery Slots (plugin)
This is where the delivery side of the ordering system comes in. Delivery Slots allows you to offer specific delivery times and dates so your customers can choose their preferred delivery schedule.
Create an online ordering system for restaurants step-by-step
Now that we’ve outlined what you’ll need, here are the step-by-step instructions to get it set up.
1. Setup your online store
The first step is to get your online store set up with WooCommerce. This well-known plugin for WordPress allows you to sell your food items or products online and take payment for them.
To install WooCommerce, do the following:
- Go to Plugins > Add New.
- Search for ‘WooCommerce’.
- Click Install.
- Click Activate and you’ll be shown the WooCommerce Wizard.
You’ll then be taken through step-by-step instructions to set up the basics of your online store with WooCommerce. If you need any extra help with this, you can check out the official WooCommerce help here: woocommerce.com/woocommerce-setup-wizard
Once this is done, you’ll be able to concentrate on listing your food items as products which we’ll go through in the next few steps.
2. Add your food items as products in WooCommerce
In order to sell your restaurant meals or take away options, you’ll need to add these as products within WooCommerce.
Here’s how:
- Click Products > Add New.
- Enter your food item’s name and description.
- Then add your categories, these will help you order your menu a little better. You can add categories like starters, mains, drinks and more.
- Add tags to your products. We recommend using these for dietary information and food allergies so customers can find exactly what they’re looking for.
- Next, you’ll need to add a product image.
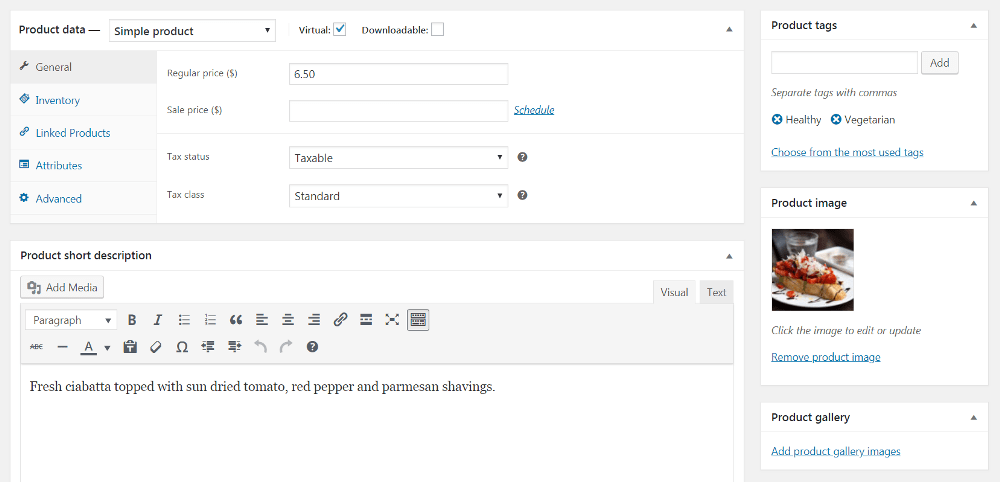
- Lastly, you’ll need to edit the Product data settings from the General tab:
- Make sure Simple product is selected from the drop-down menu, or create a variable product if you want to offer a choice of options (this is relevant if you offer different sizes for your dishes, or added extras/toppings).
- Set the Regular price, or a price for each variation if you’re using variable products.
Once done, click Publish and repeat until you’ve added all your food items as WooCommerce products.
3. List your food items in a menu style with WooCommerce Product Table
The last thing we want for your customers when browsing your new food delivery site is for them to get confused and leave because there’s too much going on, or they have to click on too many pages.
By creating a restaurant-like menu for them to order from, you’ll make it much simpler and easier for them to order from you. WooCommerce Product Table allows you to create a one-page menu for your customers to order from, instead of individual product pages for each food item.
To create your menu, do the following:
- Once you’ve purchased the WooCommerce Product Table plugin, install and activate it on your WordPress website.
- Head over to WooCommerce > Settings > Products > Product tables and enter the license key.
- Then, go to Pages > Add New to create a new page to display your online food menu.
- Give your page a name and click the Insert product table button from the text editor’s toolbar. This should add the product_table shortcode to your page.
- Click the Publish button to continue.
All of your food items should now be added to the table automatically.
4. Customise your new menu
Now we have the food items loaded into our table/menu, all that’s left to do is customize the layout and turn it into an online order placement system for your restaurant.
There are a lot of options that you can change depending on the food items you’re selling. So for the purpose of this tutorial, we’ll go through the main options:
- Go to WooCommerce > Settings > Products > Product tables.
- The Columns option under the Table content section lets you decide which items to include in your menu. For a restaurant, we’d recommend displaying the image, name, description, category, tags, price, and an add to cart button for each food item.

- Scroll down to the Add to cart section and use the Add to cart button dropdown menu to select Button and checkbox. This allows customers to select everything they’d like to add to their order instead of adding one item at a time.
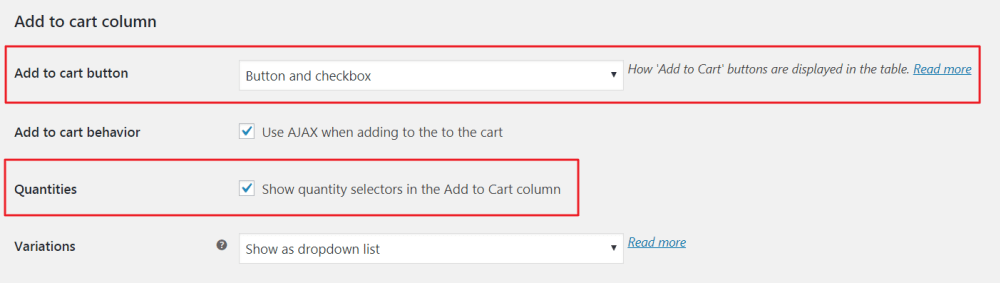
- From the same section, tick the checkbox next to Quantities. This allows customers to order more than one food item at a time.
- In the Table controls section, use the dropdown menu next to the Product filters to select Show based on columns in table. This allows customers to filter the food items in your menu based on the categories (or tags) you’ve set.

- Click the Save changes button to proceed.
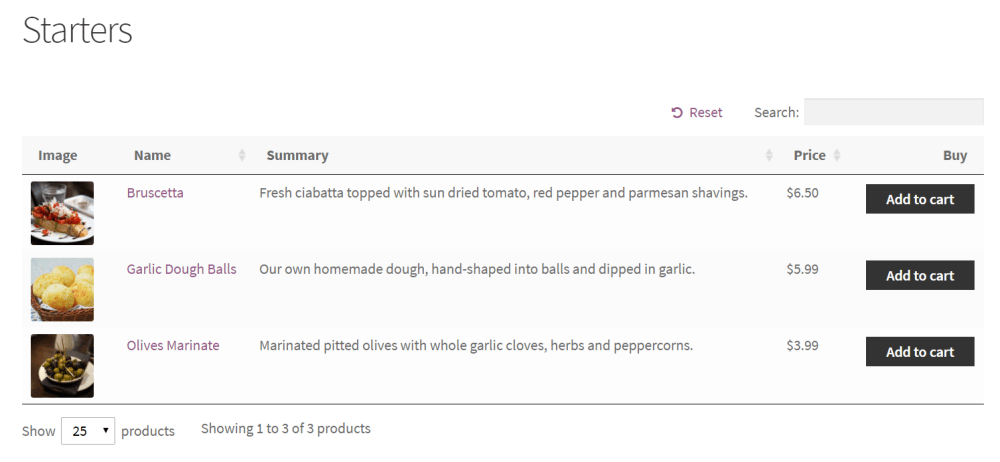
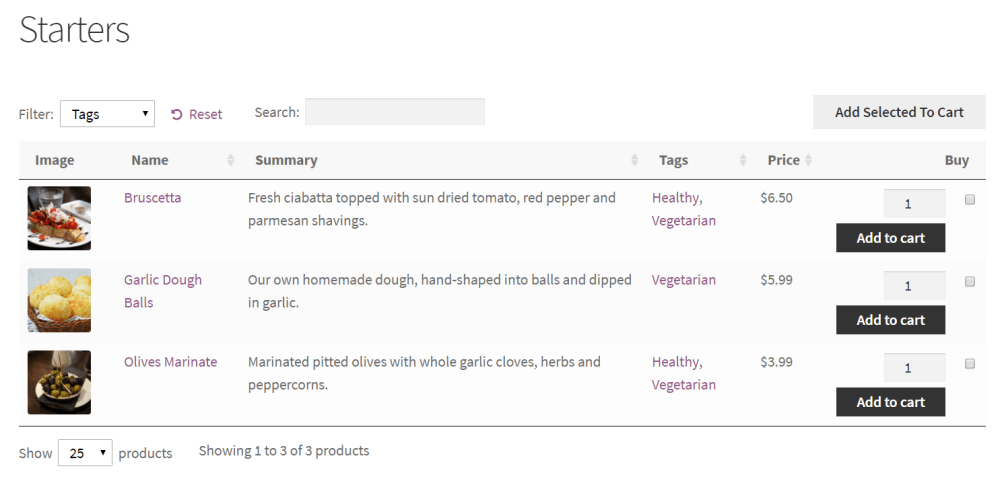
Your food ordering page should look something like this now:
5. Set your delivery schedule
Now here comes the important bit, your delivery schedule. Setting and managing your food delivery can be complicated, so we’ve optimized WooCommerce Delivery Slots to combat some of the problems you might face when delivering your food.
With Delivery Slots you can:
- Create a custom schedule to suit you, giving you the ability excluding times when you’re not available and add times that you are
- Charge additional fees for same day and next day deliveries
- Define holiday or closed periods
- Let the customer choose a delivery slot to suit them
- Allow your customers to reserve a delivery slot while they shop
WooCommerce Delivery Slots
Let customers choose their preferred WooCommerce delivery date and time right from your WooCommerce checkout page. With WooCommerce Delivery Slots, you can set a flexible delivery schedule to suit you and your customers.
To get started, purchase WooCommerce Delivery Slots from the Iconic store: iconicwp.com/woocommerce-delivery-slots
Then follow these steps:
- Go to Plugins > Add New > Upload Plugin
- Choose the zip file you downloaded, upload, and then click Activate
- Once activated, you’ll need to enter your licence key
Now that we have Delivery Slots installed, we can move on to customizing the settings for your restaurant.
Do better with video? Here’s our tutorial:
Otherwise, follow these steps:
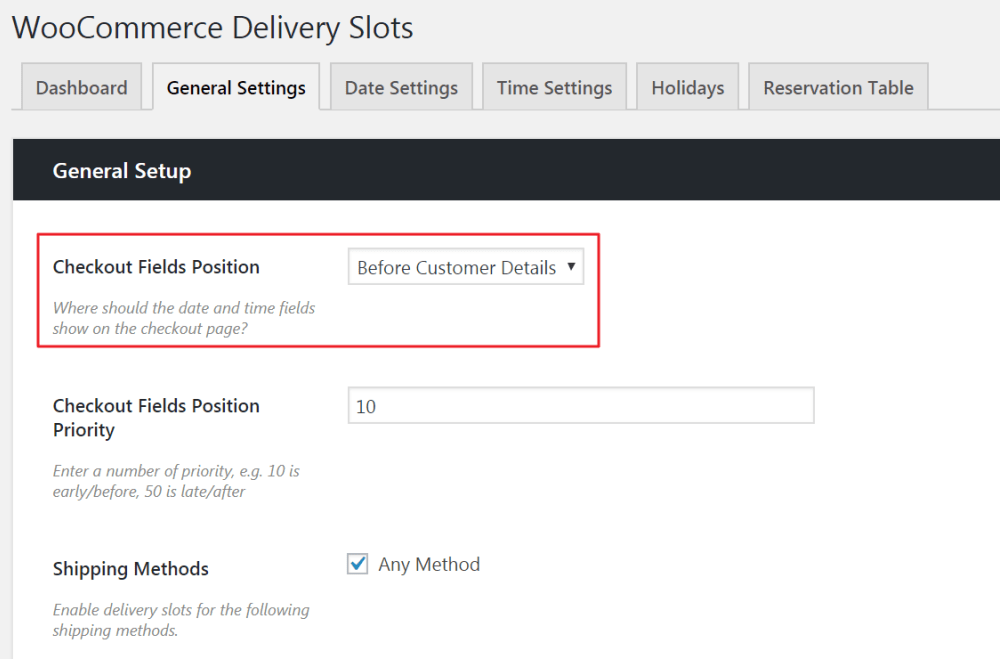
- Click WooCommerce > Delivery Slots > General Settings and configure the following settings.
- General Settings – Select where on the checkout page you’d like to display the delivery date and time using the Checkout Fields Position option.
- Date Settings – From the Date Settings tab, scroll down to the Date Settings section and select the checkboxes next to the Delivery Days option that you’d like to deliver the food on.
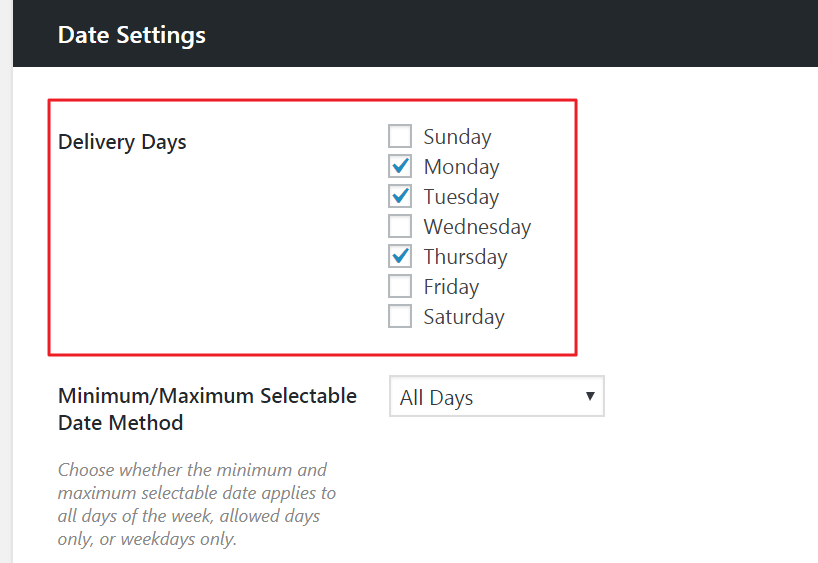
- Configure the rest of the settings in this section based on your personal preferences and requirements.
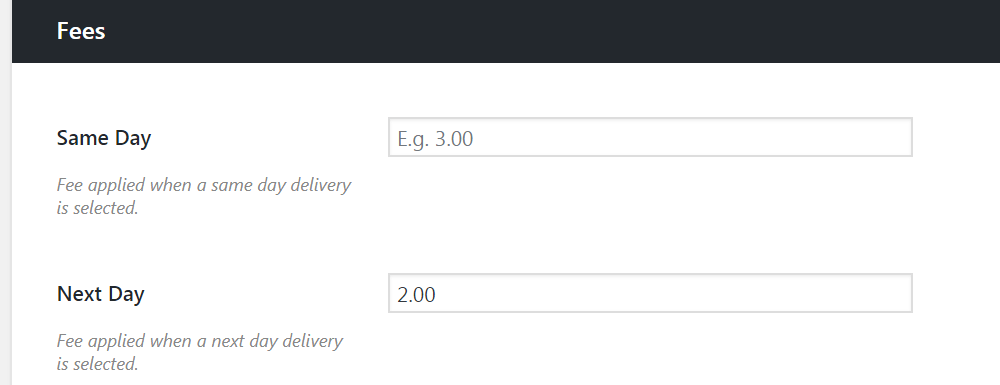
- Once that’s done, scroll down to the Fees section if you’d like to charge a delivery fee on same-day deliveries or next day deliveries.
- Time Settings – Scroll down to the Time Slots section and configure which times during the delivery days you’re available to make deliveries using these options. You can also set when you’d like to close deliveries for a particular time slot.
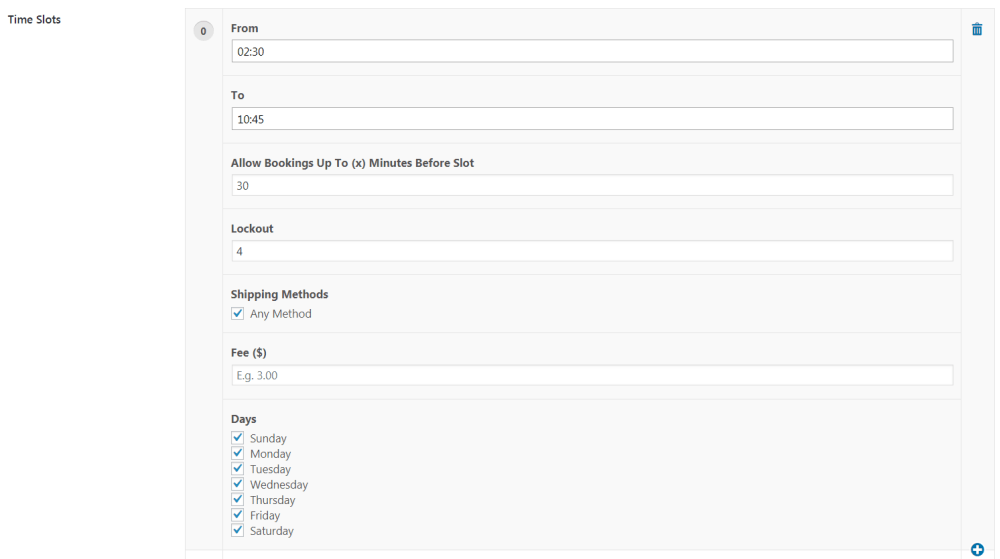
- Click the Save Changes button to proceed.
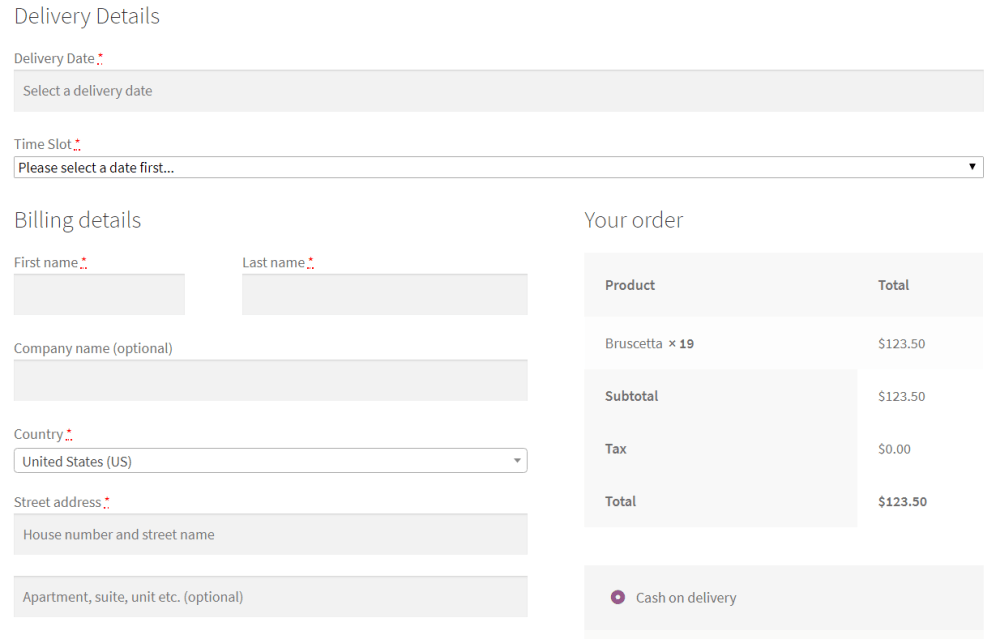
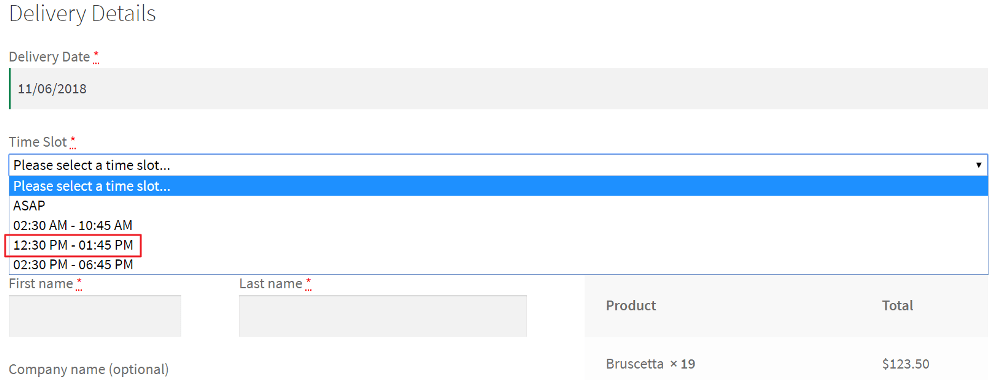
Once done, your restaurant ordering system checkout should look something like this:
If you’d like to get really specific with your delivery slots, delivery zones, and shipping methods, check out this video tutorial:
That’s it, your website is now up and running with your very own online ordering system. You’ll be able to sell your food directly to customers, have them pick their own delivery times, and keep track all within your own online ordering system.
Roundup
In this guide, you’ve learned why having your own online ordering system is beneficial for your bottom line. You’ve also had step-by-step instructions for setting up an online ordering system for restaurants using three of the best WooCommerce plugins.
When set up and running, having your own online ordering system for restaurants is a game-changer. You’ll be able to adjust and adapt as you go to create a system that’s perfect for you and your restaurant. By using these few plugins, all of this makes it just that little bit easier.
Plugins featured in this guide:
- WooCommerce – Create an online store for your WordPress site in minutes.
- WooCommerce Product Table – Create an online menu in a one-page order form layout. Making it easier for you to make sales and your customers to order their food.
- WooCommerce Delivery Slots – Make it easy for customers to choose a convenient delivery date and time during checkout. Maximize your available delivery capacity and reduce cart abandonment.

Gina Lucia is our in-house Content Manager at Orderable. She writes articles, user guides, technical documentation, and creates videos on everything WooCommerce and Orderable.
Gina has been working in the WordPress/WooCommerce space since 2012 when she developed WordPress websites for clients large and small.
For the past 8 years, she’s been writing about everything WordPress and WooCommerce, becoming an expert in what makes a WooCommerce store succeed.
When not writing, Gina loves to tend to her vegetable garden, read, or travel to mainland Europe.