In a standard WooCommerce install, customers have to make multiple clicks before they even get the product information they need to make a purchase. By adding a product lightbox to your WooCommerce store, you’ll cut out these clicks entirely. Increasing the chance of a sale for your online store.
So in this guide, we’ll provide you with step-by-step instructions for adding a WooCommerce product lightbox or quickview to your online store. The best part? You’ll be able to do it in just a few steps with the product lightbox plugin, WooCommerce Quickview.
WooCommerce Quickview
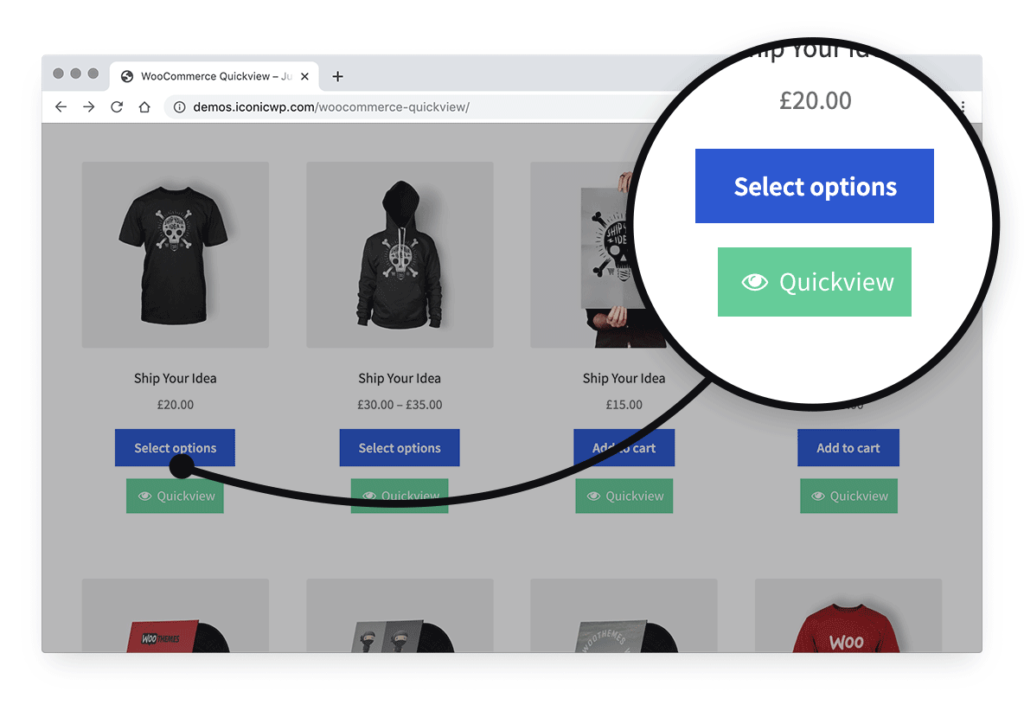
Add a WooCommerce quickview product lightbox to your category and shop pages. Allow customers to preview product information and add products to the cart without leaving the page.
If you want to jump to certain points in the article, just click on one of the following links:
Why a WooCommerce product lightbox increases revenue
Put simply, a product lightbox or ‘quickview’ makes it easier for a potential customer to view product information and then add that product to their cart.
When used well, the reduction in the number of clicks a customer has to make increases the chance of them purchasing. Not only that but if they remain on the shop page, rather than clicking through to the product page, they can keep shopping. As a result, they will increase your average order value as they can purchase more easily from your store.
Here are a few other added benefits:
- Customers can add products to their cart, directly from the product listing pages.
- They can easily browse the product gallery without clicking through to the product page.
- Customers can also use the WooCommerce Quickview to quickly compare similar products without opening multiple tabs.
We’ve outlined why adding a WooCommerce product lightbox is important for your online store, so now it’s time to get it up and running.
How to add a quick view or product lightbox to your WooCommerce store
The following are step-by-step instructions for adding this feature to your WooCommerce store using a WooCommerce Quickview plugin.
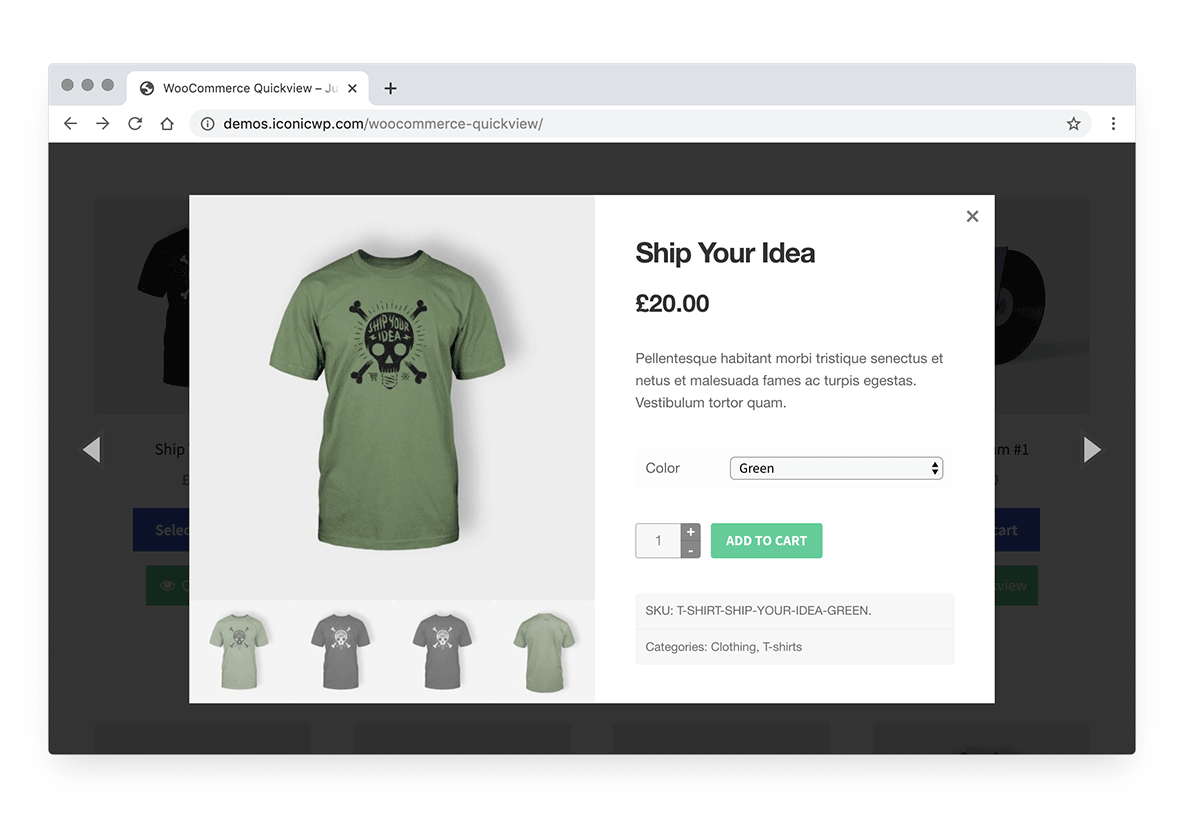
WooCommerce Quickview allows you to add a product lightbox to product listing pages, making it easy for your customers to view and add products to their cart.
To get started, purchase WooCommerce Quickview from the Iconic store: iconicwp.com/products/woocommerce-quickview
Then follow these steps:
- Go to Plugins > Add New > Upload Plugin
- Choose the zip file you downloaded, upload, and then click ‘Activate’
- Once activated, you’ll need to enter your licence key

Now that we have WooCommerce Quickview installed, we can utilize it in your online store.
How to customise the WooCommerce Quickview button
Customizing how and where your Quickview button appears is simple. First, we need to decide how we want the lightbox to show:
- Go to WooCommerce > Quickview.
- Click the ‘Quickview Trigger Settings’ tab.
It’s at this stage you can pick whether you want to display your product lightbox on hover (when the user’s mouse moves over the product) or with a Quickview button.

Next, we need to activate the button and adjust the settings so that it blends in nicely with your online store.
- Scroll down the page and until you get to the ‘Positioning’ section.
- Click the ‘Automatically insert Button’ checkbox – this will automatically add the Quickview button to your online store.
- If you’d like to add the button into your store manually, you can see our documentation here: docs.iconicwp.com/manually-insert-the-quickview-button
- Next, you can adjust the settings of where your button is displayed and how much space it has around it by adjusting the ‘Button position’, ‘Button align’ and ‘Margins’ settings.

Your button is now positioned and ready to be styled to suit your online store’s branding.
- Scroll down to the ‘Styling’ section on the same page.
- In this section, you can give your Quickview button an icon, change the wording, colours and style.
- Once you’ve styled your button, click the ‘Save Changes’ button at the bottom of the page.
We’ve activated WooCommerce Quickview and styled it to blend with your existing store and theme. Now it’s time to adjust the settings of the Quickview, or lightbox itself.
How to customise the WooCommerce Quickview lightbox
Customizing the lightbox or popup element of WooCommerce Quickview means that you can tailor your customer’s experience. In order to blend it seamlessly with your online store, go through the following settings:
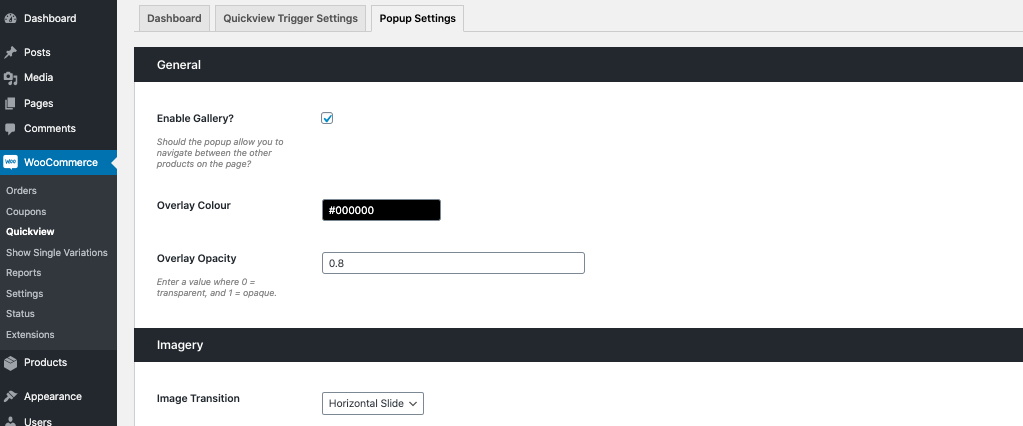
- Click the ‘Popup Settings’ tab.
- In the ‘General’ section, you can choose to allow customers to navigate between different products when the lightbox is open.
- The ‘Imagery’ section allows you to adjust the settings for your product image gallery, including how fast it scrolls, the buttons you want to use and more.
- Next is the ‘Content’ section. It’s here that you can add or remove almost any element of the lightbox. Don’t want the product quantity showing? Remove it.
- Once you’ve adjusted all the settings on this page to your liking, click the ‘Save Changes’ button and visit your product listing page to see your new product lightbox in action.
So there we have it, your online store now has a more up-to-date and seamless way for customers to view products.
Set up your product lightbox
That’s it, in this guide you’ve learned why a WooCommerce product lightbox is a must for your online store and how to set one up quickly and easily with WooCommerce Quickview.
Tweaking your store for a better customer experience will reward you in the long run. By making the buying experience simpler and quicker, customers will be able to explore your store and make purchases without friction. This also means the likelihood of them buying more also increases.
Make this change quickly and easily with WooCommerce Quickview.
WooCommerce Quickview
Add a WooCommerce quickview product lightbox to your category and shop pages. Allow customers to preview product information and add products to the cart without leaving the page.

Gina Lucia is our in-house Content Manager at Orderable. She writes articles, user guides, technical documentation, and creates videos on everything WooCommerce and Orderable.
Gina has been working in the WordPress/WooCommerce space since 2012 when she developed WordPress websites for clients large and small.
For the past 8 years, she’s been writing about everything WordPress and WooCommerce, becoming an expert in what makes a WooCommerce store succeed.
When not writing, Gina loves to tend to her vegetable garden, read, or travel to mainland Europe.