
If you’re looking to create a music store using WooCommerce, then you might be wondering how to get started.
After all, we know WooCommerce is a great solution for selling goods, both physical and digital. So how can we make the most of what WooCommerce has to offer when it comes to selling music?
Well, by the end of this article, you’ll know exactly how to create a music store using WooCommerce. With the help of a few easy-to-use plugins to save you the work.
The plugins mentioned in this guide:
- WooCommerce Product Table – Display your music tracks in an easy-to-use table so customers can preview audio clips and add them to their cart.
- WooThumbs for WooCommerce – Add SoundCloud audio embeds into your product gallery or upload MP4 sample clips.
What you’ll need to sell music on WordPress
To create a music store using WooCommerce, you’ll need a few things to get you started.
For the purpose of this article, we’ll presume you already have WordPress installed on your site with all the settings ready to go.
Install the ecommerce plugin for WordPress, WooCommerce
The first thing you’ll need to do is create a way for you to process payment and list products on your site. This is where WooCommerce comes in. WooCommerce itself has a great guide to help you get set up and running.
We’ll talk you through adding your music tracks and displaying them in the next few sections. So to do this, you’ll need…
A way to display your music tracks
When looking to sell music on WordPress, it’s important to have a way for customers to preview music tracks quickly and easily.
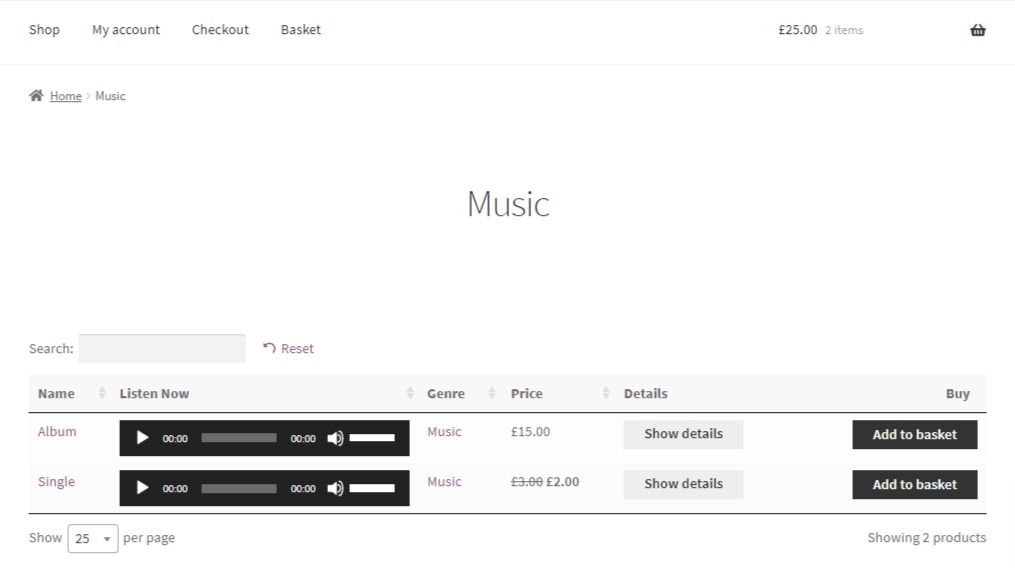
Many music stores opt to display their tracks in tables. This allows the customer to listen to a preview of the track right from the shop or category page.
Not only does this save the customer clicks, but it allows them to listen to and add multiple tracks to their cart without having to leave the page.
To achieve this, you’ll need the help of a plugin. We recommend WooCommerce Product table. We’ll show you how to get this up and running in the next few sections.
An additional way to display your music tracks
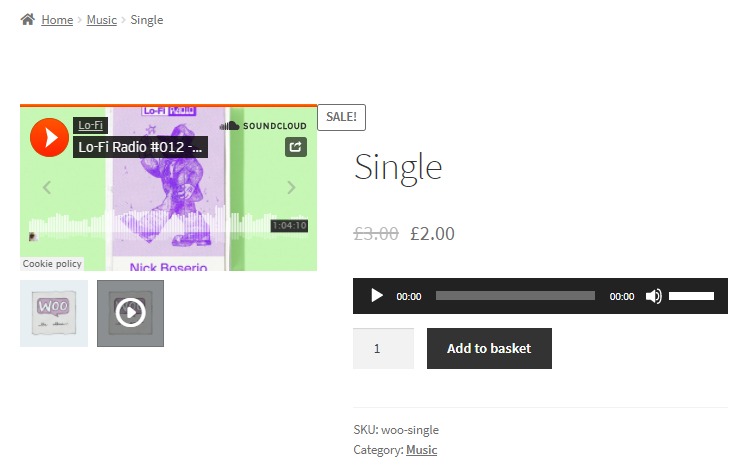
If customers are exploring your store or sharing tracks with friends, they’ll probably land on the single product page. Once there, you’ll need a few additional ways for them to listen to the track again.
The single product page is a valuable location to include additional information about the track. Including the artist, licensing, and more. So by allowing customers to listen while they read, you’ll increase the likelihood of a sale.
To achieve this, we recommend using WooThumbs for WooCommerce. With WooThumbs you can display a track preview (or entire track) within the product gallery itself. Making use of this otherwise fairly empty space.
WooThumbs for WooCommerce
Customize your WooCommerce product image gallery in minutes with a new layout, embedded video, multiple images per variation, and more.
This can be achieved by embedding a SoundCloud link into the product gallery or uploading an MP4 sample clip.
We’ll walk you through how to get this up and running later in the article.
So now we have everything we need, let’s create your WooCommerce music store!
How to create a WooCommerce music store
In this section, we’ll walk you through how to create a music store using WooCommerce. Starting with perhaps the most important part – adding your music tracks.
Step 1: Add your music tracks
The heart and soul of your music store is the music itself and lucky for us, adding music to WooCommerce is a breeze.
To add a music track to WooCommerce, take the following steps:
- From your WordPress dashboard, go to Products > Add New.
- Once here you’ll need to give your track a name and add a description. In this case, we’re going to call our product ‘Single’ and add some dummy text in the description. For demonstration purposes.
- At this point, you can add all the usual product information such as the category it’s in and the product tags.
- Once done, scroll down to the Product Data section. Here’s where we’ll add all the important information.
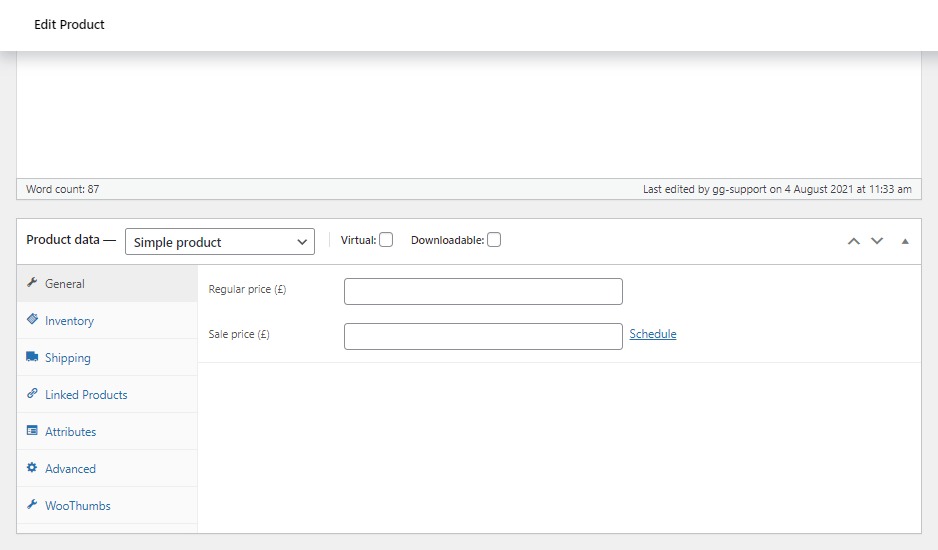
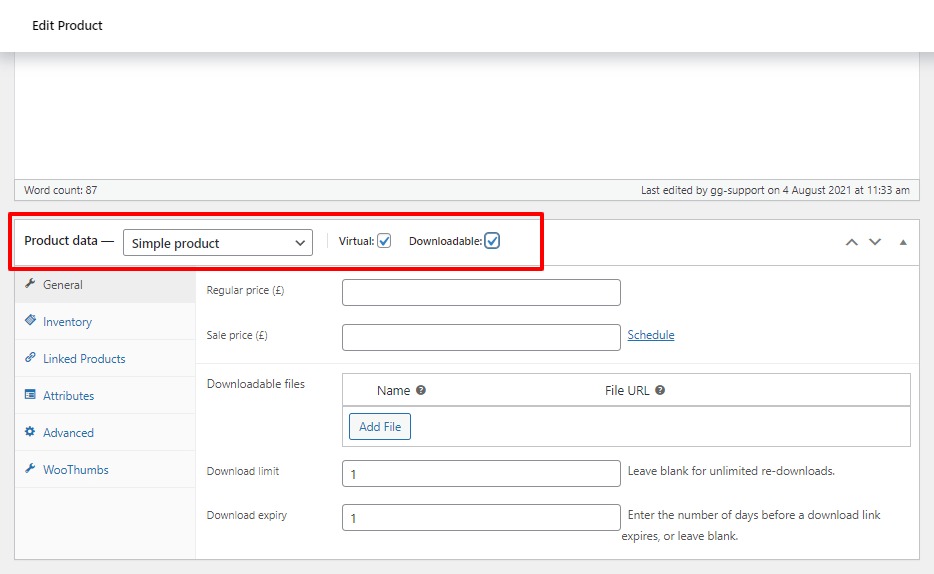
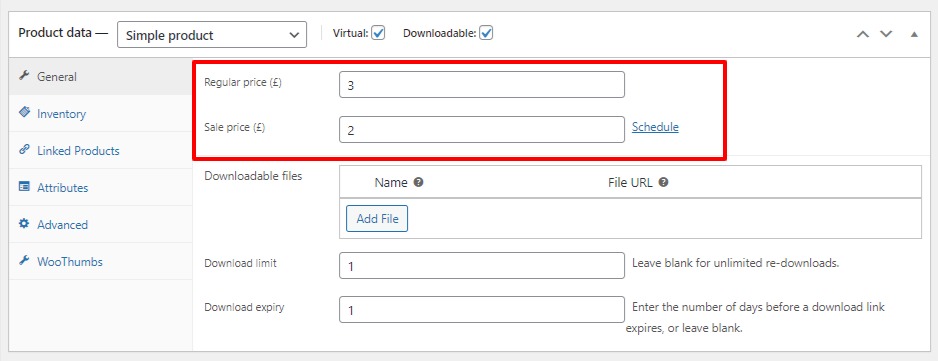
- The first thing you’ll want to do is make sure Simple product is selected from the dropdown at the top of the Product Data section. Then check both the Virtual and Downloadable boxes next to it.
- This will change the product from a physical product to a digital product – allowing you to add a downloadable music track to the order.
- Next, add a price in the Regular price and/or Sale price fields.
Add the downloadable music track
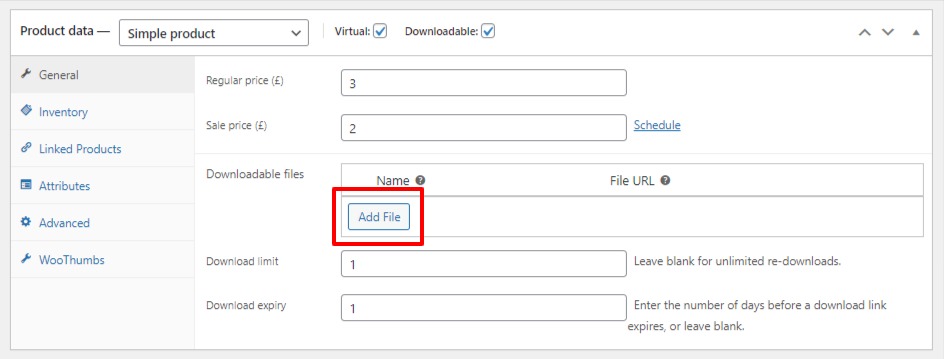
- Once done, we can add the music track customers will be sent when they purchase. To do this, click the Add File button in the Downloadable files section. This will then create a couple of fields for you to fill out (Name and File URL).
- The Name is the name of the download that’s shown to the customer.
- The File URL is the link to the music track that customers have access to.
- In this case, we recommend you click the Choose file button rather than adding your own URL to upload your music track.
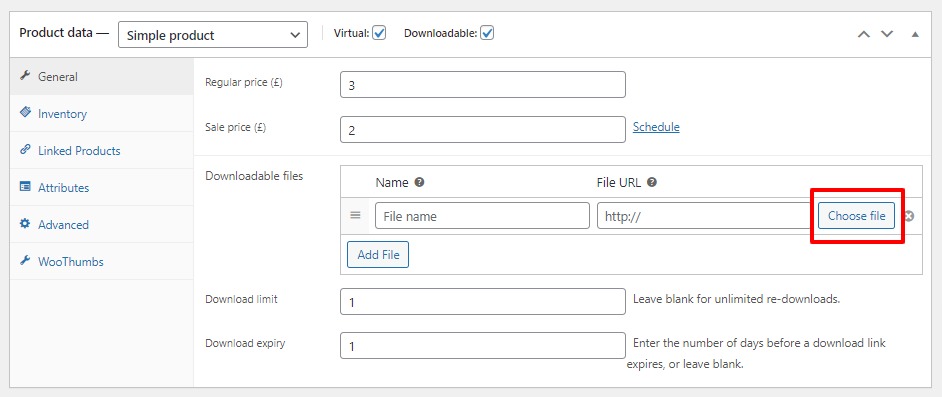
- Once clicked, a pop-up will open, enabling you to upload a file from your computer, or choose one from the Media Library.
- After you’ve uploaded your file, you’ll be able to add information like the Artist, the Album it came from a caption, and a Description.
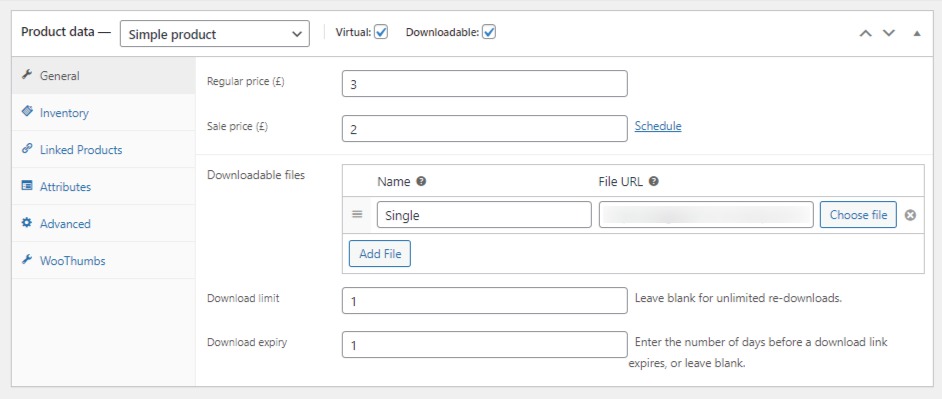
- At this point you’ll also be able to set Download limits and Download expiry limits in the Product Data section should you need to.
- Of course, this isn’t all. If you’d like to add a Product image and additional images in the Product gallery sections, you can do so. This is a great place for the album or single artwork.
- Once you’re happy with your music track, scroll up to the Publish section of the Edit Product page and click the blue Publish button.
Step 2: Display your music tracks in a table
Now we have a music track added to our WooCommerce store, we can work on displaying these tracks in a table.
The table we’re going to create will allow customers to listen to the audio clip, see its name, price, click to view more details, and/or add it to their cart.
To create your music track table, do the following:
- With WooCommerce Product Table installed on your site, from your WordPress dashboard, go to WooCommerce > Settings > Products > and click the blue Product tables link under the main tabs.
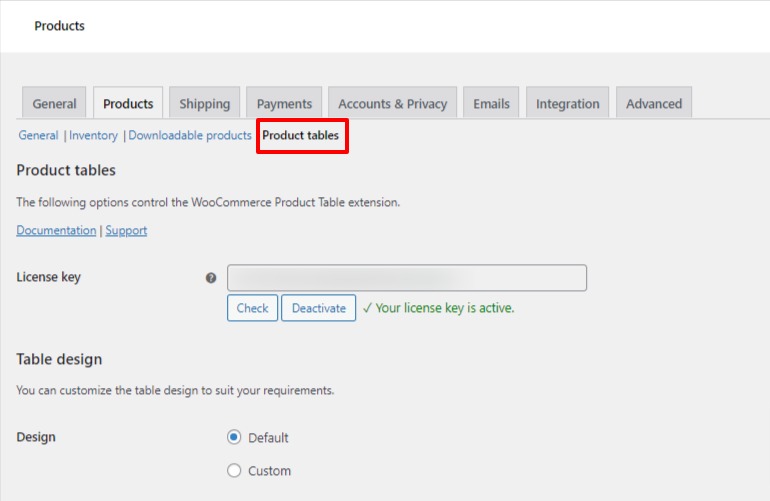
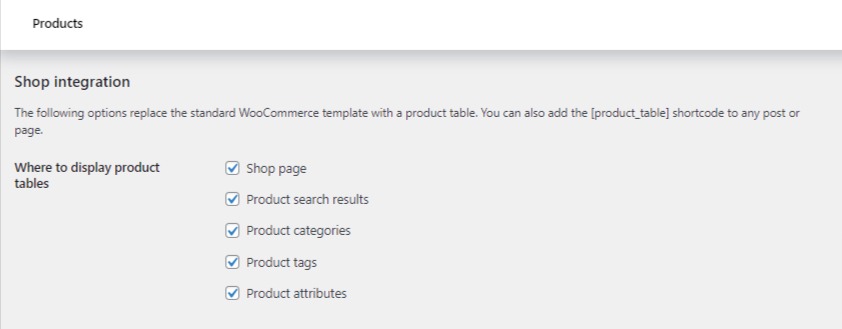
- Scroll down the page until you see the Shop integration section. Here you’ll see a bunch of checkboxes next to Where to display product tables.
- Check the locations you want your product tables to appear. In this case, we’re going to check them all.
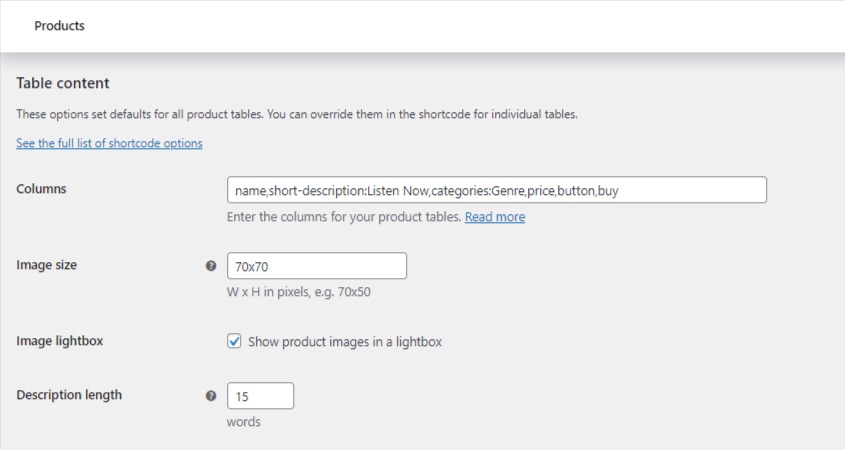
- Next, scroll down the page to the Table content section.
- This section will allow us to determine what columns we want to add to our table. As said above, we want to allow customers to listen to the track, see its name, price, click to view more details, and add it to their cart.
- To do this, we need to add the following to the Columns field:
name,short-description:Listen Now,categories:Genre,price,button,buy
- Lastly, scroll down the page to the Advanced section and check the checkbox next to Shortcodes to make sure your audio player shows up in the product table.
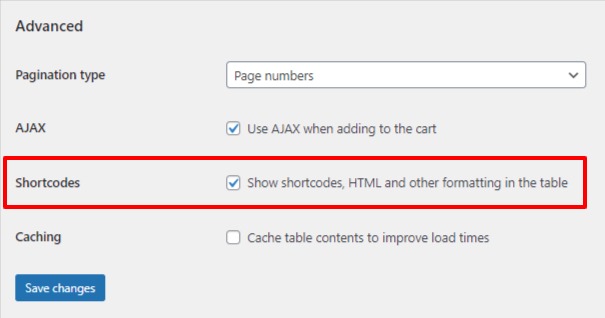
- Once happy, scroll down the page and click the blue Save changes button.
Add the audio player to your table
Because we’ve used ‘short-description’ in the product table, we’ll need to make sure our audio player is added to the product short description.
To do this, take the following steps:
- From your WordPress dashboard, go to Products > All Products and click to edit your previously created music product.
- Then scroll down to the Product short description section and click the Add Media button.
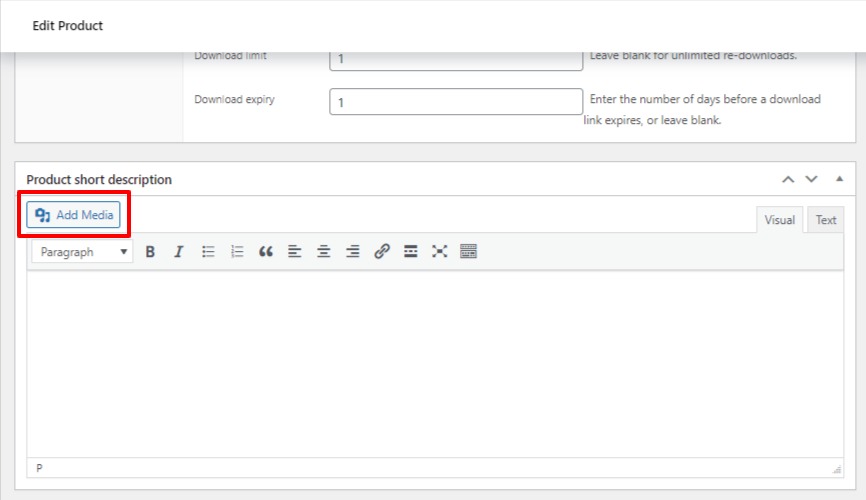
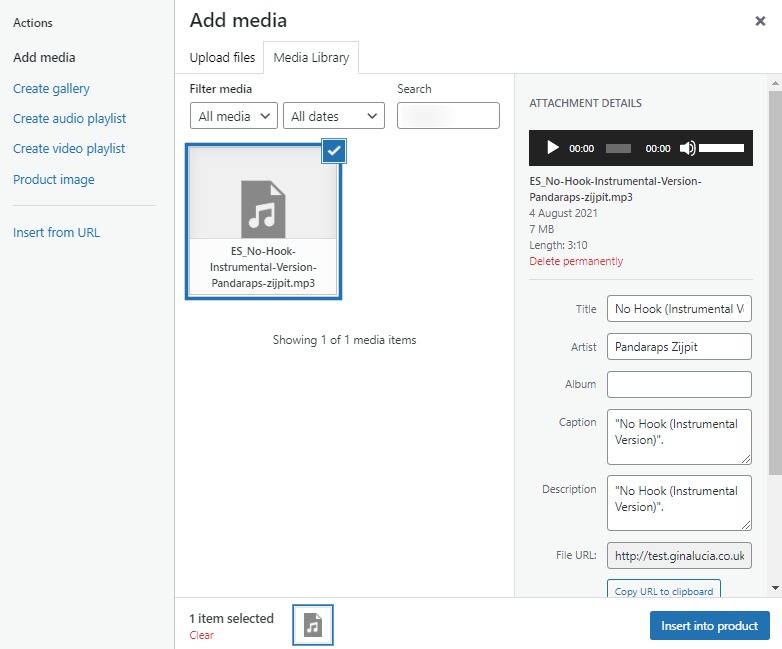
- Select the audio clip from your Media Library and click the blue Insert intro product button. The audio clip should now be added as a playable media file.
- Once happy, scroll up to the Publish section and click the blue Update button.
If you’d rather add the audio clip to the main product description, you can do so by following the same steps in the main description and adding description:Listen Now instead of short-description:Listen Now to the product table Columns field.
Top tip: If you’d rather let customers listen to shorter audio previews rather than the full track, you can upload an additional audio file to use as a track preview on the product page instead. To make it obvious to customers that it’s a preview, change short-description:Listen Now to short-description:Preview Track in the Columns field in the product table options.
Step 3: Embed your music tracks in the product gallery
Now we have your product table set up and running, it’s time to make some improvements to the single product page.
While the track audio file is playable on the single product page, to give sales an additional boost, it’s worth adding some extras to the product gallery itself.
For example, say you have a music clip you’re selling but you want to demonstrate some scenarios where the clip has been used elsewhere. You could add as many videos as you like to your product gallery using WooThumbs for WooCommerce.
WooThumbs for WooCommerce
Customize your WooCommerce product image gallery in minutes with a new layout, embedded video, multiple images per variation, and more.
Similarly, if you’d like to allow customers to listen to the clip via SoundCloud, you can embed the SoundCloud audio player into your product gallery too.
In this case, we’ll demonstrate how to add a video to your product gallery using WooThumbs for WooCommerce:
- Copy the URL of the Vimeo video or YouTube video you want to show in your product gallery (save this because we’ll need it later).
- Either that, or if you’d like to add SoundCloud, find the track you want to add, click Share and copy the URL in the share popup.
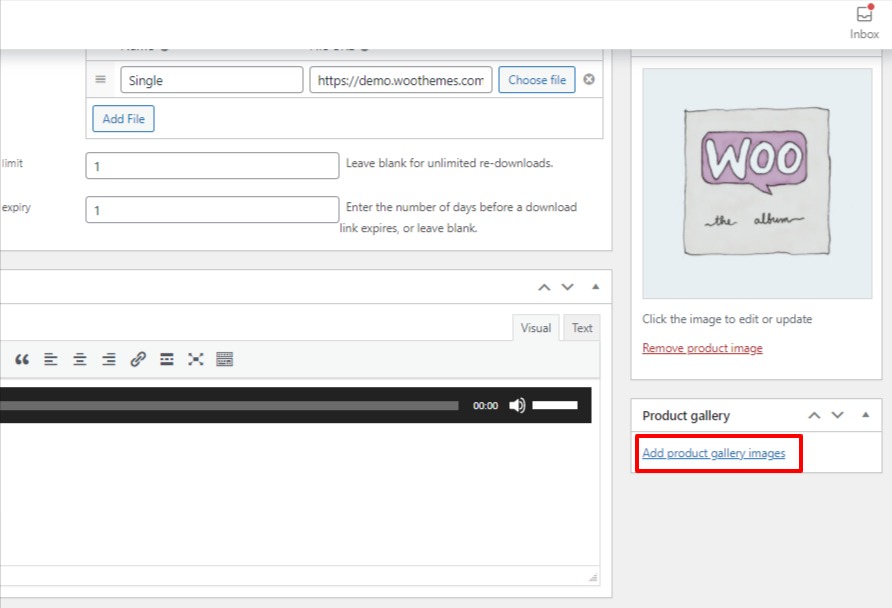
- With WooThumbs installed, from your WordPress dashboard, go to Products > All Products and click to edit your previously created music product.
- Once on the Edit Product page, scroll down to the Product gallery section and click the blue Add product gallery images link.
You’ll need to upload a thumbnail image of the video, or you can use an existing image in your media gallery.
This will act as a preview image in your WooCommerce product gallery but when clicked will show only the embedded video.
- In the Media URL field of your uploaded image, paste the YouTube (or SoundCloud) URL you copied earlier.
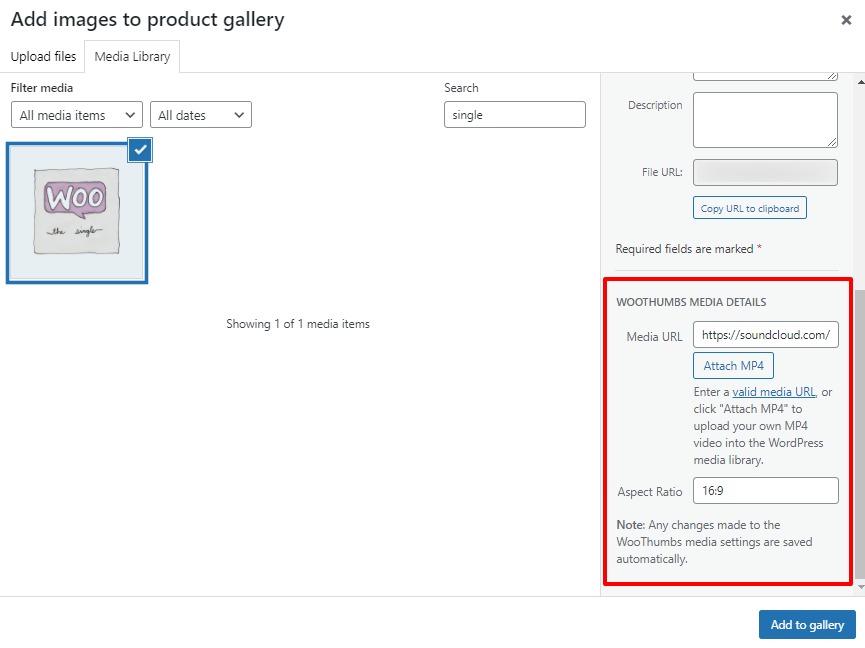
- Once happy, click the blue Add to gallery button.
- Then scroll up the Edit Product page to the Publish section and click the blue Update button.
Now when you view your product page, you’ll see a new thumbnail with a play button. When clicked, customers can watch or listed in the product gallery for the best possible customer experience.
Create your music store today
With both of these plugins on your site, your WooCommerce music store will give your customers a smooth and fuss-free experience. Allowing them to find the tracks they’re looking for and making you more sales in the process.
The plugins mentioned in this guide:
- WooCommerce Product Table – Display your music tracks in an easy-to-use table so customers can preview audio clips and add them to their cart.
- WooThumbs for WooCommerce – Add SoundCloud audio embeds into your product gallery or upload MP4 sample clips.

Katie is CEO and founder of Barn2 Plugins. A high profile figure in the WordPress community, she loves teaching website owners how to get the most out of their sites.
Katie’s story has been told in numerous WordPress and tech industry publications. As well as speaking at WordCamp conferences, her passion for sharing her knowledge and experience has also led her to co-host two podcasts – WP Product Talk and Woo BizChat at Do the Woo – where she discusses a wide range of topics related to selling WordPress products and WooCommerce extensions.