
In this guide, we’ll walk you through how to add vacation mode to your WooCommerce store in a few simple steps. Plus, we’ll teach you how to set it up so it automates itself. Saving you time, all so you can go on vacation without worry.
The plugin mentioned in this guide:
- WooCommerce Delivery Slots – Create and customize your delivery schedule in WooCommerce with closed periods, holiday mode, and more.
WooCommerce Delivery Slots
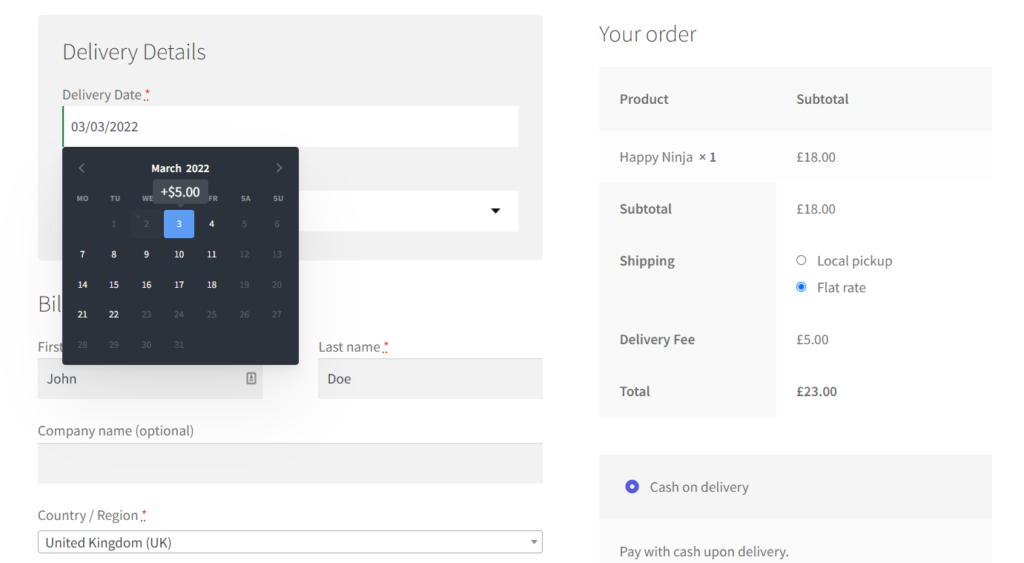
Let customers choose their preferred WooCommerce delivery date and time right from your WooCommerce checkout page. With WooCommerce Delivery Slots, you can set a flexible delivery schedule to suit you and your customers.
As WooCommerce store owners, we might not always be able to offer delivery to our customers year-round. Because of this, we need a reliable way to set up a WooCommerce vacation mode, that we can set and leave.
In this article, we’ll walk you through how. We’ll even show you how to add a vacation mode for specific shipping methods only. Just in case you can deliver some orders, but not others.
So let’s start by understanding why adding a vacation mode can help your ecommerce store.
Why add a vacation mode/holiday mode to your WooCommerce store?
There are many reasons why setting up vacation mode on your WooCommerce store will help. Here are just two we think are worth noting.
Increases trust with customers
When your store is upfront about when deliveries can be made, it develops a certain level of trust with the customer. It signals to the customer that the store is transparent in its dealings and sets the right expectations.
If you didn’t do this and still allowed customers to make orders for delivery while you’re away, you may be left with frustrated customers and abandoned carts.
Saves you extra steps
Another common problem with many online stores is the logistical nightmare the staff has to go through when a customer orders at a time when the store is not ready to deliver.
In such situations, there are only a few options available for us. We either have to explain the delay to the customer, or we spoil our vacation and find a way to deliver on time. In the worst-case scenario, we may even have to cancel the order and risk losing a valuable customer.
A better way is to automatically switch on vacation mode when the store is on holiday and notify customers through a store-wide notification bar. This can save hours of effort and frustration for the store and your customers too.
So now we know why adding vacation mode is important. Next, we’ll show you how to easily add it to your WooCommerce store.
How to add a vacation mode to your WooCommerce store
By default, a WooCommerce store setup doesn’t have the option to set a vacation mode. We need to extend its functionality with a plugin.
We’ll do this with the WooCommerce plugin, WooCommerce Delivery Slots. Delivery Slots allows you to create holidays and closed periods for your online store with ease. But that’s not all.
Introducing the plugin WooCommerce Delivery Slots
WooCommerce Delivery Slots is an easy-to-use WordPress plugin that gives you complete control over your store’s delivery schedule.
Some of its most powerful features include:
- Set holiday or vacation dates.
- Allows customers to choose delivery dates/time slots with a date picker.
- Customize delivery dates option as per shopping methods.
- Exclude certain products from the delivery date setting option.
- Customize the calendar to look as per your WordPress website theme/template.
- Set fees based on delivery dates or time slots.
- Set a range of allowed delivery dates.
- Enable/Disable specific time slots.
- Disable the delivery date option after X orders.
- Integration with 3rd party shipping plugins.

So now we’ve introduced the store vacation plugin we’ll be using. Let’s get vacation mode set up on your WooCommerce shop.
Step 1: Install WooCommerce Delivery Slots
To install the WooCommerce Delivery Slots plugin, first purchase the plugin from the product page on the Iconic website.
WooCommerce Delivery Slots
Let customers choose their preferred WooCommerce delivery date and time right from your WooCommerce checkout page. With WooCommerce Delivery Slots, you can set a flexible delivery schedule to suit you and your customers.
Post-purchase, you will get a license key in your email along with the link to download the zip file. The email will look similar to the one below:
Once you have downloaded the ZIP file, do the following:
- Log in to the WordPress admin dashboard of your WooCommerce store.
- Click on Plugins > Add New > Upload File.
- Choose the ZIP file you just downloaded and click Install Now.
- Once installed, click on Activate to enable the WooCommerce Delivery Slots plugin.
- Once you have activated the plugin, you’ll be asked to enter the license key to verify your purchase. Enter the license key from the email and click Agree & Activate License.
WooCommerce Delivery Slots plugin is now installed successfully. Next, we’ll need to optionally add your delivery/collection dates.
(optional) Step 2: Add your Delivery and Collection Days
Once you’ve installed the plugin, you can set your delivery and/or collection days through your WordPress admin dashboard.
So, if you want to disable, say, Sunday deliveries or early morning deliveries, this option will help.
To set your delivery/collection schedule, take the following steps:
- From your WordPress dashboard, go to WooCommerce > Delivery Slots and click the Date Settings tab.
- Choose the days you want to deliver in a week.
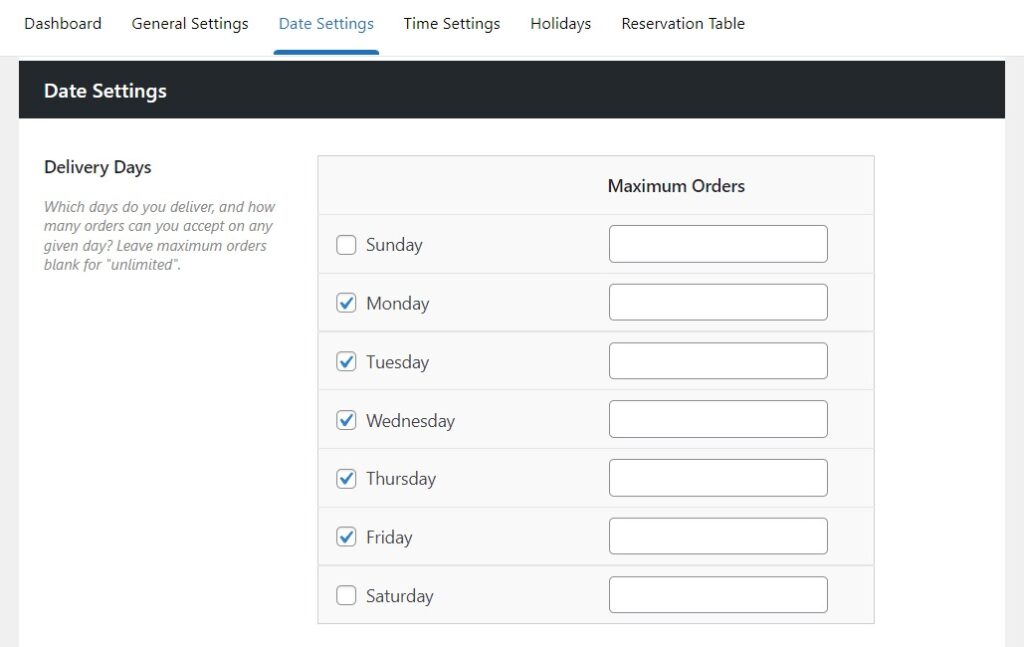
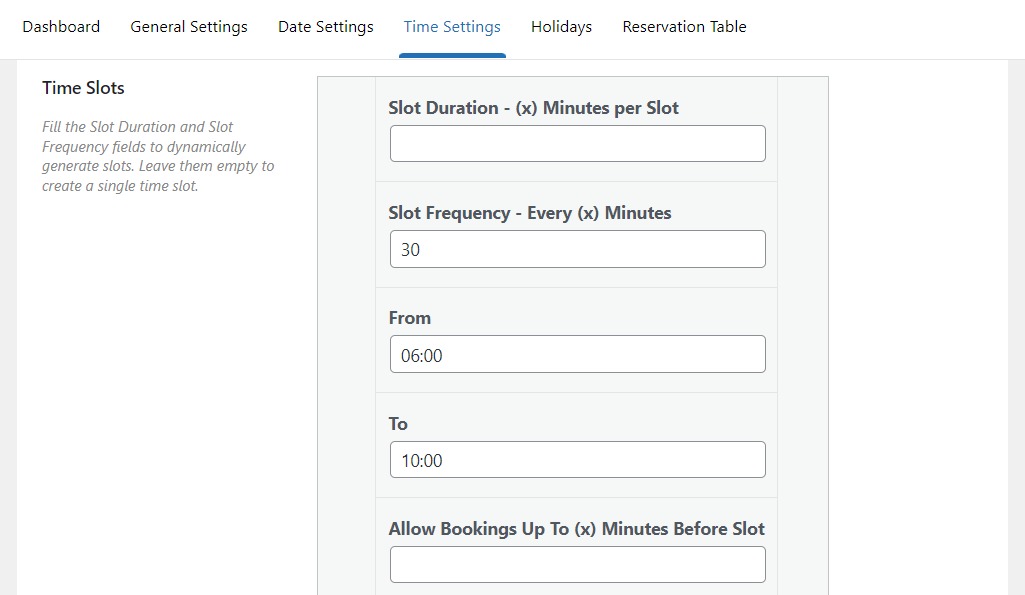
- You also have an option to set time slots if you wish to, under the WooCommerce > Delivery Slots > Time Slots tab.
If you wish to get a more detailed overview of the plugin and play with other options for controlling delivery slots, this guide will help you.
Next, we can add our WooCommerce vacation mode.
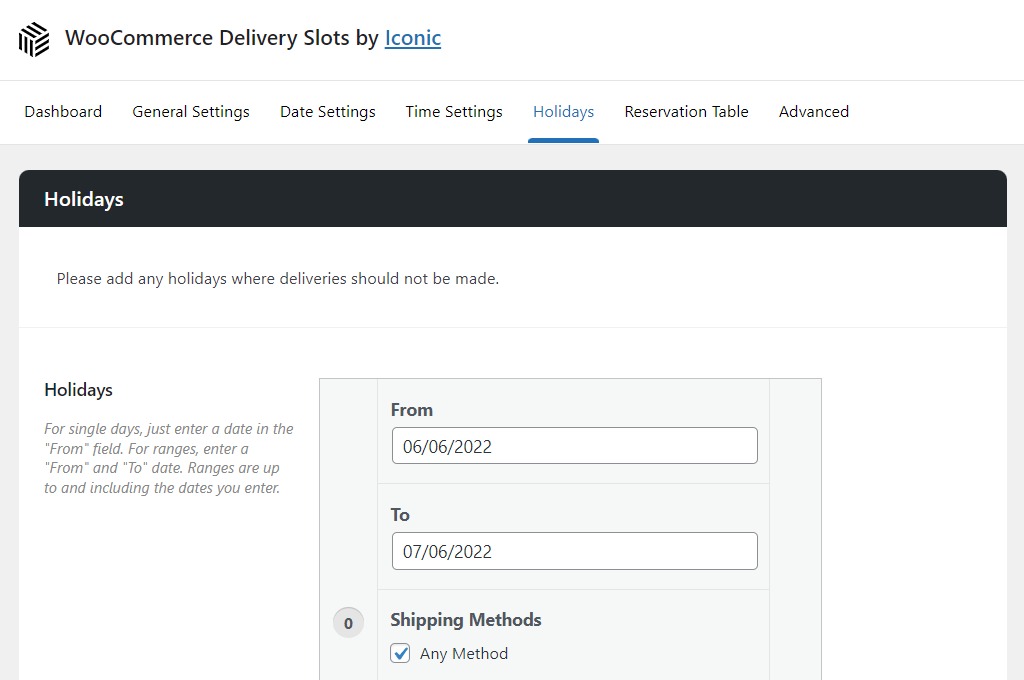
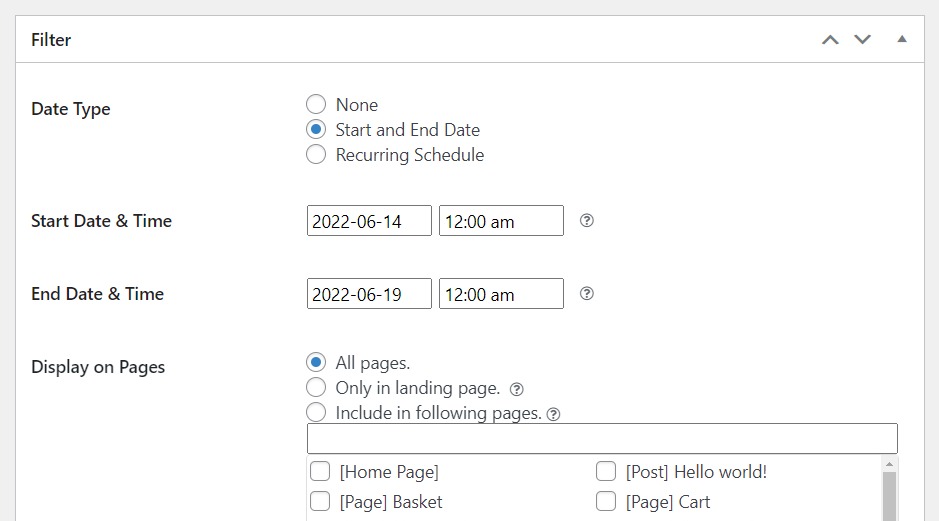
Step 3: Add your holiday/vacation dates
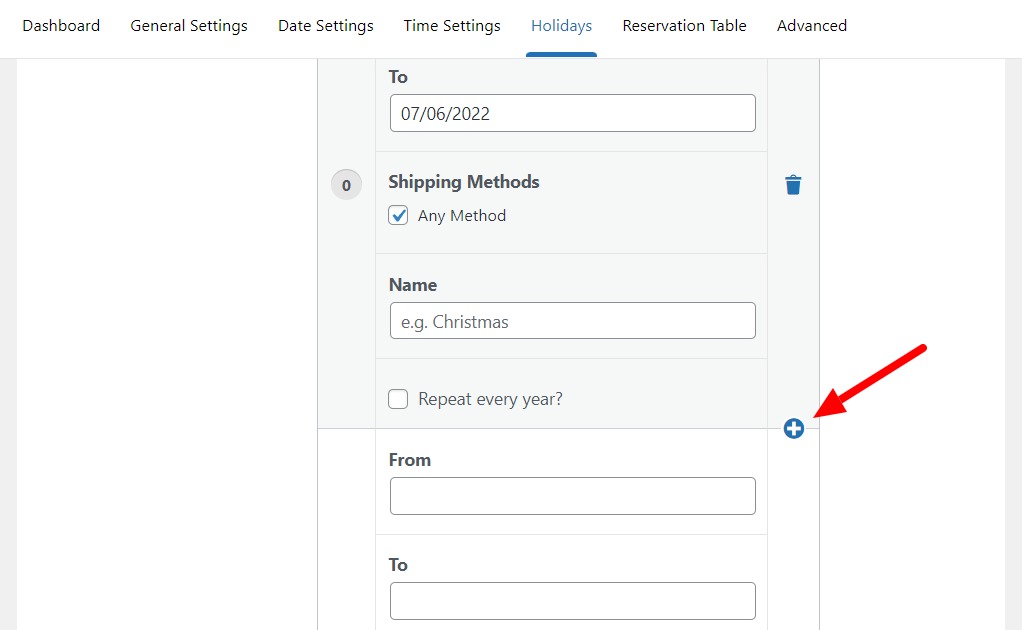
To set holiday and vacation dates, take the following steps:
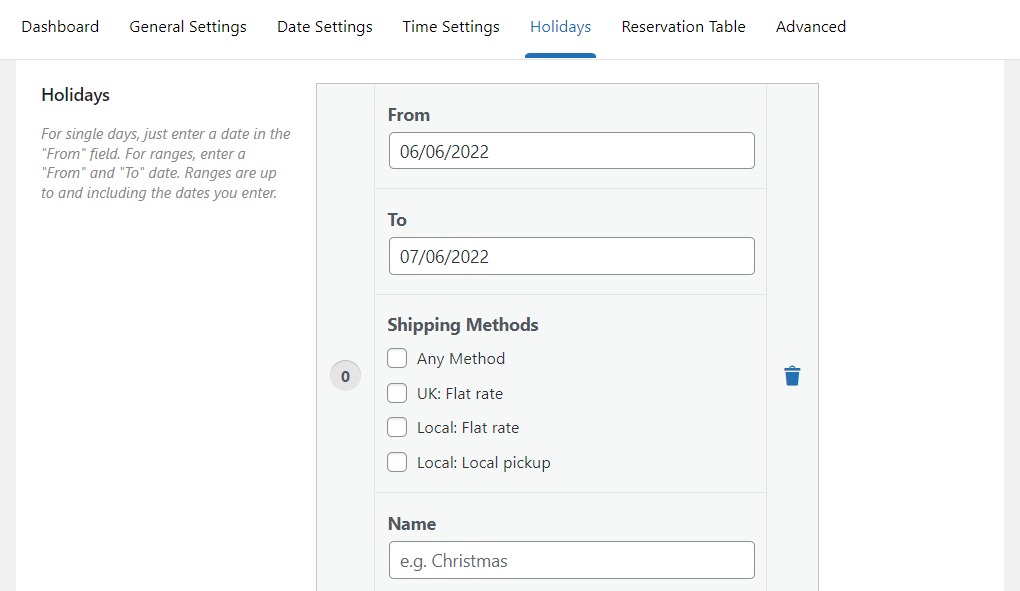
- Go to WooCommerce on your WordPress admin and click on Delivery Slots > Holidays tab.
- Choose the dates you want to not allow shipping/delivery on.
- You can also choose the shipping methods you wish to apply the holiday to. Give a name to the holiday so that you can easily recognize the time off later.
- If you wish to repeat the holiday period every year, check the Repeat every year box.
- Once happy, click Save Changes.
- To add more holidays, click on the blue + icon and add more such holiday periods.
(optional) Step 3-b: Create a new Shipping method to customize vacation mode
Sometimes you may want to set vacation mode for a particular type of shipping. E.g. you may want to set a separate holiday period for your UK customers.
The WooCommerce Delivery Slots plugin allows you to do that as well. Here’s how:
- From WordPress admin dashboard, click WooCommerce > Settings > Shipping tab. Click on Add Shipping Zone.
- Give a name to the new Zone and add the Zone region by entering zip/pin codes or country.
- Choose the appropriate shipping method for the zone you chose.
- You can add multiple shipping methods for the same zone.
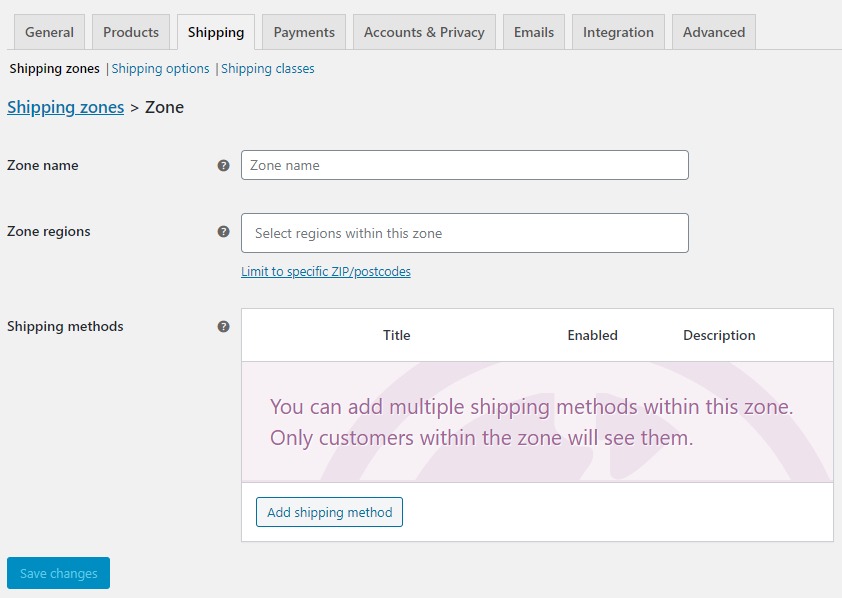
- Click the blue edit text to add charges and local taxes to your shipping methods. Once all the changes are done, click Save Changes.
Once you create a shipping method, you’ll start seeing that as an option in the Holidays tab we discussed earlier.
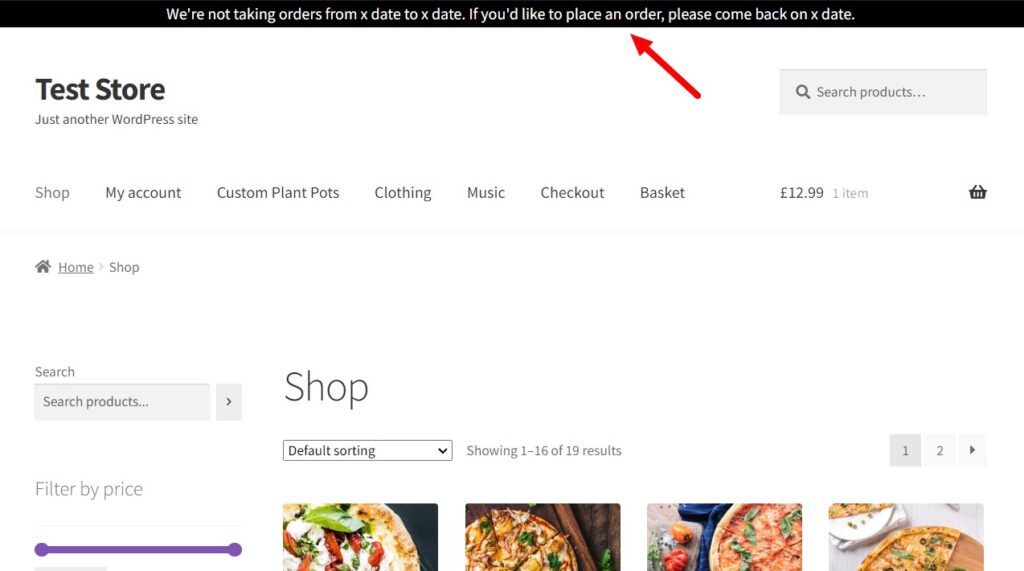
Finally, to inform customers of these changes before they get to the checkout page, we recommend setting up a store-wide notice. This will be seen before they click the add to cart button and on every page of your storefront.
Step 4: Set up your store notice
We recommend setting this up with the plugin WPFront Notification Bar. The plugin allows you to set up a store-wide notification bar on your site. It can be used to show holiday timings, maintenance alerts, and more.
To get this set up on your store, take the following steps in the plugin settings:
- Find the plugin by clicking on Plugins > Add new on your WordPress dashboard.
- Search ‘WPFront notification’ in the search plugins bar on the top-right and click Install the plugin.
- Once installed, click on Activate to enable the plugin.
- Go to Plugins and find the WPFront Notification bar plugin in the list. Click on Settings.
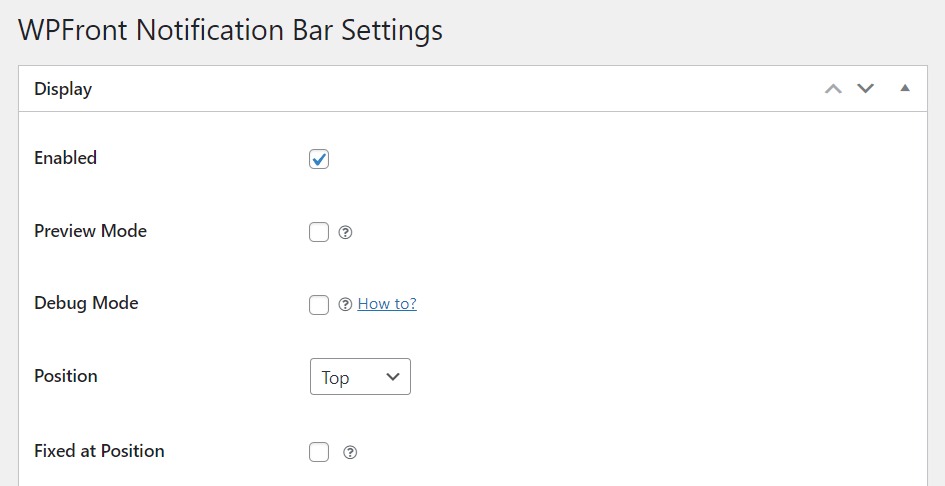
- Edit the options as per your needs and click on Save Changes.
- Don’t forget to set your start and end dates for the notification bar so it will automatically activate and deactivate itself while you’re away.
With this set up, it doesn’t matter if your customer is browsing your WooCommerce products, is on the shop page, or single product page – they’ll know when you can’t deliver but will still be able to browse your store.
By making changes in this way, you’ll not affect SEO with a vacation mode popup or blocker on your site. Customers will still be able to browse, make purchases for later dates and interact with your store while you’re gone.
Add a vacation mode to WordPress today
In this article, we’ve shown how to add a vacation mode to your WooCommerce store with WooCommerce Delivery Slots. Plus, we’ve walked you through how to enable a store-wide notification bar to let our customers know about it.
This way, we can not only have peace of mind during our vacations but also ensure that the logistics of our store have lesser shocks to deal with. We achieve all this while improving user experience and directly improving the customer lifetime value for your online shop.
This and all the other functionalities of the WooCommerce Delivery Slots plugin make it a must-have plugin for WooCommerce stores.
WooCommerce Delivery Slots
Let customers choose their preferred WooCommerce delivery date and time right from your WooCommerce checkout page. With WooCommerce Delivery Slots, you can set a flexible delivery schedule to suit you and your customers.

Gina Lucia is our in-house Content Manager at Orderable. She writes articles, user guides, technical documentation, and creates videos on everything WooCommerce and Orderable.
Gina has been working in the WordPress/WooCommerce space since 2012 when she developed WordPress websites for clients large and small.
For the past 8 years, she’s been writing about everything WordPress and WooCommerce, becoming an expert in what makes a WooCommerce store succeed.
When not writing, Gina loves to tend to her vegetable garden, read, or travel to mainland Europe.