
When selling products in your WooCommerce store, sometimes the standard WooCommerce setup doesn’t quite give you everything you need. Your products may be more complicated, or you might need to give the customer more information. In which case, you’ll need to add custom fields to your WooCommerce products to solve this problem.
So, this guide will provide you with step-by-step instructions to add custom fields to your WooCommerce product variations. As a bonus, we’ll outline what product variations and custom fields are, and why you might need to add custom fields to your products in the first place.
The plugin mentioned in this guide:
- WooCommerce Custom Fields for Variations – Provide your customers with all the right information by adding custom fields to each product variation.
WooCommerce Custom Fields for Variations
Add custom fields to your product variations and save time editing products with WooCommerce Custom Fields for Variations.
Want to jump straight to the tutorial? Click here.
What are product variations?
Before we delve into adding custom fields to each product variation, first we need to understand what a product variation actually is.
A product variation in WooCommerce is a combination of attributes belonging to a product, ranging from color, to fabric, size, style and more.
As an example, if your store sells cushion covers, they most likely vary in size and color/material. So if you have a cushion cover that’s 16×16 inches and in a patterned fabric – this is a product variation with two different attributes.
For more information on what product variations are, see our Ultimate Guide to Variable Products.
What are WooCommerce custom fields?
In WooCommerce, custom fields are additional information or data you can add to individual products and are usually displayed on the single product page. This information is usually unique to one particular product, rather than a group and can include anything from:
- A unique code or ISBN number for that individual product.
- Additional unique product information such as specifications or features.
- Checkboxes, radio buttons and additional product options.
Why you might need to display custom fields on the product page
Your online store might require custom fields for a number of unique reasons. Below, we’ll outline a few common ones.
You need to provide extra information for the customer
One of the main reasons you might need to add custom fields to WooCommerce is that the standard WooCommerce setup isn’t providing enough flexibility for the complex nature of your products.
For example, if your online store is selling security software for computers, you might have a lot of information you need to display.
You don’t want to make the product description too long because your product page will look cluttered, so you opt for custom fields instead to display each product’s system requirements, security level and extra information.
In addition to this, your security software might have different variations of the same product that require you to provide unique information. For example, you might sell a monthly license and a lifetime license. The lifetime license gives customers additional features, so to display them, you’d need to add custom fields to that specific product variation.
In the next section, we’ll demonstrate how to set this up with a WooCommerce custom fields plugin.
How to add custom fields to product variations in WooCommerce
Here we’re going to outline how to add custom fields to your product variations with a WooCommerce custom fields plugin.
Specifically, WooCommerce Custom Fields for Variations allows you to provide your customers with all the right information by adding custom fields to each product variation.
To get started, purchase WooCommerce Custom Fields for Variations from the Iconic store: iconicwp.com/woocommerce-custom-fields-variations
Or start your free trial:
WooCommerce Custom Fields for Variations
Add custom fields to your product variations and save time editing products with WooCommerce Custom Fields for Variations.
Then follow these steps:
- Go to Plugins > Add New > Upload Plugin
- Choose the zip file you downloaded, upload, and then click ‘Activate’
- Once activated, you’ll need to enter your licence key
Now that we have WooCommerce Custom Fields for Variations installed, we can move onto setting up our custom fields.
Create your custom fields
- Go to Products > Variation Field Groups.
- Click Add New.
Give your field group a title. This will be used to define the group section in the variation edit tab.
- Under Fields click Add Field.
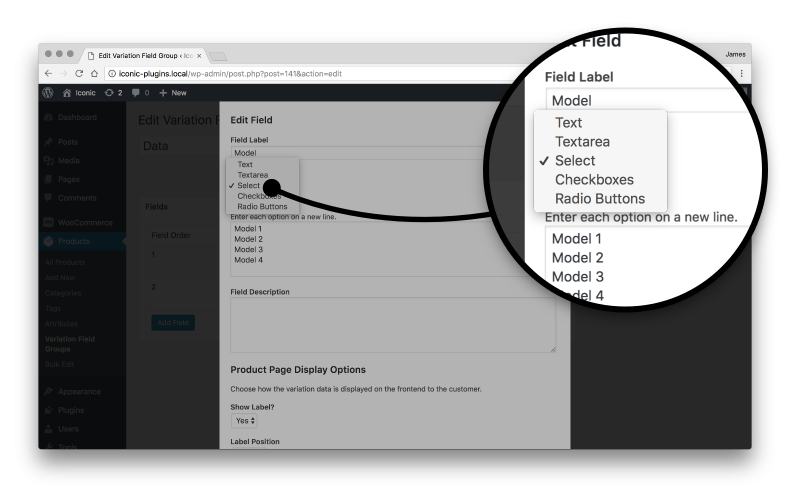
It’s here that you’ll be able to add all the information you need including the field label, description, type and what the field will look like on the product page.
For example, you could select text if you want to add system requirements for the software package.
- Once you’ve filled in everything you need to, click Add Field.
- If you’re adding more than one custom field, click Publish.
Now that you’ve added your custom fields, you’ll next want to add them to specific products.
- Go to the Variations tab of your chosen product.
- Click on a single variation.
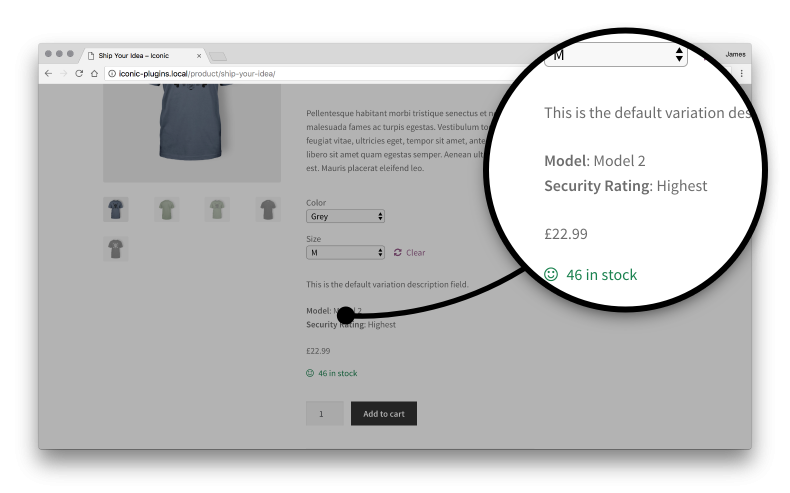
- Under the Variation Description field, you’ll see your new fields. Simply fill them in as required and click Save Changes or Update.
Start adding custom fields to WooCommerce
In this guide, you’ve learned why you might need to use custom fields for your product variations. You’ve also had step-by-step instructions for how to add these custom fields in a matter of minutes using a custom fields plugin.
When used well, adding custom fields to your individual product variations can not only make your customer’s experience better but yours too. WooCommerce Custom Fields for Variations makes that process faster.
Start your free trial:
WooCommerce Custom Fields for Variations
Add custom fields to your product variations and save time editing products with WooCommerce Custom Fields for Variations.

Gina Lucia is our in-house Content Manager at Orderable. She writes articles, user guides, technical documentation, and creates videos on everything WooCommerce and Orderable.
Gina has been working in the WordPress/WooCommerce space since 2012 when she developed WordPress websites for clients large and small.
For the past 8 years, she’s been writing about everything WordPress and WooCommerce, becoming an expert in what makes a WooCommerce store succeed.
When not writing, Gina loves to tend to her vegetable garden, read, or travel to mainland Europe.