
We’re thrilled to announce a game-changing update to Flux Checkout that’s set to redefine your WooCommerce checkout process.
Introducing Flux Checkout Elements, a powerful new feature designed to make WooCommerce checkout customization quicker, easier, and more flexible.
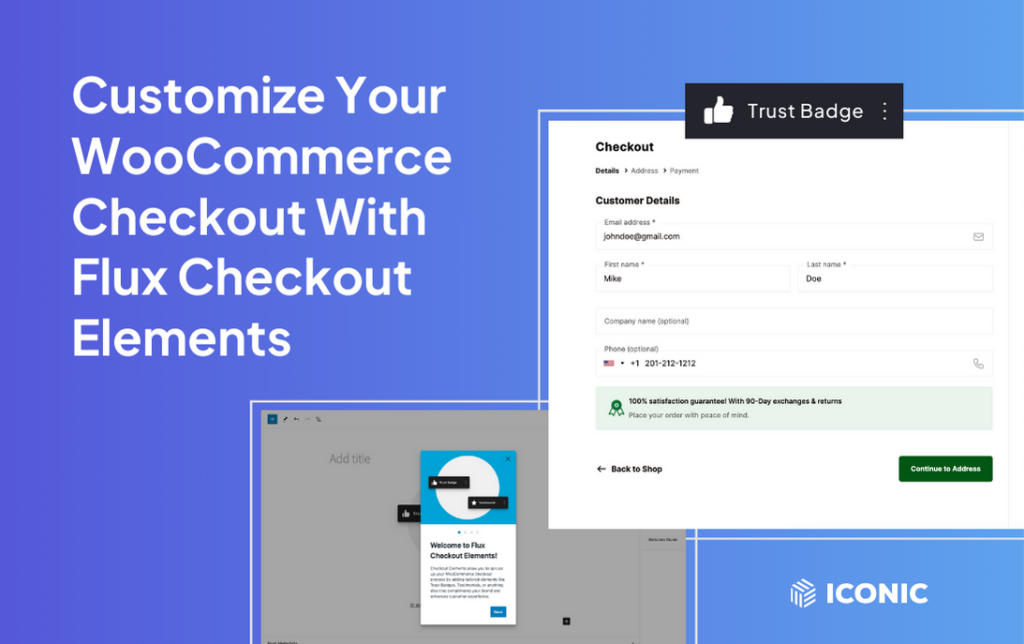
No more shortcodes, workarounds, or multiple plugins. Now, you can add custom messages, blocks, and interactive elements to your WooCommerce checkout with ease.
Introducing Flux Checkout Elements
Imagine a checkout process so flexible you can tailor it precisely to your customers’ needs and preferences. With Flux Checkout Elements, it’s not just possible. It’s simple.
This major update introduces a way to create custom checkout elements with the WordPress block editor. Allowing you to add, position, and customize blocks and patterns without writing a single line of code.
Now, anyone can customize the WooCommerce checkout experience in the easiest way possible with the WordPress block editor.
Flux Checkout for WooCommerce
Flux Checkout transforms the default WooCommerce checkout into one that’s lightning-fast, distraction-free, and reduces checkout abandonment.
We’re so excited for you to try out this update, and we can’t wait to hear what you think!
But don’t take our word for it. See for yourself.
Take a closer look at Flux Checkout Elements
Create custom checkout banners, messages, and interactive blocks
Let’s say you want to add credit card logos near the cart total, a FAQ section at the details step, or a reminder of your returns policy just before payment. Adding all these and more is easy with Elements.
When you create your checkout Element, you’ll do so in the WordPress block editor. Allowing you to add, create, and customize with endless possibilities.
Includes 5+ pre-built Elements
To get you started, we’ve created 5+ pre-built Elements that you can use and customize.
These include:
- Free shipping reminder message.
- Exchanges & returns reminder message.
- Flash sale banner with discount code.
- Testimonial block with rating, name, and quote.
- Card images/logos block.
- FAQ block that you can customize.
To add these, click the black plus icon in the block editor to add a new block, select Browse all > Patterns > Flux Checkout.
For more detailed instructions, see our Flux Checkout Elements guide.
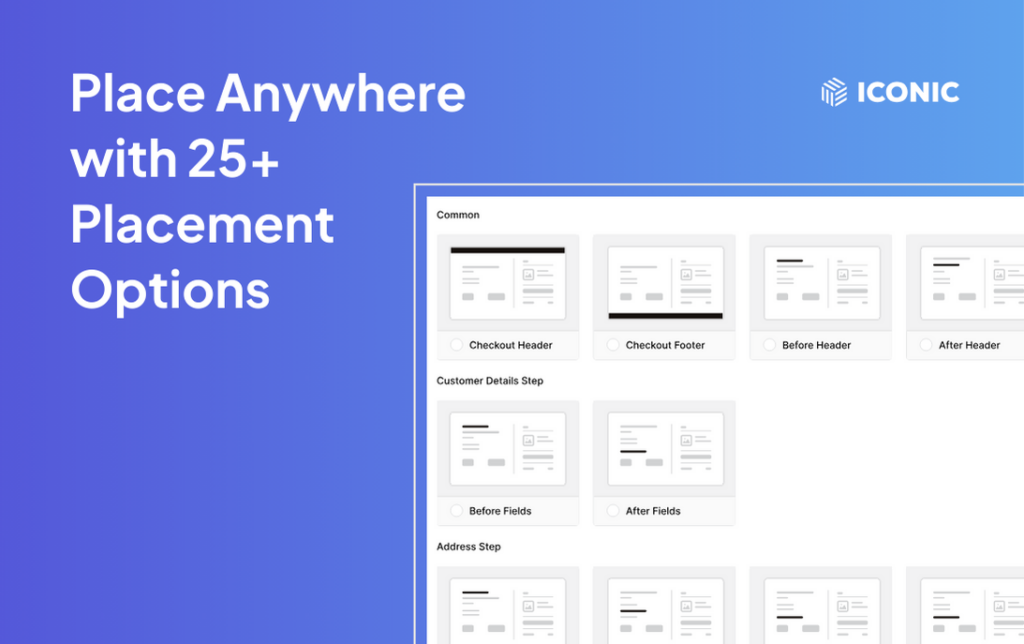
Display anywhere on the checkout page
Once you’ve created your Element, you can position it anywhere in your checkout flow using the Position setting.
With 25+ placement locations, you’ll be able to display your Element anywhere from the checkout header to before the footer and anywhere in between.
Plus, we’ve made things even easier with icons that indicate exactly where this placement is.
Make Elements conditional
Let’s say you want to display a different message depending on the customer’s user role. Or you only want an FAQ to show if a particular product is in the cart. With Flux Checkout Elements, you can.
In fact, with our Elements Conditional Display Rules, you can set your Elements to show or hide based on any kind of condition you’d like using the following:
- User roles.
- Product in the cart.
- Product categories in the cart.
- Cart total (equal to, more than, less than, etc).
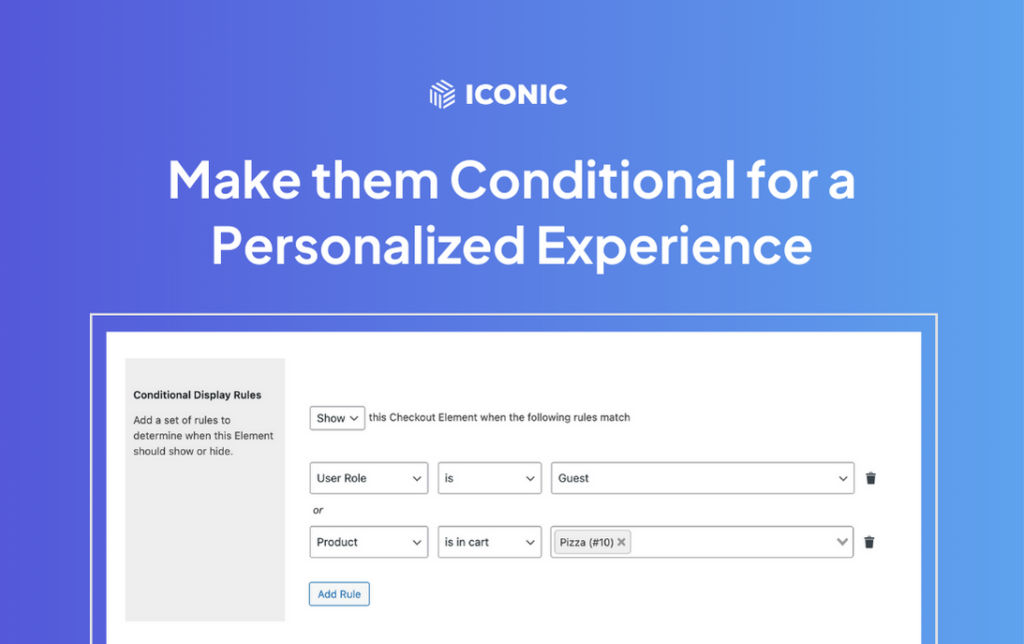
This alone means you can create highly targeted messaging that will guide your customers to make a purchase. The best part? It only takes a few minutes to set up.
Use your page builder header and footer
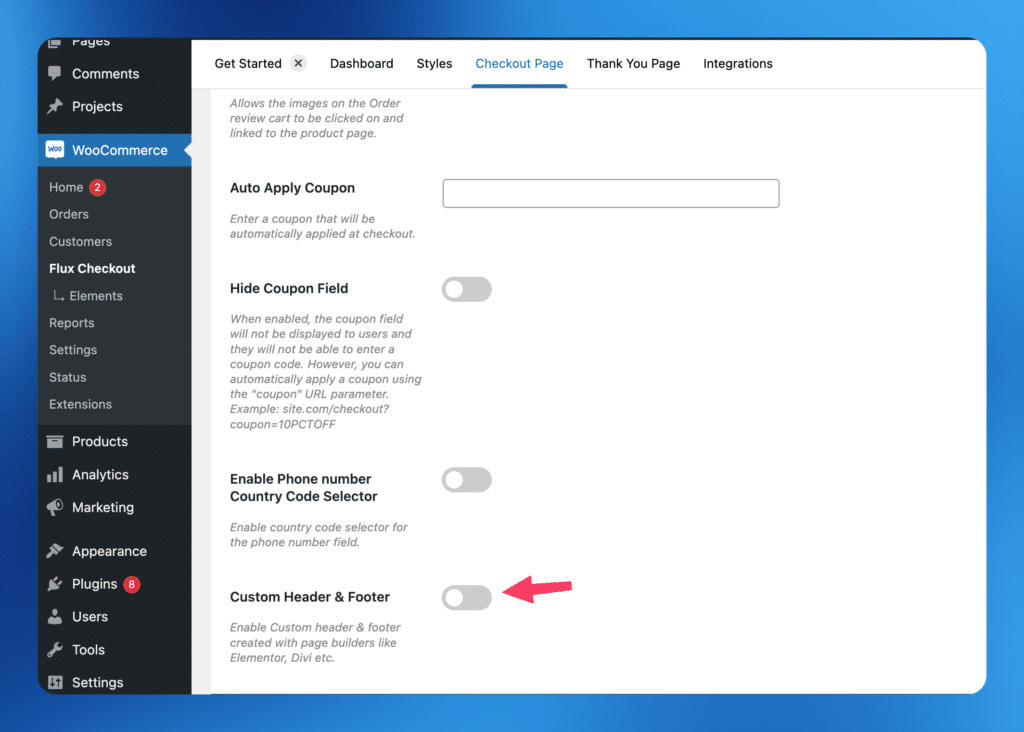
As a bonus, this update allows you to use your Divi or Elementor header and/or footer with Flux Checkout for WooCommerce.
This is an optional setting you can turn on or off. To find it, go to WooCommerce > Flux Checkout and click on the Checkout Page tab. If you have Divi or Elementor activated on your store, you’ll see a new setting on this page called Custom Header & Footer.
Want these steps in more detail? Read our Elementor and Divi user guide.
How to create and display Elements
If you’re already using Flux Checkout, you can update from the WordPress Dashboard as usual and then take the following steps:
- From your WordPress dashboard, go to WooCommerce > Flux Checkout > Elements.
- Next, click the Add new Element button at the top of the page.
- You’ll then see our Welcome Guide, which will walk you through how to add, place, and customize your new Elements.
Want to see these steps in detail? We’ve created a step-by-step doc to help: How to Use Checkout Elements
If you don’t already have Flux Checkout, you can get our new Elements feature by downloading Flux Checkout for yourself:
Flux Checkout for WooCommerce
Flux Checkout transforms the default WooCommerce checkout into one that’s lightning-fast, distraction-free, and reduces checkout abandonment.
So, what do you think of this exciting new update? Let us know in the comments. If you have questions about our Flux Checkout Elements, we’d love to hear from you.

Gina Lucia is our in-house Content Manager at Orderable. She writes articles, user guides, technical documentation, and creates videos on everything WooCommerce and Orderable.
Gina has been working in the WordPress/WooCommerce space since 2012 when she developed WordPress websites for clients large and small.
For the past 8 years, she’s been writing about everything WordPress and WooCommerce, becoming an expert in what makes a WooCommerce store succeed.
When not writing, Gina loves to tend to her vegetable garden, read, or travel to mainland Europe.