
If you’re looking for some WooCommerce checkout customization techniques to help boost sales in your WooCommerce store, this guide is for you.
In this guide, we’ll share 9 of the best WooCommerce checkout customization techniques that range from improving checkout design, to boosting sales with cross-selling.
So, let’s get started with the techniques and learn how to customize the WooCommerce checkout page.

9 easy WooCommerce checkout customization techniques
📈 Did you know that in 2018, the percentage of people abandoning their online shopping carts was 75.60%?
This means that over 75% of the people who put one of your products in their cart will potentially not go through with the sale.
It would be easy to blame this high percentage on the indecision of customers. Still, many online stores forget about making sure their customer’s buying experience is top-notch right up until they click ‘purchase.’
With just a little buyer’s psychology, you could amend your checkout to reduce that number significantly.
Technique #1: Keep your checkout simple
When was the last time you wanted to buy a product from an online store only to abandon the purchase because the checkout process was taking too long?
It happens more often than you think. In fact, 9% of people abandon their carts because the checkout process is too long, and 22% said they left simply because they had to create an account.
👋 Want to see what other important metrics you should be tracking in your ecommerce store? Read our ecommerce metrics guide.
When customizing your WooCommerce checkout, you’ll want to keep everything as simple as possible.
Think about the following:
- Do you need all of the default form fields to send your product to the customer?
- Can you change your checkout from a one-page checkout, to a multi-step checkout?
- Do you need customers to create an account with you, or can you add a guest checkout function?
- Can you minimize friction by providing a tick box that lets buyers state that the billing address and the shipping address are the same?
By minimizing the steps your customer has to take to make a purchase, you’re significantly reducing the likelihood that they’ll abandon their cart.
In addition to the fields in your checkout, you’ll also want to ensure that the page your checkout sits on is simple and clutter-free.
The last thing you want is to have your potential customers distracted by your menu, sidebar, or flashing ad right when making a purchase.
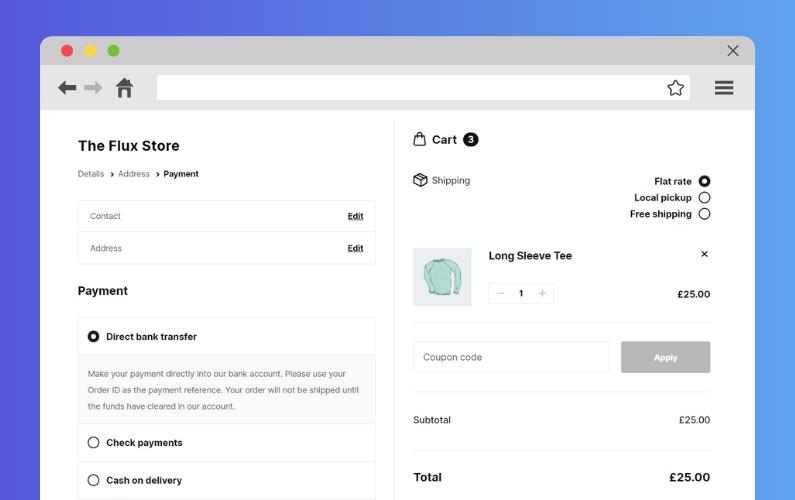
Simplify your checkout with Flux Checkout for WooCommerce
One of the easiest ways to simplify your WooCommerce checkout page is to switch it from a one-page checkout, to a multi-step checkout with the WooCommerce plugin, Flux Checkout for WooCommerce.
Flux transforms the default WooCommerce checkout page into a sleek, super-fast multi-step one that makes checking out a much more pleasant experience.

Gone are your WordPress site’s header and footer, instead, customers are presented with a straightforward checkout that walks them through the steps they need to take without distraction.
Your WooCommerce checkout fields are also reduced, with only the necessary ones kept, and others like the coupon code area, business addresses, and more that can be turned off and on.
All in all, by upgrading your checkout with Flux Checkout for WooCommerce, you’ll have a much more user-friendly checkout that works hard to reduce overwhelm and checkout abandonment.
Plus, Flux Checkout for WooCommerce works well with many WordPress themes and page builders like Elementor and Divi. So you can rest easy knowing you’ll have the best checkout plugin that works well with your existing ecommerce store.
Find out how to simplify your checkout with our guide: How to Create a Multistep Checkout in WooCommerce
Flux Checkout for WooCommerce
Prevent abandoned carts with a slick multi-step checkout experience, designed for your customer’s device.
Technique #2: Encourage trust with testimonials
Trust is everything once you reach the checkout, so it’s the focus for our next two techniques.
No matter what you’re selling, implementing testimonials into your WooCommerce checkout customization will remind the customer that you can be trusted. Adding this social proof right at the point of sale is an excellent prompt that will serve you well.
In particular, this technique works well for information or digital products, but can also work well for physical goods.
How to add testimonials to the WooCommerce checkout
To add testimonials to your WooCommerce checkout, you’ll need the help of a plugin.
Flux Checkout for WooCommerce not only transforms the default WooCommerce checkout into a streamlined and modern one, it also lets you customize it with added elements.

In this case, you can use Flux Checkout to add reviews/testimonials to the checkout page and place them wherever you want.

The best part? You can customize when these appear. Only want reviews to appear for certain products or product categories? With Flux you can set all of this, so your customers get a custom checkout specifically made for them.
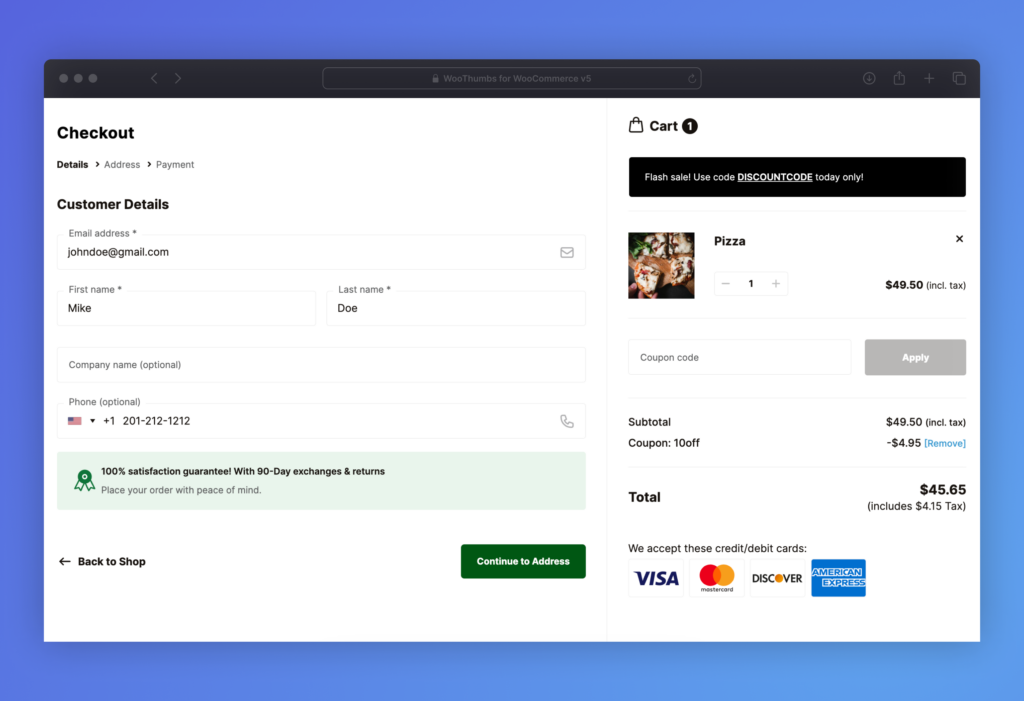
Technique #3: Encourage trust with a trust seal
People are extra weary online, especially when handing over their card details. So, at the checkout, it becomes essential that you show you can be trusted.
Many default checkouts come with credit card logos and multiple payment options. These both show that you’re a legit store, but we want to take it one step further than that.
Install a trust seal at the checkout
“A trust badge is a symbol placed on your website that ensures your visitors that the page is legitimate and that all their data is collected through secure third-party service providers.” – Omniconvert
Here are some trust badges in action at our very own checkout:

You can see that these logos draw the eye and give the customer reassurance that our site can be trusted.
Numerous studies have found a positive correlation between trust badges and increased conversions and sales.
📈 In a study by Actual Insights, they determined that 75.66% of people chose not to purchase something because they didn’t recognize the trust logo. If that’s anything to go by, then adding trust seals to your checkout process is a must to ensure your customers feel safe when buying from you.
How to add trust seals to your checkout
Adding trust seals to your WooCommerce checkout is easy with the WordPress plugin Flux Checkout for WooCommerce.
You’ll be able to add any number of images, buttons, and icons to your checkout to establish trust with your customers.
By using the WordPress block editor, you can create these in just a couple of minutes and add them to your checkout in no time at all.
If you want to use trust seals throughout your checkout process, it’s recommended to place them near form fields where the visitor is required to enter personal information.
Another example of this technique is to add ‘also used by’, or ‘also purchased by’ logos of well-known companies or people in your niche right at the checkout. This customization reinforces yet more social proof by showcasing your existing customer base – encouraging a trustworthy purchase.
Flux Checkout for WooCommerce
Prevent abandoned carts with a slick multi-step checkout experience, designed for your customer’s device.
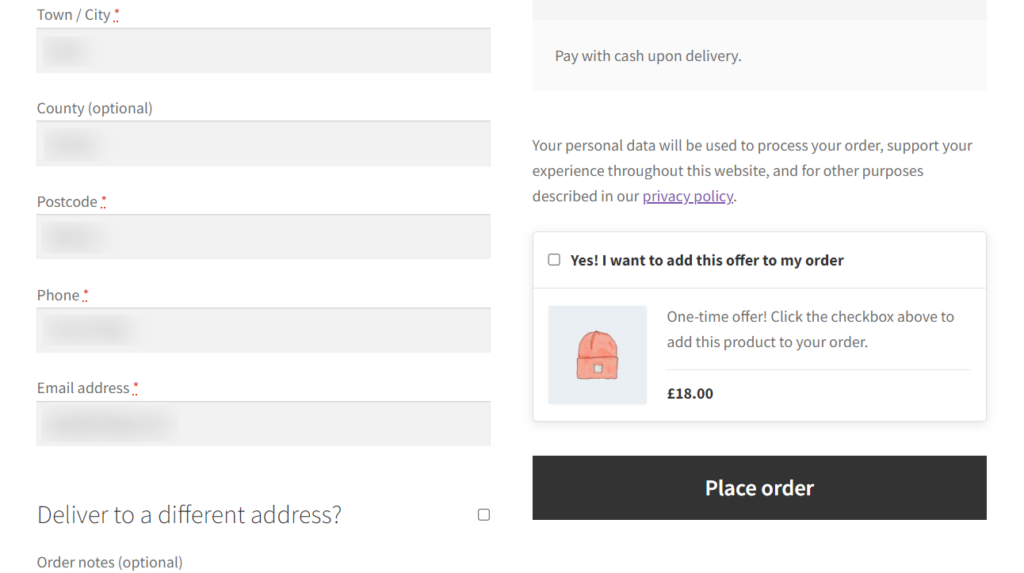
Technique #4: Encourage extra purchases right at the checkout
When your customer is at the checkout, one of the most underutilized WooCommerce checkout customization techniques is to add in an irresistible related product offer that they simply can’t refuse.
This one-time offer is simple and easy for the customer to add straight into their cart, giving them a friction-free experience and boosting your average order value in one go.
Adding an extra offer that only appears at the checkout means you’re not bombarding your customer with more products. Rather, you’re presenting them with an impossible offer to say no to.
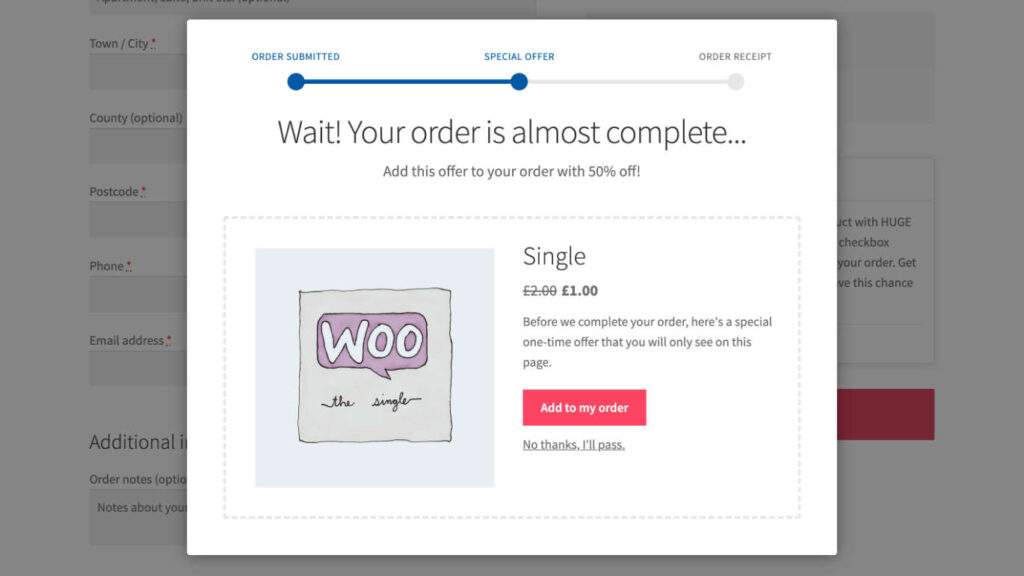
As a bonus, you can add another offer directly after they’ve clicked ‘place order,’ which they can add to their purchase rather than their cart. This way, the customer can make a quick decision, and the conversions tracked are sales.
How to add cross-sells to the checkout page
You can implement these last two WooCommerce checkout customization techniques with the plugin Iconic Sales Booster for WooCommerce. It helps you implement the best cross-selling techniques quickly and easily into your store to increase your store’s revenue.
Iconic Sales Booster for WooCommerce
Use proven cross-selling techniques to increase the average order value of your store.
By focusing on your WooCommerce checkout customization, you can be sure that each time your customer goes to make a purchase, you’ve done everything in your power to help make the sale.
Because without thinking about the last step to making a purchase, you’re leaving money on the table – and who would want that?
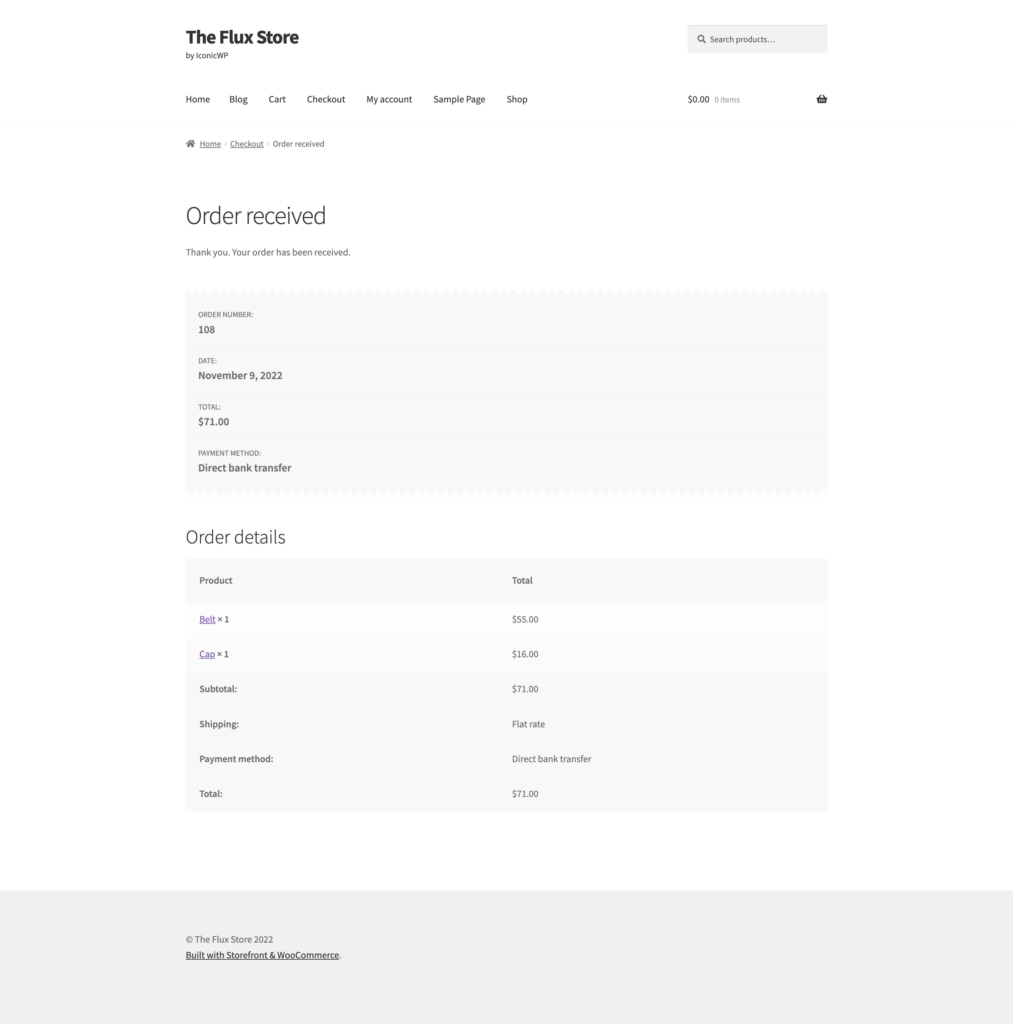
Technique #5: Improve the order confirmation/thank you page
The order confirmation/thank you page is the last page that your customers see after they complete a purchase. It’s an important opportunity to thank them for their business, provide them with information about their order, and encourage them to return to your store in the future.
What can you do to improve your order confirmation/thank you page?
- Personalize the page. Address your customers by name and thank them for their purchase. You can also include information about their order, such as the products they purchased, the shipping method they selected, and the estimated delivery date.
- Make it easy for customers to track their order. Include a link to your order tracking page so that customers can easily check the status of their shipment.
- Offer upsells and cross-sells. Suggest other products that your customers might be interested in, based on the products they purchased. You can also offer a discount on their next purchase.
- Make it easy for customers to contact you. Include your contact information on the order confirmation/thank you page in case customers have any questions or problems with their order.
How Flux Checkout for WooCommerce can help
Flux checkout for WooCommerce, as well as completely overhauling the default WooCommerce checkout, also allows you to upgrade the thank you page too.
It automatically upgrades the design to fit in with the rest of the checkout but it’s also customizable by you.
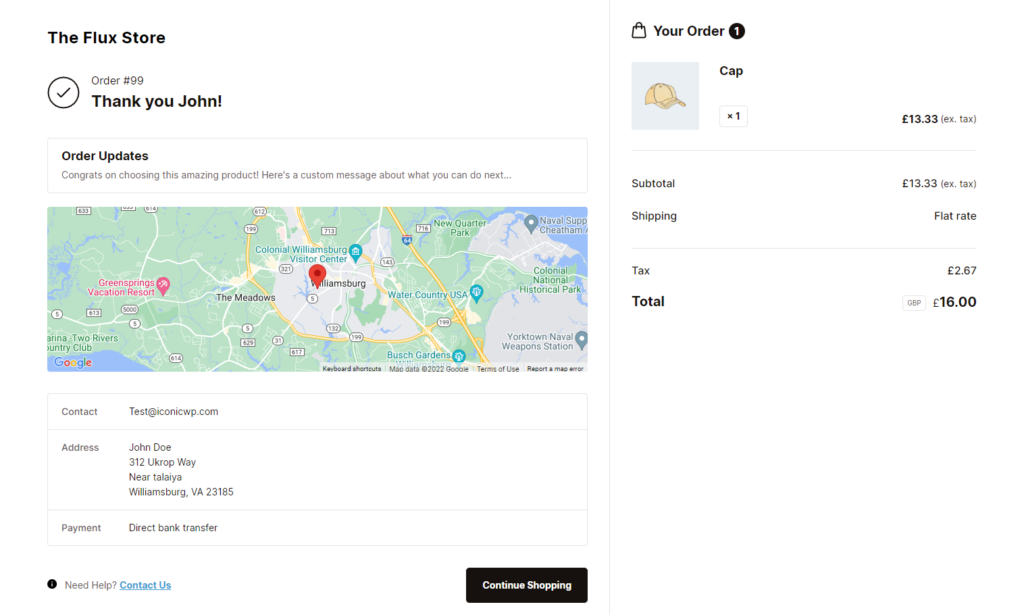
You can add new placeholder images, shortcodes for feedback forms, resources and tutorial guides for customers, a custom message, custom order notes, and more in the provided textarea.
Plus, Flux Checkout for WooCommerce offers the ability for you to include a map on the order confirmation page to allow customers to see where their shipping address is visually.
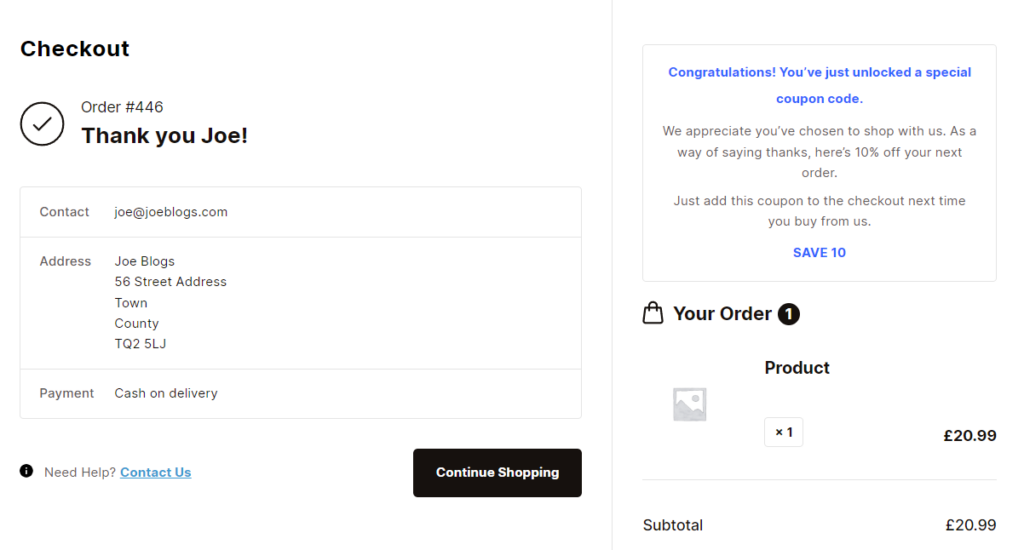
All of this customization allows you, as a store owner, to ensure your checkout process is user-friendly from beginning to end.
Flux Checkout for WooCommerce
Prevent abandoned carts with a slick multi-step checkout experience, designed for your customer’s device.
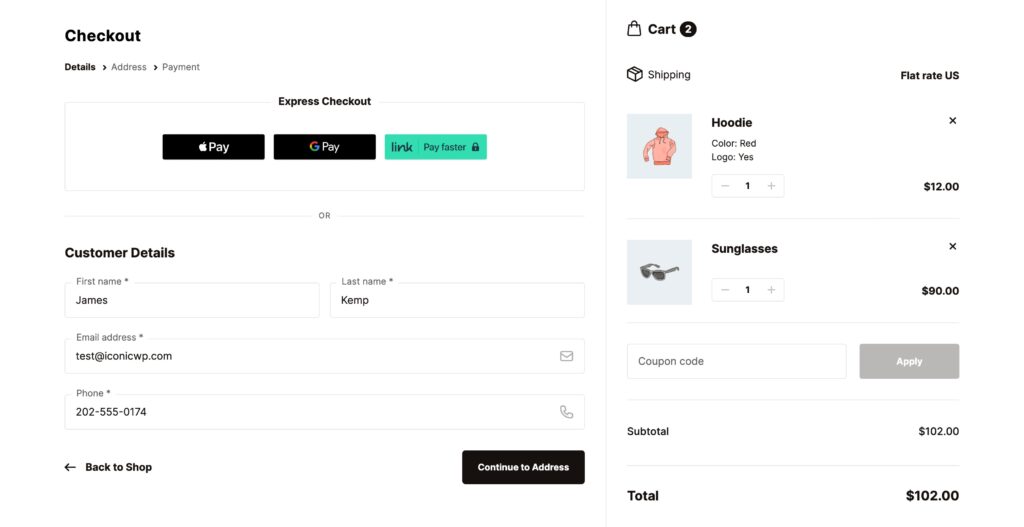
Technique #6: Include additional payment methods
Another crucial facet of optimizing your WooCommerce checkout page involves the variety of payment options you offer.
By offering a variety of payment methods, you can make it easier for customers to complete their purchases and reduce checkout abandonment. Not all customers have the same preferred payment method, so by offering more options, you’re more likely to appeal to a wider range of customers.

What can you do to include additional payment methods?
There are a number of different ways to include additional payment methods in your WooCommerce store. You can use a payment gateway that supports a variety of payment methods, or you can use separate plugins for each payment method.
Here are some popular payment gateways that support a variety of payment methods:
- PayPal.
- Stripe.
- Amazon Pay.
- Square.
- Apple Pay.
- Google Pay.

WooCommerce offers some of these by default, but if you want to include additional ones, you can find payment-specific plugins/add-ons through the WooCommerce plugin marketplace.
Technique #7: Customize WooCommerce checkout page design
The default WooCommerce checkout design is functional, but it can be improved in a number of ways. For example, it can be cluttered and difficult to navigate. It may also not match the overall design of your website.
By customizing the WooCommerce checkout design, you can create a more user-friendly and visually appealing checkout experience for your customers. This can lead to increased conversions and sales.
What aspects of the WooCommerce checkout can be improved?
Here are some of the different aspects of the WooCommerce checkout that could be improved:
- Overall layout and design. The default WooCommerce checkout layout is a one-page checkout. However, you may want to consider using a multi-step checkout instead. A multi-step checkout can make the checkout process less overwhelming for customers.
- Form fields. The default WooCommerce checkout includes a number of form fields. However, you may not need all of these fields. You can remove unnecessary fields to streamline the checkout process.
- Colors and fonts. The default WooCommerce checkout uses the same colors and fonts as the rest of your website. However, you may want to consider using different colors and fonts for the checkout page. This can make the checkout page stand out and help to focus the customer’s attention.
- Call to action. The default WooCommerce checkout includes a “Place Order” button. However, you may want to consider using a different call to action, such as “Complete My Purchase” or “Checkout Now.” You may also want to change the color and size of the call to action button to make it more prominent.
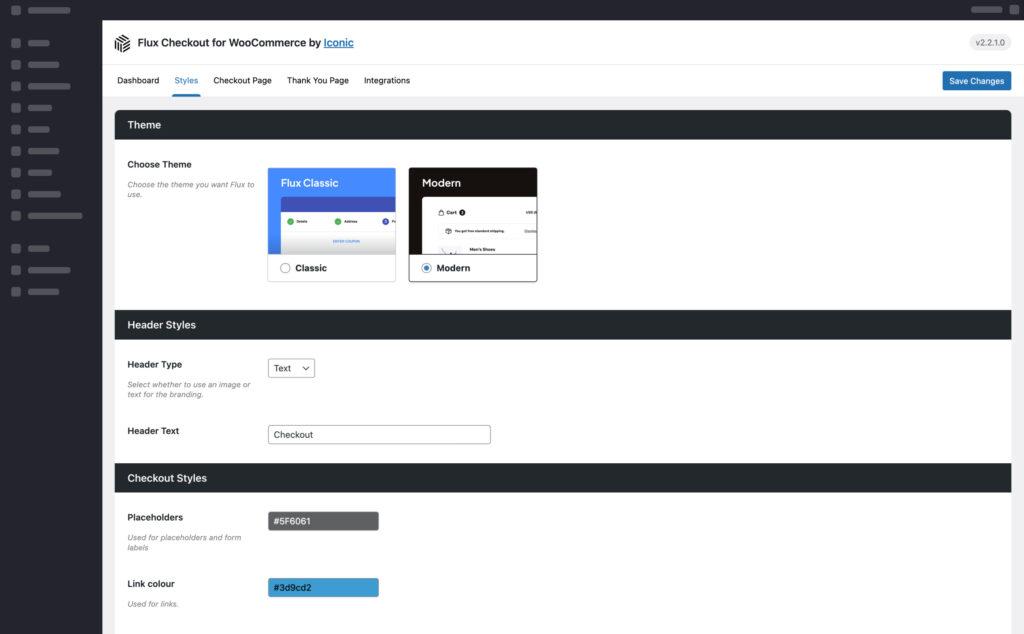
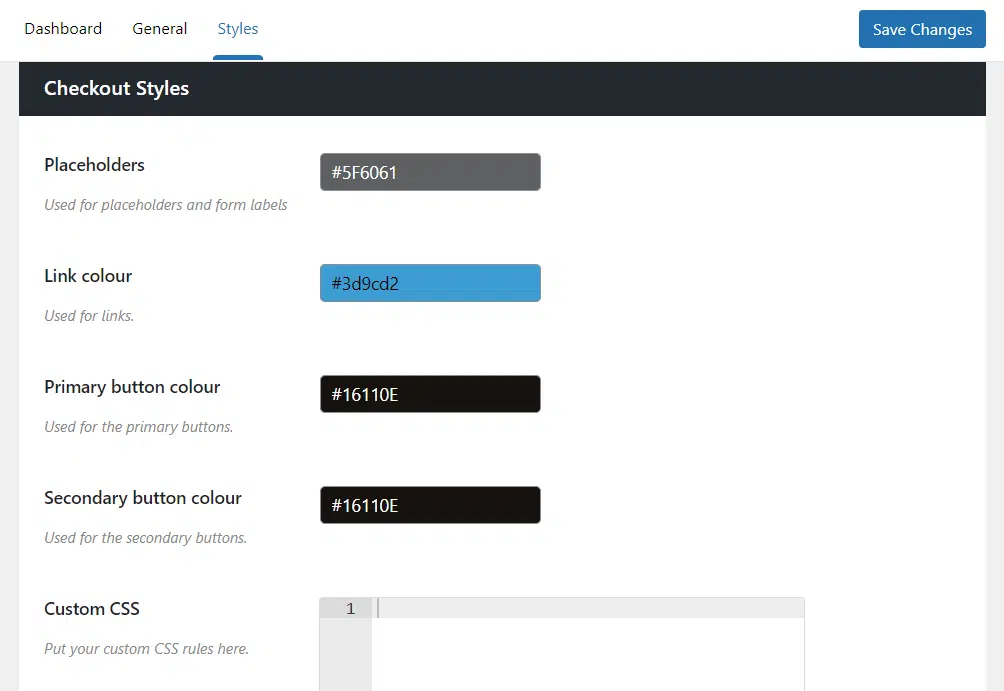
How to customize the WooCommerce checkout design with Flux Checkout
Flux Checkout for WooCommerce makes it easy to customize the WooCommerce checkout design. With Flux Checkout, you can:
- Change the overall layout and design of the checkout page. You can choose from a variety of pre-made checkout layouts to upgrade your checkout page’s design quickly. You can also tailor this to your store with a variety of customization options.
- Change the colors of the checkout page. Your checkout page should suit your store, so after selecting your checkout page’s template, you can customize everything from your checkout form’s button colors, to placeholder text colors, background colors, fonts, and more.
- Include custom CSS. As a bonus, Flux Checkout has a section on the settings page that allows you to include advanced customization through custom code. All so you can tailor everything from checkboxes, to radio buttons, dropdowns, custom fields, validation, and more. Without the need to create a child theme or completely custom checkout.
You can also use Flux Checkout to add additional features to the checkout page, such as a progress bar, a shipping calculator, and a coupon redemption field.
By customizing the WooCommerce checkout design with Flux Checkout, you can create a more user-friendly and visually appealing checkout experience for your customers. This can lead to increased conversions and sales.
Flux Checkout for WooCommerce
Prevent abandoned carts with a slick multi-step checkout experience, designed for your customer’s device.
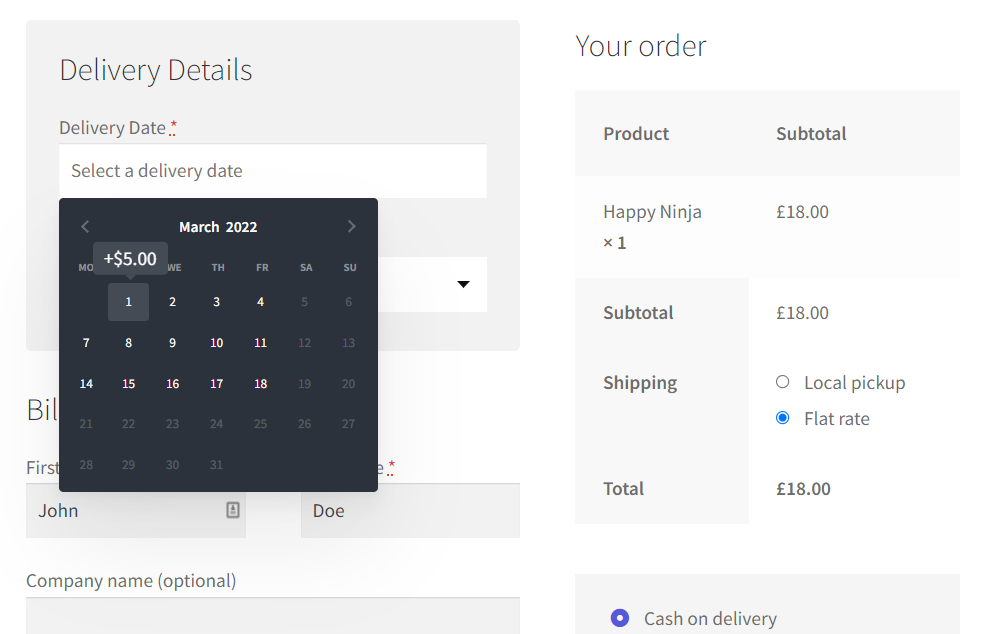
Technique #8: Add a date picker to the checkout page
Providing customers with the option to select their own delivery date can significantly improve the shopping experience on your WooCommerce site. It adds a layer of personalization and convenience that many customers appreciate.
Allowing customers to select their own delivery date at checkout can have a number of benefits, including:
- Improved customer satisfaction. Customers appreciate it when they have control over their delivery date. This is especially true for customers who have busy schedules or who need to receive their order by a specific date.
- Reduced delivery costs. If you offer multiple delivery options, customers are more likely to choose a cheaper delivery option if they can select their own delivery date.
- Increased sales. Allowing customers to select their own delivery date can lead to increased sales, as customers are more likely to complete their purchase if they can choose a delivery date that is convenient for them.
How to add a date picker to the WooCommerce checkout page with WooCommerce Delivery Slots
WooCommerce Delivery Slots is a plugin that allows you to add a date picker to the WooCommerce checkout page.
With WooCommerce Delivery Slots, you can:
- Define multiple delivery slots. You can define multiple delivery slots for each day of the week. For example, you could offer delivery slots from 9am to 12pm, 12pm to 3pm, and 3pm to 6pm.
- Set different delivery fees for different delivery slots. You can set different delivery fees for different delivery slots. For example, you could charge a higher delivery fee for deliveries made during peak hours.
- Restrict delivery slots to certain days of the week. You can restrict delivery slots to certain days of the week. For example, you could only offer deliveries on weekdays.
- Allow customers to select a preferred delivery date. Customers can select their preferred delivery date at checkout. WooCommerce Delivery Slots will automatically check if the selected delivery date is available. If unavailable, WooCommerce Delivery Slots will prompt the customer to select a different delivery date.
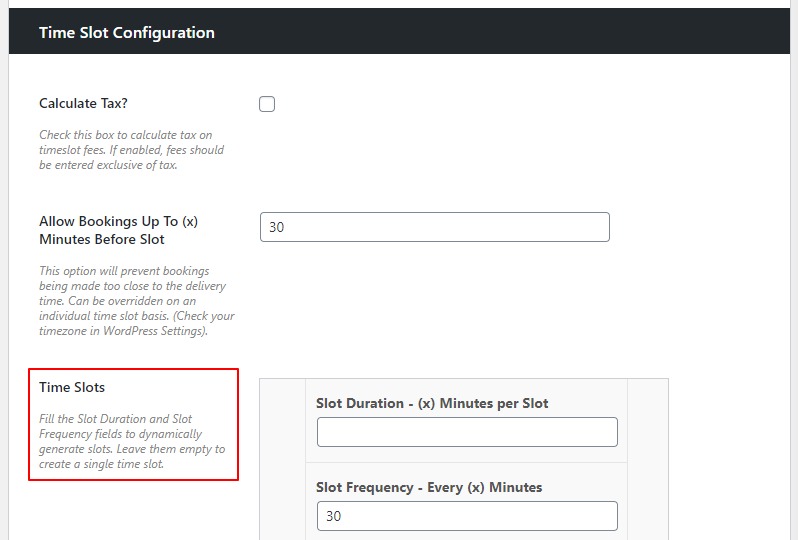
To add a date picker to the WooCommerce checkout page with WooCommerce Delivery Slots, install and activate the plugin. Once the plugin is activated, you can customize the plugin settings and add your delivery/pickup slots (don’t forget to save changes).
Once the plugin is set up, a date picker will be added to the WooCommerce checkout page. Customers can use the date picker to select their preferred delivery date.
By adding a date picker to the WooCommerce checkout page with WooCommerce Delivery Slots, you can give your customers more control over their delivery date and improve the overall customer experience.
WooCommerce Delivery Slots
Choose a delivery date and time for each order. Add a limit to the number of allowed reservations, restrict time slots to specific delivery methods, and so much more.
Technique #9: Add custom checkout fields with a checkout field editor
Perhaps one of the more technical things you can do for WooCommerce checkout customization, is to add new fields, or edit existing checkout fields.
By doing this, you’ll be able to customize how your checkout works and streamline it for your customers.
This includes adjusting things like:
- Changing field types.
- Customizing billing fields, shipping fields, and more.
- Adding new required fields.
- and more.
To do this, you’ll need the help of a plugin that allows you to edit the checkout in this way. In this case, we recommend the plugin Checkout Field Editor (Checkout Manager) for WooCommerce.
This plugin allows you to add new custom checkout fields and edit existing ones to suit your store. The best part, the plugin is free but you can upgrade to Pro to gain access to additional features for your WordPress website.
Use WooCommerce checkout customization to your advantage
There are so many ways you can customize and improve your checkout in WooCommerce that can have a huge impact on sales. We hope that the techniques in this guide give you the nudge you need to start making those changes and seeing results.
Of course, many of the techniques here include some powerful tools to help get the job done quickly:
- Flux Checkout for WooCommerce – transform the default WooCommerce checkout into one that’s lightning-fast and designed to reduce cart abandonment.
- Iconic Sales Booster for WooCommerce – improve sales during the checkout process with targeted cross-selling.
- WooCommerce Delivery Slots – add time and date slots to the checkout so customers can select when they’ll receive their order.