
Have you ever wanted to create a custom thank you page that matches your ecommerce store’s look and feel but don’t know how? The default thank you page in WooCommerce is simply a purchase confirmation page. But with an upgrade, it can provide a lot of value for your store.
In this article, we’ll walk you through creating a custom thank you page/order received page that your customers will see after purchasing a product from your WooCommerce store. Plus, we’ll do it with the help of the checkout plugin Flux Checkout for WooCommerce.
Flux Checkout for WooCommerce
Prevent abandoned carts with a slick multi-step checkout experience, designed for your customer’s device.
First things first, let’s see why you should create a custom thank you page in your WooCommerce store.
Why create a custom thank you page in WooCommerce?
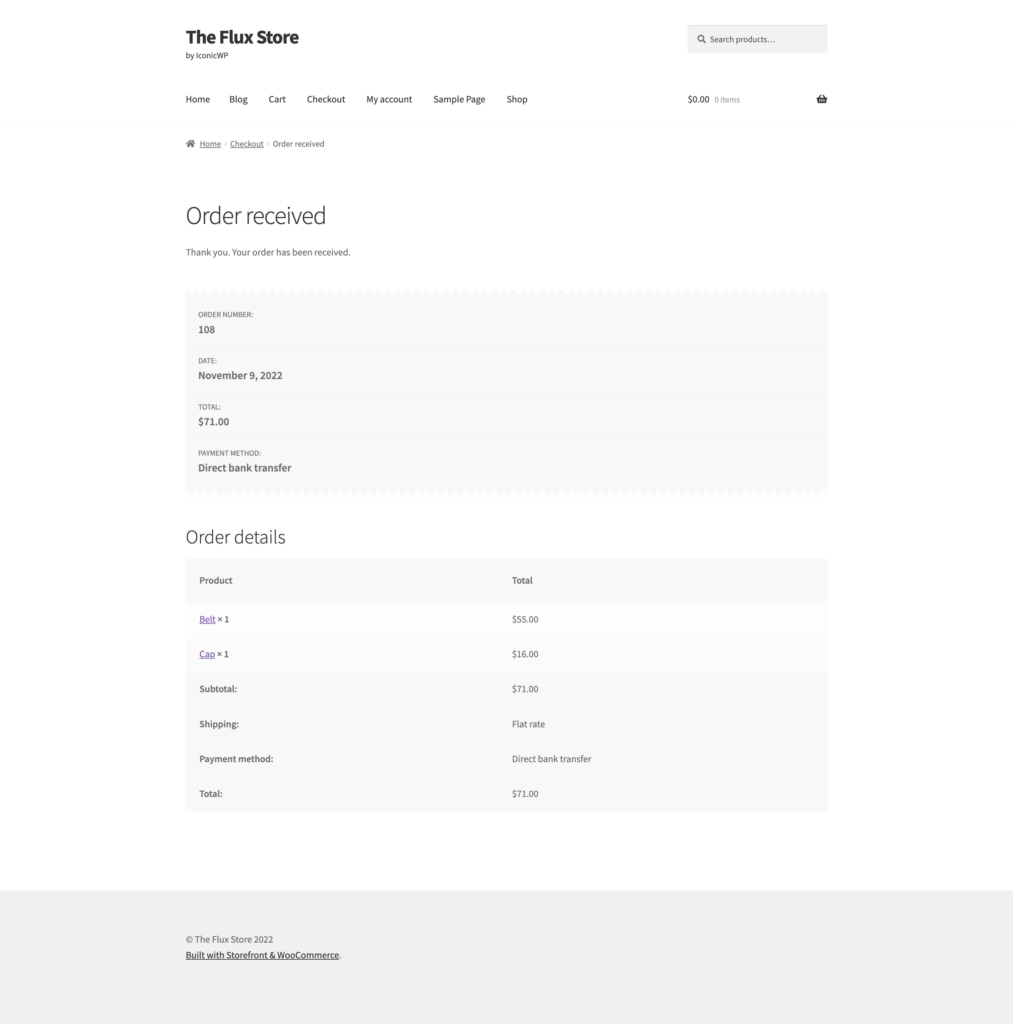
Because the thank you page comes post-purchase, it’s an area that is often overlooked in the checkout flow. By default, WooCommerce uses this page simply for purchase confirmation. It contains the details of a customer’s order plainly arranged on a table, followed by the billing address. But the thank you page can be more than just that.
It presents an opportunity for you to add and customize features to improve your customers’ checkout experience. A custom thank you page can help you to retain existing customers or win over customers who are purchasing from you for the first time.
Here are a few more specific reasons why creating a custom thank you page for your WooCommerce store is beneficial.
The WooCommerce thank you page should give customers peace of mind
If done right, the thank you page can give the customer clarity and make them feel secure in their purchase with you. Instead of just having the page say ‘Thank you for your purchase!’ and display the order details, you can add a map showing the delivery address. This is visually appealing and helps them feel confident that the order will be delivered to the right destination.
You can also include images of the items they’ve purchased rather than just words so that they can visually confirm what they’ve ordered. For their peace of mind, you can also include a visual representation of their payment method. This can be a logo of the payment gateway they used, for example, Stripe, Amazon Pay, etc.
The thank you page should be clear
The order confirmation page shouldn’t overwhelm customers with a clunky design. It should be easy to look at and navigate at a glance, so customers can make sure all the details are correct as quickly as possible.
👋 Want to see what other important metrics you should be tracking in your ecommerce store? Read our ecommerce metrics guide.
The order confirmation page should be customizable to suit you
Each individual ecommerce store might have different things they want to add or say on the thank you page. For example, a store that deals purely in physical products might want to add a map to display the delivery destination to customers. On the other hand, an ecommerce store that purely deals in virtual products doesn’t need this.
You might also want to add a coupon code, an additional message (such as a holiday message like ‘Happy Halloween!’), a welcome or instructional video, a photograph, a personal message from the store owner, etc.
Creating a custom thank you page for your store lets you add a lot of value with little effort. Unfortunately, the default WooCommerce thank you page doesn’t allow you to do all this. So to upgrade and customize the WooCommerce thank you page, we’ll need the help of a WooCommerce plugin.
How to create a WooCommerce custom thank you page
In this case, we’ll be using Flux Checkout for WooCommerce.
Flux Checkout for WooCommerce
Prevent abandoned carts with a slick multi-step checkout experience, designed for your customer’s device.
Upgrade your WooCommerce thank you page with Flux Checkout for WooCommerce
With this plugin, you can upgrade the WooCommerce thank you page and improve your customers’ experience throughout the checkout process. This includes before payment in the billing section and post-purchase in the thank you page. With Flux Checkout, you can create a custom version of your thank you page suited to your specific needs.
It lets you improve the design of your WooCommerce thank you page and seamlessly integrate it with the rest of your store’s look. You can also make it more user-friendly and, in doing so, increase your chances of retaining your customers.
Specifically, Flux Checkout for WooCommerce comes with the following features.
Improved thank you page layout and design
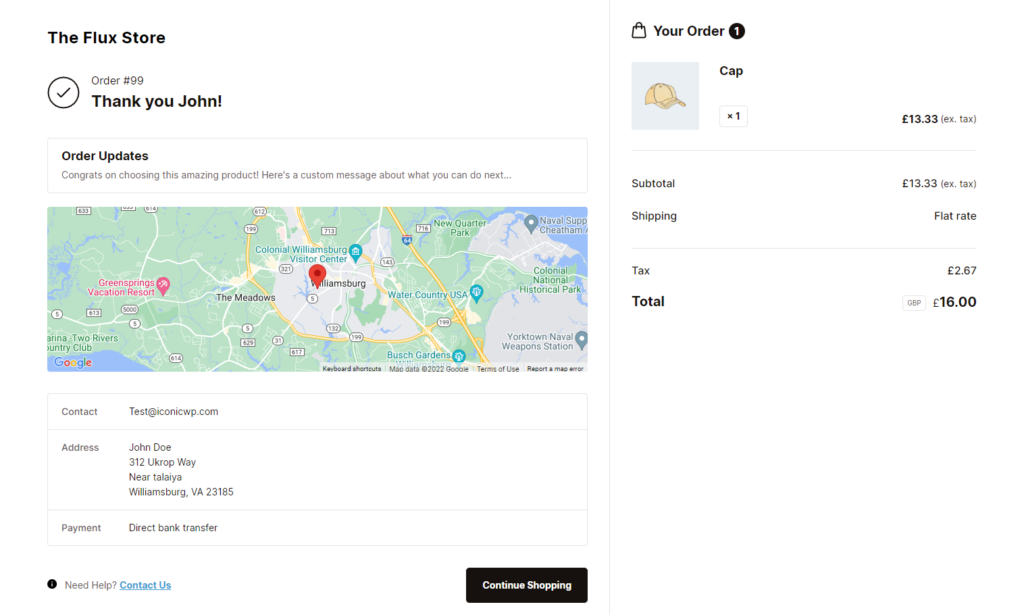
Flux Checkout’s thank you page upgrade improves this page visually. Contrary to the default thank you page, where everything is displayed in a single column, here, customer and order details appear side-by-side.


Flux Checkout also displays image thumbnails for each of the items on a customer’s order making it easier to have quick glance. Everything is neatly arranged in boxes and columns so that customers don’t have to scroll around looking for their order details. This improves the page’s user-friendliness, allowing customers to confirm their orders post-purchase quickly.
At-a-glance information for more peace of mind
Flux Checkout improves and highlights the important components of the thank you page so that this information can be confirmed at a quick glance. This includes:
- Order number and thank you message – The order number is right at the top and easy to find. But Flux Checkout’s thank you page also includes a thank you message to start the page off right.
- Customer order details and location map – With a visually appealing location map, customer shipping address, payment, and contact details – customers can confirm order details quickly.
- Order contents – The contents of a customer’s order are given just as much priority. Customers get visual confirmation via the single product image, and the price/quantity of the products are easy to see at a glance.
- Final price including shipping – Right below the order contents is the amount the customer has paid, broken down into subtotal, shipping, tax, and total.
All the above have been highlighted to enable the customer to confirm their purchase details at a glance. But there are a few additional features that make Flux Checkout’s thank you page really stand out.
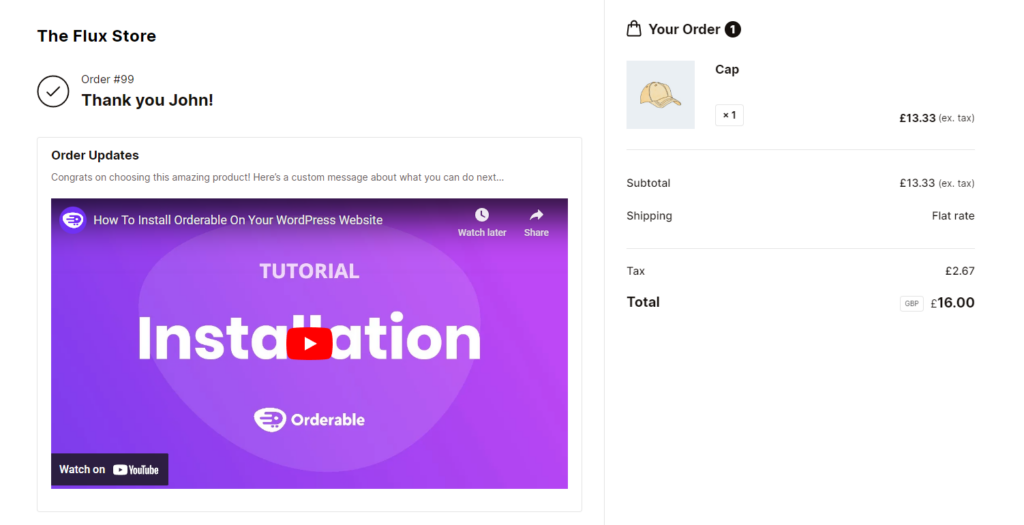
Customizable content
As the store owner or admin, Flux lets you add a custom message, images, and text to the thank you/order confirmation page. You’ll also be able to determine where it’s displayed on the order confirmation page.
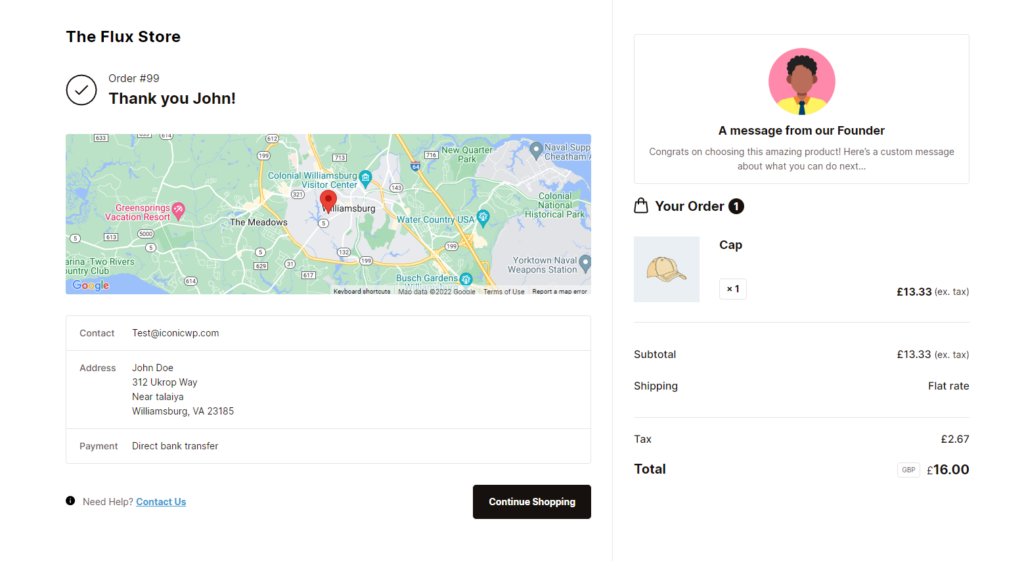
You can use this feature to provide additional information to the customer, such as when the order will be delivered or a holiday message. Adding a custom message can also help you lead customers to more seasonal promotions, taking advantage of their buying intent.
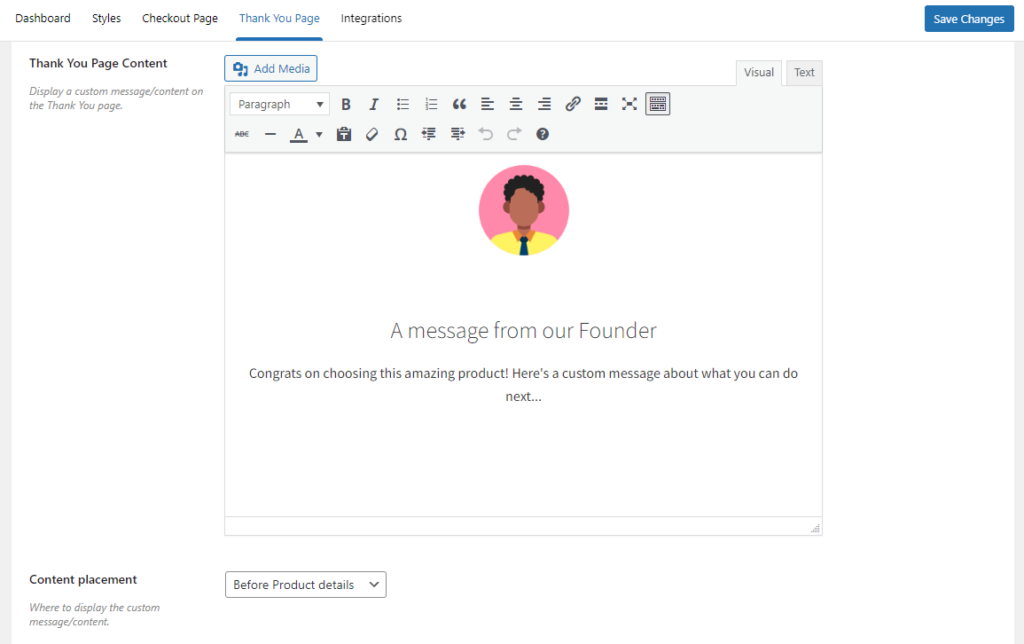
Flux lets you do this easily from the WordPress backend. All you have to do is add the custom text and select where it will be displayed. This can be before or after product or customer details.
Additional way to get in touch
With Flux Checkout, you can add a “Need help? Contact Us” section which customers can click on if they have inquiries about their purchase.
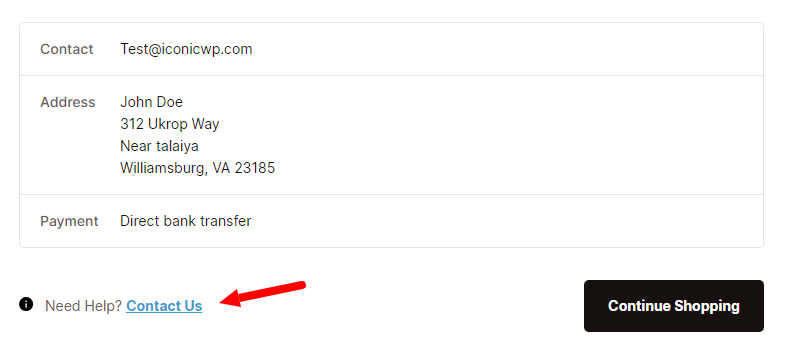
From the WordPress dashboard, you can specify a link that leads them to your contact page, where they can passively leave their questions or contact you directly. This way, customers won’t get frustrated if they face an issue post-purchase.
Flux Checkout’s other features
Aside from the thank you page, Fluck Checkout also upgrades your entire checkout process to fit in with this design. Its primary goal is to enable your customers to get through the checkout as easily and quickly as possible.
It works with any page builder (like Elementor), template, theme, and child theme (as well as Woo’s theme Storefront). All you have to do is configure/edit the custom page, and it’s ready to go.
Flux Checkout for WooCommerce
Prevent abandoned carts with a slick multi-step checkout experience, designed for your customer’s device.
To achieve this, it has the following features.
A multi-step checkout that limits distractions
Flux Checkout replaces the clunky default WooCommerce one-page checkout with an easy-to-follow multi-step checkout. This checkout process only displays the necessary sections/endpoints to avoid distractions and keep customers focused.

With customers focused on completing checkout, Flux plays a vital role in reducing checkout abandonment.
Address autocomplete to save customers time
Flux helps customers to get through the checkout faster by auto-populating the address fields. A search is initiated as soon as a customer starts typing their address details. All they have to do is click on the accurate result, and Flux will auto-populate the rest of the fields. This helps convince your customer to complete the checkout process, increasing conversions.

Fewer fields to avoid overwhelming customers
Flux Checkout only shows the necessary fields for customers to fill in the customer details section. By hiding the unnecessary fields, Flux lets you avoid overwhelming customers with a lot of work to be done.
Design your checkout your way
Flux Checkout comes with pre-built checkout templates which you can select and edit to fit with the rest of your store seamlessly. And it makes it easy for you to do this with its user-friendly editor.
Flux Checkout will ensure they have a uniform experience, whether your customer uses a desktop or mobile phone to checkout. Its mobile-optimized design will automatically adjust the size of elements and layout on mobile devices.
So, with that in mind, let’s set up Flux Checkout on your WooCommerce store and use it to create a custom thank you page.
How to customize the thank you page in WooCommerce
In this tutorial section, we’ll walk you through how to customize your store’s thank you page step-by-step. To create a custom thank you page for your WooCommerce store you’ll need to:
- Install Flux Checkout for WooCommerce.
- Customize the thank you page.
Step 1: Install Flux Checkout for WooCommerce
Start by purchasing Flux Checkout for WooCommerce from the Iconic store: iconicwp.com/flux-checkout-for-woocommerce
Flux Checkout for WooCommerce
Prevent abandoned carts with a slick multi-step checkout experience, designed for your customer’s device.
After completing the purchase, follow these simple steps to install it on your WooCommerce store.
- From your WordPress dashboard, go to Plugins > Add New and click the Upload Plugin button.
- Select the .zip file you downloaded and click Install Now.
- After installation is complete, click Activate.
- Enter your license key to verify your purchase.
Now that Flux Checkout for WooCommerce is installed, you can proceed to adjust some settings.
Step 2: Adjust and customize your settings
You’ll need to adjust a few settings to set up your new WooCommerce checkout page. To do this, take the following steps:
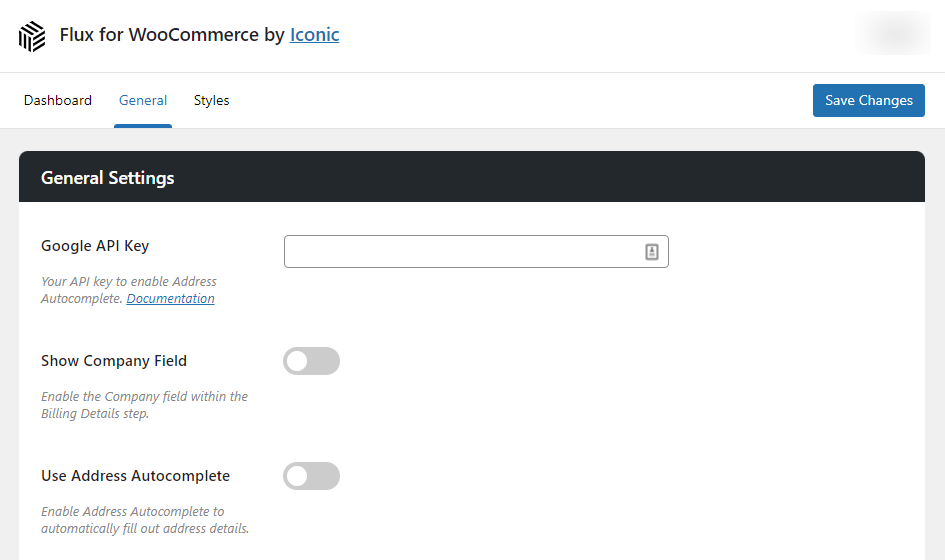
- Go to WooCommerce > Flux Checkout. You’ll see 2 tabs: General and Style.
- Click on the General tab. Here, you’ll be able to adjust general settings like:
- Enabling or disabling address autocomplete.
- Decide which fields you want to adjust and so on.
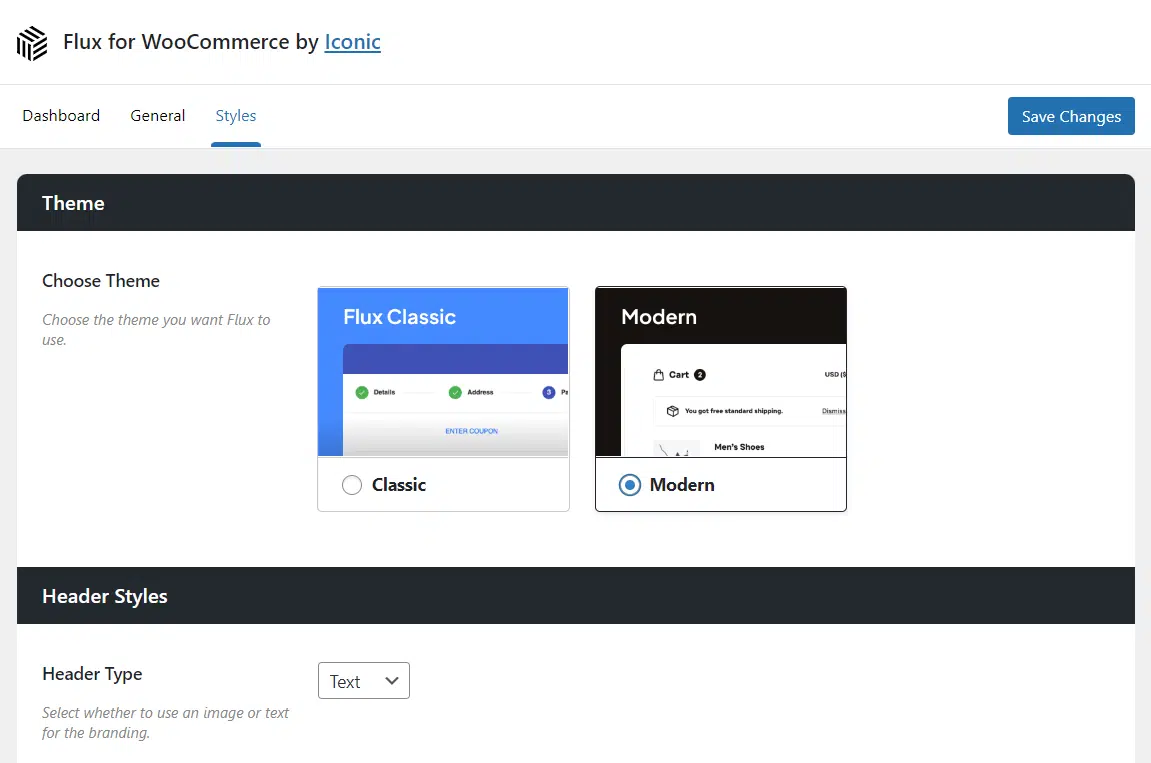
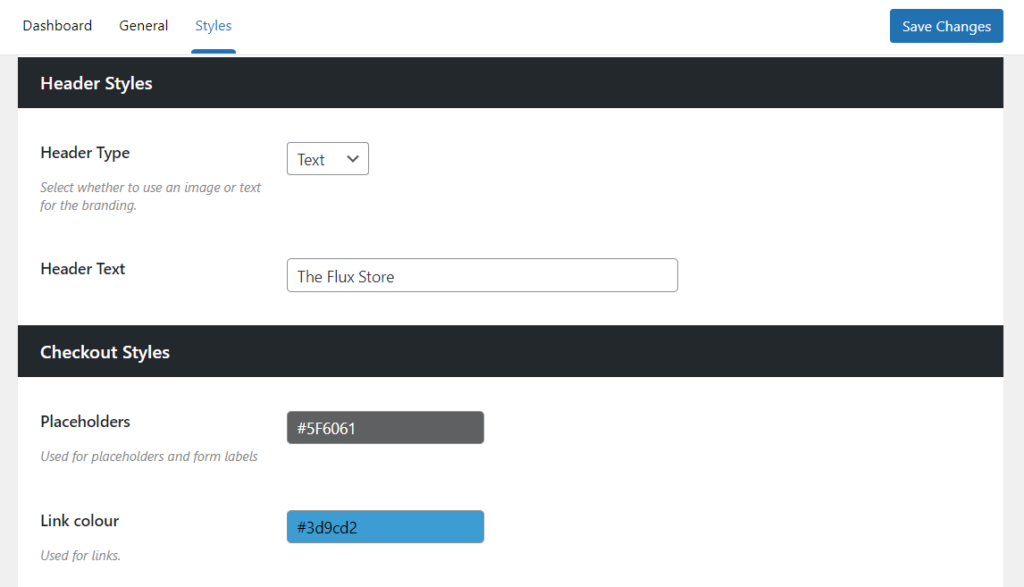
- Once you’re done with the general settings, click on the Style tab to adjust header settings.
- Here, you can choose between Classic and Modern themes. You can also make specific changes to the header text.
This is just a brief summary of the settings you can make. You can get a detailed walkthrough in our How to customize the Flux Checkout style guide. With your settings in place, we can now move to customize your thank you page.
Step 3: Customize the thank you page
You can introduce Flux Checkout’s styling to your thank you page to give your customers a consistent experience.
To customize the thank you page, take the following steps:
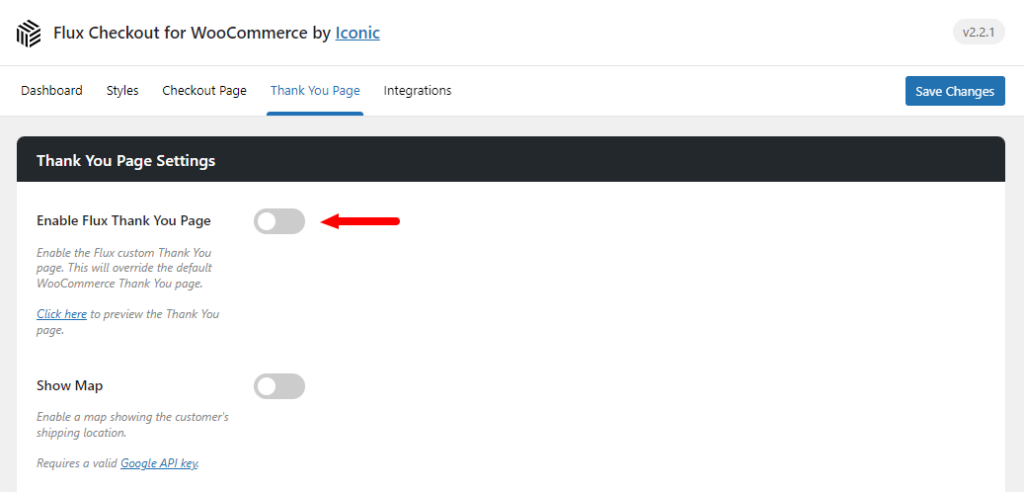
- From your WordPress dashboard, go to WooCommerce > Flux Checkout and click on the Thank You Page tab at the top.
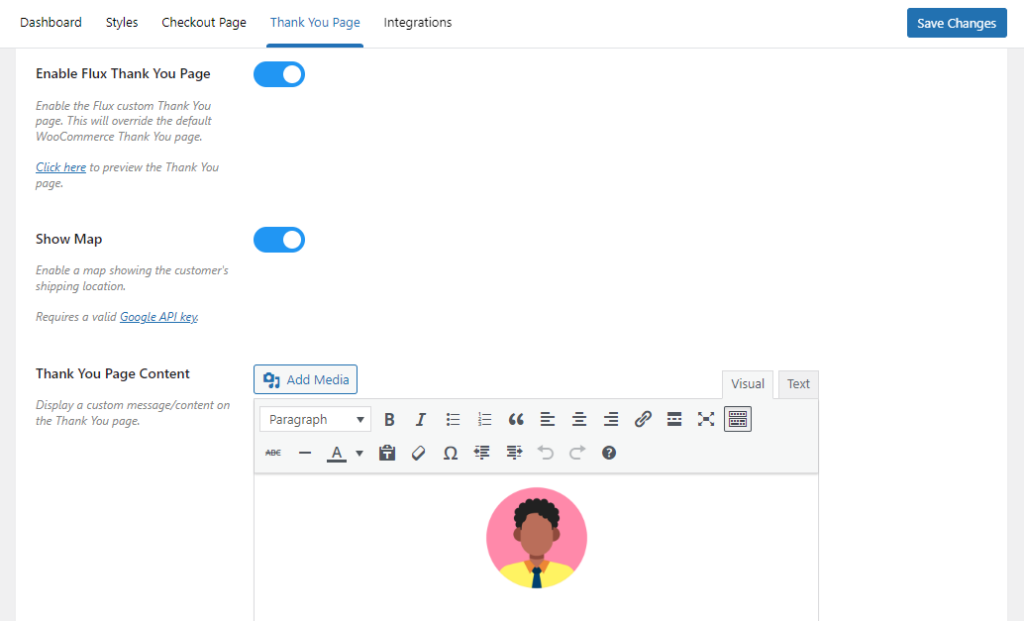
- Start by clicking the Enable Thank You Page toggle to switch it on.
- Under the Thank You Page tab, you’ll find the following settings to help you to edit the page content.
- Show map – here you click this toggle to display a map showing the customer’s location. This will be automatically disabled if all the products are virtual or not deliverable.
- Thank you page content – you can add custom text, images, and video here to be displayed on the page. Just below it, you’ll see the Content Placement section, where you can choose where the custom text will be displayed.
- Contact Us button URL – in the box next to this, you can add a link that leads customers to your contact page.
- When you’re done, click the Save Changes button at the bottom of the page.
Create your custom WooCommerce thank you page today
That’s it. You’ve just created a custom thank you page for your WooCommerce store.
With Flux Checkout for WooCommerce, you can quickly and easily customize your thank you page to help customers confirm their orders at a quick glance.
As a result of this improved experience, you’ll be able to retain your customers and convince those purchasing for the first time to return.
Flux Checkout for WooCommerce
Prevent abandoned carts with a slick multi-step checkout experience, designed for your customer’s device.