
If you’re looking to add a product gallery lightbox to your WooCommerce store, there are many benefits that come with it. You’ll be able to:
- Reduce the number of steps (clicks) it takes for a customer to buy a product.
- Keep customers on your product catalog page, allowing them to keep browsing your products instead of clicking off.
- Allow customers to add products to their cart straight from the lightbox itself.
In a standard WooCommerce setup, customers will likely visit your catalog page, click a product to get the right information and then either purchase that product, or click off your site.
With a product gallery lightbox in place, you’ll cut out those extra clicks and keep customers on your store for longer. Not only increasing the chance of a sale but increasing the chance of them buying multiple products along the way.
So, by the end of this article, you’ll know exactly how to create a product gallery lightbox in your WooCommerce store. The best part? You’ll be able to do it in 2 steps with the product lightbox plugin, WooCommerce Quickview.
WooCommerce Quickview
Quickly view any product from the catalog, without reloading the page. Encourage sales with easy and efficient product browsing.
How WooCommerce Quickview works
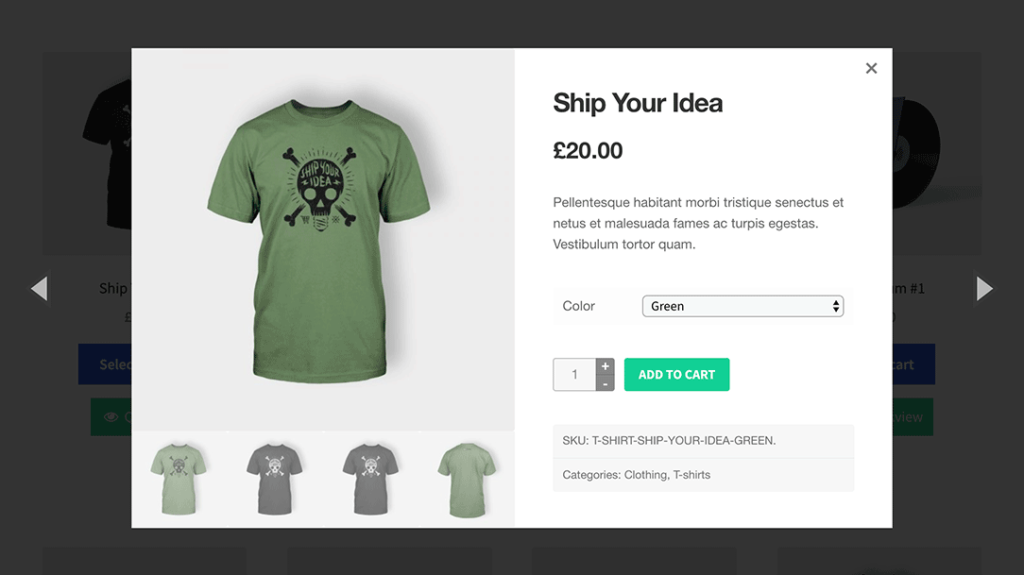
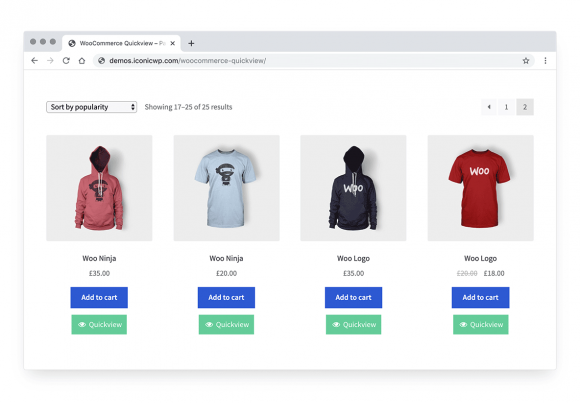
When a customer visits your online store and starts to browse your products, they’ll be presented with the normal ‘Add to cart’ or ‘Select options’ button and below that, a ‘Quickview’ button.

When clicked, this Quickview button will open a lightbox containing the product’s name, description, product gallery and more.
Either this or the customer can hover over the product and the lightbox appears (depending on the settings you choose).

This lightbox picks up the styles and elements of your single product page, so if you have the standard WooCommerce product gallery up and running, your lightbox will display that.
If however, you want to improve your product gallery by adding image zoom, additional variation images, change the layout of it and more, you can do so with the plugin WooThumbs for WooComerce.
The customer then has a choice, they can either:
- Add the product to their cart from within the lightbox itself.
- Keep browsing more products within the lightbox (using the previous and next arrows).
- Or click off the lightbox and return to the product catalog.
So now we know how WooCommerce Quickview works, let’s get it installed on your site.
How to create a product gallery lightbox in WooCommerce
To create a product gallery lightbox in WooCommerce, you’ll need to:
- Install the product lightbox plugin, WooCommerce Quickview.
- Customise your product gallery lightbox button.
- Customise your lightbox.
That’s it. Below we’ll outline these steps in detail so you can start making more sales for your online store.
Step 1: Install WooCommerce Quickview
To get started, purchase WooCommerce Quickview from the Iconic store: iconicwp.com/woocommerce-quickview
Or start your free trial below:
WooCommerce Quickview
Quickly view any product from the catalog, without reloading the page. Encourage sales with easy and efficient product browsing.
Then follow these steps:
- Go to Plugins > Add New > Upload Plugin.
- Choose the zip file you downloaded, upload, and then click Activate.
- Once activated, you’ll need to enter your licence key.
Now that we have WooCommerce Quickview installed, we can move onto getting your lightbox button set up.
Before we customise the things that appear in the product gallery lightbox itself, first we need to customise the button that makes it appear.
To do this, take the following steps:
- Go to WooCommerce > Quickview.
- Click the Quickview Trigger Settings tab.
- It’s at this stage you can pick whether you want to display your product lightbox on hover (when the user’s mouse moves over the product) or with a Quickview button.

Next, we need to activate the button to make it appear on your site and adjust the settings so it blends in nicely with your online store.
- Scroll down the page and until you get to the Positioning section.
- Click the Automatically insert Button checkbox. This will add the Quickview button to your online store.
- If you’d like to add the button into your store manually, you can follow our docs here: docs.iconicwp.com/manually-insert-the-quickview-button
- Next, you can adjust the settings of where your button is displayed and the styling of it to suit your store.
Note: Here you can also change the wording on the button itself if you’d rather not use ‘Quickview’.
Once you’re happy with your button’s settings, click the Save Changes button at the bottom of the page.
Your button is now set up and running, so let’s adjust the items you want to appear in the product lightbox itself.
Step 3: Customise your product gallery lightbox
This is perhaps the most important part of creating a product gallery lightbox for your WooCommerce store. The aim is to give customers enough information on the product so they don’t need to click through to the product page.
So let’s put this into action and amend the settings for your product lightbox:
- Go to WooCommerce > Quickview.
- Click the Popup Settings tab.
- In the General section, you can choose to allow customers to navigate between different products when the lightbox is open (with the previous and next arrows).
- The Imagery section allows you to adjust the settings for your product image gallery. Including how fast it scrolls, the buttons you want to use and more.
- Next is the Content section. Here you can add or remove almost any element of the lightbox. Don’t want the product quantity showing? Remove it to streamline your lightbox.

- Once you’re happy, click the Save Changes button and visit your product listing page to see your new product lightbox in action.
Add your product gallery lightbox to WooCommerce
That’s it, your WooCommerce store now has product gallery lightbox up and running. With this working in your store, you’ll be able to reduce customer clicks, stop people leaving your store and increase sales in the process.
Make these change quickly and easily with WooCommerce Quickview and add WooThumbs to improve your the product gallery across your entire store.